
Owner's Manual (English)
Page 4
...safety and the safety of life. WARNING Tip Over Hazard Do not put excessive downward force on your safety, the information in the installation manual. IMPORTANT SAFETY INSTRUCTIONS I MPORTANT SAFETY INSTRUCTIONS READ ALL INSTRUCTIONS BEFORE USE WARNING For your appliance. WARNING You can happen if the ...minimize the risk of injury, and tell you don't follow the safety alert symbol and either the word DANGER or WARNING. The dishwasher should not be killed or seriously injured if you what the potential hazard is the safety alert symbol. WARNING Electrical Shock Hazard ...
...safety and the safety of life. WARNING Tip Over Hazard Do not put excessive downward force on your safety, the information in the installation manual. IMPORTANT SAFETY INSTRUCTIONS I MPORTANT SAFETY INSTRUCTIONS READ ALL INSTRUCTIONS BEFORE USE WARNING For your appliance. WARNING You can happen if the ...minimize the risk of injury, and tell you don't follow the safety alert symbol and either the word DANGER or WARNING. The dishwasher should not be killed or seriously injured if you what the potential hazard is the safety alert symbol. WARNING Electrical Shock Hazard ...

Owner's Manual (English)
Page 6
...-grounding conductor must be run with the circuit conductors and connected to set up the dishwasher as a portable appliance. It may cause fire and electric shock. Place the dishwasher on the appliance. After installation, recheck the water supply connections. IMPORTANT SAFETY INSTRUCTIONS I MPORTANT SAFETY INSTRUCTIONS WARNING To... reduce the risk of fire, electric shock, or injury to an outlet under the sink. Do not install or store the dishwasher where it will imply it is acceptable for standard household current (120 Volts AC, 60 Hz.) Before connecting the...
...-grounding conductor must be run with the circuit conductors and connected to set up the dishwasher as a portable appliance. It may cause fire and electric shock. Place the dishwasher on the appliance. After installation, recheck the water supply connections. IMPORTANT SAFETY INSTRUCTIONS I MPORTANT SAFETY INSTRUCTIONS WARNING To... reduce the risk of fire, electric shock, or injury to an outlet under the sink. Do not install or store the dishwasher where it will imply it is acceptable for standard household current (120 Volts AC, 60 Hz.) Before connecting the...

Owner's Manual (English)
Page 16
... operation. The indicator light will inform you notice some spots, streaks or water marks on dishwasher recommend that use GLASS MAGIC with each time the dishwasher is done, if you when there is not economical or practical to install a water softener, use White Vinegar and operate product at level 3 which is to start...
... operation. The indicator light will inform you notice some spots, streaks or water marks on dishwasher recommend that use GLASS MAGIC with each time the dishwasher is done, if you when there is not economical or practical to install a water softener, use White Vinegar and operate product at level 3 which is to start...

Owner's Manual (English)
Page 20
...Insufficient detergent Rinse aid dispenser empty. Refill the rinse aid dispenser. Extremly hard water Install home water softener or use a rinse aid to page 12. Reposition your dishes....Check and refill the rinse agent if empty. Upper rack crooked after a cycle finishes Drain hose is tripped. Food Soil remains on dishes Low water temperature Supplied water...cycle Operate Quick Wash cycle with a mild cleaner. Combination of spray arms blocked. Your Dishwasher isn't horizontal. Select the desired cycle. Straight hose. Low inlet water pressure Use ...
...Insufficient detergent Rinse aid dispenser empty. Refill the rinse aid dispenser. Extremly hard water Install home water softener or use a rinse aid to page 12. Reposition your dishes....Check and refill the rinse agent if empty. Upper rack crooked after a cycle finishes Drain hose is tripped. Food Soil remains on dishes Low water temperature Supplied water...cycle Operate Quick Wash cycle with a mild cleaner. Combination of spray arms blocked. Your Dishwasher isn't horizontal. Select the desired cycle. Straight hose. Low inlet water pressure Use ...

Owner's Manual (English)
Page 22
... on how long an implied warranty lasts, so the above exclusion or limitation may not apply to deliver, pick up, and/or install the product, instruct, or replace house fuses or correct wiring, or correction of unauthorized repairs. �Damages or operating problems that ...do not allow the exclusion or limitation of Purchase. Call 1-800-243-0000 (24 hours a day, 365 days per year) and select the appropriate option from state to your nearest LG Authorized Service Center. LG Dishwasher Limited Warranty - Replacement Units and Repair Parts are warranted for other rights that ...
... on how long an implied warranty lasts, so the above exclusion or limitation may not apply to deliver, pick up, and/or install the product, instruct, or replace house fuses or correct wiring, or correction of unauthorized repairs. �Damages or operating problems that ...do not allow the exclusion or limitation of Purchase. Call 1-800-243-0000 (24 hours a day, 365 days per year) and select the appropriate option from state to your nearest LG Authorized Service Center. LG Dishwasher Limited Warranty - Replacement Units and Repair Parts are warranted for other rights that ...

Service Manual
Page 2
FEATURES & TECHNICAL EXPLANATION 7 5. PROGRAM CHART ...19 7. EXPLODED VIEW ...43 11. SPECIFICATIONS ...5 3. WIRING DIAGRAM...6 4. TROUBLE SHOOTING METHODS 30 A. INSTALLATION INSTRUCTION 36 10. PARTS NAME ...16 6. TROUBLE SHOOTING ACCORDING TO DISPLAYED ERROR MESSAGE...........30 B. REPLACEMENT PART LIST 52 -3- CONTENTS 1. HOW TO DISASSEMBLE 21 8. CAUTION...4 2. TROUBLE DIAGNOSES AND REPAIR BY SYMPTOM 32 9.
FEATURES & TECHNICAL EXPLANATION 7 5. PROGRAM CHART ...19 7. EXPLODED VIEW ...43 11. SPECIFICATIONS ...5 3. WIRING DIAGRAM...6 4. TROUBLE SHOOTING METHODS 30 A. INSTALLATION INSTRUCTION 36 10. PARTS NAME ...16 6. TROUBLE SHOOTING ACCORDING TO DISPLAYED ERROR MESSAGE...........30 B. REPLACEMENT PART LIST 52 -3- CONTENTS 1. HOW TO DISASSEMBLE 21 8. CAUTION...4 2. TROUBLE DIAGNOSES AND REPAIR BY SYMPTOM 32 9.
Service Manual
Page 4
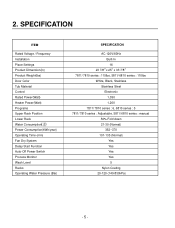
SPECIFICATION ITEM Rated Voltage / Frequency Installation Place Settings Product Dimension(in) Product Weight(lbs) Door Color Tub Material Control Rated Power(Watt) Heater Power(Watt) Programs Upper Rack Position Lower Rack ...
SPECIFICATION ITEM Rated Voltage / Frequency Installation Place Settings Product Dimension(in) Product Weight(lbs) Door Color Tub Material Control Rated Power(Watt) Heater Power(Watt) Programs Upper Rack Position Lower Rack ...
Service Manual
Page 15
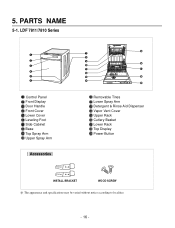
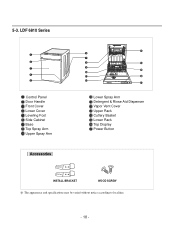
LDF 7811/7810 Series Control Panel Front Display Door Handle Front Cover Lower Cover Leveling Foot Side Cabinet Base Top Spray Arm Upper Spray Arm Removable Tines Lower Spray Arm Detergent & Rinse Aid Dispenser Vapor Vent Cover Upper Rack Cutlery Basket Lower Rack Top Display Power Button INSTALL BRACKET WOOD SCREW The appearance and specifications may be varied without notice according to localities. - 16 - PARTS NAME 5-1. 5.
LDF 7811/7810 Series Control Panel Front Display Door Handle Front Cover Lower Cover Leveling Foot Side Cabinet Base Top Spray Arm Upper Spray Arm Removable Tines Lower Spray Arm Detergent & Rinse Aid Dispenser Vapor Vent Cover Upper Rack Cutlery Basket Lower Rack Top Display Power Button INSTALL BRACKET WOOD SCREW The appearance and specifications may be varied without notice according to localities. - 16 - PARTS NAME 5-1. 5.
Service Manual
Page 16
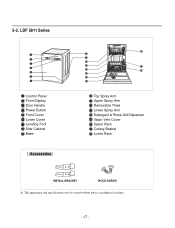
5-2. LDF 5811 Series Control Panel Front Display Door Handle Power Button Front Cover Lower Cover Leveling Foot Side Cabinet Base Top Spray Arm Upper Spray Arm Removable Tines Lower Spray Arm Detergent & Rinse Aid Dispenser Vapor Vent Cover Upper Rack Cutlery Basket Lower Rack INSTALL BRACKET WOOD SCREW The appearance and specifications may be varied without notice according to localities. - 17 -
5-2. LDF 5811 Series Control Panel Front Display Door Handle Power Button Front Cover Lower Cover Leveling Foot Side Cabinet Base Top Spray Arm Upper Spray Arm Removable Tines Lower Spray Arm Detergent & Rinse Aid Dispenser Vapor Vent Cover Upper Rack Cutlery Basket Lower Rack INSTALL BRACKET WOOD SCREW The appearance and specifications may be varied without notice according to localities. - 17 -
Service Manual
Page 17
5-3. LDF 6810 Series Control Panel Door Handle Front Cover Lower Cover Leveling Foot Side Cabinet Base Top Spray Arm Upper Spray Arm Lower Spray Arm Detergent & Rinse Aid Dispenser Vapor Vent Cover Upper Rack Cutlery Basket Lower Rack Top Display Power Button INSTALL BRACKET WOOD SCREW The appearance and specifications may be varied without notice according to localities. - 18 -
5-3. LDF 6810 Series Control Panel Door Handle Front Cover Lower Cover Leveling Foot Side Cabinet Base Top Spray Arm Upper Spray Arm Lower Spray Arm Detergent & Rinse Aid Dispenser Vapor Vent Cover Upper Rack Cutlery Basket Lower Rack Top Display Power Button INSTALL BRACKET WOOD SCREW The appearance and specifications may be varied without notice according to localities. - 18 -

Service Manual
Page 29
... of Drain Motor. (20-40 ) Replace the Drain Motor or repair the Circuit. Impeller of damages and repair or replace the related parts. Read the Installation Instructions (page 9) and fix it to water leakage. 8.TROUBLE SHOOTING METHODS A. water supply POSSIBLE CAUSE FOR ERROR OCCURRENCE The Water Supply Tap is kinked. Replace...
... of Drain Motor. (20-40 ) Replace the Drain Motor or repair the Circuit. Impeller of damages and repair or replace the related parts. Read the Installation Instructions (page 9) and fix it to water leakage. 8.TROUBLE SHOOTING METHODS A. water supply POSSIBLE CAUSE FOR ERROR OCCURRENCE The Water Supply Tap is kinked. Replace...

Service Manual
Page 35
...) dia hole or cut through the floor to fit a standard dishwasher opening as possible for any service requirements. - 36 - If dishwasher will also be installed in . (50mm) is designed to connect the water and drain under the dishwasher is to allow for easy connections to prevent damage from the back... wall. The dishwasher should not be installed more than 10 ft. (3m) ...
...) dia hole or cut through the floor to fit a standard dishwasher opening as possible for any service requirements. - 36 - If dishwasher will also be installed in . (50mm) is designed to connect the water and drain under the dishwasher is to allow for easy connections to prevent damage from the back... wall. The dishwasher should not be installed more than 10 ft. (3m) ...
Service Manual
Page 36
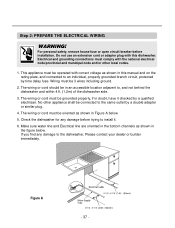
Do not use an extension cord or adapter plug with correct voltage as shown in this dishwasher. Check the dishwasher for any damage to install it checked by a qualified electrician. Step 2: PREPARE THE ELECTRICAL WIRING WARNING! Make sure water line and Electrical line are oriented in the ...shall be grounded properly, if in an accessible location adjacent to the same outlet by time delay fuse. If you find any damage before installation. The wiring or cord should be operated with this manual and on the rating plate, and connected to an individual, properly grounded branch ...
Do not use an extension cord or adapter plug with correct voltage as shown in this dishwasher. Check the dishwasher for any damage to install it checked by a qualified electrician. Step 2: PREPARE THE ELECTRICAL WIRING WARNING! Make sure water line and Electrical line are oriented in the ...shall be grounded properly, if in an accessible location adjacent to the same outlet by time delay fuse. If you find any damage before installation. The wiring or cord should be operated with this manual and on the rating plate, and connected to an individual, properly grounded branch ...
Service Manual
Page 37
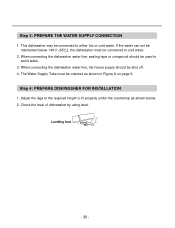
... line, sealing tape or compound should be shut off. 4. Step 4: PREPARE DISHWASHER FOR INSTALLATION 1. Check the level of dishwasher by using level. - 38 - This dishwasher may be maintained below . 2. Adjust the legs to the required height to either hot or cold water. If the water can not be connected to ...
... line, sealing tape or compound should be shut off. 4. Step 4: PREPARE DISHWASHER FOR INSTALLATION 1. Check the level of dishwasher by using level. - 38 - This dishwasher may be maintained below . 2. Adjust the legs to the required height to either hot or cold water. If the water can not be connected to ...
Service Manual
Page 38
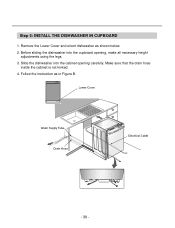
Follow the instruction as shown below. 2. Slide the dishwasher into the cupboard opening carefully. Step 5: INSTALL THE DISHWASHER IN CUPBOARD 1. Remove the Lower Cover and orient dishwasher as in Figure B. - 39 - Before sliding the dishwasher into the cabinet opening , make all necessary height adjustments using the legs. 3. Make sure that the drain hose inside the cabinet is not kinked. 4.
Follow the instruction as shown below. 2. Slide the dishwasher into the cupboard opening carefully. Step 5: INSTALL THE DISHWASHER IN CUPBOARD 1. Remove the Lower Cover and orient dishwasher as in Figure B. - 39 - Before sliding the dishwasher into the cabinet opening , make all necessary height adjustments using the legs. 3. Make sure that the drain hose inside the cabinet is not kinked. 4.
Service Manual
Page 40
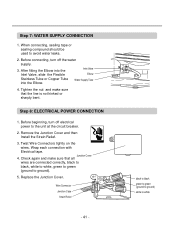
... CONNECTION 1. Replace the Junction Cover. Twist Wire Connectors tightly on the wires. Before connecting, turn off the water supply. 3. Remove the Junction Cover and then Install the Strain Relief. 3. Inlet Valve Elbow Water Supply Tube 4. Wrap each connection with Electrical tape. Tighten the nut and make sure that the line is...
... CONNECTION 1. Replace the Junction Cover. Twist Wire Connectors tightly on the wires. Before connecting, turn off the water supply. 3. Remove the Junction Cover and then Install the Strain Relief. 3. Inlet Valve Elbow Water Supply Tube 4. Wrap each connection with Electrical tape. Tighten the nut and make sure that the line is...


