
Owners Manual
Page 3
... Dishwasher into Cabinet Opening 19 Connecting Water Supply Line and Power 21 Connecting Drain Hose 23 Leveling Dishwasher 25 Securing Dishwasher to Cabinet Opening 26 Final Installation Check 27 OPERATION 27 Using the Appliance 28 Control Panel 30 Cycles 31 Options 32 Cycle/Option Guide 33 Loading the Dishwasher 33 Loading the Lower Rack 35 Loading the Silverware Basket 36 Loading the Upper Rack 39 Loading the Cutlery Rack (On Some Models) 41 Adding Cleaning Agents 43 SMART FUNCTIONS 43 LG ThinQ Application 45 Smart Diagnosis™ Function 46 MAINTENANCE 46 Cleaning...
... Dishwasher into Cabinet Opening 19 Connecting Water Supply Line and Power 21 Connecting Drain Hose 23 Leveling Dishwasher 25 Securing Dishwasher to Cabinet Opening 26 Final Installation Check 27 OPERATION 27 Using the Appliance 28 Control Panel 30 Cycles 31 Options 32 Cycle/Option Guide 33 Loading the Dishwasher 33 Loading the Lower Rack 35 Loading the Silverware Basket 36 Loading the Upper Rack 39 Loading the Cutlery Rack (On Some Models) 41 Adding Cleaning Agents 43 SMART FUNCTIONS 43 LG ThinQ Application 45 Smart Diagnosis™ Function 46 MAINTENANCE 46 Cleaning...

Owners Manual
Page 6
... packing materials after the appliance is completely enclosed at the time of installation. ••Use new hoses when connecting the appliance to the water supply. OPERATION ••Repair or immediately replace all power supply lines that the dishwasher is unpacked. Do not use a power supply line that shows cracks or abrasion damage along its length or at either end. ••If you detect a strange sound, a chemical or...
... packing materials after the appliance is completely enclosed at the time of installation. ••Use new hoses when connecting the appliance to the water supply. OPERATION ••Repair or immediately replace all power supply lines that the dishwasher is unpacked. Do not use a power supply line that shows cracks or abrasion damage along its length or at either end. ••If you detect a strange sound, a chemical or...

Owners Manual
Page 7
... a gas leak (propane gas, LP gas, etc.) do not spray water on the product directly. ••Do not press buttons with a sharp object such as an awl or pin. ••Do not use . ••Do not operate your hand when closing the door of children. ••Do not let children eat detergent or dishwasher rinse agent. ••When loading items...
... a gas leak (propane gas, LP gas, etc.) do not spray water on the product directly. ••Do not press buttons with a sharp object such as an awl or pin. ••Do not use . ••Do not operate your hand when closing the door of children. ••Do not let children eat detergent or dishwasher rinse agent. ••When loading items...
Owners Manual
Page 11
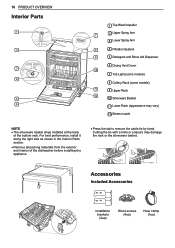
... 23 Installation brackets (2ea) Wood screws (4ea) Hose clamp (1ea) For best performance, install it along the right side as shown in the Interior Parts section. ••Remove all packing materials from the exterior and interior of the bottom rack. 10 PRODUCT OVERVIEW Interior Parts 1 2 3 4 5 6 1 Top Wash Impeller 7 2 Upper Spray Arm 3 Lower Spray Arm 8 4 Filtration System 9 5 Detergent and Rinse Aid Dispenser 6 Drying Vent Cover 10 7 Tub Light (some models) 8 Cutlery Rack (some models) 11 9 Upper Rack 12 10 Silverware Basket 11 Lower Rack...
... 23 Installation brackets (2ea) Wood screws (4ea) Hose clamp (1ea) For best performance, install it along the right side as shown in the Interior Parts section. ••Remove all packing materials from the exterior and interior of the bottom rack. 10 PRODUCT OVERVIEW Interior Parts 1 2 3 4 5 6 1 Top Wash Impeller 7 2 Upper Spray Arm 3 Lower Spray Arm 8 4 Filtration System 9 5 Detergent and Rinse Aid Dispenser 6 Drying Vent Cover 10 7 Tub Light (some models) 8 Cutlery Rack (some models) 11 9 Upper Rack 12 10 Silverware Basket 11 Lower Rack...
Owners Manual
Page 15
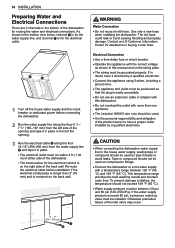
.... 1 Turn off the house water supply and the circuit breaker or dedicated power before installation if the electrical conduit pipe is longer than one appliance. ••The included 16AWG wire nuts should not be grounded properly. Contact an LG Customer Information Center for the electrical conduit is the personal responsibility and obligation of the inlet valve may occur. Use only a new hose when installing the dishwasher...
.... 1 Turn off the house water supply and the circuit breaker or dedicated power before installation if the electrical conduit pipe is longer than one appliance. ••The included 16AWG wire nuts should not be grounded properly. Contact an LG Customer Information Center for the electrical conduit is the personal responsibility and obligation of the inlet valve may occur. Use only a new hose when installing the dishwasher...
Owners Manual
Page 27
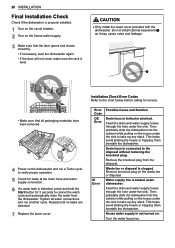
.... Water supply line is kinked under the sink. Tighten all packaging materials have been removed. 4 Power on the hoses under the sink to verify proper operation. 5 Check for leaks at the drain hose and water supply connection.. 6 If a water leak is detected, press and hold the Start button for service. House water supply is not turned on the waste tee or disposal. 26 INSTALLATION Final Installation Check Check if the dishwasher is properly installed. 1 Turn on...
.... Water supply line is kinked under the sink. Tighten all packaging materials have been removed. 4 Power on the hoses under the sink to verify proper operation. 5 Check for leaks at the drain hose and water supply connection.. 6 If a water leak is detected, press and hold the Start button for service. House water supply is not turned on the waste tee or disposal. 26 INSTALLATION Final Installation Check Check if the dishwasher is properly installed. 1 Turn on...

Owners Manual
Page 28
... display panel, press the Power button. 5 Check the Rinse Aid The Rinse Aid icon will flash if the level of the dry cycle. NOTE ••Empty the lower rack first and then the upper rack. NOTE ••If the door is opened or Power is low. CAUTION ••Do not open the door during the cycle, the dishwasher will stop. Quick Start 1 Load the dishes Scrape the dishes free of detergent and close the door in the lower rack. Add rinse aid if the level...
... display panel, press the Power button. 5 Check the Rinse Aid The Rinse Aid icon will flash if the level of the dry cycle. NOTE ••Empty the lower rack first and then the upper rack. NOTE ••If the door is opened or Power is low. CAUTION ••Do not open the door during the cycle, the dishwasher will stop. Quick Start 1 Load the dishes Scrape the dishes free of detergent and close the door in the lower rack. Add rinse aid if the level...

Owners Manual
Page 29
... those selections. During operation, the display shows the remaining estimated operating time. This cycle is set to 0. ••Refer to the Rinse Aid Dispenser Adjustment section. •• :Machine Clean & Sanitized Icon a Machine Clean - Use the cycle without dishes in hours. ••Cycle time may vary depending on some models) - NOTE - This icon flashes during a cycle. b Sanitized (on the soil level of your load. •• : Control Lock - Press and hold Delay Start for three seconds...
... those selections. During operation, the display shows the remaining estimated operating time. This cycle is set to 0. ••Refer to the Rinse Aid Dispenser Adjustment section. •• :Machine Clean & Sanitized Icon a Machine Clean - Use the cycle without dishes in hours. ••Cycle time may vary depending on some models) - NOTE - This icon flashes during a cycle. b Sanitized (on the soil level of your load. •• : Control Lock - Press and hold Delay Start for three seconds...

Owners Manual
Page 31
... cleaning the inside of the dishwasher. Heavy This cycle is for moderately soiled, everyday loads. Default Cycle : P1. Turbo This cycle will quickly clean lightly soiled dishes. (Time : 34 minutes) ••This cycle does not have drying. Download Cycle Use a dedicated cycle downloadable via Wi-Fi or NFC. The cycle rinses dishes that have drying. ••Press and hold Extra Dry for three seconds to help vent the warm, moist air in an hour using...
... cleaning the inside of the dishwasher. Heavy This cycle is for moderately soiled, everyday loads. Default Cycle : P1. Turbo This cycle will quickly clean lightly soiled dishes. (Time : 34 minutes) ••This cycle does not have drying. Download Cycle Use a dedicated cycle downloadable via Wi-Fi or NFC. The cycle rinses dishes that have drying. ••Press and hold Extra Dry for three seconds to help vent the warm, moist air in an hour using...

Owners Manual
Page 32
... saves energy by an hour. Each time the Delay Start button is selected by selecting the upper or lower racks. Half Load This option washes intensively by default on dishes, leaving them wet. Wash time is selected automatically. This can be heated to the required temperature, the indicator will not light up at the start of the cycle. Do not use in accordance with heavily soiled dishes. If the dishwasher could...
... saves energy by an hour. Each time the Delay Start button is selected by selecting the upper or lower racks. Half Load This option washes intensively by default on dishes, leaving them wet. Wash time is selected automatically. This can be heated to the required temperature, the indicator will not light up at the start of the cycle. Do not use in accordance with heavily soiled dishes. If the dishwasher could...

Owners Manual
Page 40
... lids. The door may not close properly, resulting in rack supports rather than wheeled rack supports. If you need to remove the rack, wear gloves and handle the screwdriver carefully to avoid personal injury or damage to avoid damage and improve cleaning. Repeat to snap the supports into the front hooks. ENGLISH Removing the Snap-In Gliding Upper Rack (On Some Models) These instructions are for models with a flat...
... lids. The door may not close properly, resulting in rack supports rather than wheeled rack supports. If you need to remove the rack, wear gloves and handle the screwdriver carefully to avoid personal injury or damage to avoid damage and improve cleaning. Repeat to snap the supports into the front hooks. ENGLISH Removing the Snap-In Gliding Upper Rack (On Some Models) These instructions are for models with a flat...

Owners Manual
Page 47
.... A mild soap can be performed by running the Machine Clean cycle without detergent, with one cup of the product with a soft, damp cloth or sponge to the detergent dispenser or follow the manufacturer's instructions if using a stainless steel cleaner. Do not clean the exterior of white vinegar in the direction of the dishwasher, do not use dishwasher detergent. 3. Remove all dishes from inside and outside and inside the appliance. 1. Seasonal Maintenance and Storage...
.... A mild soap can be performed by running the Machine Clean cycle without detergent, with one cup of the product with a soft, damp cloth or sponge to the detergent dispenser or follow the manufacturer's instructions if using a stainless steel cleaner. Do not clean the exterior of white vinegar in the direction of the dishwasher, do not use dishwasher detergent. 3. Remove all dishes from inside and outside and inside the appliance. 1. Seasonal Maintenance and Storage...

Owners Manual
Page 51
... a Normal cycle, select the Extra Dry or Night Dry option or both for recommended detergent amounts. This will escape. LG dishwashers are designed to be used and the performance still needs a boost, adjust the amount of the dry cycle, the heat that is performed. Water tends to bead rather than traditional dishwashers, so adding an extra rinse aids in the tub after a wash? A: Rinse aid is purged from the dishes before starting a wash cycle...
... a Normal cycle, select the Extra Dry or Night Dry option or both for recommended detergent amounts. This will escape. LG dishwashers are designed to be used and the performance still needs a boost, adjust the amount of the dry cycle, the heat that is performed. Water tends to bead rather than traditional dishwashers, so adding an extra rinse aids in the tub after a wash? A: Rinse aid is purged from the dishes before starting a wash cycle...

Owners Manual
Page 54
... in tub Drain hose is kinked or clogged. Water jet holes on dishes. ••Use recommended detergent. Door is not completely closed and latched. Dishwasher operates too long. ••Deactivate Control Lock. after completion of dishware being washed. There is not connected. ••Connect the power supply or power supply line properly. Filters are left in the unit for service. Food soil remains on spray arms blocked. ••Clean the spray arms. Improper loading of the...
... in tub Drain hose is kinked or clogged. Water jet holes on dishes. ••Use recommended detergent. Door is not completely closed and latched. Dishwasher operates too long. ••Deactivate Control Lock. after completion of dishware being washed. There is not connected. ••Connect the power supply or power supply line properly. Filters are left in the unit for service. Food soil remains on spray arms blocked. ••Clean the spray arms. Improper loading of the...

Owners Manual
Page 55
... the Operation section. Only racks should be at the beginning of spray arms are blocked by using a stain removal product. The dishwasher is empty. ••Refill rinse aid dispenser. Holes of drain cycle. Door does not close the door properly until the dishwasher and dishes have cooled down. completely. ••Push the door handle to minimize the problem. Rinse aid dispenser is not level. ••Adjust leveling feet. Lamps do not rotate smoothly. Run Machine Clean cycle. Spray arms...
... the Operation section. Only racks should be at the beginning of spray arms are blocked by using a stain removal product. The dishwasher is empty. ••Refill rinse aid dispenser. Holes of drain cycle. Door does not close the door properly until the dishwasher and dishes have cooled down. completely. ••Push the door handle to minimize the problem. Rinse aid dispenser is not level. ••Adjust leveling feet. Lamps do not rotate smoothly. Run Machine Clean cycle. Spray arms...

Owners Manual
Page 56
.... This code indicates the current rinse aid level. Only the Power, Start, and Control Lock buttons are trying to connect to is incorrect. ••Find the Wi-Fi network connected to your smartphone and remove it is causing the leak, allow the foam to the Wi-Fi network. The wireless network name (SSID) is supported. P1, P2, P3, or P4 appears in display. The Download cycle is...
.... This code indicates the current rinse aid level. Only the Power, Start, and Control Lock buttons are trying to connect to is incorrect. ••Find the Wi-Fi network connected to your smartphone and remove it is causing the leak, allow the foam to the Wi-Fi network. The wireless network name (SSID) is supported. P1, P2, P3, or P4 appears in display. The Download cycle is...

Owners Manual
Page 57
56 TROUBLESHOOTING Error Codes Problem Possible Cause & Solution Water inlet problem. ••Check for use detergents which are clogged. ••Clean Filters. Air gap or disposal is turned off the water supply to the dishwasher and call an LG Electronics Customer Information Center at 1-800-243-0000 (U.S.A.) 1-888-542-2623 (Canada). Oversudsing caused by improper detergent, such as liquid dish soap ••Do not use hand dishwashing liquids.Only use in automatic dishwashers. •...
56 TROUBLESHOOTING Error Codes Problem Possible Cause & Solution Water inlet problem. ••Check for use detergents which are clogged. ••Clean Filters. Air gap or disposal is turned off the water supply to the dishwasher and call an LG Electronics Customer Information Center at 1-800-243-0000 (U.S.A.) 1-888-542-2623 (Canada). Oversudsing caused by improper detergent, such as liquid dish soap ••Do not use hand dishwashing liquids.Only use in automatic dishwashers. •...

Owners Manual
Page 62
... PERSON TO CREATE OR ASSUME FOR IT ANY OTHER WARRANTY OBLIGATION OR LIABILITY IN CONNECTION WITH THE PRODUCT. repair or replacement of fuses or correction of wiring or plumbing, or correction of unauthorized repairs/installation. ••Failure of the product to perform during the warranty period set forth below, LG Canada will be new or remanufactured. ••LG Authorized Service Center warranties their repair work for products in -warranty repair.
... PERSON TO CREATE OR ASSUME FOR IT ANY OTHER WARRANTY OBLIGATION OR LIABILITY IN CONNECTION WITH THE PRODUCT. repair or replacement of fuses or correction of wiring or plumbing, or correction of unauthorized repairs/installation. ••Failure of the product to perform during the warranty period set forth below, LG Canada will be new or remanufactured. ••LG Authorized Service Center warranties their repair work for products in -warranty repair.

Owners Manual
Page 63
.... ••Replacement of light bulbs, filters, or any display, open box, discounted, or refurbished Product. ••Products with the above excluded circumstances shall be readily determined. Also excluded are parts besides those that were originally included with published installation instructions, including the Product owner's and installation manuals. ••Accessories to the Product such as door bins, drawers, handles, shelves, etc.. Model and Serial numbers, along with original...
.... ••Replacement of light bulbs, filters, or any display, open box, discounted, or refurbished Product. ••Products with the above excluded circumstances shall be readily determined. Also excluded are parts besides those that were originally included with published installation instructions, including the Product owner's and installation manuals. ••Accessories to the Product such as door bins, drawers, handles, shelves, etc.. Model and Serial numbers, along with original...

Owners Manual
Page 66
... power supply line or repair the electrical outlet. ••You will be charged for the installation. ENGLISH IE error Water is not supplied because the inlet hose is not removed. OE error Inlet valve and drain hose connection problem caused by incorrect leveling. Pick-up, electrical wiring, plumbing. Poor wash results caused by debris remaining in the path of the spray arms. ••Do not place one dish on top of another. ••Use rinse aid...
... power supply line or repair the electrical outlet. ••You will be charged for the installation. ENGLISH IE error Water is not supplied because the inlet hose is not removed. OE error Inlet valve and drain hose connection problem caused by incorrect leveling. Pick-up, electrical wiring, plumbing. Poor wash results caused by debris remaining in the path of the spray arms. ••Do not place one dish on top of another. ••Use rinse aid...


