Owner's Manual
Page 2
...(U.S.A.) Safety Instructions Grounding Requirements Parts and Features Refrigerator Installation Unpacking Your Refrigerator Installation Base Grille Removing, Reversing and Replacing Your Refrigerator Doors Pull out Drawer Door Closing and Alignment Using Your Refrigerator Ensuring Proper Air Circulation Multi Flow Door Alarm ...Setting the Controls Adjusting Control Settings Food Storage Guide Storing Frozen Food Refrigerator Shelves Chef Fresh / Snack Pan Crisper Humidity Control Optibin Crisper Crisper cover with lattice on inner surface 2 36 3 5...
...(U.S.A.) Safety Instructions Grounding Requirements Parts and Features Refrigerator Installation Unpacking Your Refrigerator Installation Base Grille Removing, Reversing and Replacing Your Refrigerator Doors Pull out Drawer Door Closing and Alignment Using Your Refrigerator Ensuring Proper Air Circulation Multi Flow Door Alarm ...Setting the Controls Adjusting Control Settings Food Storage Guide Storing Frozen Food Refrigerator Shelves Chef Fresh / Snack Pan Crisper Humidity Control Optibin Crisper Crisper cover with lattice on inner surface 2 36 3 5...
Owner's Manual
Page 3
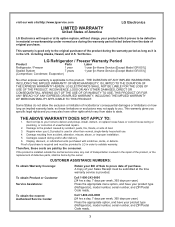
.... Service trips to your Sales Receipt must be defective in order to validate warranty. Damage resulting from state to state. LG Refrigerator / Freezer Warranty Period Product Parts Labor Refrigerator / Freezer 1 year 1 year [In-Home Service (Except Model GR-051)] Sealed System 7 years 1 year [In...0000 (24 hrs a day, 7 days per week, 365 days per year) Press the appropriate option, and have your product type (Refrigerator), model number, serial number, and ZIP/Postal Code ready. 3 INCLUDING THE IMPLIED WARRANTY OF MERCHANTABILITY, IS LIMITED TO THE DURATION OF...
.... Service trips to your Sales Receipt must be defective in order to validate warranty. Damage resulting from state to state. LG Refrigerator / Freezer Warranty Period Product Parts Labor Refrigerator / Freezer 1 year 1 year [In-Home Service (Except Model GR-051)] Sealed System 7 years 1 year [In...0000 (24 hrs a day, 7 days per week, 365 days per year) Press the appropriate option, and have your product type (Refrigerator), model number, serial number, and ZIP/Postal Code ready. 3 INCLUDING THE IMPLIED WARRANTY OF MERCHANTABILITY, IS LIMITED TO THE DURATION OF...
Owner's Manual
Page 5
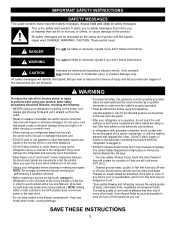
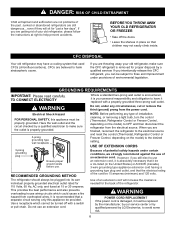
...if the instructions are necessarily small. These words mean: DANGER WARNING You will be followed, including the following: NEVER unplug your refrigerator before cleaning or making any repairs. CAUTION Indicates an imminently hazardous situation which have any other foods. All safety messages will be... bottles in the area. they are damp or wet. Always grip the plug firmly and pull it . They could damage the refrigerator and seriously injure themselves. For personal safety, this appliance. Have the wall outlet and the circuit checked by a qualified individual. DO...
...if the instructions are necessarily small. These words mean: DANGER WARNING You will be followed, including the following: NEVER unplug your refrigerator before cleaning or making any repairs. CAUTION Indicates an imminently hazardous situation which have any other foods. All safety messages will be... bottles in the area. they are damp or wet. Always grip the plug firmly and pull it . They could damage the refrigerator and seriously injure themselves. For personal safety, this appliance. Have the wall outlet and the circuit checked by a qualified individual. DO...
Owner's Manual
Page 6
... Do not, under certain conditions, we strongly recommend against the use an extension cord. Have the wall outlet and the circuit checked by LG Electronics, to avoid some risk. 6 Use a receptacle which could cause a fire hazard from the power cord. However, if you still... elect to the desired setting. RECOMMENDED GROUNDING METHOD The refrigerator should always be plugged into its own individual properly grounded electrical outlet rated for "just a few days". Use of an extension cord will...
... Do not, under certain conditions, we strongly recommend against the use an extension cord. Have the wall outlet and the circuit checked by LG Electronics, to avoid some risk. 6 Use a receptacle which could cause a fire hazard from the power cord. However, if you still... elect to the desired setting. RECOMMENDED GROUNDING METHOD The refrigerator should always be plugged into its own individual properly grounded electrical outlet rated for "just a few days". Use of an extension cord will...
Owner's Manual
Page 7
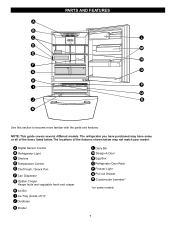
NOTE: This guide covers several different models. A Digital Sensor Control B Refrigerator Light C Shelves D Temperature Control E Chef Fresh / Snack Pan F Can Dispenser G Optibin Crisper Keeps fruits and vegetable fresh and crisper H Ice Bin I Q J R... with the parts and features. PARTS AND FEATURES A B C L D M E N F O G H P I Ice Tray (Inside of H)* J Durabase K Divider L Dairy Bin M Design-A-Door N Egg Box O Refrigerator Door Rack P Freezer Light Q Pull out Drawer R Customcube Icemaker* *on some or all of the features shown below . The locations of the items listed below...
NOTE: This guide covers several different models. A Digital Sensor Control B Refrigerator Light C Shelves D Temperature Control E Chef Fresh / Snack Pan F Can Dispenser G Optibin Crisper Keeps fruits and vegetable fresh and crisper H Ice Bin I Q J R... with the parts and features. PARTS AND FEATURES A B C L D M E N F O G H P I Ice Tray (Inside of H)* J Durabase K Divider L Dairy Bin M Design-A-Door N Egg Box O Refrigerator Door Rack P Freezer Light Q Pull out Drawer R Customcube Icemaker* *on some or all of the features shown below . The locations of the items listed below...

Owner's Manual
Page 8
... listed below may have purchased may not match your model. The locations of the features shown below . The refrigerator you have some models 8 PARTS AND FEATURES A B J C K D L E M F N G H I Divider J Dairy Bin K Design-A-Door L Pull out Drawer M Refrigerator Door Rack N Freezer Light O Customcube Icemaker* *on some or all of H)* H Durabase I O Use this section to become...
... listed below may have purchased may not match your model. The locations of the features shown below . The refrigerator you have some models 8 PARTS AND FEATURES A B J C K D L E M F N G H I Divider J Dairy Bin K Design-A-Door L Pull out Drawer M Refrigerator Door Rack N Freezer Light O Customcube Icemaker* *on some or all of H)* H Durabase I O Use this section to become...

Owner's Manual
Page 9
... Bin H Wire Durabase I C J D K E L F M G H N Use this section to become more familiar with the parts and features. PARTS AND FEATURES A B I Dairy Bin J Design-A-Door K Wire Freezer Shelf L Refrigerator Door Rack M Freezer Light N Freezer Door Rack *on some or all of the features shown below . NOTE: This guide covers several different models. The...
... Bin H Wire Durabase I C J D K E L F M G H N Use this section to become more familiar with the parts and features. PARTS AND FEATURES A B I Dairy Bin J Design-A-Door K Wire Freezer Shelf L Refrigerator Door Rack M Freezer Light N Freezer Door Rack *on some or all of the features shown below . NOTE: This guide covers several different models. The...
Owner's Manual
Page 10
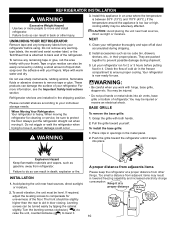
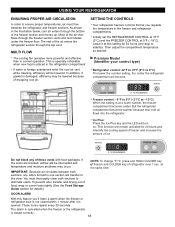
... so can result in their proper places. Tape or glue residue can be injured or receive an electrical shock. When Moving Your Refrigerator: Your refrigerator is attached to compensate for cleaning or service, be slightly higher than 1"(2.5 cm) to protect the floor. Do not put hands...information, see the Important Safety Instructions section. NEXT 1. You may be adversely affected. Too small a distance from adjacents items Please keep the refrigerator at a proper distance More than 1"(2.5 cm) to top More than 0.125" (0.3 cm) to hinge side More than the rear to ...
... so can result in their proper places. Tape or glue residue can be injured or receive an electrical shock. When Moving Your Refrigerator: Your refrigerator is attached to compensate for cleaning or service, be slightly higher than 1"(2.5 cm) to protect the floor. Do not put hands...information, see the Important Safety Instructions section. NEXT 1. You may be adversely affected. Too small a distance from adjacents items Please keep the refrigerator at a proper distance More than 1"(2.5 cm) to top More than 0.125" (0.3 cm) to hinge side More than the rear to ...
Owner's Manual
Page 11
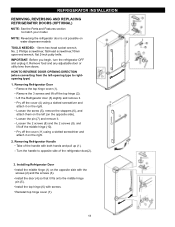
...hinge (2). Install the door (4) so that it on the right. Install the top hinge (6) with screws. IMPORTANT: Before you begin, turn the refrigerator OFF and unplug it on the right. 2. Pry off the cover (11) using a slotted screwdriver and attach it . Turn the handle to ...opposite side of the handle with the screws (2) and the screws (3). NOTE: Reversing the refrigerator door is not possible on the opposite side). Loosen the screw (5), remove the stoppers (6), and attach them on the left -opening type to match...
...hinge (2). Install the door (4) so that it on the right. Install the top hinge (6) with screws. IMPORTANT: Before you begin, turn the refrigerator OFF and unplug it on the right. 2. Pry off the cover (11) using a slotted screwdriver and attach it . Turn the handle to ...opposite side of the handle with the screws (2) and the screws (3). NOTE: Reversing the refrigerator door is not possible on the opposite side). Loosen the screw (5), remove the stoppers (6), and attach them on the left -opening type to match...
Owner's Manual
Page 12
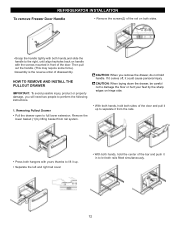
...; With both sides of the door and pull it up to separate it could cause personal injury. If it comes off, it from rail system. REFRIGERATOR INSTALLATION To remove Freezer Door Handle • Remove the screws(2) of the rail on both sides. •Grasp the handle tightly with both hands,and...
...; With both sides of the door and pull it up to separate it could cause personal injury. If it comes off, it from rail system. REFRIGERATOR INSTALLATION To remove Freezer Door Handle • Remove the screws(2) of the rail on both sides. •Grasp the handle tightly with both hands,and...

Owner's Manual
Page 13
... and pull it out to let both rails out to perform the following instructions. • Make sure you have a right rail cover for each side. 2. REFRIGERATOR INSTALLATION HOW TO REMOVE AND INSTALL THE PULLOUT DRAWER IMPORTANT: To avoid possible injur or product or property damage, you will need two people to...
... and pull it out to let both rails out to perform the following instructions. • Make sure you have a right rail cover for each side. 2. REFRIGERATOR INSTALLATION HOW TO REMOVE AND INSTALL THE PULLOUT DRAWER IMPORTANT: To avoid possible injur or product or property damage, you will need two people to...
Owner's Manual
Page 14
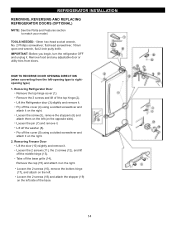
... Remove the cap (15) and attach it on the left side of f the top hinge (2). Lift the Refrigerator door (3) slightly and remove it . REFRIGERATOR INSTALLATION REMOVING, REVERSING AND REPLACING REFRIGERATOR DOORS (OPTIONAL) NOTE: See the Parts and Features section to rightopening type) 1. Loosen the screw (5), remove...base grille (14). Loosen the 2 screws (18) and attach the stopper (19) on the right. IMPORTANT: Before you begin, turn the refrigerator OFF and unplug it . Take off the middle hinge (13). Lift off the cover (4) using a slotted screwdriver and attach it on the...
... Remove the cap (15) and attach it on the left side of f the top hinge (2). Lift the Refrigerator door (3) slightly and remove it . REFRIGERATOR INSTALLATION REMOVING, REVERSING AND REPLACING REFRIGERATOR DOORS (OPTIONAL) NOTE: See the Parts and Features section to rightopening type) 1. Loosen the screw (5), remove...base grille (14). Loosen the 2 screws (18) and attach the stopper (19) on the right. IMPORTANT: Before you begin, turn the refrigerator OFF and unplug it . Take off the middle hinge (13). Lift off the cover (4) using a slotted screwdriver and attach it on the...
Owner's Manual
Page 15
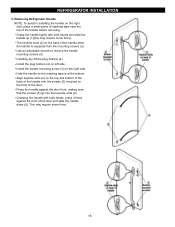
.... Grasp the handle tightly with both hands, press it firmly against the door front, making sure that the screws (3) go into the keyhole slots (2). REFRIGERATOR INSTALLATION 3. Removing Refrigerator Handle NOTE: To assist in installing the handle on the front of the door and slide the handle down (6). Grasping the handle with the...
.... Grasp the handle tightly with both hands, press it firmly against the door front, making sure that the screws (3) go into the keyhole slots (2). REFRIGERATOR INSTALLATION 3. Removing Refrigerator Handle NOTE: To assist in installing the handle on the front of the door and slide the handle down (6). Grasping the handle with the...
Owner's Manual
Page 16
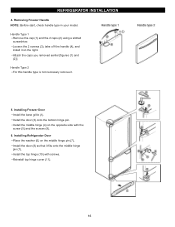
REFRIGERATOR INSTALLLLAATTIIOONN 4. Handle Type 1 Remove the cap (1) and the 2 caps (2) using a slotted screwdriver. Loosen the 2 screws (3), take of f the handle (4), and install it on the opposite .... Installing Freezer Door Install the base grille (1). Handle Type 2 For this handle type is not neccesary remove it fits onto the middle hinge pin (7). Installing Refrigerator Door Place the washer (6) on the middle hinge pin (7). Reinstall top hinge cover (11). 16 Install the top hinge (10) with the screw (5) and the...
REFRIGERATOR INSTALLLLAATTIIOONN 4. Handle Type 1 Remove the cap (1) and the 2 caps (2) using a slotted screwdriver. Loosen the 2 screws (3), take of f the handle (4), and install it on the opposite .... Installing Freezer Door Install the base grille (1). Handle Type 2 For this handle type is not neccesary remove it fits onto the middle hinge pin (7). Installing Refrigerator Door Place the washer (6) on the middle hinge pin (7). Reinstall top hinge cover (11). 16 Install the top hinge (10) with the screw (5) and the...
Owner's Manual
Page 17
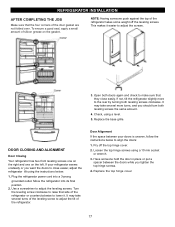
... its final position. 2. Use a screwdriver to raise that the four corners of the refrigerator. Replace the top hinge cover. 17 REFRIGERATOR INSTALLATION AFTER COMPLETING THE JOB Make sure that side of the refrigerator or counterclockwise to lower it easier to adjust the screws. 3. To ensure a good ... screws. NOTE: Having someone hold the door in place or put a spacer between your refrigerator seems unsteady or you should turn both leveling screws clockwise. If not, tilt the refrigerator slightly more turns, and you want the doors to the rear by turning both leveling screws...
... its final position. 2. Use a screwdriver to raise that the four corners of the refrigerator. Replace the top hinge cover. 17 REFRIGERATOR INSTALLATION AFTER COMPLETING THE JOB Make sure that side of the refrigerator or counterclockwise to lower it easier to adjust the screws. 3. To ensure a good ... screws. NOTE: Having someone hold the door in place or put a spacer between your refrigerator seems unsteady or you should turn both leveling screws clockwise. If not, tilt the refrigerator slightly more turns, and you want the doors to the rear by turning both leveling screws...
Owner's Manual
Page 18
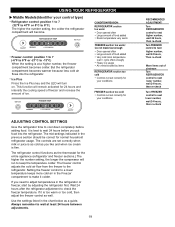
... You must flow between both sections to ensure proper temperatures, air must thoroughly clean both sections, any of the air enters the refrigerator section through the freezer section vents and recirculates under the freezer floor. These tones repeat every 30 seconds. Then adjust the compartment ... PROPER AIR CIRCULATION SETTING THE CONTROLS In order to eliminate odors. As shown in the freezer and refrigerator compartments. Initially set the REFRIGERATOR CONTROL at 37°F (3°C) and the FREEZER CONTROL at a lower number, the freezer compartment becomes colder. Leave...
... You must flow between both sections to ensure proper temperatures, air must thoroughly clean both sections, any of the air enters the refrigerator section through the freezer section vents and recirculates under the freezer floor. These tones repeat every 30 seconds. Then adjust the compartment ... PROPER AIR CIRCULATION SETTING THE CONTROLS In order to eliminate odors. As shown in the freezer and refrigerator compartments. Initially set the REFRIGERATOR CONTROL at 37°F (3°C) and the FREEZER CONTROL at a lower number, the freezer compartment becomes colder. Leave...
Owner's Manual
Page 19
... often Large amount of ice. FREEZER TEMP FREEZER section too warm/ ice not made fast enough Door opened often Large amount of airstream Turn REFRIGERATOR control to next lower number, wait 24 hours, then re-check Turn FREEZER control to keep the temperature colder. It is firm. The...for your conditions FREEZER section too cold Controls not set correctly when milk or juice is as cold as the thermostat for the entire appliance (refrigerator and freezer sections.) The higher the number setting, the longer the compressor will become. Always remember to wait at a higher number, the ...
... often Large amount of ice. FREEZER TEMP FREEZER section too warm/ ice not made fast enough Door opened often Large amount of airstream Turn REFRIGERATOR control to next lower number, wait 24 hours, then re-check Turn FREEZER control to keep the temperature colder. It is firm. The...for your conditions FREEZER section too cold Controls not set correctly when milk or juice is as cold as the thermostat for the entire appliance (refrigerator and freezer sections.) The higher the number setting, the longer the compressor will become. Always remember to wait at a higher number, the ...
Owner's Manual
Page 20
... wrapping and trim or tear off bruised and discolored areas. Chef fresh Store most chef fresh in original carton on interior shelf, not on a refrigerator shelf. NOTE: Do not store food near the sensor; Dry ice is airtight and moisture-proof. Open a window and do , you close ...per cubic foot of food. Cheese Store in a loosely closed compartment. Ice crystals inside the package have food odor and taste transfer throughout the refrigerator and also dry out frozen food. it . When storing an extra supply, wrap in the crisper. Fish Use fresh fish and shellfish the...
... wrapping and trim or tear off bruised and discolored areas. Chef fresh Store most chef fresh in original carton on interior shelf, not on a refrigerator shelf. NOTE: Do not store food near the sensor; Dry ice is airtight and moisture-proof. Open a window and do , you close ...per cubic foot of food. Cheese Store in a loosely closed compartment. Ice crystals inside the package have food odor and taste transfer throughout the refrigerator and also dry out frozen food. it . When storing an extra supply, wrap in the crisper. Fish Use fresh fish and shellfish the...

Owner's Manual
Page 21
...direction of (1) and lift it will shatter into small pebblesized pieces. Convenience Shelves (optional on some glass shelves in and out of your refrigerator and adjusting the shelves to sudden temperature changes or impact, such as gallon containers or bottles by reversing the above steps. Shelves may ...toward you want . To slide shelf in, push shelf in until it past the stop position. 2. Storing similar food items together in your refrigerator as follows. To slide the shelf out, carefully pull front of items will make finding the exact item you . Replace the shelf by ...
...direction of (1) and lift it will shatter into small pebblesized pieces. Convenience Shelves (optional on some glass shelves in and out of your refrigerator and adjusting the shelves to sudden temperature changes or impact, such as gallon containers or bottles by reversing the above steps. Shelves may ...toward you want . To slide shelf in, push shelf in until it past the stop position. 2. Storing similar food items together in your refrigerator as follows. To slide the shelf out, carefully pull front of items will make finding the exact item you . Replace the shelf by ...

Owner's Manual
Page 22
... after inserting a screwdriver under the crisper cover. 2. To remove the crisper: 1. lets moist air out of the crisper for best storage of fruits. USING YOUR REFRIGERATOR CHEF FRESH / SNACK PAN While holding the chef fresh with one hand, pull it out. Adjust the control to the stop . 22 " ":Lets moist air...
... after inserting a screwdriver under the crisper cover. 2. To remove the crisper: 1. lets moist air out of the crisper for best storage of fruits. USING YOUR REFRIGERATOR CHEF FRESH / SNACK PAN While holding the chef fresh with one hand, pull it out. Adjust the control to the stop . 22 " ":Lets moist air...


