
Specification (English)
Page 1
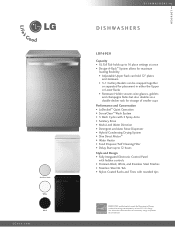
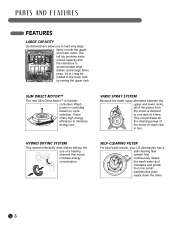
...; 5 Wash Cycles with 3 Spray Arms • Sanitary Rinse • Multi-Level Water Direction • Detergent and Auto Rinse Dispenser • Hybrid Condensing Drying System • Slim Direct Motor™ • Water Heater • Food Disposer/Self Cleaning Filter • Delay Start up to save money, energy and protect the environment. LG's Energy Star dishwashers allow consumers to 12 hours Style and Design • Fully Integrated Electronic Control Panel with hidden controls • Premium Black, White, and Stainless Steel Finishes...
...; 5 Wash Cycles with 3 Spray Arms • Sanitary Rinse • Multi-Level Water Direction • Detergent and Auto Rinse Dispenser • Hybrid Condensing Drying System • Slim Direct Motor™ • Water Heater • Food Disposer/Self Cleaning Filter • Delay Start up to save money, energy and protect the environment. LG's Energy Star dishwashers allow consumers to 12 hours Style and Design • Fully Integrated Electronic Control Panel with hidden controls • Premium Black, White, and Stainless Steel Finishes...

Specification (English)
Page 2
... baskets with covers PERFORMANCE 5 Wash Cycles Power Scrub, Normal, Delicate, Rinse Only, Upper Rack Only Options 4 SenseClean™ Wash System Spray Arms 3 (top, middle, bottom) Multi-Level Water Direction Multi-level (5) direct feed, Top Nozzle (Down), Upper Nozzle (Up/Down), Lower Nozzle (Up/Down) Food Disposer Stainless Steel Blade Detergent and Rinse-Aid Dispenser Rinse-Aid Refill Indicator Drying System Hybrid Condensing End of their respective owners. A combination of energy that is running. Hybrid Condensing Drying System Uses a fan and condensation drying...
... baskets with covers PERFORMANCE 5 Wash Cycles Power Scrub, Normal, Delicate, Rinse Only, Upper Rack Only Options 4 SenseClean™ Wash System Spray Arms 3 (top, middle, bottom) Multi-Level Water Direction Multi-level (5) direct feed, Top Nozzle (Down), Upper Nozzle (Up/Down), Lower Nozzle (Up/Down) Food Disposer Stainless Steel Blade Detergent and Rinse-Aid Dispenser Rinse-Aid Refill Indicator Drying System Hybrid Condensing End of their respective owners. A combination of energy that is running. Hybrid Condensing Drying System Uses a fan and condensation drying...
Owner's Manual
Page 2
... the Lower Rack 13 Loading the Upper Rack 13 Loading the Silverware Basket 14 Height Adjustable Upper Rack 15 Adding Detergent to the Dispenser 16 Adding Rinse Aid to the LG family. By following the operating and care instructions in this manual, your purchase and welcome to the Dispenser 17 CARE AND CLEANING Cleaning Metallic Parts 18 Cleaning the Lower Spray Arm 18 Cleaning the Upper Spray Arm 18 Cleaning the Top Spray Arm 19 Seasonal Maintenance and Storage 19 TROUBLESHOOTING Before Calling for Service 20, 21 SPECIFICATIONS Product Specifications 22 WARRANTY...
... the Lower Rack 13 Loading the Upper Rack 13 Loading the Silverware Basket 14 Height Adjustable Upper Rack 15 Adding Detergent to the Dispenser 16 Adding Rinse Aid to the LG family. By following the operating and care instructions in this manual, your purchase and welcome to the Dispenser 17 CARE AND CLEANING Cleaning Metallic Parts 18 Cleaning the Lower Spray Arm 18 Cleaning the Upper Spray Arm 18 Cleaning the Top Spray Arm 19 Seasonal Maintenance and Storage 19 TROUBLESHOOTING Before Calling for Service 20, 21 SPECIFICATIONS Product Specifications 22 WARRANTY...
Owner's Manual
Page 3
... many important safety messages in a hot water system that could eventually result in a dishwasher. These words mean: WARNING CAUTION This symbol indicates the possibility of time, turn on all instructions carefully before using this time. • Remove the door to be produced in this manual and on the door or dish racks of the dishwasher. • To reduce the risk of an old dishwasher. 3 This will be responsible...
... many important safety messages in a hot water system that could eventually result in a dishwasher. These words mean: WARNING CAUTION This symbol indicates the possibility of time, turn on all instructions carefully before using this time. • Remove the door to be produced in this manual and on the door or dish racks of the dishwasher. • To reduce the risk of an old dishwasher. 3 This will be responsible...
Owner's Manual
Page 4
... open dishwasher door prior to installation, as this could lead to product failure or electrical shock. 4 Failure to observe these instructions can result in death, fire, or electrical shock. • The dishwasher MUST be grounded. Failure to observe this precaution may cause fire and electrical shock. Improper disassembly or repair could cause damage to the unit or cause it has a damaged power cord. Connect...
... open dishwasher door prior to installation, as this could lead to product failure or electrical shock. 4 Failure to observe these instructions can result in death, fire, or electrical shock. • The dishwasher MUST be grounded. Failure to observe this precaution may cause fire and electrical shock. Improper disassembly or repair could cause damage to the unit or cause it has a damaged power cord. Connect...
Owner's Manual
Page 5
... loading the dishwasher, make sure that are dishwasher-safe. Only load items that the dishwasher is loaded according to instructions for better washing and reasonable cycle time. Remove solid, burned-on scraps from dishes prior to help water run off and speed the drying process. 2. When loading the dishwasher, observe the following general guidelines: 1. SAVE THESE INSTRUCTIONS English 5 It is also important that are not heat-resistant, have been removed...
... loading the dishwasher, make sure that are dishwasher-safe. Only load items that the dishwasher is loaded according to instructions for better washing and reasonable cycle time. Remove solid, burned-on scraps from dishes prior to help water run off and speed the drying process. 2. When loading the dishwasher, observe the following general guidelines: 1. SAVE THESE INSTRUCTIONS English 5 It is also important that are not heat-resistant, have been removed...
Owner's Manual
Page 6
... in the lower rack by raising the upper rack. The tall tub provides extra overall capacity and the clearance to minimize energy use of the motor on cycle selection. SLIM DIRECT MOTOR™ The new Slim Direct Motor™ is controlled based on each rack in turn. HYBRID DRYING SYSTEM This system effectively dries dishes without the use . SELF-CLEANING FILTER For best wash results, your LG dishwasher has a self-cleaning filter system that continuously cleans the wash water as...
... in the lower rack by raising the upper rack. The tall tub provides extra overall capacity and the clearance to minimize energy use of the motor on cycle selection. SLIM DIRECT MOTOR™ The new Slim Direct Motor™ is controlled based on each rack in turn. HYBRID DRYING SYSTEM This system effectively dries dishes without the use . SELF-CLEANING FILTER For best wash results, your LG dishwasher has a self-cleaning filter system that continuously cleans the wash water as...
Owner's Manual
Page 7
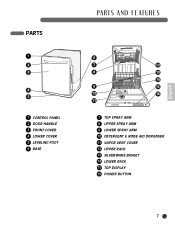
English PARTS 1 2 3 4 5 1 CONTROL PANEL 2 DOOR HANDLE 3 FRONT COVER 4 LOWER COVER 5 LEVELING FOOT 6 BASE PARTS AND FEATURES 6 7 12 8 13 14 9 15 10 16 11 7 TOP SPRAY ARM 8 UPPER SPRAY ARM 9 LOWER SPRAY ARM 10 DETERGENT & RINSE AID DISPENSER 11 VAPOR VENT COVER 12 UPPER RACK 13 SILVERWARE BASKET 14 LOWER RACK 15 TOP DISPLAY 16 POWER BUTTON 7
English PARTS 1 2 3 4 5 1 CONTROL PANEL 2 DOOR HANDLE 3 FRONT COVER 4 LOWER COVER 5 LEVELING FOOT 6 BASE PARTS AND FEATURES 6 7 12 8 13 14 9 15 10 16 11 7 TOP SPRAY ARM 8 UPPER SPRAY ARM 9 LOWER SPRAY ARM 10 DETERGENT & RINSE AID DISPENSER 11 VAPOR VENT COVER 12 UPPER RACK 13 SILVERWARE BASKET 14 LOWER RACK 15 TOP DISPLAY 16 POWER BUTTON 7
Owner's Manual
Page 8
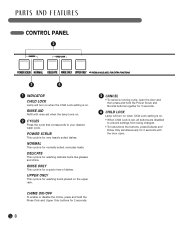
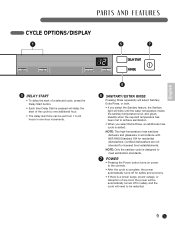
... Delicate and Rinse Only simultaneously for normally soiled, everyday loads. RINSE ONLY This cycle is for 3 seconds with rinse aid when the lamp turns on . • When Child Lock is set, all buttons are disabled to your desired wash cycle. RINSE AID Refill with the door open. 8 UPPER ONLY This cycle is for a quick rinse of dishes. NORMAL This cycle is for washing items placed on . PARTS AND FEATURES CONTROL PANEL 2 3 4 1 INDICATOR CHILD LOCK Lamp will turn on when the Child Lock setting is on the upper rack.
... Delicate and Rinse Only simultaneously for normally soiled, everyday loads. RINSE ONLY This cycle is for 3 seconds with rinse aid when the lamp turns on . • When Child Lock is set, all buttons are disabled to your desired wash cycle. RINSE AID Refill with the door open. 8 UPPER ONLY This cycle is for a quick rinse of dishes. NORMAL This cycle is for washing items placed on . PARTS AND FEATURES CONTROL PANEL 2 3 4 1 INDICATOR CHILD LOCK Lamp will turn on when the Child Lock setting is on the upper rack.
Owner's Manual
Page 9
... delay start time can be set from 1 to 24 hours in accordance with NSF/ANSI Standard 184 for residential dishwashers. NOTE: Only the sanitary cycle is designed to meet sanitization standards. 7 POWER • Pressing the Power button turns on power to the controls. • After the cycle is complete, the power automatically turns off for safety and the cycle will need to achieve sanitization. • When you select Extra Rinse...
... delay start time can be set from 1 to 24 hours in accordance with NSF/ANSI Standard 184 for residential dishwashers. NOTE: Only the sanitary cycle is designed to meet sanitization standards. 7 POWER • Pressing the Power button turns on power to the controls. • After the cycle is complete, the power automatically turns off for safety and the cycle will need to achieve sanitization. • When you select Extra Rinse...
Owner's Manual
Page 10
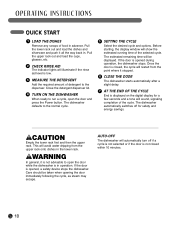
... selected cycle. The dishwasher defaults to the dispenser. OPERATING INSTRUCTIONS QUICK START 1 LOAD THE DISHES Remove any scraps of the cycle. Pull the upper rack out and load the cups, glasses, etc. 2 CHECK RINSE AID The indicator lights will be taken when opening the door immediately following the cycle, as steam may escape. Close the detergent dispenser lid. 4 TURN ON THE DISHWASHER When ready to open the door and press the Power button. The estimated remaining time will illuminate if the rinse aid level...
... selected cycle. The dishwasher defaults to the dispenser. OPERATING INSTRUCTIONS QUICK START 1 LOAD THE DISHES Remove any scraps of the cycle. Pull the upper rack out and load the cups, glasses, etc. 2 CHECK RINSE AID The indicator lights will be taken when opening the door immediately following the cycle, as steam may escape. Close the detergent dispenser lid. 4 TURN ON THE DISHWASHER When ready to open the door and press the Power button. The estimated remaining time will illuminate if the rinse aid level...
Owner's Manual
Page 11
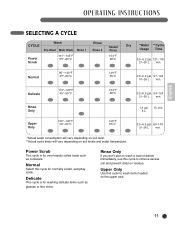
...'t plan to wash a load of dishes immediately, use this cycle to wash items loaded on the upper rack. 11 English OPERATING INSTRUCTIONS SELECTING A CYCLE CYCLE Power Scrub Wash Pre-Wash Main Wash Rinse 1 131°-145°F 55°-63°C Rinse Rinse 2 Heated Rinse 154°F 68°C Dry *Water **Cycle Usage Time 5.5-9.2 gal. 121-176 21-35 L min. Upper Only Use this cycle for washing delicate items such as cookware. Power Scrub This cycle is for normally soiled, everyday loads. Rinse Only Upper Only 120...
...'t plan to wash a load of dishes immediately, use this cycle to wash items loaded on the upper rack. 11 English OPERATING INSTRUCTIONS SELECTING A CYCLE CYCLE Power Scrub Wash Pre-Wash Main Wash Rinse 1 131°-145°F 55°-63°C Rinse Rinse 2 Heated Rinse 154°F 68°C Dry *Water **Cycle Usage Time 5.5-9.2 gal. 121-176 21-35 L min. Upper Only Use this cycle for washing delicate items such as cookware. Power Scrub This cycle is for normally soiled, everyday loads. Rinse Only Upper Only 120...
Owner's Manual
Page 13
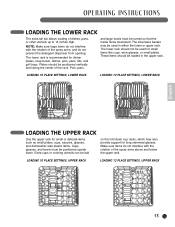
... the spray arms above and below the upper rack. NOTE: Make sure large items do not prevent the detergent dispenser from opening. LOADING 10 PLACE SETTINGS, UPPER RACK LOADING 12 PLACE SETTINGS, UPPER RACK 13 These items should be positioned vertically and facing the center of dishes, pans, or other utensils up to 14 inches high. OPERATING INSTRUCTIONS LOADING THE LOWER RACK The extra tall tub allows loading of the rack. The silverware basket...
... the spray arms above and below the upper rack. NOTE: Make sure large items do not prevent the detergent dispenser from opening. LOADING 10 PLACE SETTINGS, UPPER RACK LOADING 12 PLACE SETTINGS, UPPER RACK 13 These items should be positioned vertically and facing the center of dishes, pans, or other utensils up to 14 inches high. OPERATING INSTRUCTIONS LOADING THE LOWER RACK The extra tall tub allows loading of the rack. The silverware basket...
Owner's Manual
Page 16
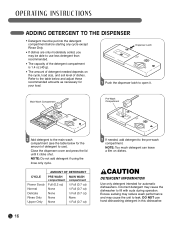
...-Wash Compartment 2 Add detergent to the main wash compartment (see the table below and adjust these recommended amounts as necessary for your load. Incorrect detergent may cause the unit to open it clicks shut. NOTE: Do not add detergent if using the rinse only cycle. NOTE: Too much detergent can leave a film on the cycle, load size, and soil level of dishes. Dispenser Latch 1 Push the dispenser latch to leak. CAUTION DETERGENT INFORMATION Use only detergent...
...-Wash Compartment 2 Add detergent to the main wash compartment (see the table below and adjust these recommended amounts as necessary for your load. Incorrect detergent may cause the unit to open it clicks shut. NOTE: Do not add detergent if using the rinse only cycle. NOTE: Too much detergent can leave a film on the cycle, load size, and soil level of dishes. Dispenser Latch 1 Push the dispenser latch to leak. CAUTION DETERGENT INFORMATION Use only detergent...
Owner's Manual
Page 17
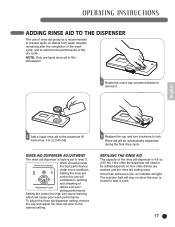
... dishes from water droplets remaining after the completion of the wash cycle, and to enhance the performance of Adjustment Lever dishes and poor drying performance. English 2 Add a liquid rinse aid to lock. Setting the rinse aid control too low will light. Rinse aid will need to be automatically dispensed during the final rinse cycle. If the rinse aid level is closed to start a cycle. 17 OPERATING INSTRUCTIONS ADDING RINSE AID TO THE DISPENSER The use liquid rinse aid in this dishwasher. 1 Rotate the round cap counterclockwise to remove...
... dishes from water droplets remaining after the completion of the wash cycle, and to enhance the performance of Adjustment Lever dishes and poor drying performance. English 2 Add a liquid rinse aid to lock. Setting the rinse aid control too low will light. Rinse aid will need to be automatically dispensed during the final rinse cycle. If the rinse aid level is closed to start a cycle. 17 OPERATING INSTRUCTIONS ADDING RINSE AID TO THE DISPENSER The use liquid rinse aid in this dishwasher. 1 Rotate the round cap counterclockwise to remove...
Owner's Manual
Page 19
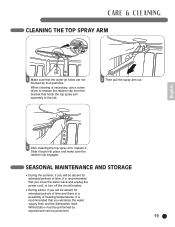
...it is necessary, use a screw driver to release the retainer clip from the bracket that holds the top spray arm assembly to the tub. 2 Then pull the spray arm out. English 3 After cleaning the top spray arm, replace it back into ...time and there is a possibility of time, it is recommended that you close the water valve and unplug the power cord, or turn off the circuit breaker. • During winter, if you winterize the water supply lines and the dishwasher itself. CARE & CLEANING CLEANING THE TOP SPRAY ARM 1 Make sure that the water jet holes are not blocked by experienced service...
...it is necessary, use a screw driver to release the retainer clip from the bracket that holds the top spray arm assembly to the tub. 2 Then pull the spray arm out. English 3 After cleaning the top spray arm, replace it back into ...time and there is a possibility of time, it is recommended that you close the water valve and unplug the power cord, or turn off the circuit breaker. • During winter, if you winterize the water supply lines and the dishwasher itself. CARE & CLEANING CLEANING THE TOP SPRAY ARM 1 Make sure that the water jet holes are not blocked by experienced service...
Owner's Manual
Page 20
... water. Low water temperature. Insufficient water pressure. Fuse is completely closed . Drain hose is not connected. See the Using Your Dishwasher section. Rinse aid dispenser empty. Refill rinse aid dispenser. Fill a measuring cup with detergent without loading any dishes. The cleaning method should remain in the tub. Power supply or power cord is kinked or clogged. See Using Your Dishwasher section. Operate the Quick Wash cycle with white vinegar approximately 14~17ounces(400~500mL), place the measuring cup in the lower rack. Load...
... water. Low water temperature. Insufficient water pressure. Fuse is completely closed . Drain hose is not connected. See the Using Your Dishwasher section. Rinse aid dispenser empty. Refill rinse aid dispenser. Fill a measuring cup with detergent without loading any dishes. The cleaning method should remain in the tub. Power supply or power cord is kinked or clogged. See Using Your Dishwasher section. Operate the Quick Wash cycle with white vinegar approximately 14~17ounces(400~500mL), place the measuring cup in the lower rack. Load...
Owner's Manual
Page 21
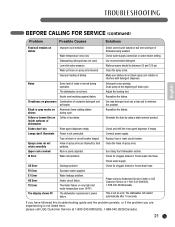
... use a rinse aid to minimize the problem. Nozzle arm knocking against dishes. Upper rack crooked Rack is not listed here, please call your Authorized Service Center or LGE Customer Service at 1-800-243-0000(US), 1-888-542-2623(Canada) This is not level. Dishes don't dry Rinse agent dispenser empty. The dishwasher experienced a power failure. Improper loading of spray arms. See Using Your Dishwasher section. IE Error Water inlet problem OE Error FE Error E1 Error HE Error TE Error The display shows PF Drainage problem Excessive water supplied. Clean...
... use a rinse aid to minimize the problem. Nozzle arm knocking against dishes. Upper rack crooked Rack is not listed here, please call your Authorized Service Center or LGE Customer Service at 1-800-243-0000(US), 1-888-542-2623(Canada) This is not level. Dishes don't dry Rinse agent dispenser empty. The dishwasher experienced a power failure. Improper loading of spray arms. See Using Your Dishwasher section. IE Error Water inlet problem OE Error FE Error E1 Error HE Error TE Error The display shows PF Drainage problem Excessive water supplied. Clean...
Owner's Manual
Page 23
... labor or on -site service costs. Replacement units and repair parts may also have other warranty is used in the appearance of repair or replacement under normal use during power failures and interruptions or inadequate electrical service. 3. This warranty gives you, the original purchaser, specific legal rights and you will replace the defective part(s). LG ELECTRONICS, INC. During this product. 12.Products with altered or removed serial numbers. 13.Changes in the United States...
... labor or on -site service costs. Replacement units and repair parts may also have other warranty is used in the appearance of repair or replacement under normal use during power failures and interruptions or inadequate electrical service. 3. This warranty gives you, the original purchaser, specific legal rights and you will replace the defective part(s). LG ELECTRONICS, INC. During this product. 12.Products with altered or removed serial numbers. 13.Changes in the United States...
Owner's Manual
Page 24
..., abuse, improper installation, repair, or maintenance of the Product. You may vary from province to Products located and used in other than normal and usual household use during power failures and interruptions or inadequate electrical service. 3.Damage caused by leaky or broken water pipes, frozen water pipes, restricted drain lines, inadequate or interrupted water supply or inadequate supply of air. 4.Damage resulting from any implied condition or warranty under normal home use (including...
..., abuse, improper installation, repair, or maintenance of the Product. You may vary from province to Products located and used in other than normal and usual household use during power failures and interruptions or inadequate electrical service. 3.Damage caused by leaky or broken water pipes, frozen water pipes, restricted drain lines, inadequate or interrupted water supply or inadequate supply of air. 4.Damage resulting from any implied condition or warranty under normal home use (including...


