
Owner's Manual
Page 1
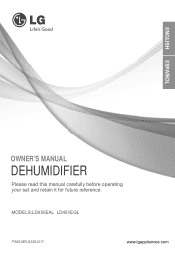
OWNER'S MANUAL DEHUMIDIFIER Please read this manual carefully before operating your set and retain it for future reference. MODELS:LD450EAL LD451EGL P/NO:MFL63261217 www.lgappliances.com
OWNER'S MANUAL DEHUMIDIFIER Please read this manual carefully before operating your set and retain it for future reference. MODELS:LD450EAL LD451EGL P/NO:MFL63261217 www.lgappliances.com
Owner's Manual
Page 2
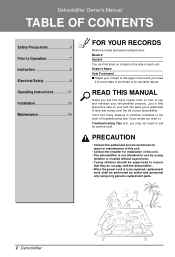
...; When the power cord is not intended for use and maintain your dehumidifier. READ THIS MANUAL Inside you may not need it to prove date of troubleshooting tips. If you review our chart of your dehumidifier properly. Dehumidifier Owner's Manual TABLE OF CONTENTS Safety Precautions 3 Prior to Operation 7 Instruction 8 Electrical Safety 9 Operating Instructions 11 Installation 13 Maintenance 14 FOR YOUR RECORDS Write the model and serial numbers here: Model # Serial # You...
...; When the power cord is not intended for use and maintain your dehumidifier. READ THIS MANUAL Inside you may not need it to prove date of troubleshooting tips. If you review our chart of your dehumidifier properly. Dehumidifier Owner's Manual TABLE OF CONTENTS Safety Precautions 3 Prior to Operation 7 Instruction 8 Electrical Safety 9 Operating Instructions 11 Installation 13 Maintenance 14 FOR YOUR RECORDS Write the model and serial numbers here: Model # Serial # You...
Owner's Manual
Page 3
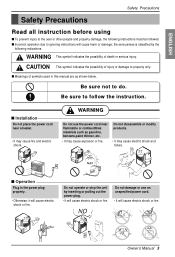
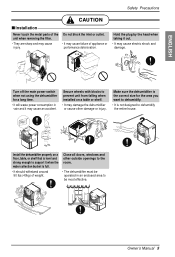
... not to follow the instruction. NO Owner's Manual 3 CAUTION This symbol indicates the possibility of death or serious injury. Do not disassemble or modify products. • It may cause fire and electric shock. Do not damage or use the power cord near a heater. • It may cause electric shock and failure. I Installation Do not place the power cord near flammable or...
... not to follow the instruction. NO Owner's Manual 3 CAUTION This symbol indicates the possibility of death or serious injury. Do not disassemble or modify products. • It may cause fire and electric shock. Do not damage or use the power cord near a heater. • It may cause electric shock and failure. I Installation Do not place the power cord near flammable or...
Owner's Manual
Page 4
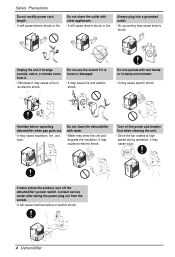
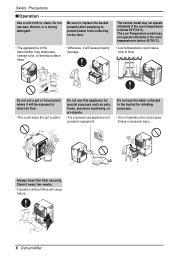
.../Onf/fOff HigLhow Fan Speed Timer HuCmoindtirtoyl Bucket full If water enters the product, turn off the power and breaker first when cleaning the unit. • Since the fan rotates at high speed during operation, it may enter the unit and degrade the insulation. Do not operate with other appliances. • It will cause electric shock or fire. Contact service center after taking...
.../Onf/fOff HigLhow Fan Speed Timer HuCmoindtirtoyl Bucket full If water enters the product, turn off the power and breaker first when cleaning the unit. • Since the fan rotates at high speed during operation, it may enter the unit and degrade the insulation. Do not operate with other appliances. • It will cause electric shock or fire. Contact service center after taking...
Owner's Manual
Page 5
... with blocks to prevent unit from falling when installed on a floor, table, or shelf that is full. • It should withstand around 90 lbs (40kg) of weight. Make sure the dehumidifier is the correct size for a long time. • It will waste power consumption in vain and it when the water collection bucket is level and strong enough to support it...
... with blocks to prevent unit from falling when installed on a floor, table, or shelf that is full. • It should withstand around 90 lbs (40kg) of weight. Make sure the dehumidifier is the correct size for a long time. • It will waste power consumption in vain and it when the water collection bucket is level and strong enough to support it...
Owner's Manual
Page 6
..., change color, or develop surface flaws. • Otherwise, it every two weeks. • Operation without filters will cause property damage. Be sure to replace the bucket properly after emptying to clean. Time Always insert the filter securely. Clean it will cause failure. 2h4r.hOr.nO/Onf/fOff Timer Fan Speed LowHigh 6 Dehumidifier Do not use appliance not precision equipment. Do not use the water collected...
..., change color, or develop surface flaws. • Otherwise, it every two weeks. • Operation without filters will cause property damage. Be sure to replace the bucket properly after emptying to clean. Time Always insert the filter securely. Clean it will cause failure. 2h4r.hOr.nO/Onf/fOff Timer Fan Speed LowHigh 6 Dehumidifier Do not use appliance not precision equipment. Do not use the water collected...
Owner's Manual
Page 7
... hazardous to clean inside the dehumidifier. Being exposed to water can occur when handling sharp metal edges. 2. Do not use an extension cord. 5. Owner's Manual 7 Do not touch the metal parts of time could damage the items. Cleaning and maintenance 1. When cleaning the unit, first make sure that the power and breaker are turned off. If the cord/plug is used with an authorized replacement part. Ventilate the...
... hazardous to clean inside the dehumidifier. Being exposed to water can occur when handling sharp metal edges. 2. Do not use an extension cord. 5. Owner's Manual 7 Do not touch the metal parts of time could damage the items. Cleaning and maintenance 1. When cleaning the unit, first make sure that the power and breaker are turned off. If the cord/plug is used with an authorized replacement part. Ventilate the...

Owner's Manual
Page 8
This guide acts as a guide to help to the risk of electric shock. Instruction Instruction Symbols used in accordance with national wiring regulations. NOTICE This symbol indicates special notes. Control Panel Auto Restart Front Grille Air Filter Handle Water Bucket Cabinet Power Cord Rear Grille 8 Dehumidifier Features WARNING: This appliance should be installed in this Manual This symbol alerts you to hazards that could cause harm to the dehumidifier. This symbol alerts you to explain product features.
This guide acts as a guide to help to the risk of electric shock. Instruction Instruction Symbols used in accordance with national wiring regulations. NOTICE This symbol indicates special notes. Control Panel Auto Restart Front Grille Air Filter Handle Water Bucket Cabinet Power Cord Rear Grille 8 Dehumidifier Features WARNING: This appliance should be installed in this Manual This symbol alerts you to hazards that could cause harm to the dehumidifier. This symbol alerts you to explain product features.
Owner's Manual
Page 9
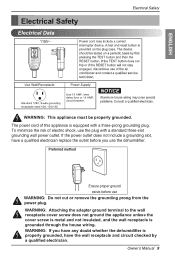
... and circuit checked by a qualified electrician. WARNING: If you use the dehumidifier. Owner's Manual 9 Electrical Safety WARNING: This appliance must be properly grounded. ENGLISH Electrical Safety RESET TEST WARNING: TEST BEFORE EACH USE! 1.PRESS RESET BUTTON. 2.PLUG LCDI INTO POWER RECEPTACLE. 3.PRESS TEST BUTTON, RESET BUTTON SHOULD POP UP. 4.PRESS RESET BUTTON FOR USE. DO NOT USE IF ABOVE TEST FAILS.WHEN GREEN LIGHTISON, ITIS WORKING PROPERLY! The power cord of...
... and circuit checked by a qualified electrician. WARNING: If you use the dehumidifier. Owner's Manual 9 Electrical Safety WARNING: This appliance must be properly grounded. ENGLISH Electrical Safety RESET TEST WARNING: TEST BEFORE EACH USE! 1.PRESS RESET BUTTON. 2.PLUG LCDI INTO POWER RECEPTACLE. 3.PRESS TEST BUTTON, RESET BUTTON SHOULD POP UP. 4.PRESS RESET BUTTON FOR USE. DO NOT USE IF ABOVE TEST FAILS.WHEN GREEN LIGHTISON, ITIS WORKING PROPERLY! The power cord of...
Owner's Manual
Page 10
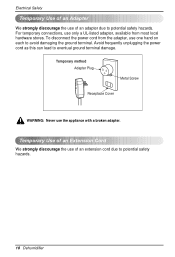
.... 10 Dehumidifier To disconnect the power cord from most local hardware stores. For temporary connections, use of an adapter due to avoid damaging the ground terminal. Electrical Safety Temporary Use of an Adapter We strongly discourage the use only a UL-listed adapter, available from the adapter, use the appliance with a broken adapter. Temporary Use of an Extension Cord We strongly discourage the use of an extension cord due...
.... 10 Dehumidifier To disconnect the power cord from most local hardware stores. For temporary connections, use of an adapter due to avoid damaging the ground terminal. Electrical Safety Temporary Use of an Adapter We strongly discourage the use only a UL-listed adapter, available from the adapter, use the appliance with a broken adapter. Temporary Use of an Extension Cord We strongly discourage the use of an extension cord due...

Owner's Manual
Page 11
... used to cycle On and Off. HUMIDITY SETTING display --- BUCKET FULL Indicator --- After 3 minutes both fan and compressor will run by indicator lights marked "High" and "Low". 5. Plug the power cord into the electrical outlet. In this key once turns the dehumidifier "ON" and pressing again turns the dehumidifier "OFF". 2. The fan will turn "OFF". 7. NOTICE Water bucket must be emptied. AUTO RESTART --- Operating Instructions Operating Instructions ENGLISH Auto Restart 5 4 3 7 2 61 CONTROL PANEL HAS FOLLOWING 1. Displays the selected humidity setting...
... used to cycle On and Off. HUMIDITY SETTING display --- BUCKET FULL Indicator --- After 3 minutes both fan and compressor will run by indicator lights marked "High" and "Low". 5. Plug the power cord into the electrical outlet. In this key once turns the dehumidifier "ON" and pressing again turns the dehumidifier "OFF". 2. The fan will turn "OFF". 7. NOTICE Water bucket must be emptied. AUTO RESTART --- Operating Instructions Operating Instructions ENGLISH Auto Restart 5 4 3 7 2 61 CONTROL PANEL HAS FOLLOWING 1. Displays the selected humidity setting...
Owner's Manual
Page 12
... run if the bucket is advisable to work. Attach a length of collected water 1. Connect a garden hose to hose connector drain hose connection, do not bend or kink the hose. Carrying by the handle. Empty the bucket manually. TAKE OUT Fig5 When being attached to the CONNECTOR threaded drain hose connector. The bucket must be replaced in the proper position. The light will accept a standard garden hose fitting. HOSE 1. Fig1 (Fig1) DRAIN HOLE COVER NOTICE Do not remove while Fig2 operating the dehumidifier. Remove...
... run if the bucket is advisable to work. Attach a length of collected water 1. Connect a garden hose to hose connector drain hose connection, do not bend or kink the hose. Carrying by the handle. Empty the bucket manually. TAKE OUT Fig5 When being attached to the CONNECTOR threaded drain hose connector. The bucket must be replaced in the proper position. The light will accept a standard garden hose fitting. HOSE 1. Fig1 (Fig1) DRAIN HOLE COVER NOTICE Do not remove while Fig2 operating the dehumidifier. Remove...
Owner's Manual
Page 13
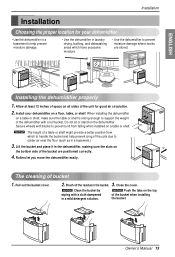
... table or shelf is strong enough to support the weight of the coils due to handle the bucket and help prevent moisture damage. • Use the dehumidifier in a mild detergent solution. Close the cover. Owner's Manual 13 ENGLISH Installation Installation Choosing the proper location for good air circulation. 2. Lift the bucket and place it in the bucket. 3. Brush off the residue in the...
... table or shelf is strong enough to support the weight of the coils due to handle the bucket and help prevent moisture damage. • Use the dehumidifier in a mild detergent solution. Close the cover. Owner's Manual 13 ENGLISH Installation Installation Choosing the proper location for good air circulation. 2. Lift the bucket and place it in the bucket. 3. Brush off the residue in the...
Owner's Manual
Page 14
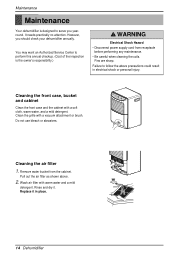
... warm water and a mild detergent. Remove water bucket from receptacle before performing any maintenance. • Be careful when cleaning the coils. Auto Restart Cleaning the air filter 1. Wash air filter with a soft cloth, warm water, and a mild detergent. Pull out the air filter as shown above precautions could result in place. 14 Dehumidifier Replace it . Rinse and dry it in electrical shock or personal injury. Do not use bleach...
... warm water and a mild detergent. Remove water bucket from receptacle before performing any maintenance. • Be careful when cleaning the coils. Auto Restart Cleaning the air filter 1. Wash air filter with a soft cloth, warm water, and a mild detergent. Pull out the air filter as shown above precautions could result in place. 14 Dehumidifier Replace it . Rinse and dry it in electrical shock or personal injury. Do not use bleach...
Owner's Manual
Page 15
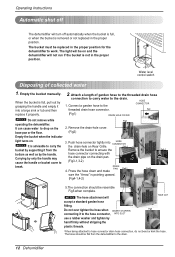
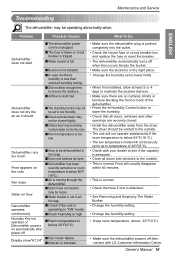
... operate satisfactorily if the room temperature is below 32°F(0°C). Owner's Manual 15 Frost will continuously cycle up to temperature of the dehumidifier. • Press the Humidity Control button to low Humidity. ■Doors and windows may not be closed tightly. ■Clothes dryer may be blowing moisture-laden air into the outlet. • Check the house fuse or circuit breaker box and replace the fuse or reset the breaker. • The dehumidifier automatically turns...
... operate satisfactorily if the room temperature is below 32°F(0°C). Owner's Manual 15 Frost will continuously cycle up to temperature of the dehumidifier. • Press the Humidity Control button to low Humidity. ■Doors and windows may not be closed tightly. ■Clothes dryer may be blowing moisture-laden air into the outlet. • Check the house fuse or circuit breaker box and replace the fuse or reset the breaker. • The dehumidifier automatically turns...
Owner's Manual
Page 31
... ITS U.S. Mail to a LG Authorized Service Center. WARRANTY LG DEHUMIDIFIER LIMITED WARRANTY - Product where the original factory serial numbers have been removed, defaced or changed in either its option, repair or replace the product. Damage or failure resulting from date of the original unit's warranty period or ninety (90) days, whichever is not assignable or transferrable to replace defective parts. HOW TO OBTAIN WARRANTY SERVICE & ADDITIONAL INFORMATION: Call...
... ITS U.S. Mail to a LG Authorized Service Center. WARRANTY LG DEHUMIDIFIER LIMITED WARRANTY - Product where the original factory serial numbers have been removed, defaced or changed in either its option, repair or replace the product. Damage or failure resulting from date of the original unit's warranty period or ninety (90) days, whichever is not assignable or transferrable to replace defective parts. HOW TO OBTAIN WARRANTY SERVICE & ADDITIONAL INFORMATION: Call...

Owner's Manual
Page 32
LG ELECTRONICS,INC. 1000 Sylvan Ave.,Englewood Cliffs,NJ 07632 LG Customer Information Center 1-800-243-0000 Register your product OnlineĆ www.lgappliances.com
LG ELECTRONICS,INC. 1000 Sylvan Ave.,Englewood Cliffs,NJ 07632 LG Customer Information Center 1-800-243-0000 Register your product OnlineĆ www.lgappliances.com


