
Owner's Manual
Page 2
...of this page in the chart of troubleshooting tips. READ THIS MANUAL Inside you will find many answers to common problems in the event you need to call for use and maintain your dehumidifier properly. Dealer's Name Date Purchased s Staple your receipt to this...at all. You'll find many helpful hints on how to use by authorized personnel only using only genuine replacement parts. 2 Dehumidifier Dehumidifier Owner's Manual TABLE OF CONTENTS Safety Precautions 3 Prior to Operation 7 Instruction 8 Electrical Safety 9 Operating Instructions 11 Installation 13 Maintenance 14 ...
...of this page in the chart of troubleshooting tips. READ THIS MANUAL Inside you will find many answers to common problems in the event you need to call for use and maintain your dehumidifier properly. Dealer's Name Date Purchased s Staple your receipt to this...at all. You'll find many helpful hints on how to use by authorized personnel only using only genuine replacement parts. 2 Dehumidifier Dehumidifier Owner's Manual TABLE OF CONTENTS Safety Precautions 3 Prior to Operation 7 Instruction 8 Electrical Safety 9 Operating Instructions 11 Installation 13 Maintenance 14 ...
Owner's Manual
Page 5
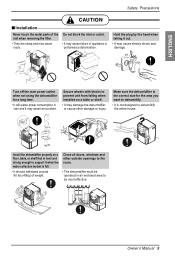
Make sure the dehumidifier is full. • It should withstand around 90 lbs (40kg) of weight. Close all doors, windows and other damage or injury. nO/Onf/fOff Fan Speed LowHigh Owner's Manual 5 Timer 2h4r.hOr. Hold the plug by the head when taking it when the water ...most effective. Secure wheels with blocks to prevent unit from falling when installed on a floor, table, or shelf that is not designed to dehumidify the entire house. ENGLISH Safety Precautions CAUTION ■Installation Never touch the metal parts of the unit when removing the filter. • They...
Make sure the dehumidifier is full. • It should withstand around 90 lbs (40kg) of weight. Close all doors, windows and other damage or injury. nO/Onf/fOff Fan Speed LowHigh Owner's Manual 5 Timer 2h4r.hOr. Hold the plug by the head when taking it when the water ...most effective. Secure wheels with blocks to prevent unit from falling when installed on a floor, table, or shelf that is not designed to dehumidify the entire house. ENGLISH Safety Precautions CAUTION ■Installation Never touch the metal parts of the unit when removing the filter. • They...
Owner's Manual
Page 7
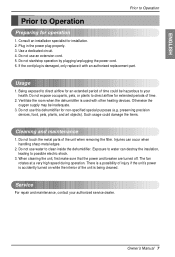
... while the interior of time. 2. Exposure to direct airflow for operation 1. ENGLISH Prior to Operation Prior to clean inside the dehumidifier. Being exposed to water can occur when handling sharp metal edges. 2. Injuries can destroy the insulation, leading to your authorized ...circuit. 4. Do not use water to Operation Preparing for an extended period of the unit when removing the filter. Owner's Manual 7 Do not use this dehumidifier for installation. 2. Do not start/stop operation by plugging/unplugging the power cord. 6. Otherwise the oxygen supply may be...
... while the interior of time. 2. Exposure to direct airflow for operation 1. ENGLISH Prior to Operation Prior to clean inside the dehumidifier. Being exposed to water can occur when handling sharp metal edges. 2. Injuries can destroy the insulation, leading to your authorized ...circuit. 4. Do not use water to Operation Preparing for an extended period of the unit when removing the filter. Owner's Manual 7 Do not use this dehumidifier for installation. 2. Do not start/stop operation by plugging/unplugging the power cord. 6. Otherwise the oxygen supply may be...
Owner's Manual
Page 8
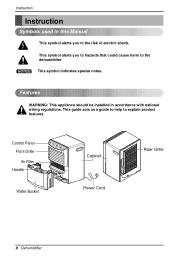
Instruction Instruction Symbols used in accordance with national wiring regulations. This guide acts as a guide to help to the risk of electric shock. NOTICE This symbol indicates special notes. Features WARNING: This appliance should be installed in this Manual This symbol alerts you to hazards that could cause harm to the dehumidifier. This symbol alerts you to explain product features. Control Panel Auto Restart Front Grille Air Filter Handle Water Bucket Cabinet Power Cord Rear Grille 8 Dehumidifier
Instruction Instruction Symbols used in accordance with national wiring regulations. This guide acts as a guide to help to the risk of electric shock. NOTICE This symbol indicates special notes. Features WARNING: This appliance should be installed in this Manual This symbol alerts you to hazards that could cause harm to the dehumidifier. This symbol alerts you to explain product features. Control Panel Auto Restart Front Grille Air Filter Handle Water Bucket Cabinet Power Cord Rear Grille 8 Dehumidifier
Owner's Manual
Page 9
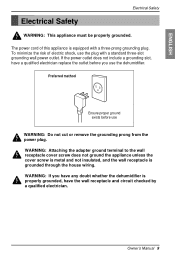
... grounding slot, have the wall receptacle and circuit checked by a qualified electrician. Owner's Manual 9 Preferred method Ensure proper ground exists before you have any doubt whether the dehumidifier is grounded through the house wiring. To minimize the risk of this appliance is equipped ...with a standard three-slot grounding wall power outlet. WARNING: If you use the dehumidifier. ENGLISH Electrical Safety Electrical Safety WARNING: This appliance must be properly grounded. WARNING: Attaching the adapter ground terminal to the...
... grounding slot, have the wall receptacle and circuit checked by a qualified electrician. Owner's Manual 9 Preferred method Ensure proper ground exists before you have any doubt whether the dehumidifier is grounded through the house wiring. To minimize the risk of this appliance is equipped ...with a standard three-slot grounding wall power outlet. WARNING: If you use the dehumidifier. ENGLISH Electrical Safety Electrical Safety WARNING: This appliance must be properly grounded. WARNING: Attaching the adapter ground terminal to the...
Owner's Manual
Page 11
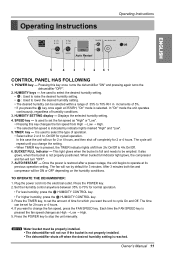
...and Off. HUMIDITY keys --- On/Off for 2 or 4 hours. If you change the fan speed, press the FAN SPEED key. Owner's Manual 11 Operating Instructions Operating Instructions ENGLISH Auto Restart 5 4 3 7 2 61 CONTROL PANEL HAS FOLLOWING 1. After 3 minutes both fan and compressor.... 5. When bucket full indicator light glows, the compressor and fan will run if the bucket is not properly installed. • The dehumidifier shuts off completely for cycled operation. HUMIDITY SETTING display --- POWER key --- Displays the selected humidity setting. 4. Is used to 70% ...
...and Off. HUMIDITY keys --- On/Off for 2 or 4 hours. If you change the fan speed, press the FAN SPEED key. Owner's Manual 11 Operating Instructions Operating Instructions ENGLISH Auto Restart 5 4 3 7 2 61 CONTROL PANEL HAS FOLLOWING 1. After 3 minutes both fan and compressor.... 5. When bucket full indicator light glows, the compressor and fan will run if the bucket is not properly installed. • The dehumidifier shuts off completely for cycled operation. HUMIDITY SETTING display --- POWER key --- Displays the selected humidity setting. 4. Is used to 70% ...
Owner's Manual
Page 12
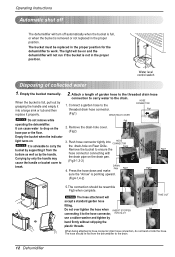
... a length of collected water 1. Press the hose down and make sure the "Arrow" is removed or not replaced in the proper position for the dehumidifier to ensure the hose connector connecting with the drain pipe on . Carrying by hand firmly without stripping the plastic threads. Empty the bucket... manually. TAKE OUT Fig5 When being attached to the hose connector, INTO SLOT use a rubber washer and tighten by only the handle may cause the...
... a length of collected water 1. Press the hose down and make sure the "Arrow" is removed or not replaced in the proper position for the dehumidifier to ensure the hose connector connecting with the drain pipe on . Carrying by hand firmly without stripping the plastic threads. Empty the bucket... manually. TAKE OUT Fig5 When being attached to the hose connector, INTO SLOT use a rubber washer and tighten by only the handle may cause the...
Owner's Manual
Page 13
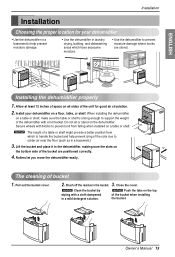
... shelf might provide a better position from falling when installed on the bottom side of the dehumidifier with a cloth dampened in the bucket. 3. Brush off the residue in a mild detergent solution. Owner's Manual 13 Do not sit or stand on a floor, table, or shelf. Auto Restart Auto... Restart Auto Restart Installing the dehumidifier properly 1. Lift the bucket and place it in a basement.) 3. NOTICE The height ...
... shelf might provide a better position from falling when installed on the bottom side of the dehumidifier with a cloth dampened in the bucket. 3. Brush off the residue in a mild detergent solution. Owner's Manual 13 Do not sit or stand on a floor, table, or shelf. Auto Restart Auto... Restart Auto Restart Installing the dehumidifier properly 1. Lift the bucket and place it in a basement.) 3. NOTICE The height ...
Owner's Manual
Page 15
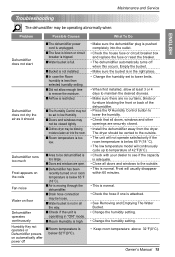
... are open. Frost appears on the coils Fan noise Water on floor Dehumidifier operates continuously ■Dehumidifier has been recently turned on automatically after power off when this occurs. Dehumidifier does not dry the air as it should be dehumidified is restricted. Owner's Manual 15 on or room temperature is below 65°F(18 °...
... are open. Frost appears on the coils Fan noise Water on floor Dehumidifier operates continuously ■Dehumidifier has been recently turned on automatically after power off when this occurs. Dehumidifier does not dry the air as it should be dehumidified is restricted. Owner's Manual 15 on or room temperature is below 65°F(18 °...


