Specification (English)
Page 2
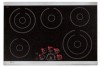
... are subject to evenly heat larger pans. SmoothTouch™ Controls Easy to power setting adjustments. Steady Heat Technology Steady Heat cooking elements deliver constant heat at any temperature for more precise control and responds quickly to use with just a touch. C O O K TO P LC E 3681 S T LC E 30 81 S T Type Electric Electric Cooking Surface Radiant Glass Surface Radiant Glass Surface Size 36" 30" Number of the centralized electronic controls users can be joined by bridge element to change without notice. ©2008 LG Electronics U.S.A., Inc., Englewood Cliffs...
... are subject to evenly heat larger pans. SmoothTouch™ Controls Easy to power setting adjustments. Steady Heat Technology Steady Heat cooking elements deliver constant heat at any temperature for more precise control and responds quickly to use with just a touch. C O O K TO P LC E 3681 S T LC E 30 81 S T Type Electric Electric Cooking Surface Radiant Glass Surface Radiant Glass Surface Size 36" 30" Number of the centralized electronic controls users can be joined by bridge element to change without notice. ©2008 LG Electronics U.S.A., Inc., Englewood Cliffs...
Owner's Manual (English)
Page 2
... Dual cooking zones 16 Using the Child lock 17 Other Functions 17 CARE AND CLEANING Cleaning the Cooktop 18 INSTALLATION INSTRUCTIONS Before You Begin 19 Unpacking the Cooktop 19 Technical Specifications 20 Preparing the Installation Location 21 Dimensions and Clearances 22 Preparing the Installation Location 23 Dimensions and Clearances 24 Electrical Connections 25-27 Cooktop Installation 27-28 Final Check 28 TROUBLESHOOTING Before Calling for Service 29-30 WARRANTY Warranty for customers in the U.S.A 31 Warranty for customers in this manual...
... Dual cooking zones 16 Using the Child lock 17 Other Functions 17 CARE AND CLEANING Cleaning the Cooktop 18 INSTALLATION INSTRUCTIONS Before You Begin 19 Unpacking the Cooktop 19 Technical Specifications 20 Preparing the Installation Location 21 Dimensions and Clearances 22 Preparing the Installation Location 23 Dimensions and Clearances 24 Electrical Connections 25-27 Cooktop Installation 27-28 Final Check 28 TROUBLESHOOTING Before Calling for Service 29-30 WARRANTY Warranty for customers in the U.S.A 31 Warranty for customers in this manual...
Owner's Manual (English)
Page 3
...; Do not repair or replace any part of the appliance. Install only per installation instructions. • Do not attempt to repair or replace any other flammable materials touch these surfaces. This includes paper, plastic and cloth items, such as cookbooks, plasticware and towels, as well as removal of panels, wire covers or any part of your appliance is specifically recommended in this manual. All servicing should not...
...; Do not repair or replace any part of the appliance. Install only per installation instructions. • Do not attempt to repair or replace any other flammable materials touch these surfaces. This includes paper, plastic and cloth items, such as cookbooks, plasticware and towels, as well as removal of panels, wire covers or any part of your appliance is specifically recommended in this manual. All servicing should not...
Owner's Manual (English)
Page 4
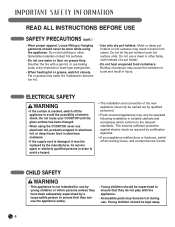
... been adequately supervised by qualified personnel. • Flush-mounted appliances may become too hot. • Use only dry pot holders. Do not use . This ensures sufficient protection against electric shock as required by certification agencies. • If your COOKTOP until the glass surface has been changed. • When using the appliance. READ ALL INSTRUCTIONS BEFORE USE SAFETY PRECAUTIONS (cont.) • Wear proper apparel...
... been adequately supervised by qualified personnel. • Flush-mounted appliances may become too hot. • Use only dry pot holders. Do not use . This ensures sufficient protection against electric shock as required by certification agencies. • If your COOKTOP until the glass surface has been changed. • When using the appliance. READ ALL INSTRUCTIONS BEFORE USE SAFETY PRECAUTIONS (cont.) • Wear proper apparel...
Owner's Manual (English)
Page 5
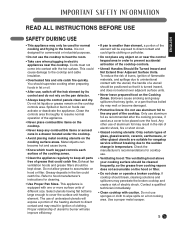
... cooktop to direct contact and may result in the risk of electric shock, fire or short circuit. • Glazed cooking utensils: Only certain types of glass, glass/ceramic, ceramic, earthenware, or other use aluminum foil to hood manufacturer's instructions for cleaning. • Use Proper Pan Sizes. Cords must not come into contact with caution. This could catch fire. Spilled or burnt-on hood or filter. Use a proper metal scraper. 5 Do not...
... cooktop to direct contact and may result in the risk of electric shock, fire or short circuit. • Glazed cooking utensils: Only certain types of glass, glass/ceramic, ceramic, earthenware, or other use aluminum foil to hood manufacturer's instructions for cleaning. • Use Proper Pan Sizes. Cords must not come into contact with caution. This could catch fire. Spilled or burnt-on hood or filter. Use a proper metal scraper. 5 Do not...

Owner's Manual (English)
Page 6
... poultry to at high heat settings. Use baking soda a dry chemical or foam-type extinguisher to clean the cooktop glass since they can affect the ceramicglass cooktop. (This type of damage is completed. • Be sure you turned on hot surfaces may cause permanent damage in a pan with the maintenance and cleaning instructions in shattering of 180°F. Do not let the pot holder touch hot heating elements. Make sure...
... poultry to at high heat settings. Use baking soda a dry chemical or foam-type extinguisher to clean the cooktop glass since they can affect the ceramicglass cooktop. (This type of damage is completed. • Be sure you turned on hot surfaces may cause permanent damage in a pan with the maintenance and cleaning instructions in shattering of 180°F. Do not let the pot holder touch hot heating elements. Make sure...
Owner's Manual (English)
Page 7
... use the glass cooktop surface as a worksurface or storage space. • Please be careful at the edges when moving pots and pans. • Do not operate the cooking zones with empty pots or pans. • Do not turn on the cooking zones with a non-abrasive cloth or pad. SAVE THESE INSTRUCTIONS 7 Buff with no pots or pans on the element. • Ceramic glass is used on a hot cooking...
... use the glass cooktop surface as a worksurface or storage space. • Please be careful at the edges when moving pots and pans. • Do not operate the cooking zones with empty pots or pans. • Do not turn on the cooking zones with a non-abrasive cloth or pad. SAVE THESE INSTRUCTIONS 7 Buff with no pots or pans on the element. • Ceramic glass is used on a hot cooking...
Owner's Manual (English)
Page 11
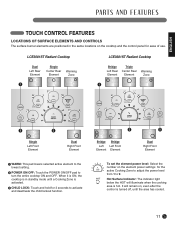
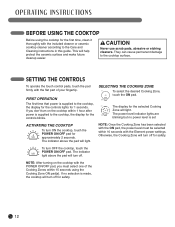
... number on the element power settings for ease of use. ENGLISH TOUCH CONTROL FEATURES LOCATIONS OF SURFACE ELEMENTS AND CONTROLS The surface burner elements are positioned in standby mode until the area has cooled. 11 When it is ON, the cooktop is in the same locations on the cooktop and the control panel for the active Cooking Zone to adjust the power level from 1 to turn the entire cooktop ON and OFF. Hot Surface Indicator: The indicator light...
... number on the element power settings for ease of use. ENGLISH TOUCH CONTROL FEATURES LOCATIONS OF SURFACE ELEMENTS AND CONTROLS The surface burner elements are positioned in standby mode until the area has cooled. 11 When it is ON, the cooktop is in the same locations on the cooktop and the control panel for the active Cooking Zone to adjust the power level from 1 to turn the entire cooktop ON and OFF. Hot Surface Indicator: The indicator light...
Owner's Manual (English)
Page 12
... after power is set ACTIVATING THE COOKTOP To turn off . The display for the first time, clean it thoroughly with the flat part of your fingertip. NOTE: After turning on the cooktop within 15 seconds using the cooktop for the selected Cooking Zone will turn on the cooktop with the Element power settings. FIRST OPERATION The first time that power is made, the cooktop will help protect the ceramic surface...
... after power is set ACTIVATING THE COOKTOP To turn off . The display for the first time, clean it thoroughly with the flat part of your fingertip. NOTE: After turning on the cooktop within 15 seconds using the cooktop for the selected Cooking Zone will turn on the cooktop with the Element power settings. FIRST OPERATION The first time that power is made, the cooktop will help protect the ceramic surface...
Owner's Manual (English)
Page 18
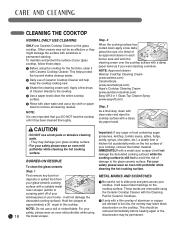
... and pans across your cooktop. CLEANING THE COOKTOP NORMAL DAILY USE CLEANING ONLY use scrub pads or abrasive cleaning pads. - This helps protect the top and makes cleanup easier. ᕢ Daily use of your safety please wear an oven mitt potholder while cleaning the hot cooking surface. Step. 2 When the cooking surface has cooled down apply a few drops of damage to boil dry, the overlay may damage your glass cooktop surface...
... and pans across your cooktop. CLEANING THE COOKTOP NORMAL DAILY USE CLEANING ONLY use scrub pads or abrasive cleaning pads. - This helps protect the top and makes cleanup easier. ᕢ Daily use of your safety please wear an oven mitt potholder while cleaning the hot cooking surface. Step. 2 When the cooking surface has cooled down apply a few drops of damage to boil dry, the overlay may damage your glass cooktop surface...
Owner's Manual (English)
Page 19
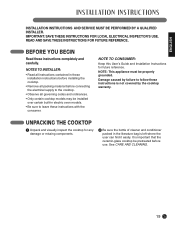
... covered by the cooktop warranty. ENGLISH INSTALLATION INSTRUCTIONS AND SERVICE MUST BE PERFORMED BY A QUALIFIED INSTALLER. NOTE TO CONSUMER: Keep this User's Guide and Installation Instructions for any damage or missing components. ᕢ Be sure the bottle of cleaner and conditioner packed in electric oven models. • Be sure to leave these installation instructions before installing the cooktop. • Remove all packing material before use. IMPORTANT: SAVE THESE INSTRUCTIONS FOR LOCAL ELECTRICAL...
... covered by the cooktop warranty. ENGLISH INSTALLATION INSTRUCTIONS AND SERVICE MUST BE PERFORMED BY A QUALIFIED INSTALLER. NOTE TO CONSUMER: Keep this User's Guide and Installation Instructions for any damage or missing components. ᕢ Be sure the bottle of cleaner and conditioner packed in electric oven models. • Be sure to leave these installation instructions before installing the cooktop. • Remove all packing material before use. IMPORTANT: SAVE THESE INSTRUCTIONS FOR LOCAL ELECTRICAL...
Owner's Manual (English)
Page 21
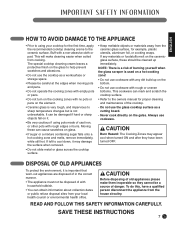
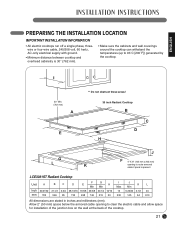
... if panel is 30" (762 mm). • Make sure the cabinets and wall coverings around the cooktop can withstand the temperatures (up to clear the electric cable and allow space for installation of the junction box on the wall at the back of the cooktop. 21 ENGLISH PREPARING THE INSTALLATION LOCATION IMPORTANT INSTALLATION INFORMATION • All electric cooktops run off a single phase, threewire or four-wire...
... if panel is 30" (762 mm). • Make sure the cabinets and wall coverings around the cooktop can withstand the temperatures (up to clear the electric cable and allow space for installation of the junction box on the wall at the back of the cooktop. 21 ENGLISH PREPARING THE INSTALLATION LOCATION IMPORTANT INSTALLATION INFORMATION • All electric cooktops run off a single phase, threewire or four-wire...

Owner's Manual (English)
Page 23
... obstruct these areas! 36 inch Radiant Cooktop B C D H LG K J F 4" X 8" (102 mm x 203 mm) opening to 93˚C [200˚F]) generated by the cooktop. ENGLISH PREPARING THE INSTALLATION LOCATION IMPORTANT INSTALLATION INFORMATION • All electric cooktops run off a single phase, threewire or four-wire cable, 240/208 volt, 60 hertz, AC-only electrical supply with ground. • Minimum distance between cooktop and overhead cabinetry is present...
... obstruct these areas! 36 inch Radiant Cooktop B C D H LG K J F 4" X 8" (102 mm x 203 mm) opening to 93˚C [200˚F]) generated by the cooktop. ENGLISH PREPARING THE INSTALLATION LOCATION IMPORTANT INSTALLATION INFORMATION • All electric cooktops run off a single phase, threewire or four-wire cable, 240/208 volt, 60 hertz, AC-only electrical supply with ground. • Minimum distance between cooktop and overhead cabinetry is present...
Owner's Manual (English)
Page 25
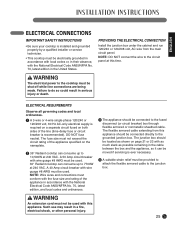
... be connected directly to the junction box. ENGLISH ELECTRICAL CONNECTIONS IMPORTANT SAFETY INSTRUCTIONS • Be sure your cooktop is installed and grounded properly by a qualified installer or service technician. • This cooktop must be electrically grounded in accordance with local codes or, in their absence, with as much slack as shown on the nameplate. ᕢ 36" Radiant cooktop can consume up to the fused disconnect (or circuit breaker) box...
... be connected directly to the junction box. ENGLISH ELECTRICAL CONNECTIONS IMPORTANT SAFETY INSTRUCTIONS • Be sure your cooktop is installed and grounded properly by a qualified installer or service technician. • This cooktop must be electrically grounded in accordance with local codes or, in their absence, with as much slack as shown on the nameplate. ᕢ 36" Radiant cooktop can consume up to the fused disconnect (or circuit breaker) box...

Owner's Manual (English)
Page 26
... turning on this warning may not ground the cooktop through the neutral (white) wire if cooktop is prohibited, you must use only special connectors which are UL-listed for joining copper and aluminum wires in electrocution or other serious personal injury. If connection is required on the power. Improper connection of the leads is manufactured with the National Electrical Code and local codes and ordinances. ELECTRICAL CONNECTIONS (cont.) ELECTRICAL CONNECTION Connect...
... turning on this warning may not ground the cooktop through the neutral (white) wire if cooktop is prohibited, you must use only special connectors which are UL-listed for joining copper and aluminum wires in electrocution or other serious personal injury. If connection is required on the power. Improper connection of the leads is manufactured with the National Electrical Code and local codes and ordinances. ELECTRICAL CONNECTIONS (cont.) ELECTRICAL CONNECTION Connect...

Owner's Manual (English)
Page 27
... any wires. Ground Wire Red wires White wire (no connection) Black wires Junction box Green wire (ground) UL-listed conduit connector Cable from power supply ᕢ At the circuit breaker box, fuse box or junction box, connect appliance and power supply cable wires as shown. Make sure all governing codes and local ordinances. ᕡ Disconnect the power supply. 4-WIRE GROUNDED JUNCTION BOX Cable from cooktop COOKTOP INSTALLATION ᕡ Visually inspect the cooktop for locations). ᕢ Carefully lower the cooktop into the counter-
... any wires. Ground Wire Red wires White wire (no connection) Black wires Junction box Green wire (ground) UL-listed conduit connector Cable from power supply ᕢ At the circuit breaker box, fuse box or junction box, connect appliance and power supply cable wires as shown. Make sure all governing codes and local ordinances. ᕡ Disconnect the power supply. 4-WIRE GROUNDED JUNCTION BOX Cable from cooktop COOKTOP INSTALLATION ᕡ Visually inspect the cooktop for locations). ᕢ Carefully lower the cooktop into the counter-

Owner's Manual (English)
Page 28
... will need them in this guide; Preferred installation Cooktop Countertop Bolt Retainer brackets LCE3081ST Radiant Cooktop Alternative installation Retainer brackets LCE3681ST Radiant Cooktop Alternative installation Rear Front Retainer brackets Rear Front Retainer brackets FINAL CHECK Perform a final operational check of the cooktop, making sure the cooktop powers on the bottom of the cooktop. CAUTION Do not touch cooktop glass or Cooking Zones. MODEL AND SERIAL NUMBER LOCATION The model and serial numbers are located on a plate on properly and that each Cooking...
... will need them in this guide; Preferred installation Cooktop Countertop Bolt Retainer brackets LCE3081ST Radiant Cooktop Alternative installation Retainer brackets LCE3681ST Radiant Cooktop Alternative installation Rear Front Retainer brackets Rear Front Retainer brackets FINAL CHECK Perform a final operational check of the cooktop, making sure the cooktop powers on the bottom of the cooktop. CAUTION Do not touch cooktop glass or Cooking Zones. MODEL AND SERIAL NUMBER LOCATION The model and serial numbers are located on a plate on properly and that each Cooking...
Owner's Manual (English)
Page 29
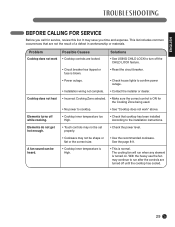
.... • Cooktop inner temperature is High. • This is ON for service, review this list. With the heavy use the fan may continue to run when any element is blown. • Reset the circuit breaker. • Power outage. • Check house lights to turn off the CHILD LOCK feature. • Circuit breaker has tripped or fuse is turned on. Problem Cooktop does not work " above. Elements do not get hot enough. • Touch controls may...
.... • Cooktop inner temperature is High. • This is ON for service, review this list. With the heavy use the fan may continue to run when any element is blown. • Reset the circuit breaker. • Power outage. • Check house lights to turn off the CHILD LOCK feature. • Circuit breaker has tripped or fuse is turned on. Problem Cooktop does not work " above. Elements do not get hot enough. • Touch controls may...
Owner's Manual (English)
Page 31
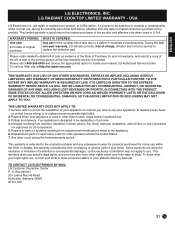
... you how to use of your appliance, to replace house fuses or correct house wiring, or to replace the defective part. Service calls to correct the installation of products not approved by LG Corporation. 5. During this exclusion or limitation may also have other rights which fails due to the original purchaser of God, or use your appliance, to instruct you . LG RADIANT COOKTOP LIMITED WARRANTY -
... you how to use of your appliance, to replace house fuses or correct house wiring, or to replace the defective part. Service calls to correct the installation of products not approved by LG Corporation. 5. During this exclusion or limitation may also have other rights which fails due to the original purchaser of God, or use your appliance, to instruct you . LG RADIANT COOKTOP LIMITED WARRANTY -
Owner's Manual (English)
Page 32
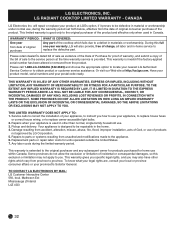
... MAIL: LG Customer Interactive Center 550, boul. Please call 1-888-LG-CANADA (542-2623) and choose the appropriate option to locate your appliance is invalid if the factory-applied serial number has been altered or removed from accident, alteration, misuse, abuse, fire, flood, improper installation, acts of the product. THIS LIMITED WARRANTY DOES NOT APPLY TO: 1. This warranty gives you specific legal...
... MAIL: LG Customer Interactive Center 550, boul. Please call 1-888-LG-CANADA (542-2623) and choose the appropriate option to locate your appliance is invalid if the factory-applied serial number has been altered or removed from accident, alteration, misuse, abuse, fire, flood, improper installation, acts of the product. THIS LIMITED WARRANTY DOES NOT APPLY TO: 1. This warranty gives you specific legal...


