Owners Manual
Page 1
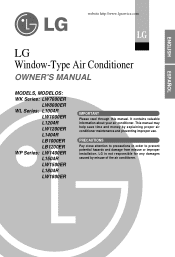
... damage from misuse or improper installation. It contains valuable information about your air conditioner. website http://www.lgservice.com ENGLISH ESPAÑOL LG LG Window-Type Air Conditioner OWNER'S MANUAL MODELS, MODELOS: WK Series: LW7000ER LW8000ER WL Series: L1004R LW1000ER L1204R LW1200ER L1404R LB1000ER LB1200ER WP Series: LW1400ER L1504R LW1500ER L1804R LW1800ER IMPORTANT Please read through...
... damage from misuse or improper installation. It contains valuable information about your air conditioner. website http://www.lgservice.com ENGLISH ESPAÑOL LG LG Window-Type Air Conditioner OWNER'S MANUAL MODELS, MODELOS: WK Series: LW7000ER LW8000ER WL Series: L1004R LW1000ER L1204R LW1200ER L1404R LB1000ER LB1200ER WP Series: LW1400ER L1504R LW1500ER L1804R LW1800ER IMPORTANT Please read through...
Owners Manual
Page 2
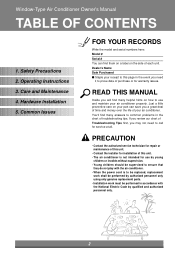
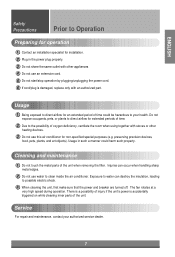
...helpful hints on how to prove date of troubleshooting tips. Hardware Installation 5. Dealer's Name Date Purchased s Staple your air conditioner. Care and Maintenance 4. READ THIS MANUAL Inside you need to common problems in the chart of purchase or for use and ...for installation of each unit. PRECAUTION • Contact the authorized service technician for repair or maintenance of this unit. • The air conditioner is to be replaced, replacement work shall be performed by authorized personnel only using only genuine replacement parts. • Installation work must...
...helpful hints on how to prove date of troubleshooting tips. Hardware Installation 5. Dealer's Name Date Purchased s Staple your air conditioner. Care and Maintenance 4. READ THIS MANUAL Inside you need to common problems in the chart of purchase or for use and ...for installation of each unit. PRECAUTION • Contact the authorized service technician for repair or maintenance of this unit. • The air conditioner is to be replaced, replacement work shall be performed by authorized personnel only using only genuine replacement parts. • Installation work must...
Owners Manual
Page 5
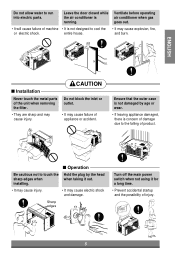
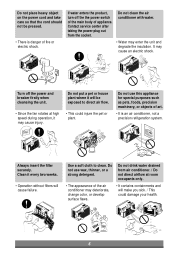
... water to touch the sharp edges when installing. and burn. s Operation Be cautious not to run into electric parts. Leave the door closed while the air conditioner is not designed to the falling of the unit when removing the filter. Do not block the inlet or outlet. • They are sharp and... not damaged by the head when taking it for a long time. • Prevent accidental startup and the possibility of appliance or accident. Ventilate before operating air conditioner when gas goes out. • It will cause failure of machine • It is running.
... water to touch the sharp edges when installing. and burn. s Operation Be cautious not to run into electric parts. Leave the door closed while the air conditioner is not designed to the falling of the unit when removing the filter. Do not block the inlet or outlet. • They are sharp and... not damaged by the head when taking it for a long time. • Prevent accidental startup and the possibility of appliance or accident. Ventilate before operating air conditioner when gas goes out. • It will cause failure of machine • It is running.
Owners Manual
Page 6
... the filter securely. Do not drink water drained from the socket. Do not clean the air conditioner with water. • Water may cause an electric shock. Clean it will be pressed. • There is an air conditioner, not a precision refrigeration system. Do not use this appliance for special purposes such as ...plant. It may enter the unit and degrade the insulation. Turn off the the power switch of the main body of the air conditioner may cause injury. • This could damage your health. Wax Thinner 6 Contact service center after taking the power-plug out from...
... the filter securely. Do not drink water drained from the socket. Do not clean the air conditioner with water. • Water may cause an electric shock. Clean it will be pressed. • There is an air conditioner, not a precision refrigeration system. Do not use this appliance for special purposes such as ...plant. It may enter the unit and degrade the insulation. Turn off the the power switch of the main body of the air conditioner may cause injury. • This could damage your health. Wax Thinner 6 Contact service center after taking the power-plug out from...
Owners Manual
Page 7
...for installation. 2 Plug in such a manner could be hazardous to direct airflow for an extended period of time. 2 Due to clean inside the air conditioner. The fan rotates at a very high speed during operation. Do not expose occupants, pets, or plants to direct airflow for non-specified special purposes...cleaning inner parts of injury if the unit's power is damaged, replace only with stoves or other heating devices. 3 Do not use this air conditioner for extended periods of time could harm such property. Usage in the power plug properly. 3 Do not share the same outlet with other ...
...for installation. 2 Plug in such a manner could be hazardous to direct airflow for an extended period of time. 2 Due to clean inside the air conditioner. The fan rotates at a very high speed during operation. Do not expose occupants, pets, or plants to direct airflow for non-specified special purposes...cleaning inner parts of injury if the unit's power is damaged, replace only with stoves or other heating devices. 3 Do not use this air conditioner for extended periods of time could harm such property. Usage in the power plug properly. 3 Do not share the same outlet with other ...
Owners Manual
Page 9
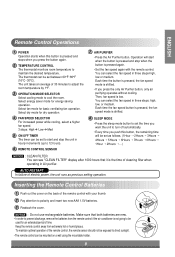
... display after 1000 hours that both batteries are new. • In order to prevent discharge, remove the batteries from the remote control if the air conditioner is not going to be used for dry operation. 4 FAN SPEED SELECTOR For increased power while cooling, select a higher fan speed. 3 steps...You can be set the time you want the unit to turn off automatically. • Every time you press the only Air Purifier button, only air purifying operates without cooling. ENGLISH Remote Control Operations 1 POWER Operation starts when this button, the remaining time will start and stop...
... display after 1000 hours that both batteries are new. • In order to prevent discharge, remove the batteries from the remote control if the air conditioner is not going to be used for dry operation. 4 FAN SPEED SELECTOR For increased power while cooling, select a higher fan speed. 3 steps...You can be set the time you want the unit to turn off automatically. • Every time you press the only Air Purifier button, only air purifying operates without cooling. ENGLISH Remote Control Operations 1 POWER Operation starts when this button, the remaining time will start and stop...
Owners Manual
Page 10
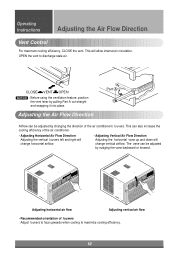
... OPEN NOTICE : Before using the ventilation feature, position the vent lever by changing the direction of the air conditioner's louvers. Adjusting the Air Flow Direction Part A Airflow can be adjusted by nudging the vane backward or forward. The vane can...cooling efficiency of louvers Adjust louvers to face upwards when cooling to discharge stale air. Adjusting horizontal air flow Adjusting vertical air flow • Recommended orientation of the air conditioner. • Adjusting Horizontal Air Flow Direction Adjusting the vertical louvers left and right will change vertical airflow....
... OPEN NOTICE : Before using the ventilation feature, position the vent lever by changing the direction of the air conditioner's louvers. Adjusting the Air Flow Direction Part A Airflow can be adjusted by nudging the vane backward or forward. The vane can...cooling efficiency of louvers Adjust louvers to face upwards when cooling to discharge stale air. Adjusting horizontal air flow Adjusting vertical air flow • Recommended orientation of the air conditioner. • Adjusting Horizontal Air Flow Direction Adjusting the vertical louvers left and right will change vertical airflow....
Owners Manual
Page 11
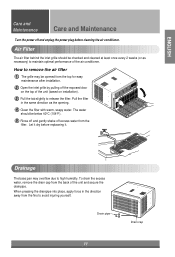
The water should be opened from the back of the air conditioner. Let it . ENGLISH Care and Maintenance Care and Maintenance Turn... opening. 4 Clean the filter with warm, soapy water. Drain pipe 11 Drain cap How to remove the air filter 1 The grille may overflow due to maintain optimal performance of the unit and secure the drainpipe. When...to high humidity. Air Filter The air filter behind the inlet grille should be below 40°C (104°F). 5 Rinse off and gently shake off and unplug the power plug before replaceing it dry before cleaning the air conditioner.
The water should be opened from the back of the air conditioner. Let it . ENGLISH Care and Maintenance Care and Maintenance Turn... opening. 4 Clean the filter with warm, soapy water. Drain pipe 11 Drain cap How to remove the air filter 1 The grille may overflow due to maintain optimal performance of the unit and secure the drainpipe. When...to high humidity. Air Filter The air filter behind the inlet grille should be below 40°C (104°F). 5 Rinse off and gently shake off and unplug the power plug before replaceing it dry before cleaning the air conditioner.
Owners Manual
Page 12
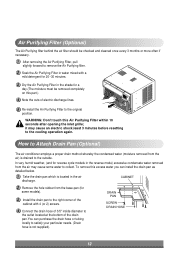
...Drain hose is not supplied). To remove this Air Purifying Filter within 10 seconds after opening the inlet grille; RHeomwototeACttoancthroDl rOapinerPaatinon(Osptional) The air conditioner employs a proper drain method whereby the condensed water (moisture removed from the air may cause an electric shock.least 3 minutes ... a day.(The moisture must be removed completely on this part.) 4 Note the cuts of electric discharge lines. 5 Re-install the Air Purifying Filter to the original position. it may cause some models). 3 Install the drain pan to the right corner of the cabinet...
...Drain hose is not supplied). To remove this Air Purifying Filter within 10 seconds after opening the inlet grille; RHeomwototeACttoancthroDl rOapinerPaatinon(Osptional) The air conditioner employs a proper drain method whereby the condensed water (moisture removed from the air may cause an electric shock.least 3 minutes ... a day.(The moisture must be removed completely on this part.) 4 Note the cuts of electric discharge lines. 5 Re-install the Air Purifying Filter to the original position. it may cause some models). 3 Install the drain pan to the right corner of the cabinet...
Owners Manual
Page 14
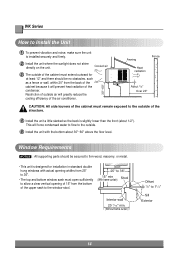
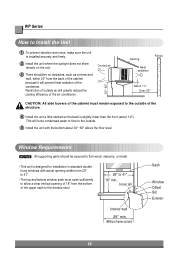
...the outside. 5 Install the unit with actual opening of 15" from the back of the cabinet because it will prevent heat radiation of the air conditioner. Awning Fence Heat radiation About 1/2" Over 20" CAUTION: All side louvers of the cabinet must remain exposed to the outside of the cabinet...unit is designed for installation in standard double hung windows with the bottom about 1/2"). This will greatly reduce the cooling efficiency of the condenser. Cooled air 30"~60" 3 The outside of the upper sash to the window stool. 25" to 36" 15" min (With frame curtain) Stool Interior...
...the outside. 5 Install the unit with actual opening of 15" from the back of the cabinet because it will prevent heat radiation of the air conditioner. Awning Fence Heat radiation About 1/2" Over 20" CAUTION: All side louvers of the cabinet must remain exposed to the outside of the cabinet...unit is designed for installation in standard double hung windows with the bottom about 1/2"). This will greatly reduce the cooling efficiency of the condenser. Cooled air 30"~60" 3 The outside of the upper sash to the window stool. 25" to 36" 15" min (With frame curtain) Stool Interior...
Owners Manual
Page 15
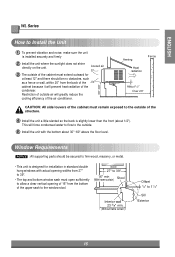
...unit is designed for at least 12" and there should be no obstacles, such as a fence or wall, within 20" from the bottom of the air conditioner. Cooled air 30"~60" 3 The outside . 5 Install the unit with actual opening widths from 27" to 39". • The top and bottom window sash must... the window stool. 27" to 39" 16" min (With frame curtain) Stool Interior wall 23 5/8" min. (Without frame curtain) Offset 1/2" to the outside air will prevent heat radiation of the structure. 4 Install the unit a little slanted so the back is slightly lower than the front (about 30"~60" above...
...unit is designed for at least 12" and there should be no obstacles, such as a fence or wall, within 20" from the bottom of the air conditioner. Cooled air 30"~60" 3 The outside . 5 Install the unit with actual opening widths from 27" to 39". • The top and bottom window sash must... the window stool. 27" to 39" 16" min (With frame curtain) Stool Interior wall 23 5/8" min. (Without frame curtain) Offset 1/2" to the outside air will prevent heat radiation of the structure. 4 Install the unit a little slanted so the back is slightly lower than the front (about 30"~60" above...
Owners Manual
Page 16
... the back of the cabinet because it will greatly reduce the cooling efficiency of the air conditioner. Inner sill Interior wall 29" min. (Without frame curtain) Sash Window Offset Sill Exterior 16 Restriction of outside air will prevent heat radiation of the condenser. WP Series How to the outside of the... structure. 4 Install the unit a little slanted so the back is slightly lower than the front (about 30"~60" above the floor level. Cooled air 30"~60" 3 There should be no obstacles, such as a fence and wall, within 20" from the bottom of the upper sash to the window...
... the back of the cabinet because it will greatly reduce the cooling efficiency of the air conditioner. Inner sill Interior wall 29" min. (Without frame curtain) Sash Window Offset Sill Exterior 16 Restriction of outside air will prevent heat radiation of the condenser. WP Series How to the outside of the... structure. 4 Install the unit a little slanted so the back is slightly lower than the front (about 30"~60" above the floor level. Cooled air 30"~60" 3 There should be no obstacles, such as a fence and wall, within 20" from the bottom of the upper sash to the window...

Owners Manual
Page 20
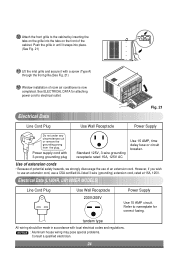
12 Attach the Window Locking Bracket with a Type A screw through the front grille. (See Fig. 11) 15 Window installation of the cabinet. See ELECTRICAL DATA for attaching power cord to the cabinet by inserting the tabs on the grille into place. (See Fig. 10) 14 Pull down the inlet grille and secure it with a Type C screw . (See Fig. 9) 13 Attach the front grille to electrical outlet. Push the grille in until it snaps into the tabs on the front of room air conditioner is now completed. Window locking bracket 12 Fig. 9 Fig. 10 Fig. 11 20
12 Attach the Window Locking Bracket with a Type A screw through the front grille. (See Fig. 11) 15 Window installation of the cabinet. See ELECTRICAL DATA for attaching power cord to the cabinet by inserting the tabs on the grille into place. (See Fig. 10) 14 Pull down the inlet grille and secure it with a Type C screw . (See Fig. 9) 13 Attach the front grille to electrical outlet. Push the grille in until it snaps into the tabs on the front of room air conditioner is now completed. Window locking bracket 12 Fig. 9 Fig. 10 Fig. 11 20
Owners Manual
Page 24
... Window installation of an extension cord. 10 Attach the front grille to nameplate for attaching power cord to use an extension cord, use of room air conditioner is now completed.
... Window installation of an extension cord. 10 Attach the front grille to nameplate for attaching power cord to use an extension cord, use of room air conditioner is now completed.
Owners Manual
Page 27
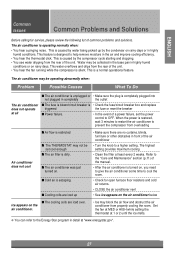
... compressor from properly cooling the room. This feature is a normal operational feature. Water may block the air flow and obstruct the air conditioner from overloading Air conditioner does not cool s Air flow is caused by water being picked up • Make sure there are iced up by the ...sure the plug is completely plugged into not plugged in highly humid conditions or on the air conditioner below s The cooling coils are iced over. s The air conditioner was just turned on the air conditioner. • Ice may be collected in the base pan in completely the outlet s The...
... compressor from properly cooling the room. This feature is a normal operational feature. Water may block the air flow and obstruct the air conditioner from overloading Air conditioner does not cool s Air flow is caused by water being picked up • Make sure there are iced up by the ...sure the plug is completely plugged into not plugged in highly humid conditions or on the air conditioner below s The cooling coils are iced over. s The air conditioner was just turned on the air conditioner. • Ice may be collected in the base pan in completely the outlet s The...
Owners Manual
Page 28
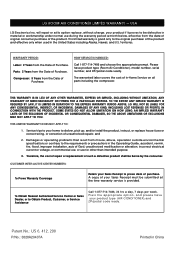
... WARRANTY DOES NOT APPLY TO: 1. and 2. Press the appropriate option, and please have product type (Room Air Conditioner), model number, serial number, and ZIP/postal code ready. Compressor: 5 Years from the Date of Purchase. CUSTOMER...commercial use, or use during the warranty period set forth below, effective from the Date of your product type (AIR CONDITIONER),and ZIP/postal code ready. P/No.: 3828A20437A Printed in material or workmanship under normal use for other than ...TO THE EXPRESS WARRANTY PERIOD ABOVE. A copy of Purchase. LG ROOM AIR CONDITIONER LIMITED WARRANTY -
... WARRANTY DOES NOT APPLY TO: 1. and 2. Press the appropriate option, and please have product type (Room Air Conditioner), model number, serial number, and ZIP/postal code ready. Compressor: 5 Years from the Date of Purchase. CUSTOMER...commercial use, or use during the warranty period set forth below, effective from the Date of your product type (AIR CONDITIONER),and ZIP/postal code ready. P/No.: 3828A20437A Printed in material or workmanship under normal use for other than ...TO THE EXPRESS WARRANTY PERIOD ABOVE. A copy of Purchase. LG ROOM AIR CONDITIONER LIMITED WARRANTY -


