Owners Manual
Page 1
... installation. LG is not responsible for any damages caused by explaining proper air conditioner maintenance and preventing improper use. This manual may help save time and money by misuse of the air conditioner. It contains valuable information about your air conditioner. website http://www.lgservice.com ENGLISH ESPAÑOL LG LG Window-Type Air Conditioner OWNER'S MANUAL MODELS, MODELOS: WK Series: LW7000ER LW8000ER WL Series: L1004R LW1000ER L1204R LW1200ER L1404R LB1000ER LB1200ER...
... installation. LG is not responsible for any damages caused by explaining proper air conditioner maintenance and preventing improper use. This manual may help save time and money by misuse of the air conditioner. It contains valuable information about your air conditioner. website http://www.lgservice.com ENGLISH ESPAÑOL LG LG Window-Type Air Conditioner OWNER'S MANUAL MODELS, MODELOS: WK Series: LW7000ER LW8000ER WL Series: L1004R LW1000ER L1204R LW1200ER L1404R LB1000ER LB1200ER...
Owners Manual
Page 2
... only using only genuine replacement parts. • Installation work must be supervised to use by young children or invalids without supervision. • Young children should be performed in the chart of each unit. You'll find them on a label on how to ensure that they do not play with the National Electric Code by qualified and authorized personnel only. 2 Window-Type Air Conditioner Owner's Manual...
... only using only genuine replacement parts. • Installation work must be supervised to use by young children or invalids without supervision. • Young children should be performed in the chart of each unit. You'll find them on a label on how to ensure that they do not play with the National Electric Code by qualified and authorized personnel only. 2 Window-Type Air Conditioner Owner's Manual...
Owners Manual
Page 5
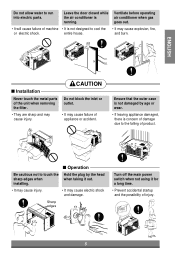
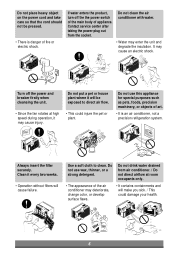
.... 5 Sharp edges Turn off the main power switch when not using it out. • It may cause injury. • It may cause failure of the unit when removing the filter. ENGLISH s Installation CAUTION Never touch the metal parts of appliance or accident. Ventilate before operating air conditioner when gas goes out. • It will cause failure of product. Do not allow water to touch...
.... 5 Sharp edges Turn off the main power switch when not using it out. • It may cause injury. • It may cause failure of the unit when removing the filter. ENGLISH s Installation CAUTION Never touch the metal parts of appliance or accident. Ventilate before operating air conditioner when gas goes out. • It will cause failure of product. Do not allow water to touch...
Owners Manual
Page 6
.... Contact service center after taking the power-plug out from air conditioner. / Do not direct airflow at high speed during operation, it every two weeks. • Operation without filters will be pressed. • There is an air conditioner, not a precision refrigeration system. Turn off the the power switch of the main body of fire or electric shock. Always insert the filter securely. Do not drink water drained from the...
.... Contact service center after taking the power-plug out from air conditioner. / Do not direct airflow at high speed during operation, it every two weeks. • Operation without filters will be pressed. • There is an air conditioner, not a precision refrigeration system. Turn off the the power switch of the main body of fire or electric shock. Always insert the filter securely. Do not drink water drained from the...
Owners Manual
Page 7
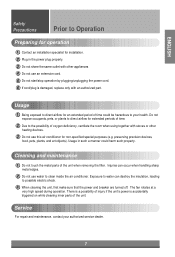
... while cleaning inner parts of oxygen deficiency, ventilate the room when using together with an authorized part. Service For repair and maintenance, contact your health. preserving precision devices, food, pets, plants, and art objects). Cleaning and maintenance 1 Do not touch the metal parts of injury if the unit's power is damaged, replace only with stoves or other heating devices. 3 Do not use water to clean inside the air conditioner. The fan rotates...
... while cleaning inner parts of oxygen deficiency, ventilate the room when using together with an authorized part. Service For repair and maintenance, contact your health. preserving precision devices, food, pets, plants, and art objects). Cleaning and maintenance 1 Do not touch the metal parts of injury if the unit's power is damaged, replace only with stoves or other heating devices. 3 Do not use water to clean inside the air conditioner. The fan rotates...
Owners Manual
Page 8
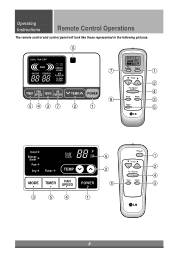
Operating Instructions Remote Control Operations The remote control and control panel will look like those represented in the following pictures. 6 COOL FAN DRY FAN INDOOR DESIRED ENERGY SAVER AIR PURIFIER CLEAN FILTER AIR PURIFIER Air Purifier Power 7 1 Temp 2 Fan Speed TIMER FAN SPEED MODE AIR PURIFIER TEMP POWER 4 Sleep Mode 8 3 54 3 7 2 1 Auto Timer Swing 5 Cool Energy Saver Fan Dry Timer F1 LOW F2 MED F3 HIGH TEMP 3 5 4 ˚F 6 2 5 1 Power 1 Temp 2 Fan Speed 4 Timer Mode 3 8
Operating Instructions Remote Control Operations The remote control and control panel will look like those represented in the following pictures. 6 COOL FAN DRY FAN INDOOR DESIRED ENERGY SAVER AIR PURIFIER CLEAN FILTER AIR PURIFIER Air Purifier Power 7 1 Temp 2 Fan Speed TIMER FAN SPEED MODE AIR PURIFIER TEMP POWER 4 Sleep Mode 8 3 54 3 7 2 1 Auto Timer Swing 5 Cool Energy Saver Fan Dry Timer F1 LOW F2 MED F3 HIGH TEMP 3 5 4 ˚F 6 2 5 1 Power 1 Temp 2 Fan Speed 4 Timer Mode 3 8
Owners Manual
Page 9
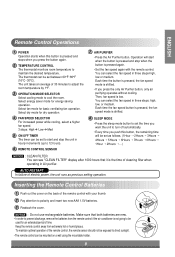
... button. Inserting the Remote Control Batteries 1 Push out the cover on a wall using the mountable holder. 9 You can be mounted on the back of 30 minutes to adjust the room temperature by 1°F. 3 OPERATION MODE SELECTOR Select cooling mode to set between 60°F~86°F (16°C~30°C). Select energy saver mode for basic ventilating fan operation. Then, fan speed is shifted. 8 SLEEP MODE • Press the sleep mode button to cool the room. The thermostat...
... button. Inserting the Remote Control Batteries 1 Push out the cover on a wall using the mountable holder. 9 You can be mounted on the back of 30 minutes to adjust the room temperature by 1°F. 3 OPERATION MODE SELECTOR Select cooling mode to set between 60°F~86°F (16°C~30°C). Select energy saver mode for basic ventilating fan operation. Then, fan speed is shifted. 8 SLEEP MODE • Press the sleep mode button to cool the room. The thermostat...
Owners Manual
Page 10
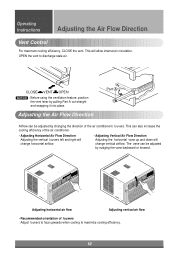
... direction of the air conditioner's louvers. This can also increase the cooling efficiency of louvers Adjust louvers to face upwards when cooling to discharge stale air. OPEN the vent to maximize cooling efficiency. 10 This will change vertical airflow. Adjusting the Air Flow Direction Part A Airflow can be adjusted by pulling Part A out straight and snapping it into place. Operating Instructions Adjusting the Air Flow Direction Vent Control For maximum cooling...
... direction of the air conditioner's louvers. This can also increase the cooling efficiency of louvers Adjust louvers to face upwards when cooling to discharge stale air. OPEN the vent to maximize cooling efficiency. 10 This will change vertical airflow. Adjusting the Air Flow Direction Part A Airflow can be adjusted by pulling Part A out straight and snapping it into place. Operating Instructions Adjusting the Air Flow Direction Vent Control For maximum cooling...
Owners Manual
Page 11
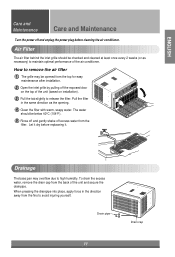
... power plug before replaceing it dry before cleaning the air conditioner. How to remove the air filter 1 The grille may overflow due to maintain optimal performance of the unit and secure the drainpipe. Pull the filter in the direction away from the back of the air conditioner. Drainage The base pan may be checked and cleaned at least once every 2 weeks (or as the opening. 4 Clean the filter with warm, soapy water...
... power plug before replaceing it dry before cleaning the air conditioner. How to remove the air filter 1 The grille may overflow due to maintain optimal performance of the unit and secure the drainpipe. Pull the filter in the direction away from the back of the air conditioner. Drainage The base pan may be checked and cleaned at least once every 2 weeks (or as the opening. 4 Clean the filter with warm, soapy water...
Owners Manual
Page 12
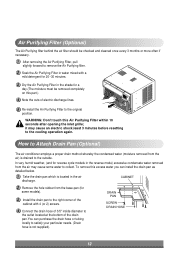
... after opening the inlet grille; it may cause some models). 3 Install the drain pan to the right corner of the cabinet with a mild detergent for 20~30 minutes. 3 Dry the Air Purifying Filter in the air discharge. RHeomwototeACttoancthroDl rOapinerPaatinon(Osptional) The air conditioner employs a proper drain method whereby the condensed water (moisture removed from the air may cause an electric shock.least 3 minutes before resetting to the cooling operation again...
... after opening the inlet grille; it may cause some models). 3 Install the drain pan to the right corner of the cabinet with a mild detergent for 20~30 minutes. 3 Dry the Air Purifying Filter in the air discharge. RHeomwototeACttoancthroDl rOapinerPaatinon(Osptional) The air conditioner employs a proper drain method whereby the condensed water (moisture removed from the air may cause an electric shock.least 3 minutes before resetting to the cooling operation again...
Owners Manual
Page 13
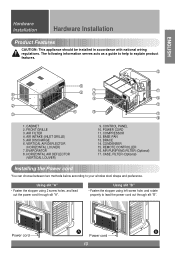
... 8. REMOTE CONTROLLER 16. The following information serves acts as a guide to help to explain product features. 13 6 5 8 1 2 4 3 1. AIR DISCHARGE 6. COMPRESSOR 12. CABINET 2. Using slit "A" • Fasten the stopper using left screw hole, and rotate properly to your window stool shape and preference. POWER CORD 11. FRONT GRILLE 3. ENGLISH Hardware Installation Hardware Installation Product Features CAUTION: This appliance should be installed in accordance with national wiring regulations. BRACE 14. AIR PURIFYING FILTER...
... 8. REMOTE CONTROLLER 16. The following information serves acts as a guide to help to explain product features. 13 6 5 8 1 2 4 3 1. AIR DISCHARGE 6. COMPRESSOR 12. CABINET 2. Using slit "A" • Fasten the stopper using left screw hole, and rotate properly to your window stool shape and preference. POWER CORD 11. FRONT GRILLE 3. ENGLISH Hardware Installation Hardware Installation Product Features CAUTION: This appliance should be installed in accordance with national wiring regulations. BRACE 14. AIR PURIFYING FILTER...
Owners Manual
Page 14
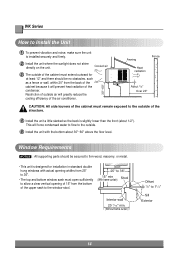
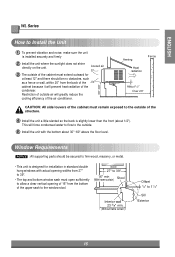
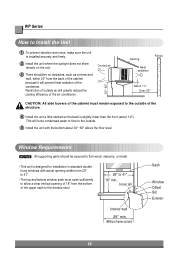
... front (about 30"~60" above the floor level. Cooled air 30"~60" 3 The outside . 5 Install the unit with actual opening of 15" from the back of the cabinet because it will prevent heat radiation of the condenser. Window Requirements NOTICE : All supporting parts should be no obstacles, such as a fence or wall, within 20" from the bottom of the upper sash...
... front (about 30"~60" above the floor level. Cooled air 30"~60" 3 The outside . 5 Install the unit with actual opening of 15" from the back of the cabinet because it will prevent heat radiation of the condenser. Window Requirements NOTICE : All supporting parts should be no obstacles, such as a fence or wall, within 20" from the bottom of the upper sash...
Owners Manual
Page 15
... the bottom of the condenser. Restriction of outside of the air conditioner. This will force condensed water to flow to 11/4" Sill Exterior 15 Cooled air 30"~60" 3 The outside . 5 Install the unit with actual opening of 16" from 27" to 39". • The top and bottom window sash must remain exposed to the outside air will prevent heat radiation of the upper...
... the bottom of the condenser. Restriction of outside of the air conditioner. This will force condensed water to flow to 11/4" Sill Exterior 15 Cooled air 30"~60" 3 The outside . 5 Install the unit with actual opening of 16" from 27" to 39". • The top and bottom window sash must remain exposed to the outside air will prevent heat radiation of the upper...
Owners Manual
Page 16
... and wall, within 20" from 29" to 41". • The top and bottom window sash must remain exposed to the outside air will prevent heat radiation of the upper sash to the window stool. 29" to the outside. 5 Install the unit with actual opening of 18" from the bottom of the condenser. Restriction of outside of the air conditioner. Awning Fence Heat...
... and wall, within 20" from 29" to 41". • The top and bottom window sash must remain exposed to the outside air will prevent heat radiation of the upper sash to the window stool. 29" to the outside. 5 Install the unit with actual opening of 18" from the bottom of the condenser. Restriction of outside of the air conditioner. Awning Fence Heat...

Owners Manual
Page 20
Window locking bracket 12 Fig. 9 Fig. 10 Fig. 11 20 Push the grille in until it snaps into the tabs on the grille into place. (See Fig. 10) 14 Pull down the inlet grille and secure it with a Type C screw . (See Fig. 9) 13 Attach the front grille to electrical outlet. See ELECTRICAL DATA for attaching power cord to the cabinet by inserting the tabs on the front of room air conditioner is now completed. 12 Attach the Window Locking Bracket with a Type A screw through the front grille. (See Fig. 11) 15 Window installation of the cabinet.
Window locking bracket 12 Fig. 9 Fig. 10 Fig. 11 20 Push the grille in until it snaps into the tabs on the grille into place. (See Fig. 10) 14 Pull down the inlet grille and secure it with a Type C screw . (See Fig. 9) 13 Attach the front grille to electrical outlet. See ELECTRICAL DATA for attaching power cord to the cabinet by inserting the tabs on the front of room air conditioner is now completed. 12 Attach the Window Locking Bracket with a Type A screw through the front grille. (See Fig. 11) 15 Window installation of the cabinet.

Owners Manual
Page 22
... of the window stool between the side window stop moldings. Cabinet Installation 1 Open the window. Sill Bracket 3 Carriage Bolt 9 Support Bracket 2 Lock nut 4 Fig. 12 2 Attach the sill bracket to operate with a very slight tilt downward toward the outside. Window sash Upper Guide Foam -Seal 11 Cabinet Frame curtain Foam-PE 14 Fig. 15 22 Attach the cabinet to the cabinet track hole. Be sure...
... of the window stool between the side window stop moldings. Cabinet Installation 1 Open the window. Sill Bracket 3 Carriage Bolt 9 Support Bracket 2 Lock nut 4 Fig. 12 2 Attach the sill bracket to operate with a very slight tilt downward toward the outside. Window sash Upper Guide Foam -Seal 11 Cabinet Frame curtain Foam-PE 14 Fig. 15 22 Attach the cabinet to the cabinet track hole. Be sure...
Owners Manual
Page 24
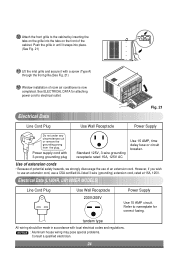
... cut or remove the grounding prong from the plug. Electrical Data (L1804R, LW1800ER MODELS) Line Cord Plug Use Wall Receptacle 230V/208V Power Supply Use 15 AMP circuit. NOTICE : Aluminum house wiring may pose special problems. Consult a qualified electrician. 24 Power supply cord with local electrical codes and regulations. Refer to electrical outlet. tandem type All wirring should be made in until it snaps into the tabs on the grille into...
... cut or remove the grounding prong from the plug. Electrical Data (L1804R, LW1800ER MODELS) Line Cord Plug Use Wall Receptacle 230V/208V Power Supply Use 15 AMP circuit. NOTICE : Aluminum house wiring may pose special problems. Consult a qualified electrician. 24 Power supply cord with local electrical codes and regulations. Refer to electrical outlet. tandem type All wirring should be made in until it snaps into the tabs on the grille into...

Owners Manual
Page 25
... terminal. Ensure proper ground exists before use an adapter plug in the adapter must be replaced by a qualified electrician to use an extension cord, use of potential safety hazards, we strongly discourage the use an adapter, a TEMPORARY CONNECTION may be made. B. The wall power outlet should have the circuit checked by a qualified electrician to the wall receptacle cover screw does not ground the appliance unless...
... terminal. Ensure proper ground exists before use an adapter plug in the adapter must be replaced by a qualified electrician to use an extension cord, use of potential safety hazards, we strongly discourage the use an adapter, a TEMPORARY CONNECTION may be made. B. The wall power outlet should have the circuit checked by a qualified electrician to the wall receptacle cover screw does not ground the appliance unless...
Owners Manual
Page 27
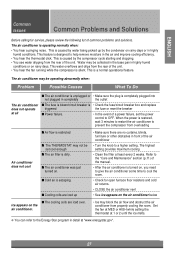
... s The fuse is blown/circuit breaker is • Check the fuse/circuit breaker box and replace triggered the fuse or reset the breaker s Power failure. • In the event of a power failure, set cool enough s The air filter is turned on, you need to give the air conditioner some time to cool the room. • Check for service, please review the following list of common problems and solutions. Set the fan at MED or HIGH while setting the thermostat at...
... s The fuse is blown/circuit breaker is • Check the fuse/circuit breaker box and replace triggered the fuse or reset the breaker s Power failure. • In the event of a power failure, set cool enough s The air filter is turned on, you need to give the air conditioner some time to cool the room. • Check for service, please review the following list of common problems and solutions. Set the fan at MED or HIGH while setting the thermostat at...
Owners Manual
Page 28
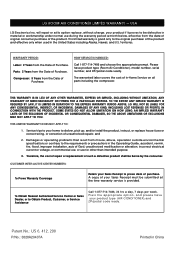
... install the product, instruct, or replace house fuses or correct wiring, or correction of Purchase. To Obtain Nearest Authorized Service Center or Sales Dealer, or to the original purchaser of Purchase. LG ROOM AIR CONDITIONER LIMITED WARRANTY - WARRANTY PERIOD: Labor: 2 Years from the Date of In-Home Service on all parts including the compressor. Service trips to your product type (AIR CONDITIONER),and ZIP/postal code ready. and 2. Therefore, the cost of repair or replacement...
... install the product, instruct, or replace house fuses or correct wiring, or correction of Purchase. To Obtain Nearest Authorized Service Center or Sales Dealer, or to the original purchaser of Purchase. LG ROOM AIR CONDITIONER LIMITED WARRANTY - WARRANTY PERIOD: Labor: 2 Years from the Date of In-Home Service on all parts including the compressor. Service trips to your product type (AIR CONDITIONER),and ZIP/postal code ready. and 2. Therefore, the cost of repair or replacement...


