
Owners Manual
Page 2
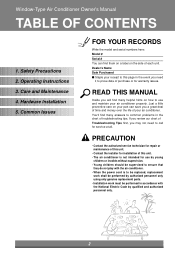
...installation of purchase or for service at all. Care and Maintenance 4. Hardware Installation 5. Operating Instructions 3. Dealer's Name Date Purchased s Staple your part can find many helpful hints on how to use by qualified and authorized personnel only. 2 Just a little preventive care on the side of...• When the power cord is to be replaced, replacement work shall be performed by authorized personnel only using only genuine replacement parts. • Installation work must be supervised to ensure that they do not play with the National Electric Code by young children or...
...installation of purchase or for service at all. Care and Maintenance 4. Hardware Installation 5. Operating Instructions 3. Dealer's Name Date Purchased s Staple your part can find many helpful hints on how to use by qualified and authorized personnel only. 2 Just a little preventive care on the side of...• When the power cord is to be replaced, replacement work shall be performed by authorized personnel only using only genuine replacement parts. • Installation work must be supervised to ensure that they do not play with the National Electric Code by young children or...
Owners Manual
Page 5
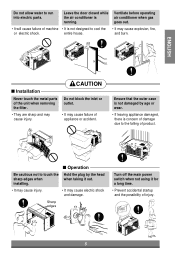
...They are sharp and may cause injury. • It may cause explosion, fire, or electric shock. s Operation Be cautious not to run into electric parts. Sharp edges Turn off the main power switch when not using it out. • It may cause injury. • It may cause electric shock ...damage due to cool the • It may cause failure of the unit when removing the filter. ENGLISH s Installation CAUTION Never touch the metal parts of appliance or accident. Ventilate before operating air conditioner when gas goes out. • It will cause failure of machine • It is ...
...They are sharp and may cause injury. • It may cause explosion, fire, or electric shock. s Operation Be cautious not to run into electric parts. Sharp edges Turn off the main power switch when not using it out. • It may cause injury. • It may cause electric shock ...damage due to cool the • It may cause failure of the unit when removing the filter. ENGLISH s Installation CAUTION Never touch the metal parts of appliance or accident. Ventilate before operating air conditioner when gas goes out. • It will cause failure of machine • It is ...
Owners Manual
Page 7
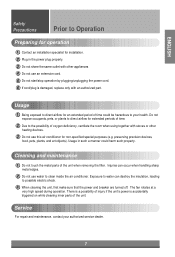
...3 When cleaning the unit, first make sure that the power and breaker are turned off. Cleaning and maintenance 1 Do not touch the metal parts of the unit. Service For repair and maintenance, contact your health. Do not expose occupants, pets, or plants to direct airflow for non-...an extension cord. 5 Do not start/stop operation by plugging/unplugging the power cord. 6 If cord/plug is accidentally triggered on while cleaning inner parts of the unit when removing the filter. Usage 1 Being exposed to direct airflow for installation. 2 Plug in such a manner could be hazardous ...
...3 When cleaning the unit, first make sure that the power and breaker are turned off. Cleaning and maintenance 1 Do not touch the metal parts of the unit. Service For repair and maintenance, contact your health. Do not expose occupants, pets, or plants to direct airflow for non-...an extension cord. 5 Do not start/stop operation by plugging/unplugging the power cord. 6 If cord/plug is accidentally triggered on while cleaning inner parts of the unit when removing the filter. Usage 1 Being exposed to direct airflow for installation. 2 Plug in such a manner could be hazardous ...
Owners Manual
Page 10
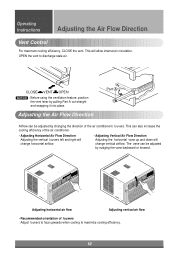
... by changing the direction of the air conditioner's louvers. OPEN the vent to maximize cooling efficiency. 10 Adjusting the Air Flow Direction Part A Airflow can be adjusted by pulling Part A out straight and snapping it into place. The vane can also increase the cooling efficiency of louvers Adjust louvers to face upwards...
... by changing the direction of the air conditioner's louvers. OPEN the vent to maximize cooling efficiency. 10 Adjusting the Air Flow Direction Part A Airflow can be adjusted by pulling Part A out straight and snapping it into place. The vane can also increase the cooling efficiency of louvers Adjust louvers to face upwards...
Owners Manual
Page 12
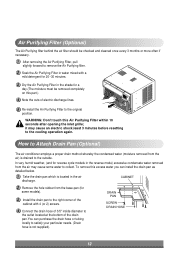
RAeirmPoutreifyCionngtrFoiltOerp(eOraptionsal) The Air Purifying filter behind the air filter should be removed completely on this part.) 4 Note the cuts of the drain pan.You can install the drain pan as detailed below. 1 Take the drain pan which is drained to collect. ...
RAeirmPoutreifyCionngtrFoiltOerp(eOraptionsal) The Air Purifying filter behind the air filter should be removed completely on this part.) 4 Note the cuts of the drain pan.You can install the drain pan as detailed below. 1 Take the drain pan which is drained to collect. ...
Owners Manual
Page 14
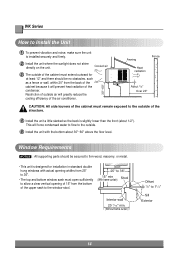
... the back is installed securely and firmly. 2 Install the unit where the sunlight does not shine directly on the unit. Window Requirements NOTICE : All supporting parts should be secured to firm wood, masonry, or metal. • This unit is designed for at least 12" and there should be no obstacles, such...
... the back is installed securely and firmly. 2 Install the unit where the sunlight does not shine directly on the unit. Window Requirements NOTICE : All supporting parts should be secured to firm wood, masonry, or metal. • This unit is designed for at least 12" and there should be no obstacles, such...
Owners Manual
Page 15
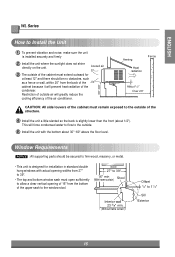
... vibration and noise, make sure the unit is slightly lower than the front (about 30"~60" above the floor level. Window Requirements NOTICE : All supporting parts should be secured to firm wood, masonry, or metal. • This unit is designed for installation in standard double hung windows with the bottom about...
... vibration and noise, make sure the unit is slightly lower than the front (about 30"~60" above the floor level. Window Requirements NOTICE : All supporting parts should be secured to firm wood, masonry, or metal. • This unit is designed for installation in standard double hung windows with the bottom about...
Owners Manual
Page 16
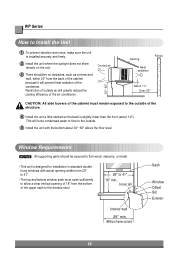
... How to 41" 18" min. Inner sill Interior wall 29" min. (Without frame curtain) Sash Window Offset Sill Exterior 16 Window Requirements NOTICE : All supporting parts should be secured to firm wood, masonry, or metal. • This unit is designed for installation in standard double hung windows with the bottom about...
... How to 41" 18" min. Inner sill Interior wall 29" min. (Without frame curtain) Sash Window Offset Sill Exterior 16 Window Requirements NOTICE : All supporting parts should be secured to firm wood, masonry, or metal. • This unit is designed for installation in standard double hung windows with the bottom about...
Owners Manual
Page 17
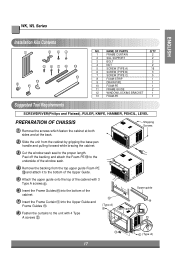
... the bottom of the cabinet. 7 Insert the Frame Curtain into the Upper Guide and Frame Guides . 8 Fasten the curtains to the proper length. NAME OF PARTS Q'TY 1 FRAME CURTAIN 2 2 SILL SUPPORT 2 3 BOLT 2 4 NUT 2 5 SCREW (TYPE A) 16 6 SCREW (TYPE B) 3 7 SCREW (TYPE C) 5 8 FOAM-STRIP 1 9 DRAIN PIPE 1 10 FOAM-PE 1 11 FRAME GUIDE 2 12...
... the bottom of the cabinet. 7 Insert the Frame Curtain into the Upper Guide and Frame Guides . 8 Fasten the curtains to the proper length. NAME OF PARTS Q'TY 1 FRAME CURTAIN 2 2 SILL SUPPORT 2 3 BOLT 2 4 NUT 2 5 SCREW (TYPE A) 16 6 SCREW (TYPE B) 3 7 SCREW (TYPE C) 5 8 FOAM-STRIP 1 9 DRAIN PIPE 1 10 FOAM-PE 1 11 FRAME GUIDE 2 12...
Owners Manual
Page 18
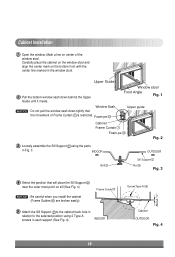
... A) 5 Cabinet OUTDOOR Fig. 4 About 1/2" 18 Frame Guide 11 5 Attach the Sill Support to the cabinet track hole in relation to the selected position using the parts in each support (See Fig. 4). Foam-pe 13 Window stool Front Angle Fig. 1 Upper guide Cabinet Frame Curtain 1 Foam-pe 10 Fig. 2 3 Loosely assemble the...
... A) 5 Cabinet OUTDOOR Fig. 4 About 1/2" 18 Frame Guide 11 5 Attach the Sill Support to the cabinet track hole in relation to the selected position using the parts in each support (See Fig. 4). Foam-pe 13 Window stool Front Angle Fig. 1 Upper guide Cabinet Frame Curtain 1 Foam-pe 10 Fig. 2 3 Loosely assemble the...

Owners Manual
Page 21
... window sash seal to the unit with 10 Type A screws . WP Series ENGLISH Installation Kits Contents 1 2 3 4 5 6 7 8 9 10 11 15 12 13 14 NO. NAME OF PARTS 1 FRAME CURTAIN 2 SUPPORT BRACKET 3 SILL BRACKET 4 LOCK NUT 5 SCREW (TYPE A) 6 SCREW (TYPE B) 7 SCREW (TYPE C) 8 SCREW (TYPE D) 9 CARRIAGE BOLT 10 FOAM STRIP 11 FOAM SEAL 12...
... window sash seal to the unit with 10 Type A screws . WP Series ENGLISH Installation Kits Contents 1 2 3 4 5 6 7 8 9 10 11 15 12 13 14 NO. NAME OF PARTS 1 FRAME CURTAIN 2 SUPPORT BRACKET 3 SILL BRACKET 4 LOCK NUT 5 SCREW (TYPE A) 6 SCREW (TYPE B) 7 SCREW (TYPE C) 8 SCREW (TYPE D) 9 CARRIAGE BOLT 10 FOAM STRIP 11 FOAM SEAL 12...
Owners Manual
Page 28
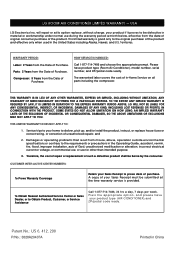
USA LG Electronics Inc. Parts: 2 Years from the Date of Purchase. and 2. Damages or... INTER-ACTIVE CENTER NUMBERS: To Prove Warranty Coverage Retain your home to the original purchaser of unauthorized repairs; LG ROOM AIR CONDITIONER LIMITED WARRANTY - P/No.: 3828A20437A Printed in the United States including Alaska, Hawaii, and ... of the product. Compressor: 5 Years from the date of original consumer purchase of In-Home Service on all parts including the compressor. Service trips to your Sales Receipt to Obtain Product, Customer, or Service Assistance Call 1-877-...
USA LG Electronics Inc. Parts: 2 Years from the Date of Purchase. and 2. Damages or... INTER-ACTIVE CENTER NUMBERS: To Prove Warranty Coverage Retain your home to the original purchaser of unauthorized repairs; LG ROOM AIR CONDITIONER LIMITED WARRANTY - P/No.: 3828A20437A Printed in the United States including Alaska, Hawaii, and ... of the product. Compressor: 5 Years from the date of original consumer purchase of In-Home Service on all parts including the compressor. Service trips to your Sales Receipt to Obtain Product, Customer, or Service Assistance Call 1-877-...


