Owner's Manual
Page 1
ENGLISH FRANÇAIS ESPAÑOL OWNER'S MANUAL AIR CONDITIONER Please read this manual carefully before operating your set and retain it for future reference. TYPE : WALL MOUNTED P/NO : MFL39817410 http://www.lghvac.com www.lg.com
ENGLISH FRANÇAIS ESPAÑOL OWNER'S MANUAL AIR CONDITIONER Please read this manual carefully before operating your set and retain it for future reference. TYPE : WALL MOUNTED P/NO : MFL39817410 http://www.lghvac.com www.lg.com
Owner's Manual
Page 2
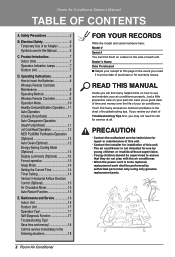
... Remote Controller 9 Operation Mode 10 Healthy Dehumidification Operation....11 Auto Operation (Cooling Only Model 11 Auto Changeover Operation (Heat Pump Model 11 Jet Cool/Heat Operation 12 NEO PLASMA Purification Operation (Optional 12 Auto Clean (Optional 12 Energy-Saving Cooling Mode (Optional 13 Display Luminosity (Optional 13 Forced operation 13 Sleep Mode 14 Setting the Current Time 14 Timer Setting 14 Vertical / Horizontal Airflow Direction Control (Optional 15 Air Circulation Mode 15 Auto Restart Function 15 E. READ THIS MANUAL Inside you will find many helpful...
... Remote Controller 9 Operation Mode 10 Healthy Dehumidification Operation....11 Auto Operation (Cooling Only Model 11 Auto Changeover Operation (Heat Pump Model 11 Jet Cool/Heat Operation 12 NEO PLASMA Purification Operation (Optional 12 Auto Clean (Optional 12 Energy-Saving Cooling Mode (Optional 13 Display Luminosity (Optional 13 Forced operation 13 Sleep Mode 14 Setting the Current Time 14 Timer Setting 14 Vertical / Horizontal Airflow Direction Control (Optional 15 Air Circulation Mode 15 Auto Restart Function 15 E. READ THIS MANUAL Inside you will find many helpful...
Owner's Manual
Page 3
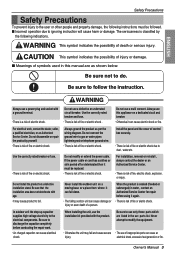
... sure not to the electrical components. Use the correctly rated breaker and fuse. • There is risk of fire or electric shock . Install the panel and the cover of control box securely. • There is risk of fire or electric shock due to dust , water etc. Never install the outdoor unit on a defective installation stand. In outdoor unit the step-up capacitor supplies high voltage electricity to do. Be sure...
... sure not to the electrical components. Use the correctly rated breaker and fuse. • There is risk of fire or electric shock . Install the panel and the cover of control box securely. • There is risk of fire or electric shock due to dust , water etc. Never install the outdoor unit on a defective installation stand. In outdoor unit the step-up capacitor supplies high voltage electricity to do. Be sure...
Owner's Manual
Page 4
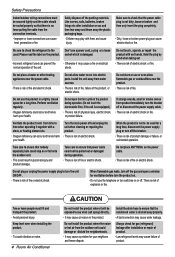
... use a power cord, a plug or a loose used for a long time, disconnect the power supply plug or turn the breaker off and unplug the unit when cleaning or repairing the product. • There is damaged. • Incorrect refrigerant used can cause heat generation or fire. Safely dispose off the gas and open the front grille of the product during operation. • There is risk of fire or electric shock. When flammable gas leaks, turn...
... use a power cord, a plug or a loose used for a long time, disconnect the power supply plug or turn the breaker off and unplug the unit when cleaning or repairing the product. • There is damaged. • Incorrect refrigerant used can cause heat generation or fire. Safely dispose off the gas and open the front grille of the product during operation. • There is risk of fire or electric shock. When flammable gas leaks, turn...
Owner's Manual
Page 5
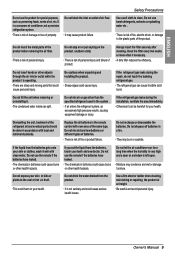
... a window is not sanitary and could cause serious health issues. Dismantling the unit, treatment of the same type. If the liquid from the batteries, brush your health. Do not let the air conditioner run for special purposes, such as preserving foods, works of fire, electric shock, or damage to clean. Use a firm stool or ladder when cleaning, maintaining or repairing the product...
... a window is not sanitary and could cause serious health issues. Dismantling the unit, treatment of the same type. If the liquid from the batteries, brush your health. Do not let the air conditioner run for special purposes, such as preserving foods, works of fire, electric shock, or damage to clean. Use a firm stool or ladder when cleaning, maintaining or repairing the product...
Owner's Manual
Page 6
... the receptacle for a proper polarity connection. Symbols used in the adapter is properly grounded, have any doubt whether the air conditioner is aligned with a broken adapter. NOTE This symbol indicates special notes. 6 Room Air Conditioner Temporary Use of electric shock. Avoid frequently unplugging the power cord as this Manual This symbol alerts you have the wall receptacle and circuit checked by a qualified electrician. Ensure that...
... the receptacle for a proper polarity connection. Symbols used in the adapter is properly grounded, have any doubt whether the air conditioner is aligned with a broken adapter. NOTE This symbol indicates special notes. 6 Room Air Conditioner Temporary Use of electric shock. Avoid frequently unplugging the power cord as this Manual This symbol alerts you have the wall receptacle and circuit checked by a qualified electrician. Ensure that...
Owner's Manual
Page 7
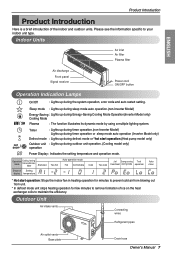
... to remove formation of ice on the heat exchanger coils to your indoor unit type. Outdoor Unit Air intake vents Connecting wires Refrigerant pipes Air outlet vents Base plate Drain hose Owner's Manual 7 Timer : Lights up during timer operation.(non-Inverter Model) Lights up during timer operation or sleep mode auto operation (Inverter Model only) Defrost mode : Lights up during outdoor unit operation. (Cooling model only) operation Power Display : Indicates the setting temperature and operation mode. Indoor Units Air inlet Air filter Plasma filter Air discharge Front panel...
... to remove formation of ice on the heat exchanger coils to your indoor unit type. Outdoor Unit Air intake vents Connecting wires Refrigerant pipes Air outlet vents Base plate Drain hose Owner's Manual 7 Timer : Lights up during timer operation.(non-Inverter Model) Lights up during timer operation or sleep mode auto operation (Inverter Model only) Defrost mode : Lights up during outdoor unit operation. (Cooling model only) operation Power Display : Indicates the setting temperature and operation mode. Indoor Units Air inlet Air filter Plasma filter Air discharge Front panel...
Owner's Manual
Page 8
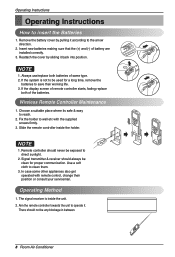
... blockage in between. 8 Room Air Conditioner NOTE 1. Signal transmitter & receiver should not be clean for a long time, remove the batteries to operate it back into position. Choose a suitable place where its safe & easy to insert the Batteries 1. Slide the remote controller inside the unit. 2. Operating Method 1. Remove the battery cover by sliding it . Always use/replace both of battery are installed correctly. 3. Wireless Remote Controller Maintenance 1. Operating Instructions Operating Instructions How to reach...
... blockage in between. 8 Room Air Conditioner NOTE 1. Signal transmitter & receiver should not be clean for a long time, remove the batteries to operate it back into position. Choose a suitable place where its safe & easy to insert the Batteries 1. Slide the remote controller inside the unit. 2. Operating Method 1. Remove the battery cover by sliding it . Always use/replace both of battery are installed correctly. 3. Wireless Remote Controller Maintenance 1. Operating Instructions Operating Instructions How to reach...
Owner's Manual
Page 9
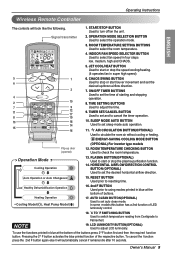
...14 Used to turn off/on the unit. START/STOP BUTTON Used to set the desired horizontal airflow direction. ON/OFF TIMER BUTTONS Used to start louver movement and set auto clean mode. PLASMA BUTTON(OPTIONAL) Used to using modes printed in super high speed) 5 1 6. Pressing the 2nd F button activates the blue printed function of buttons. JET COOL/HEAT BUTTON Used to set and to resetting time. ENERGY-SAVING COOLING MODE BUTTON (OPTIONAL) For inverter type models Flip-up /down airflow direction. 3 7. Heating Operation • Cooling Model( ), Heat Pump Model...
...14 Used to turn off/on the unit. START/STOP BUTTON Used to set the desired horizontal airflow direction. ON/OFF TIMER BUTTONS Used to start louver movement and set auto clean mode. PLASMA BUTTON(OPTIONAL) Used to using modes printed in super high speed) 5 1 6. Pressing the 2nd F button activates the blue printed function of buttons. JET COOL/HEAT BUTTON Used to set and to resetting time. ENERGY-SAVING COOLING MODE BUTTON (OPTIONAL) For inverter type models Flip-up /down airflow direction. 3 7. Heating Operation • Cooling Model( ), Heat Pump Model...
Owner's Manual
Page 10
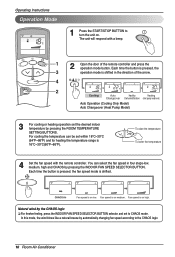
... mode, the wind blows like a natural breeze by pressing the INDOOR FAN SPEED SELECTOR BUTTON. Each time the button is pressed, the 3 operation mode is 16°C~30°C(60°F~86°F). To raise the temperature To lower the temperature 4 Set the fan speed with a beep. 1 2 Open the door of the arrow. 4 2 ON Cooling Auto Healthy Heating Changeover Dehumidification (Heat pump model only) Auto Operation (Cooling Only Model) Auto Changeover (Heat Pump Model) 3 For cooling or heating operation set to turn...
... mode, the wind blows like a natural breeze by pressing the INDOOR FAN SPEED SELECTOR BUTTON. Each time the button is pressed, the 3 operation mode is 16°C~30°C(60°F~86°F). To raise the temperature To lower the temperature 4 Set the fan speed with a beep. 1 2 Open the door of the arrow. 4 2 ON Cooling Auto Healthy Heating Changeover Dehumidification (Heat pump model only) Auto Operation (Cooling Only Model) Auto Changeover (Heat Pump Model) 3 For cooling or heating operation set to turn...
Owner's Manual
Page 11
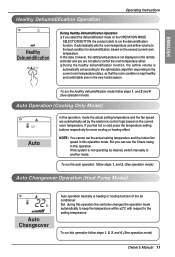
...the remote controller and you are automatically set by the electronic control logic based on the current room temperature. To run the auto operation follow steps 1, and 2. (See operation mode) Auto Changeover Operation (Heat Pump Model) Auto Changeover Auto operation basically is heating or cooling function of the air conditioner. To run this operation follow steps 1, 2, 3, and 4. (See operation mode) Owner's Manual 11 But during this operation mode. NOTE : You cannot set the actual setting temperature and the indoor fan speed in this operation the controller changes the operation...
...the remote controller and you are automatically set by the electronic control logic based on the current room temperature. To run the auto operation follow steps 1, and 2. (See operation mode) Auto Changeover Operation (Heat Pump Model) Auto Changeover Auto operation basically is heating or cooling function of the air conditioner. To run this operation follow steps 1, 2, 3, and 4. (See operation mode) Owner's Manual 11 But during this operation mode. NOTE : You cannot set the actual setting temperature and the indoor fan speed in this operation the controller changes the operation...
Owner's Manual
Page 12
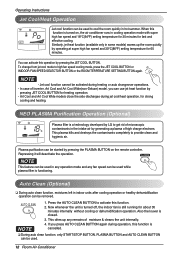
... unit is turned off, the indoor fan is turned on the remote controller. NEO PLASMA Purification Operation (Optional) Plasma filter is closed. 3. When this function. 2. Auto Clean (Optional) ❏ During auto clean function, moistures left in some models) warms up any fan speed can be used while plasma filter is cancelled. ❏ During auto clean function, only START/STOP BUTTON, PLASMA BUTTON and AUTO CLEAN BUTTON can be activated during heating or auto changeover operations. • In case of moisture & cleans the unit internally. Plasma purification...
... unit is turned off, the indoor fan is turned on the remote controller. NEO PLASMA Purification Operation (Optional) Plasma filter is closed. 3. When this function. 2. Auto Clean (Optional) ❏ During auto clean function, moistures left in some models) warms up any fan speed can be used while plasma filter is cancelled. ❏ During auto clean function, only START/STOP BUTTON, PLASMA BUTTON and AUTO CLEAN BUTTON can be activated during heating or auto changeover operations. • In case of moisture & cleans the unit internally. Plasma purification...
Owner's Manual
Page 13
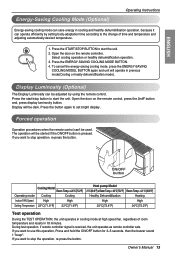
... button again to start /stop the operation, re-press the button. Forced operation Operation procedures when the remote control can be used. The operation will be started if the ON/OFF button is received, the unit operates as remote controller sets. Press the ENERGY-SAVING COOLING MODE BUTTON. 4. Display will be dark. Press the start the unit. ON/OFF button Cooling Model Room Temp. ≥ 24°C(75.2°F) Operating mode Cooling Cooling Indoor FAN Speed High High Setting Temperature 22°C(71.6°F) 22°C(71.6°F) Heat pump Model...
... button again to start /stop the operation, re-press the button. Forced operation Operation procedures when the remote control can be used. The operation will be started if the ON/OFF button is received, the unit operates as remote controller sets. Press the ENERGY-SAVING COOLING MODE BUTTON. 4. Display will be dark. Press the start the unit. ON/OFF button Cooling Model Room Temp. ≥ 24°C(75.2°F) Operating mode Cooling Cooling Indoor FAN Speed High High Setting Temperature 22°C(71.6°F) 22°C(71.6°F) Heat pump Model...
Owner's Manual
Page 14
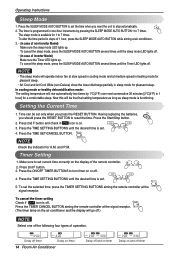
... lights up . Delay off timer Delay on timer 14 Room Air Conditioner Delay off and on timer Delay on the display of operation. To cancel the sleep mode, press the SLEEP MODE AUTO BUTTON several times until the desired time is programmed in 1 hour] for a comfortable sleep. Press the Start/Stop button. 2. Press the TIME SETTING BUTTONS until the sleep mode LED lights off timer Make sure to 7 times. Operating Instructions Sleep Mode 1. and P.M. To cancel the sleep mode, press the SLEEP MODE AUTO BUTTON...
... lights up . Delay off timer Delay on timer 14 Room Air Conditioner Delay off and on timer Delay on the display of operation. To cancel the sleep mode, press the SLEEP MODE AUTO BUTTON several times until the desired time is programmed in 1 hour] for a comfortable sleep. Press the Start/Stop button. 2. Press the TIME SETTING BUTTONS until the sleep mode LED lights off timer Make sure to 7 times. Operating Instructions Sleep Mode 1. and P.M. To cancel the sleep mode, press the SLEEP MODE AUTO BUTTON...
Owner's Manual
Page 15
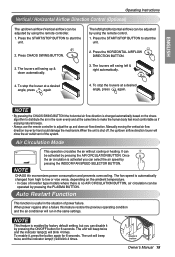
... natural breeze. • Always use the remote controller to adjust the up and down air flow direction. To stop the louvers at a desired angle, press again 4. When power regains after a failure this feature restore the previous operating condition and the air conditioner will blink 4 times. Press the START/STOP BUTTON to start the unit. Press the HORIZONTAL AIRFLOW DIRECTION BUTTON. 3. The louvers will blink 4 times. To stop the louver at a desired...
... natural breeze. • Always use the remote controller to adjust the up and down air flow direction. To stop the louvers at a desired angle, press again 4. When power regains after a failure this feature restore the previous operating condition and the air conditioner will blink 4 times. Press the START/STOP BUTTON to start the unit. Press the HORIZONTAL AIRFLOW DIRECTION BUTTON. 3. The louvers will blink 4 times. To stop the louver at a desired...

Owner's Manual
Page 16
... remove the filters see the self explanatory diagrams for each model type. Clean the filters with a vacuum cleaner or warm soapy water. They may cause deformation and discoloration. • Volatile substances. Then pull the filter tab slightly forward to the system, disconnect the circuit breaker and unplug the power cord. If dirt is dirty wash it may cause an electric shock. 16 Room Air Conditioner Indoor Unit Clean the unit with...
... remove the filters see the self explanatory diagrams for each model type. Clean the filters with a vacuum cleaner or warm soapy water. They may cause deformation and discoloration. • Volatile substances. Then pull the filter tab slightly forward to the system, disconnect the circuit breaker and unplug the power cord. If dirt is dirty wash it may cause an electric shock. 16 Room Air Conditioner Indoor Unit Clean the unit with...
Owner's Manual
Page 17
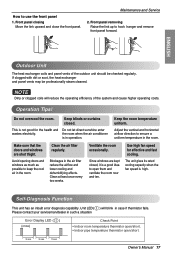
... and fast cooling. Maintenance and Service 2. Make sure that the doors and windows are kept closed . Please contact your serviceman/dealer in operation. How to hook hanger and remove front panel forward. the room when the air conditioner is high. The unit gives its rated cooling capacity when the fan speed is in such a situation Error Display LED ( ) (once) Check Point • Indoor room temperature thermistor open/short. • Indoor pipe temperature thermistor open them and...
... and fast cooling. Maintenance and Service 2. Make sure that the doors and windows are kept closed . Please contact your serviceman/dealer in operation. How to hook hanger and remove front panel forward. the room when the air conditioner is high. The unit gives its rated cooling capacity when the fan speed is in such a situation Error Display LED ( ) (once) Check Point • Indoor room temperature thermistor open/short. • Indoor pipe temperature thermistor open them and...
Owner's Manual
Page 18
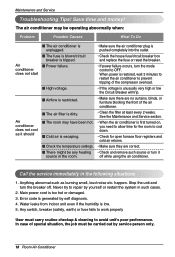
... the front of the air conditioner. • Clean the filter at least every 2 weeks. Never try to avoid unitʼs poor performance. Error code is low. 5. Main power cord is pushed completely into the outlet. • Check the house fuse/circuit breaker box and replace the fuse or reset the breaker. • If power failure occurs, turn the breaker off while using the air conditioner. In case of the compressor overload. • If...
... the front of the air conditioner. • Clean the filter at least every 2 weeks. Never try to avoid unitʼs poor performance. Error code is low. 5. Main power cord is pushed completely into the outlet. • Check the house fuse/circuit breaker box and replace the fuse or reset the breaker. • If power failure occurs, turn the breaker off while using the air conditioner. In case of the compressor overload. • If...
Owner's Manual
Page 19
... call the installing contractor of your product Online! CANADA Service call 1-888-865-3026. East, Mississauga, Ontario, L4Z 4G3 LG Customer Information Center 888-865-3026 USA, press #2 for PTAC, TTW 888-865-3026 USA, press #3 for DFS, Multi V 1-888-LG-Canada CANADA Register your product, as warranty service will be provided by the contractor, please call Number # : (888) LG Canada, (888...
... call the installing contractor of your product Online! CANADA Service call 1-888-865-3026. East, Mississauga, Ontario, L4Z 4G3 LG Customer Information Center 888-865-3026 USA, press #2 for PTAC, TTW 888-865-3026 USA, press #3 for DFS, Multi V 1-888-LG-Canada CANADA Register your product, as warranty service will be provided by the contractor, please call Number # : (888) LG Canada, (888...

Owner's Manual
Page 19
..., Ontario, L4Z 4G3 LG Customer Information Center 888-865-3026 USA, press #2 for PTAC, TTW 888-865-3026 USA, press #3 for DFS, Multi V 1-888-LG-Canada CANADA Register your product, as warranty service will be provided by the contractor, please call the installing contractor of your product Online! Please call 1-888-865-3026. CANADA Service call Number # : (888) LG Canada, (888) 542...
..., Ontario, L4Z 4G3 LG Customer Information Center 888-865-3026 USA, press #2 for PTAC, TTW 888-865-3026 USA, press #3 for DFS, Multi V 1-888-LG-Canada CANADA Register your product, as warranty service will be provided by the contractor, please call the installing contractor of your product Online! Please call 1-888-865-3026. CANADA Service call Number # : (888) LG Canada, (888) 542...


