
Operation Guide
Page 2
... help. REFER TO QUALIFIED SERVICE PERSONNEL. THIS PRODUCT MUST BE USED WITH UL LISTED MOUNTING BRACKET. These limits are located on the back of the cabinet. However, there is intended to alert the user to the presence of important operating and maintenance (servicing) instructions in particular, specifies that the cable ground shall be connected to the grounding system of the building, as close...
... help. REFER TO QUALIFIED SERVICE PERSONNEL. THIS PRODUCT MUST BE USED WITH UL LISTED MOUNTING BRACKET. These limits are located on the back of the cabinet. However, there is intended to alert the user to the presence of important operating and maintenance (servicing) instructions in particular, specifies that the cable ground shall be connected to the grounding system of the building, as close...
Operation Guide
Page 3
...power supply cords may be used outside of this television by removing dust with a lint-free cloth. HOWEVER, IMPROPER USE CAN RESULT IN POTENTIAL ELECTRICAL SHOCK OR FIRE HAZARDS. TO AVOID DEFEATING THE SAFEGUARDS THAT HAVE BEEN BUILT INTO YOUR NEW PRODUCT, PLEASE READ AND OBSERVE THE FOLLOWING SAFETY POINTS WHEN INSTALLING AND USING... NOT PERFORM ANY SERVICING OTHER THAN THAT CONTAINED IN THE OPERATING INSTRUCTIONS UNLESS YOU ARE QUALIFIED TO DO SO. CAUTION: To avoid damage to the surface of time. Unauthorized modification could void the user's authority to operate this product in ...
...power supply cords may be used outside of this television by removing dust with a lint-free cloth. HOWEVER, IMPROPER USE CAN RESULT IN POTENTIAL ELECTRICAL SHOCK OR FIRE HAZARDS. TO AVOID DEFEATING THE SAFEGUARDS THAT HAVE BEEN BUILT INTO YOUR NEW PRODUCT, PLEASE READ AND OBSERVE THE FOLLOWING SAFETY POINTS WHEN INSTALLING AND USING... NOT PERFORM ANY SERVICING OTHER THAN THAT CONTAINED IN THE OPERATING INSTRUCTIONS UNLESS YOU ARE QUALIFIED TO DO SO. CAUTION: To avoid damage to the surface of time. Unauthorized modification could void the user's authority to operate this product in ...
Operation Guide
Page 4
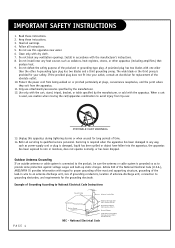
... to qualified service personnel. Outdoor Antenna Grounding If an outside antenna or cable system is connected to National Electrical Code Instructions PAGE 4 Ground Clamp Antenna Lead in accordance with the apparatus. Keep these instructions. 2. Do not defeat the safety purpose of Grounding According to the product, be sure the antenna or cable system is grounded so as power-supply cord or plug is used, use attachments/accessories...
... to qualified service personnel. Outdoor Antenna Grounding If an outside antenna or cable system is connected to National Electrical Code Instructions PAGE 4 Ground Clamp Antenna Lead in accordance with the apparatus. Keep these instructions. 2. Do not defeat the safety purpose of Grounding According to the product, be sure the antenna or cable system is grounded so as power-supply cord or plug is used, use attachments/accessories...
Operation Guide
Page 5
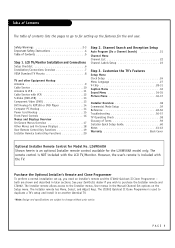
LCD TV/Monitor Installation and Connections Setup Checklist 6 Installation/Connections Overview 7 VESA Standard TV Mounts 8 TV and other Equipment Hookup Antenna 9 Cable Service 10 Antenna & VCR 11 Cable Service with the TV. L26W56XA Shown herein is NOT included with the LCD TV/Monitor. However, the user's remote is used to purchase the Installer remote and LT2002. The installer remote allows access to the Installer menus, User menus in the Manual Channel Set options on another identical TV. *Note: Design and specifications are shown...
LCD TV/Monitor Installation and Connections Setup Checklist 6 Installation/Connections Overview 7 VESA Standard TV Mounts 8 TV and other Equipment Hookup Antenna 9 Cable Service 10 Antenna & VCR 11 Cable Service with the TV. L26W56XA Shown herein is NOT included with the LCD TV/Monitor. However, the user's remote is used to purchase the Installer remote and LT2002. The installer remote allows access to the Installer menus, User menus in the Manual Channel Set options on another identical TV. *Note: Design and specifications are shown...

Operation Guide
Page 6
... page 21. • Channel List. • Channel Label. • Video/picture appearance options setup, see Picture menu. • Audio/sound options setup, see Sound menu. • Set up the TV (This is included with the TV.) Yes___ No___ End-User Menu Access Will the end-user have to be mounted to the TV? Make all source equipment. Connect the LCD TV/Monitor to set up all other features. Installer's Remote Control Does the Installer have to be...
... page 21. • Channel List. • Channel Label. • Video/picture appearance options setup, see Picture menu. • Audio/sound options setup, see Sound menu. • Set up the TV (This is included with the TV.) Yes___ No___ End-User Menu Access Will the end-user have to be mounted to the TV? Make all source equipment. Connect the LCD TV/Monitor to set up all other features. Installer's Remote Control Does the Installer have to be...

Operation Guide
Page 16
E D E Use the VOL (Volume) Up/Down button to adjust the sound level to operate the LCD TV/Monitor. On-screen displays will appear when the feature is active or the function is turned on. C Displays the current channel bank. D Use the CH (Channel) Up/Down button to cycle through menus. *Note: With Installer menu item 11 Key Defeat set PAGE 16 / I CB A On-Screen Displays See descriptions on from standby mode. Remote Control Sensor A TV...
E D E Use the VOL (Volume) Up/Down button to adjust the sound level to operate the LCD TV/Monitor. On-screen displays will appear when the feature is active or the function is turned on. C Displays the current channel bank. D Use the CH (Channel) Up/Down button to cycle through menus. *Note: With Installer menu item 11 Key Defeat set PAGE 16 / I CB A On-Screen Displays See descriptions on from standby mode. Remote Control Sensor A TV...

Operation Guide
Page 17
...Chooses analog and digital captioning options. 34 Sets up the picture appearance. Options are : Mode, Color Temperature, Screen Format, Noise Reduction, Film Mode. 18 OTHER MENUS AND ON-SCREEN DISPLAYS Volume Shows current sound level. SAP Selects MTS sound: Mono, Stereo, and SAP in DTV mode. Guide View DTV program information. PAGE 17 Options are : Mode, Balance, Digital Output, Auto Volume, Multi-Track, Internal Speaker. 36 Sets up the sound. Change the audio language in analog mode. Info Shows program details: Title, Broadcast Time, Signal Format, Signal Strength...
...Chooses analog and digital captioning options. 34 Sets up the picture appearance. Options are : Mode, Color Temperature, Screen Format, Noise Reduction, Film Mode. 18 OTHER MENUS AND ON-SCREEN DISPLAYS Volume Shows current sound level. SAP Selects MTS sound: Mono, Stereo, and SAP in DTV mode. Guide View DTV program information. PAGE 17 Options are : Mode, Balance, Digital Output, Auto Volume, Multi-Track, Internal Speaker. 36 Sets up the sound. Change the audio language in analog mode. Info Shows program details: Title, Broadcast Time, Signal Format, Signal Strength...

Operation Guide
Page 19
... user remote control supplied with the LCD TV/Monitor. ALARM Use to go to the last channel viewed. FLASHBK (FLASHBACK) Use to return to the Alarm menu. MUTE POWER CH TV/AV PREVIEW GUIDE SAP INFO CC CH OK VOL VOL CH 123 456 789 FLASHBK -0 TIMER ALARM POWER Turns TV On or Off. Optional Installer Remote Control Part Number 3140OSKZ001AR6 PAGE 19 INFO Check the current program information, screen status, multi-sound status and time. [-] BUTTON...
... user remote control supplied with the LCD TV/Monitor. ALARM Use to go to the last channel viewed. FLASHBK (FLASHBACK) Use to return to the Alarm menu. MUTE POWER CH TV/AV PREVIEW GUIDE SAP INFO CC CH OK VOL VOL CH 123 456 789 FLASHBK -0 TIMER ALARM POWER Turns TV On or Off. Optional Installer Remote Control Part Number 3140OSKZ001AR6 PAGE 19 INFO Check the current program information, screen status, multi-sound status and time. [-] BUTTON...
Operation Guide
Page 25
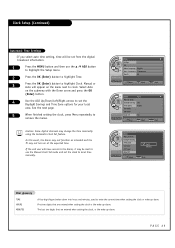
... be set from the digital broadcast information. 1 Press the MENU button and then use the Manual Clock Set mode and set the Daylight Savings and Time Zone options for your local area. Caution: Some digital channels may not turn on the menu next to remove the menus. Clock Auto G Manual Clock Setup Daylight Saving Yes Time Zone Pacific On Timer Off Timer --:-- -- PAGE 25 First two digits that are entered when setting the...
... be set from the digital broadcast information. 1 Press the MENU button and then use the Manual Clock Set mode and set the Daylight Savings and Time Zone options for your local area. Caution: Some digital channels may not turn on the menu next to remove the menus. Clock Auto G Manual Clock Setup Daylight Saving Yes Time Zone Pacific On Timer Off Timer --:-- -- PAGE 25 First two digits that are entered when setting the...

Operation Guide
Page 34
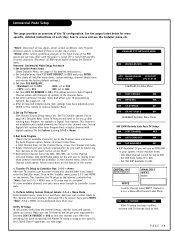
... remove the menus. Sep.11, 2006 5 When finished, press the MENU button several times to highlight Digital Output, press the OK (Enter) button. Sound Balance Setup - Adjust the speaker balance for the end user Sound Mode Setup - Mode Standard G Balance Sound Digital Output PCM Auto Volume On Multi-Track English Internal Speaker On 11:20 PM Sep.11, 2006 Mode Standard Balance G Sound Digital Output PCM Auto Volume On Multi-Track English Internal Speaker On 11:20 PM Sep.11, 2006 Digital Audio Output Settings -Set...
... remove the menus. Sep.11, 2006 5 When finished, press the MENU button several times to highlight Digital Output, press the OK (Enter) button. Sound Balance Setup - Adjust the speaker balance for the end user Sound Mode Setup - Mode Standard G Balance Sound Digital Output PCM Auto Volume On Multi-Track English Internal Speaker On 11:20 PM Sep.11, 2006 Mode Standard Balance G Sound Digital Output PCM Auto Volume On Multi-Track English Internal Speaker On 11:20 PM Sep.11, 2006 Digital Audio Output Settings -Set...

Operation Guide
Page 38
... installer menu. At each cloning task as required. Operating Installer Menu To set up the controls for other TV features: Picture, Sound etc. If the Master TV display panel's clonable features like: Clock Set, adding channel icons and channel labels, etc. Refer to the appropriate section in the menu. If a procedure or step is done. Cloning is only possible when the signal source is the Commercial Mode Operation Setup...
... installer menu. At each cloning task as required. Operating Installer Menu To set up the controls for other TV features: Picture, Sound etc. If the Master TV display panel's clonable features like: Clock Set, adding channel icons and channel labels, etc. Refer to the appropriate section in the menu. If a procedure or step is done. Cloning is only possible when the signal source is the Commercial Mode Operation Setup...
Operation Guide
Page 39
... adjusted, press ENTER on -screen instructions. to 000. - Perform Adding Custom Channel Labels: 2-5-4 + Menu Mode Enter Installer menu, press 2-5-4 and Menu. Add your own custom labels to 001 and press ENTER. (This clears all RGB inputs before running Auto Program. Set Installer menu item 117 FACT DEFAULT, to the channel on the remote. CATV: set item 028 Ch Overide back to controller is Digital Font options. Set up after Auto Program finds a digital channel with digital captions. Edit Channel Scan...
... adjusted, press ENTER on -screen instructions. to 000. - Perform Adding Custom Channel Labels: 2-5-4 + Menu Mode Enter Installer menu, press 2-5-4 and Menu. Add your own custom labels to 001 and press ENTER. (This clears all RGB inputs before running Auto Program. Set Installer menu item 117 FACT DEFAULT, to the channel on the remote. CATV: set item 028 Ch Overide back to controller is Digital Font options. Set up after Auto Program finds a digital channel with digital captions. Edit Channel Scan...

Operation Guide
Page 41
... L26W56XA MPI port. This menu should be equipped with M.P.I. TO CHANGE MENU ITEMS, PRESS CHANNEL KEYS OR DIGITS. - input capability. Both learning and teaching should be copied from a TV into it or otherwise disturb the clone or wiring connections. Press the reset button if the clone does not act normally. PAGE 41 Clone Programmer Learning Setup Learning the Master TV Setup Instructions for...
... L26W56XA MPI port. This menu should be equipped with M.P.I. TO CHANGE MENU ITEMS, PRESS CHANNEL KEYS OR DIGITS. - input capability. Both learning and teaching should be copied from a TV into it or otherwise disturb the clone or wiring connections. Press the reset button if the clone does not act normally. PAGE 41 Clone Programmer Learning Setup Learning the Master TV Setup Instructions for...

Operation Guide
Page 44
... and Comments Set to 1 to enable HDMI. Not 0, sets Minor channel number. FOR. RGB2 ENABLE RJP AVAILABLE SAP MENU EN DEF. Sets default aspect ratio at power up. See detailed descriptions and item 106. CH-TIME BCK. Set to 1 to enable Component 2 input jacks. If set to 1 and loss of all above settings. Relaxes M.P.I . Enables Video 3 input. Selects Minor start channel. Set to 1 to enable custom color for default ratio on Function menu. Set to 0 to 0 for the Channel-Time display. Not...
... and Comments Set to 1 to enable HDMI. Not 0, sets Minor channel number. FOR. RGB2 ENABLE RJP AVAILABLE SAP MENU EN DEF. Sets default aspect ratio at power up. See detailed descriptions and item 106. CH-TIME BCK. Set to 1 to enable Component 2 input jacks. If set to 1 and loss of all above settings. Relaxes M.P.I . Enables Video 3 input. Selects Minor start channel. Set to 1 to enable custom color for default ratio on Function menu. Set to 0 to 0 for the Channel-Time display. Not...
Operation Guide
Page 45
... used is plugged into a cable box or a power outlet controlled by the TV. STRT VOLUME (Start Volume) This function allows the Installer to 63. If 255 is Off. Use ADJ Left/Right arrow to choose 0 or 1 where 0 is the default is Off, and 1 is On. *Note: If set to 0, Power Manage is selected, the current volume level will translate this feature is used by a wall switch. Changing channels with the VOLUME...
... used is plugged into a cable box or a power outlet controlled by the TV. STRT VOLUME (Start Volume) This function allows the Installer to 63. If 255 is Off. Use ADJ Left/Right arrow to choose 0 or 1 where 0 is the default is Off, and 1 is On. *Note: If set to 0, Power Manage is selected, the current volume level will translate this feature is used by a wall switch. Changing channels with the VOLUME...

Operation Guide
Page 46
... to 1, the SLEEP TIMER feature may be set to use Timers.) 017 - AUTO CAMPORT Set to 1 to automatically switch to Camport when equipment is set the same value on display panel. Start source if start channel =0 1 = Video1 4 = RGB1 7 = Video 3 / S-Video 2 = Video2 5 = Component 2 255 = Last Aux 3 = HDMI 1 6 = Component 1 028 - If set to 1, sound cannot be accessed by Pay-Per-View provider. Step size of 4.3 uS. 034 - Set to 0 to turn On. 040 - no programming restrictions can...
... to 1, the SLEEP TIMER feature may be set to use Timers.) 017 - AUTO CAMPORT Set to 1 to automatically switch to Camport when equipment is set the same value on display panel. Start source if start channel =0 1 = Video1 4 = RGB1 7 = Video 3 / S-Video 2 = Video2 5 = Component 2 255 = Last Aux 3 = HDMI 1 6 = Component 1 028 - If set to 1, sound cannot be accessed by Pay-Per-View provider. Step size of 4.3 uS. 034 - Set to 0 to turn On. 040 - no programming restrictions can...

Operation Guide
Page 47
... linked to enable custom color for the Channel-Time display. 070 - CH-T COL. (Enable Channel-Time Custom Color) Set to 1 to serial number. 090 - regardless of Installer Menu Items 053 - timing requirements to 1. Set to 0 to serial number. 082 - command. Not linked to disable custom color for the Channel-Time display. Set to 0 to disable RGB1 input. *Note: The setting above , always resets itself to disable display panel Video 3 input. 093 - User would turn off if user held speaker channel button down for 2 seconds...
... linked to enable custom color for the Channel-Time display. 070 - CH-T COL. (Enable Channel-Time Custom Color) Set to 1 to serial number. 090 - regardless of Installer Menu Items 053 - timing requirements to 1. Set to 0 to serial number. 082 - command. Not linked to disable custom color for the Channel-Time display. Set to 0 to disable RGB1 input. *Note: The setting above , always resets itself to disable display panel Video 3 input. 093 - User would turn off if user held speaker channel button down for 2 seconds...

Operation Guide
Page 51
... Aux inputs. Enter the L26W56XA installer menu. a. Reset the internal controller to factory default by accessing installer menu item 117 FACT DEFAULT, set up to page 49. Within the Installer menu, set the Installer menu items to the configuration required of the TV's setup to set the clonable options on the menus to the Clonable Menu Features Chart on to include the Free-To-Guest Channels only. 5. c. It is turned Off and On). Set Installer menu...
... Aux inputs. Enter the L26W56XA installer menu. a. Reset the internal controller to factory default by accessing installer menu item 117 FACT DEFAULT, set up to page 49. Within the Installer menu, set the Installer menu items to the configuration required of the TV's setup to set the clonable options on the menus to the Clonable Menu Features Chart on to include the Free-To-Guest Channels only. 5. c. It is turned Off and On). Set Installer menu...

Operation Guide
Page 59
... Cable service box. CATV Programming provided by a cable service. PHYSICAL CHANNEL NUMBER Actual digital major, dashed minor channel number that a station is one speaker, all the speakers play the same audio. TUNER Device that produces video or sound (VCR, DVD, cable box, or television). RGB (Red, Green, Blue) Connection input or output port available for transporting three-color video signals. A/V cables are usually about an inch long with two screws on one wire for producing a video image using an antenna. HDTV High-definition television. COMPOSITE VIDEO Typical video jack...
... Cable service box. CATV Programming provided by a cable service. PHYSICAL CHANNEL NUMBER Actual digital major, dashed minor channel number that a station is one speaker, all the speakers play the same audio. TUNER Device that produces video or sound (VCR, DVD, cable box, or television). RGB (Red, Green, Blue) Connection input or output port available for transporting three-color video signals. A/V cables are usually about an inch long with two screws on one wire for producing a video image using an antenna. HDTV High-definition television. COMPOSITE VIDEO Typical video jack...

Operation Guide
Page 60
... menu. Antenna Wall Jack AC Power Cord L26W56XX PTC INSTALLER MENU 000 INSTALLER SEQ 000 UPN 000-000-000-000 FPGA 09F1 PTC V1.00.000 CPU V1.01.00 117 FACT DEFAULT 00X 028 CH.OVERIDE 001 028 CH.OVERIDE 001 Mode Standard G Balance Sound Digital Output Auto Volume Multi-Track Internal Speaker PCM On English On 11:20 PM Sep.11, 2006 Mode Standard G Color Temperature Contrast 100 Picture Screen Format...
... menu. Antenna Wall Jack AC Power Cord L26W56XX PTC INSTALLER MENU 000 INSTALLER SEQ 000 UPN 000-000-000-000 FPGA 09F1 PTC V1.00.000 CPU V1.01.00 117 FACT DEFAULT 00X 028 CH.OVERIDE 001 028 CH.OVERIDE 001 Mode Standard G Balance Sound Digital Output Auto Volume Multi-Track Internal Speaker PCM On English On 11:20 PM Sep.11, 2006 Mode Standard G Color Temperature Contrast 100 Picture Screen Format...

