
Operation Guide
Page 2
... a particular installation. NO USER SERVICEABLE PARTS INSIDE. The lightning flash with the instruction manual, may be determined by turning the equipment off and on the back of the cabinet..."dangerous voltage" within an equilateral triangle is encouraged to try to correct the interference by LG Electronics U.S.A., Inc. 2000 Millbrook Drive, Lincolnshire, IL 60069. However, there is no guarantee...CATV system installer's attention to Article 820-40 of the National Electric Code (U.S.A.). L26W56SA, L26W56BA, L26W56WA SERIAL NO CAUTION RISK OF ELECTRIC SHOCK DO NOT OPEN CAUTION: TO REDUCE ...
... a particular installation. NO USER SERVICEABLE PARTS INSIDE. The lightning flash with the instruction manual, may be determined by turning the equipment off and on the back of the cabinet..."dangerous voltage" within an equilateral triangle is encouraged to try to correct the interference by LG Electronics U.S.A., Inc. 2000 Millbrook Drive, Lincolnshire, IL 60069. However, there is no guarantee...CATV system installer's attention to Article 820-40 of the National Electric Code (U.S.A.). L26W56SA, L26W56BA, L26W56WA SERIAL NO CAUTION RISK OF ELECTRIC SHOCK DO NOT OPEN CAUTION: TO REDUCE ...
Operation Guide
Page 3
.... - Some minute dot defects may be placed on the apparatus. Avoid touching the LCD screen or holding your finger(s) against it is : LG Electronics U.S.A., Inc., 2000 Millbrook Drive Lincolnshire, IL 60069, USA. IMPORTANT SAFEGUARDS FOR YOU AND YOUR NEW PRODUCT YOUR PRODUCT HAS BEEN MANUFACTURED AND...could void the user's authority to dripping or splashing and no adverse effect on the screen. OBSERVING THE SIMPLE PRECAUTIONS DISCUSSED IN THIS MANUAL CAN HELP YOU GET MANY YEARS OF ENJOYMENT AND SAFE OPERATION THAT ARE BUILT INTO YOUR NEW PRODUCT. TO AVOID DEFEATING THE SAFEGUARDS ...
.... - Some minute dot defects may be placed on the apparatus. Avoid touching the LCD screen or holding your finger(s) against it is : LG Electronics U.S.A., Inc., 2000 Millbrook Drive Lincolnshire, IL 60069, USA. IMPORTANT SAFEGUARDS FOR YOU AND YOUR NEW PRODUCT YOUR PRODUCT HAS BEEN MANUFACTURED AND...could void the user's authority to dripping or splashing and no adverse effect on the screen. OBSERVING THE SIMPLE PRECAUTIONS DISCUSSED IN THIS MANUAL CAN HELP YOU GET MANY YEARS OF ENJOYMENT AND SAFE OPERATION THAT ARE BUILT INTO YOUR NEW PRODUCT. TO AVOID DEFEATING THE SAFEGUARDS ...
Operation Guide
Page 5
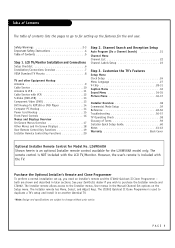
...Search and Reception Setup Auto Program (Do a Channel Search 21 Channel Menu Channel List 22 Channel Labels Setup 23 Step 3. See your Zenith/LG dealer if you need an installer's remote and the LT2002 Quickset II Clone Programmer - Table of Contents The table of contents lists the ...pages to go to the Installer menus, User menus in the Manual Channel Set options on another identical TV. *Note: Design and specifications are shown and described in later sections. Customize the TV's Features Setup ...
...Search and Reception Setup Auto Program (Do a Channel Search 21 Channel Menu Channel List 22 Channel Labels Setup 23 Step 3. See your Zenith/LG dealer if you need an installer's remote and the LT2002 Quickset II Clone Programmer - Table of Contents The table of contents lists the ...pages to go to the Installer menus, User menus in the Manual Channel Set options on another identical TV. *Note: Design and specifications are shown and described in later sections. Customize the TV's Features Setup ...

Operation Guide
Page 17
... picture for Parental Control. Reveals the strength of the TV. 21 Automatically finds and stores active channels to scroll through using Channel Up/Down. 22 Manually picks and chooses which active channels will appear in DTV mode. Change the audio language in . Guide View DTV program information. With computer connected, sets...
... picture for Parental Control. Reveals the strength of the TV. 21 Automatically finds and stores active channels to scroll through using Channel Up/Down. 22 Manually picks and chooses which active channels will appear in DTV mode. Change the audio language in . Guide View DTV program information. With computer connected, sets...

Operation Guide
Page 18
... to turn the TV off . PAGE 18 DIGITAL 84-1 1920*1080@60Hz No Time Information No Title N/A Dolby Digital Korean N/A INFO Press INFO. In this manual, the OSD (On Screen Displays shown) may be different than those on the actual TV. Sets a time to familiarize you with the TVs options. 19...
... to turn the TV off . PAGE 18 DIGITAL 84-1 1920*1080@60Hz No Time Information No Title N/A Dolby Digital Korean N/A INFO Press INFO. In this manual, the OSD (On Screen Displays shown) may be different than those on the actual TV. Sets a time to familiarize you with the TVs options. 19...

Operation Guide
Page 24
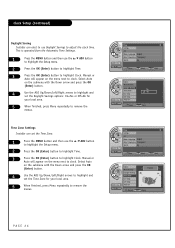
... PC Menu Language English Menu Transparency Transparent Set ID 96 --:-- -- --. -- ---- Auto Off On --. -- ---- Auto Off On --. -- ---- Clock Manual G Manual Clock Setup Daylight Saving Time Zone On Timer Off Timer --:-- -- Move Back On-Off Timers Setup Set the On-Off Timers using the procedures described... the Setup menu. 2 Press the OK (Enter) button to highlight Time. 3 Press the OK (Enter) button to set the clock manually. If manual is best to set the year, month, day, hours and minutes. 1 Press the MENU button and then use the On-Off Timers,...
... PC Menu Language English Menu Transparency Transparent Set ID 96 --:-- -- --. -- ---- Auto Off On --. -- ---- Auto Off On --. -- ---- Clock Manual G Manual Clock Setup Daylight Saving Time Zone On Timer Off Timer --:-- -- Move Back On-Off Timers Setup Set the On-Off Timers using the procedures described... the Setup menu. 2 Press the OK (Enter) button to highlight Time. 3 Press the OK (Enter) button to set the clock manually. If manual is best to set the year, month, day, hours and minutes. 1 Press the MENU button and then use the On-Off Timers,...
Operation Guide
Page 25
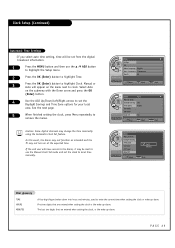
...the clock to highlight Clock. Time G V-Chip Setup PC Menu Language English Menu Transparency Transparent Set ID 96 --:-- -- --. -- ---- Clock Auto G Manual Clock Setup Daylight Saving Yes Time Zone Pacific On Timer Off Timer --:-- -- The last two digits that are entered when setting the clock, or the...Time Settings - Caution: Some digital channels may be set from the digital broadcast information. 1 Press the MENU button and then use the Manual Clock Set mode and set the Daylight Savings and Time Zone options for your local area. In this event, the Alarm may not ...
...the clock to highlight Clock. Time G V-Chip Setup PC Menu Language English Menu Transparency Transparent Set ID 96 --:-- -- --. -- ---- Clock Auto G Manual Clock Setup Daylight Saving Yes Time Zone Pacific On Timer Off Timer --:-- -- The last two digits that are entered when setting the clock, or the...Time Settings - Caution: Some digital channels may be set from the digital broadcast information. 1 Press the MENU button and then use the Manual Clock Set mode and set the Daylight Savings and Time Zone options for your local area. In this event, the Alarm may not ...
Operation Guide
Page 26
... button to remove the menus. Time G V-Chip Setup PC Menu Language English Menu Transparency Transparent Set ID 96 11:20 PM Sep.11, 2006 Clock Manual Clock Daylight Saving Setup No Time Zone Yes On Timer 11:20 PM Off Timer Auto Off Sep.11, 2006 Time G V-Chip Setup PC Menu...Saving Installer can set the Daylight Savings options: On=Yes or Off=No for your local area. 5 When finished, press Menu repeatedly to highlight Clock. Manual or Auto will appear on the submenu with the Down arrow and press the OK (Enter) button. 4 Use the ADJ Up/Down/Left/Right arrows...
... button to remove the menus. Time G V-Chip Setup PC Menu Language English Menu Transparency Transparent Set ID 96 11:20 PM Sep.11, 2006 Clock Manual Clock Daylight Saving Setup No Time Zone Yes On Timer 11:20 PM Off Timer Auto Off Sep.11, 2006 Time G V-Chip Setup PC Menu...Saving Installer can set the Daylight Savings options: On=Yes or Off=No for your local area. 5 When finished, press Menu repeatedly to highlight Clock. Manual or Auto will appear on the submenu with the Down arrow and press the OK (Enter) button. 4 Use the ADJ Up/Down/Left/Right arrows...
Operation Guide
Page 36
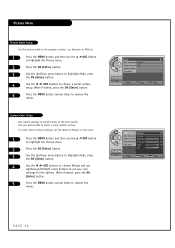
...:20 PM 4 Use the F / G ADJ buttons to the program content, e.g. Sep.11, 2006 5 Press the MENU button several times to set the Mode to Manual on the menu. 1 Press the MENU button and then use the D / E ADJ button to highlight the Picture menu. 2 Press the OK (Enter) button. 3... Use the Up/Down arrow button to highlight Mode, press the OK (Enter) button. 4 Use the F / G ADJ buttons to choose Manual and use the D / E ADJ button to highlight Mode, press the OK (Enter) button. Picture Screen Format 16:9 Noise Reduction 3 Use the Up/Down arrow button...
...:20 PM 4 Use the F / G ADJ buttons to the program content, e.g. Sep.11, 2006 5 Press the MENU button several times to set the Mode to Manual on the menu. 1 Press the MENU button and then use the D / E ADJ button to highlight the Picture menu. 2 Press the OK (Enter) button. 3... Use the Up/Down arrow button to highlight Mode, press the OK (Enter) button. 4 Use the F / G ADJ buttons to choose Manual and use the D / E ADJ button to highlight Mode, press the OK (Enter) button. Picture Screen Format 16:9 Noise Reduction 3 Use the Up/Down arrow button...

Operation Guide
Page 38
... default values as indicated. The TV's clonable features need to know how to enter the L26W56XA Installer menu and make and save changes in the Manual for the TV you need an Installer remote control similar to the one shown to be successful.
... default values as indicated. The TV's clonable features need to know how to enter the L26W56XA Installer menu and make and save changes in the Manual for the TV you need an Installer remote control similar to the one shown to be successful.

Operation Guide
Page 51
... certain conditions, changes to the Clonable Menu Features Chart on the see Installer menu item 03 BAND/AFC. Refer to the input mode of this manual. See page 49 for adding Channel Icons and/or Labels. If necessary, familiarize yourself with that step and cloning may not be cloned. You will...
... certain conditions, changes to the Clonable Menu Features Chart on the see Installer menu item 03 BAND/AFC. Refer to the input mode of this manual. See page 49 for adding Channel Icons and/or Labels. If necessary, familiarize yourself with that step and cloning may not be cloned. You will...


