Owner's Manual (English)
Page 4
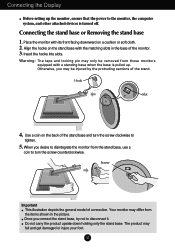
... pin may differ from the items shown in the base of the stand. Connecting the stand base or Removing the stand base 1. Your monitor may only be injured by the protruding sections of the monitor. 3. Place the monitor with a standing base when the base is turned off. Otherwise, you desire to disintegrate the... monitor from those monitors equipped with its front facing downward on the stand base with the matching slots in the picture. A3 The product may be removed from the ...
... pin may differ from the items shown in the base of the stand. Connecting the stand base or Removing the stand base 1. Your monitor may only be injured by the protruding sections of the monitor. 3. Place the monitor with a standing base when the base is turned off. Otherwise, you desire to disintegrate the... monitor from those monitors equipped with its front facing downward on the stand base with the matching slots in the picture. A3 The product may be removed from the ...
Owner's Manual (English)
Page 5
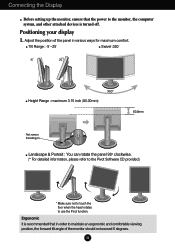
... viewing position, the forward tilt angle of the panel in various ways for maximum comfort. Connecting the Display Before setting up the monitor, ensure that the power to the monitor, the computer system, and other attached devices is recommended that in order to use the Pivot function. Positioning your display 1. Adjust the...
... viewing position, the forward tilt angle of the panel in various ways for maximum comfort. Connecting the Display Before setting up the monitor, ensure that the power to the monitor, the computer system, and other attached devices is recommended that in order to use the Pivot function. Positioning your display 1. Adjust the...
Owner's Manual (English)
Page 6
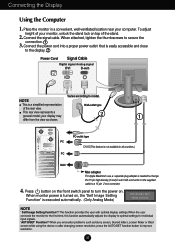
To adjust height of your monitor, unlock the stand lock on , the 'Self Image Setting Function' is easily accessible and close ... row) D-sub VGA connector on . This rear view represents a general model; When monitor power is needed to improve resolution. Connect the signal cable. your computer. Place the monitor in all countries.) PC MAC Mac adapter For Apple Macintosh use, a separate plug adapter...Display Using the Computer 1. This function provides the user with optimal display settings.When the user connects the monitor for individual input signals. 'AUTO/SET' Function?
To adjust height of your monitor, unlock the stand lock on , the 'Self Image Setting Function' is easily accessible and close ... row) D-sub VGA connector on . This rear view represents a general model; When monitor power is needed to improve resolution. Connect the signal cable. your computer. Place the monitor in all countries.) PC MAC Mac adapter For Apple Macintosh use, a separate plug adapter...Display Using the Computer 1. This function provides the user with optimal display settings.When the user connects the monitor for individual input signals. 'AUTO/SET' Function?
Owner's Manual (English)
Page 8
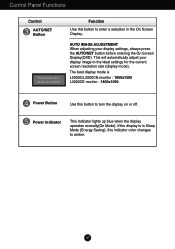
... the On Screen Display(OSD). Power Indicator This Indicator lights up blue when the display operates normally(On Mode). A7 If the display is L2000C/L2000CN monitor : 1600x1200 L2000CE monitor : 1400x1050 Power Button Use this button to the ideal settings for the current screen resolution size (display mode). Control Panel Functions Control AUTO...
... the On Screen Display(OSD). Power Indicator This Indicator lights up blue when the display operates normally(On Mode). A7 If the display is L2000C/L2000CN monitor : 1600x1200 L2000CE monitor : 1400x1050 Power Button Use this button to the ideal settings for the current screen resolution size (display mode). Control Panel Functions Control AUTO...
Owner's Manual (English)
Page 11
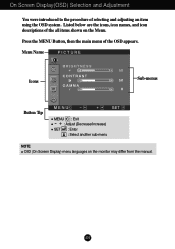
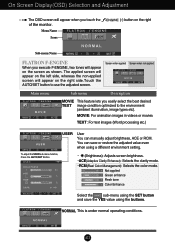
A10 On Screen Display(OSD) Selection and Adjustment You were introduced to the procedure of the all items shown on the monitor may differ from the manual. Menu Name PICTURE Icons Sub-menus Button Tip MENU : Exit - + : Adjust (Decrease/Increase) SET : Enter : Select another sub-menu NOTE OSD (On Screen Display) menu languages on the Menu. Listed below are the icons, icon names, and icon descriptions of selecting and adjusting an item using the OSD system. Press the MENU Button, then the main menu of the OSD appears.
A10 On Screen Display(OSD) Selection and Adjustment You were introduced to the procedure of the all items shown on the monitor may differ from the manual. Menu Name PICTURE Icons Sub-menus Button Tip MENU : Exit - + : Adjust (Decrease/Increase) SET : Enter : Select another sub-menu NOTE OSD (On Screen Display) menu languages on the Menu. Listed below are the icons, icon names, and icon descriptions of selecting and adjusting an item using the OSD system. Press the MENU Button, then the main menu of the OSD appears.
Owner's Manual (English)
Page 12
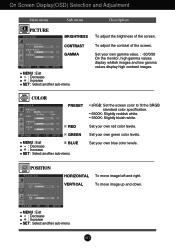
.... COLOR COLOR PRESET RED GREEN MENU : Exit +- : Decrease : Increase BLUE SET : Select another sub-menu A11 Set your own gamma value. : -50/0/50 On the monitor, high gamma values display whitish images and low gamma values display high contrast images. POSITION POSITION HORIZONTAL VERTICAL To move image up and down.
.... COLOR COLOR PRESET RED GREEN MENU : Exit +- : Decrease : Increase BLUE SET : Select another sub-menu A11 Set your own gamma value. : -50/0/50 On the monitor, high gamma values display whitish images and low gamma values display high contrast images. POSITION POSITION HORIZONTAL VERTICAL To move image up and down.
Owner's Manual (English)
Page 13
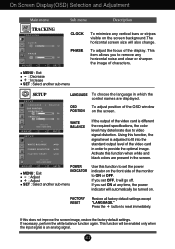
... and Adjustment Main menu TRACKING TRACKING Sub menu Description CLOCK PHASE To minimize any vertical bars or stripes visible on the front side of the monitor to ON or OFF.
... and Adjustment Main menu TRACKING TRACKING Sub menu Description CLOCK PHASE To minimize any vertical bars or stripes visible on the front side of the monitor to ON or OFF.
Owner's Manual (English)
Page 14
... use the adjusted screen. Screen when applied Screen when not applied Main menu Sub menu Description MOVIE This feature lets you touch the of the monitor.
... use the adjusted screen. Screen when applied Screen when not applied Main menu Sub menu Description MOVIE This feature lets you touch the of the monitor.
Owner's Manual (English)
Page 17
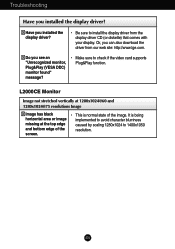
Or, you installed the display driver? L2000CE Monitor Image not stretched vertically at 1280x1024@60 and 1280x1024@75 resolutions Image Image has black horizontal area or image missing at the top edge and ... of the screen. A16 Be sure to install the display driver from our web site: http://www.lge.com. Troubleshooting Have you see an "Unrecognized monitor, Plug&Play (VESA DDC) monitor found" message? Have you can also download the driver from the display driver CD (or diskette) that comes with your display.
Or, you installed the display driver? L2000CE Monitor Image not stretched vertically at 1280x1024@60 and 1280x1024@75 resolutions Image Image has black horizontal area or image missing at the top edge and ... of the screen. A16 Be sure to install the display driver from our web site: http://www.lge.com. Troubleshooting Have you see an "Unrecognized monitor, Plug&Play (VESA DDC) monitor found" message? Have you can also download the driver from the display driver CD (or diskette) that comes with your display.
Owner's Manual (English)
Page 23
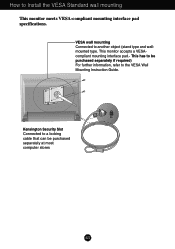
This has to the VESA Wall Mounting Instruction Guide. Kensington Security Slot Connected to a locking cable that can be purchased separately if required) For further information, refer to be purchased separately at most computer stores A22 How to another object (stand type and wallmounted type. VESA wall mounting Connected to Install the VESA Standard wall mounting This monitor meets VESA-compliant mounting interface pad specifications. This monitor accepts a VESAcompliant mounting interface pad.-
This has to the VESA Wall Mounting Instruction Guide. Kensington Security Slot Connected to a locking cable that can be purchased separately if required) For further information, refer to be purchased separately at most computer stores A22 How to another object (stand type and wallmounted type. VESA wall mounting Connected to Install the VESA Standard wall mounting This monitor meets VESA-compliant mounting interface pad specifications. This monitor accepts a VESAcompliant mounting interface pad.-


