

Owner's Manual
Page 7
... that this function once again, push the 'AUTO/SET' button on . When monitor power is turned on, the 'Self Image Setting Function' is needed to change the 15 pin high density (3 row) D-sub VGA connector on the OSD adjustment menu. PC-outlet type (Connects to a 15 pin 2 row connector. 2. Connecting the...
... that this function once again, push the 'AUTO/SET' button on . When monitor power is turned on, the 'Self Image Setting Function' is needed to change the 15 pin high density (3 row) D-sub VGA connector on the OSD adjustment menu. PC-outlet type (Connects to a 15 pin 2 row connector. 2. Connecting the...
Owner's Manual
Page 8
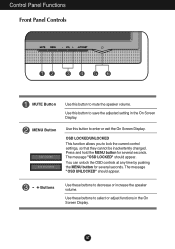
... several seconds. Control Panel Functions Front Panel Controls MUTE Button Use this button to lock the current control settings, so that they cannot be inadvertently changed. MENU Button Use this button to select or adjust functions in the On Screen Display. Press and hold the MENU button for several seconds. Use...
... several seconds. Control Panel Functions Front Panel Controls MUTE Button Use this button to lock the current control settings, so that they cannot be inadvertently changed. MENU Button Use this button to select or adjust functions in the On Screen Display. Press and hold the MENU button for several seconds. Use...

Owner's Manual
Page 9
... Button Use this button to turn the display on or off. A8 The best display mode is in Sleep Mode (Energy Saving), this indicator color changes to enter a selection in the On Screen Display. Power Indicator This Indicator lights up blue when the display operates normally(On Mode). This will automatically...
... Button Use this button to turn the display on or off. A8 The best display mode is in Sleep Mode (Energy Saving), this indicator color changes to enter a selection in the On Screen Display. Power Indicator This Indicator lights up blue when the display operates normally(On Mode). This will automatically...

Owner's Manual
Page 15
... of characters. : Decrease : Increase SHARPNESS To adjust the clearness of the display. VERTICAL To move image left and right. The horizontal screen size will also change. PHASE To adjust the focus of the screen. This item allows you to remove any vertical bars or stripes visible on the screen background. On...
... of characters. : Decrease : Increase SHARPNESS To adjust the clearness of the display. VERTICAL To move image left and right. The horizontal screen size will also change. PHASE To adjust the focus of the screen. This item allows you to remove any vertical bars or stripes visible on the screen background. On...

Owner's Manual
Page 17
... power outlet. ● Is the power indicator • Press the Power button. You can secure the current control settings, so that they cannot be inadvertently changed. frequency range of horizontal or vertical the screen? Check the signal cable and try moving the mouse or pressing any time by pushing the MENU...
... power outlet. ● Is the power indicator • Press the Power button. You can secure the current control settings, so that they cannot be inadvertently changed. frequency range of horizontal or vertical the screen? Check the signal cable and try moving the mouse or pressing any time by pushing the MENU...

Owner's Manual
Page 18
... screen display. • Check Control Panel --> Display --> Settings and see if the frequency or the resolution were changed. A17 Settings. • Check if the screen is set to interlace mode and if yes, change it to fasten if necessary. • Make sure the video card is properly connected and use a screwdriver to...
... screen display. • Check Control Panel --> Display --> Settings and see if the frequency or the resolution were changed. A17 Settings. • Check if the screen is set to interlace mode and if yes, change it to fasten if necessary. • Make sure the video card is properly connected and use a screwdriver to...

Owner's Manual
Page 20
...;C to 60 ˚C Humidity 5 % to 90 % non-Condensing Attached( ), Detached ( O ) Wall-outlet type or PC-outlet type NOTE Information in this document is subject to change without notice. A19
...;C to 60 ˚C Humidity 5 % to 90 % non-Condensing Attached( ), Detached ( O ) Wall-outlet type or PC-outlet type NOTE Information in this document is subject to change without notice. A19

Owner's Manual
Page 21
...;C to 60 ˚C Humidity 5 % to 90 % non-Condensing Attached( ), Detached ( O ) Wall-outlet type or PC-outlet type NOTE Information in this document is subject to change without notice. A20
...;C to 60 ˚C Humidity 5 % to 90 % non-Condensing Attached( ), Detached ( O ) Wall-outlet type or PC-outlet type NOTE Information in this document is subject to change without notice. A20


