
User Guide
Page 2
... have not been designed for more than a short period of time, unplug it from dropping or pushing objects into the display's cabinet openings. Use only a stand recommended by the supplier. To Prevent Fire or Hazards: Always turn the display OFF if you use , and servicing. They may result in a shock or...
... have not been designed for more than a short period of time, unplug it from dropping or pushing objects into the display's cabinet openings. Use only a stand recommended by the supplier. To Prevent Fire or Hazards: Always turn the display OFF if you use , and servicing. They may result in a shock or...

User Guide
Page 4
... injure your foot. Do not carry the product upside down holding only the stand base. Check the direction of the Stand Body, and connect it into the Hinge Body as shown in the picture. Hinge Body Stand Body 3. Once assembled take the monitor up the monitor, ensure that the ... the monitor with its front facing downward on a soft cloth. 2. Connecting the Display Before setting up carefully and face the front side Stand Body Stand Base Important This illustration depicts the general model of connection. The product may differ from the items shown in the picture. Connecting the...
... injure your foot. Do not carry the product upside down holding only the stand base. Check the direction of the Stand Body, and connect it into the Hinge Body as shown in the picture. Hinge Body Stand Body 3. Once assembled take the monitor up the monitor, ensure that the ... the monitor with its front facing downward on a soft cloth. 2. Connecting the Display Before setting up carefully and face the front side Stand Body Stand Base Important This illustration depicts the general model of connection. The product may differ from the items shown in the picture. Connecting the...
User Guide
Page 5
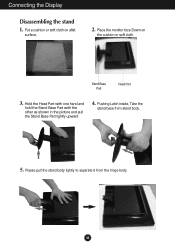
Put a cushion or soft cloth on the cushion or soft cloth. A4 Hold the Head Part with one hand and hold the Stand Base Part with the other as shown in the picture and pull the Stand Base Part lightly upward 4. Please pull the stand body lightly to separate it from stand body. 5. Connecting the Display Disassembling the stand 1. Stand Base Part Head Part 3. Pushing Latch inside, Take the stand base from the hinge body. Place the monitor face Down on aflat surface. 2.
Put a cushion or soft cloth on the cushion or soft cloth. A4 Hold the Head Part with one hand and hold the Stand Base Part with the other as shown in the picture and pull the Stand Base Part lightly upward 4. Please pull the stand body lightly to separate it from stand body. 5. Connecting the Display Disassembling the stand 1. Stand Base Part Head Part 3. Pushing Latch inside, Take the stand base from the hinge body. Place the monitor face Down on aflat surface. 2.

User Guide
Page 19
Specifications Display Sync Input Video Input Resolution Plug&Play Power Consumption Dimensions & Weight Range Power Input Environmental Conditions Stand Base Power cord 17 inches (43 cm) Flat Panel Active matrix-TFT LCD Anti-Glare coating Visible diagonal size : 43 cm 0.264 mm pixel pitch ... 1280 x 1024 @ 75 Hz VESA 1280 x 1024 @ 60 Hz DDC 2B On Mode Sleep Mode Off Mode : 30W(Typ.) ≤ 1W ≤ 1W With Stand Without Stand Width 37.44 cm / 14.74 inches 37.44 cm / 14.74 inches Height 39.085 cm / 15.39 inches 31.36 cm / 12.35...
Specifications Display Sync Input Video Input Resolution Plug&Play Power Consumption Dimensions & Weight Range Power Input Environmental Conditions Stand Base Power cord 17 inches (43 cm) Flat Panel Active matrix-TFT LCD Anti-Glare coating Visible diagonal size : 43 cm 0.264 mm pixel pitch ... 1280 x 1024 @ 75 Hz VESA 1280 x 1024 @ 60 Hz DDC 2B On Mode Sleep Mode Off Mode : 30W(Typ.) ≤ 1W ≤ 1W With Stand Without Stand Width 37.44 cm / 14.74 inches 37.44 cm / 14.74 inches Height 39.085 cm / 15.39 inches 31.36 cm / 12.35...
User Guide
Page 21
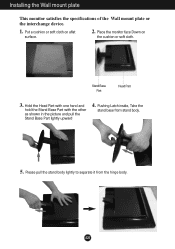
Please pull the stand body lightly to separate it from stand body. 5. Hold the Head Part with one hand and hold the Stand Base Part with the other as shown in the picture and pull the Stand Base Part lightly upward 4. Place the monitor face Down on aflat surface. 2. Put a cushion or soft cloth on the cushion or soft cloth. Pushing Latch inside, Take the stand base from the hinge body. A20 Stand Base Part Head Part 3. Installing the Wall mount plate This monitor satisfies the specifications of the Wall mount plate or the interchange device. 1.
Please pull the stand body lightly to separate it from stand body. 5. Hold the Head Part with one hand and hold the Stand Base Part with the other as shown in the picture and pull the Stand Base Part lightly upward 4. Place the monitor face Down on aflat surface. 2. Put a cushion or soft cloth on the cushion or soft cloth. Pushing Latch inside, Take the stand base from the hinge body. A20 Stand Base Part Head Part 3. Installing the Wall mount plate This monitor satisfies the specifications of the Wall mount plate or the interchange device. 1.

User Guide
Page 22
Installing the Wall mount plate .6 Install the Wall mount plate. Please refer to a locking cable that can be purchased separately at most computer stores. A21 Wall mount plate(Separate purchase) This is stand-type or wall mount type and is purchased. Kensington Security Slot Connected to the installation guide for more details, which is provided when Wall mount plate is connectable with Wall mount plate.
Installing the Wall mount plate .6 Install the Wall mount plate. Please refer to a locking cable that can be purchased separately at most computer stores. A21 Wall mount plate(Separate purchase) This is stand-type or wall mount type and is purchased. Kensington Security Slot Connected to the installation guide for more details, which is provided when Wall mount plate is connectable with Wall mount plate.


