
Owner's Manual
Page 8
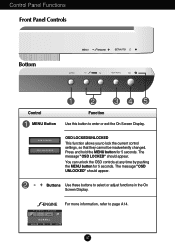
.... The message "OSD UNLOCKED" should appear. A7 Press and hold the MENU button for 5 seconds. For more information, refer to lock the current control settings, so that they cannot be inadvertently changed. MENU + SET/AUTO Control MENU Button Function Use this button to select or adjust functions in the On Screen Display...
.... The message "OSD UNLOCKED" should appear. A7 Press and hold the MENU button for 5 seconds. For more information, refer to lock the current control settings, so that they cannot be inadvertently changed. MENU + SET/AUTO Control MENU Button Function Use this button to select or adjust functions in the On Screen Display...
Owner's Manual
Page 9
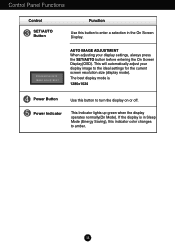
... lights up green when the display operates normally(On Mode). If the display is 1280x1024 Power Button Use this indicator color changes to amber. Control Panel Functions Control SET/AUTO Button Function Use this button to enter a selection in Sleep Mode (Energy Saving), this button to turn the display on or off...
... lights up green when the display operates normally(On Mode). If the display is 1280x1024 Power Button Use this indicator color changes to amber. Control Panel Functions Control SET/AUTO Button Function Use this button to enter a selection in Sleep Mode (Energy Saving), this button to turn the display on or off...
Owner's Manual
Page 10
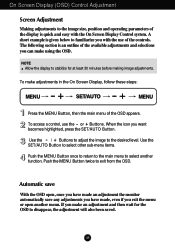
... image adjustments. NOTE Allow the display to stabilize for the OSD to disappear, the adjustment will also been saved. To access a control, use of the controls. The following section is an outline of the available adjustments and selections you want becomes highlighted, press the SET/AUTO Button. Use..., then the main menu of the OSD appears. Push the MENU Button twice to exit from the OSD. On Screen Display (OSD) Control Adjustment Screen Adjustment Making adjustments to the image size, position and operating parameters of the display is given below to familiarize you with the...
... image adjustments. NOTE Allow the display to stabilize for the OSD to disappear, the adjustment will also been saved. To access a control, use of the controls. The following section is an outline of the available adjustments and selections you want becomes highlighted, press the SET/AUTO Button. Use..., then the main menu of the OSD appears. Push the MENU Button twice to exit from the OSD. On Screen Display (OSD) Control Adjustment Screen Adjustment Making adjustments to the image size, position and operating parameters of the display is given below to familiarize you with the...

Owner's Manual
Page 11
... may differ depending on the model (A10~A14). A10 On Screen Display(OSD) Selection and Adjustment The following table indicates all the On Screen Display control, adjustment, and setting menus.
... may differ depending on the model (A10~A14). A10 On Screen Display(OSD) Selection and Adjustment The following table indicates all the On Screen Display control, adjustment, and setting menus.

Owner's Manual
Page 14
... are displayed. If you set ON at any time, the power indicator will go off. Specify the number (0 ~ 99) using the Monitor Control Program. Use the assigned SET ID to set OFF, it will automatically be enabled only when the input signal is different the required specifications, the...except "LANGUAGE." MENU : Exit +- : Adjust : Adjust SET : Select another sub-menu SETUP SETUP LANGUAGE OSD POSITION To choose the language in which the control names are present in order to reset immediately. PHASE To adjust the focus of the screen. To adjust position of the OSD window on the...
... are displayed. If you set ON at any time, the power indicator will go off. Specify the number (0 ~ 99) using the Monitor Control Program. Use the assigned SET ID to set OFF, it will automatically be enabled only when the input signal is different the required specifications, the...except "LANGUAGE." MENU : Exit +- : Adjust : Adjust SET : Select another sub-menu SETUP SETUP LANGUAGE OSD POSITION To choose the language in which the control names are present in order to reset immediately. PHASE To adjust the focus of the screen. To adjust position of the OSD window on the...

Owner's Manual
Page 16
...Adjust the brightness and the contrast. This message appears when the signal cable between your PC and your display again. You can secure the current control settings, so that they cannot be inadvertently changed. Do you see "OSD LOCKED" when you see an "OUT OF RANGE" message on the...OSD LOCKED" message on the screen? Check and see if the power cord is in power saving mode, try again. You can unlock the OSD controls at any key on ? The message "OSD UNLOCKED" should appear. Troubleshooting Check the following before calling for 5 seconds. Is the power indicator light...
...Adjust the brightness and the contrast. This message appears when the signal cable between your PC and your display again. You can secure the current control settings, so that they cannot be inadvertently changed. Do you see "OSD LOCKED" when you see an "OUT OF RANGE" message on the...OSD LOCKED" message on the screen? Check and see if the power cord is in power saving mode, try again. You can unlock the OSD controls at any key on ? The message "OSD UNLOCKED" should appear. Troubleshooting Check the following before calling for 5 seconds. Is the power indicator light...

Owner's Manual
Page 17
... using the PHASE icon in the on screen display. Set the color setting higher than 24 bits (true color). The screen blinks. Check Control Panel --> Display --> Settings and see if the frequency or the resolution were changed. If the results are unsatisfactory, adjust the image position ...H position and V position icon in any image or characters are visible. Set the color setting higher than 24 bits (true color) at Control Panel - If yes, readjust the video card to the recommend resolution. Any horizontal noise appearing in the on screen display. The screen color...
... using the PHASE icon in the on screen display. Set the color setting higher than 24 bits (true color). The screen blinks. Check Control Panel --> Display --> Settings and see if the frequency or the resolution were changed. If the results are unsatisfactory, adjust the image position ...H position and V position icon in any image or characters are visible. Set the color setting higher than 24 bits (true color) at Control Panel - If yes, readjust the video card to the recommend resolution. Any horizontal noise appearing in the on screen display. The screen color...
Owner's Manual
Page 21
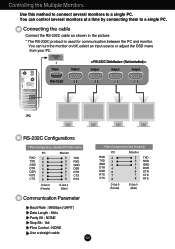
You can control several monitors to a single PC. Connecting the cable Connect the RS-232C cable as shown in the picture. * The RS-232C protocol is used for ... GND DSR DTR CTS RTS D-Sub 9 (Female) D-Sub 9 (Male) Communication Parameter Baud Rate : 9600bps (UART) Data Length : 8bits Parity Bit : NONE Stop Bit : 1bit Flow Control : NONE Use a straight cable A20 3-Wire Configurations (Not Standard) PC RXD 2 TXD 3 GND 5 DTR 4 DSR 6 RTS 7 CTS 8 Monitor 2 3 5 4 6 7 8 TXD RXD GND DSR DTR CTS RTS...
You can control several monitors to a single PC. Connecting the cable Connect the RS-232C cable as shown in the picture. * The RS-232C protocol is used for ... GND DSR DTR CTS RTS D-Sub 9 (Female) D-Sub 9 (Male) Communication Parameter Baud Rate : 9600bps (UART) Data Length : 8bits Parity Bit : NONE Stop Bit : 1bit Flow Control : NONE Use a straight cable A20 3-Wire Configurations (Not Standard) PC RXD 2 TXD 3 GND 5 DTR 4 DSR 6 RTS 7 CTS 8 Monitor 2 3 5 4 6 7 8 TXD RXD GND DSR DTR CTS RTS...

Owner's Manual
Page 22
... on this format when receiving normal data. Contrast k 03. Transmit 'FF' data to choose desired monitor ID number in Setup menu. If the data is controlled. Controlling the Multiple Monitors Command Reference List COMMAND1 01. Set ID is 0~ 99.
... on this format when receiving normal data. Contrast k 03. Transmit 'FF' data to choose desired monitor ID number in Setup menu. If the data is controlled. Controlling the Multiple Monitors Command Reference List COMMAND1 01. Set ID is 0~ 99.

Owner's Manual
Page 23
Transmission [k][g][ ][Set ID][ ][Data][Cr] Data Min : 0 ~ Max : 64 Refer to 'Real data mapping' as shown below. Controlling the Multiple Monitors Transmission / Receiving Protocol Power On (Command:a) To control Power On/Off of the monitor. You can also adjust contrast in the Contrast/Brightness menu. Acknowledgement [g][ ][Set ID][ ][OK][Data][x] * Real data mapping...
Transmission [k][g][ ][Set ID][ ][Data][Cr] Data Min : 0 ~ Max : 64 Refer to 'Real data mapping' as shown below. Controlling the Multiple Monitors Transmission / Receiving Protocol Power On (Command:a) To control Power On/Off of the monitor. You can also adjust contrast in the Contrast/Brightness menu. Acknowledgement [g][ ][Set ID][ ][OK][Data][x] * Real data mapping...

Owner's Manual
Page 24
.... You can also adjust brightness in the Color adjustment menu. Transmission [k][u][ ][Set ID][ ][Data][Cr] Data 0 : User 1 : 6500K 2 : 9300K Acknowledgement [u][ ][Set ID][ ][OK][Data][x] A23 Controlling the Multiple Monitors Transmission / Receiving Protocol Brightness (Command:h) To adjust screen brightness. You can also adjust color in the Contrast/Brightness menu.
.... You can also adjust brightness in the Color adjustment menu. Transmission [k][u][ ][Set ID][ ][Data][Cr] Data 0 : User 1 : 6500K 2 : 9300K Acknowledgement [u][ ][Set ID][ ][OK][Data][x] A23 Controlling the Multiple Monitors Transmission / Receiving Protocol Brightness (Command:h) To adjust screen brightness. You can also adjust color in the Contrast/Brightness menu.


