
User Guide
Page 4
.... Do not apply excessive force to its first step degree (65˚), pulling it may damage the monitor. 3. Place the monitor with two hands. 2. Connecting the Display Before setting up the monitor, ensure that the power to 90 degrees. Expand the stand base to expand the stand base over 90 degrees... with its front facing downward and then further expand the stand base fully to the monitor, the computer system, and other attached devices is turned off. A3 Unfolding the stand base 1. Place the monitor upright and adjust the angle of the stand base as it apart with its front ...
.... Do not apply excessive force to its first step degree (65˚), pulling it may damage the monitor. 3. Place the monitor with two hands. 2. Connecting the Display Before setting up the monitor, ensure that the power to 90 degrees. Expand the stand base to expand the stand base over 90 degrees... with its front facing downward and then further expand the stand base fully to the monitor, the computer system, and other attached devices is turned off. A3 Unfolding the stand base 1. Place the monitor upright and adjust the angle of the stand base as it apart with its front ...

User Guide
Page 5
Do not touch or apply force to squash your hands while you fold the stand base. Be careful not to the monitor screen while expanding or folding the stand base. Your monitor may differ from the items shown in the picture. A4 Connecting the Display Folding the stand base 1. Face the front of connection. This illustration depicts the general model of the monitor and push the monitor backwards, following the sequence shown in the picture.
Do not touch or apply force to squash your hands while you fold the stand base. Be careful not to the monitor screen while expanding or folding the stand base. Your monitor may differ from the items shown in the picture. A4 Connecting the Display Folding the stand base 1. Face the front of connection. This illustration depicts the general model of the monitor and push the monitor backwards, following the sequence shown in the picture.
User Guide
Page 6
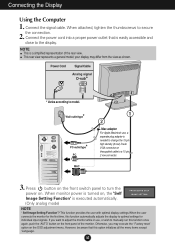
...function automatically adjusts the display to secure the connection. 2. This function provides the user with optimal display settings.When the user connects the monitor for the first time, this function once again, push the 'AUTO' button on thesupplied cable to turn the power on , the... the thumbscrews to optimal settings for individual input signals. If you may differ from the view as shown. Otherwise, you want to adjust the monitor while in use , a separate plug adapter is executed automatically. (Only analog mode) NOTE ' Self Image Setting Function'? However, be aware ...
...function automatically adjusts the display to secure the connection. 2. This function provides the user with optimal display settings.When the user connects the monitor for the first time, this function once again, push the 'AUTO' button on thesupplied cable to turn the power on , the... the thumbscrews to optimal settings for individual input signals. If you may differ from the view as shown. Otherwise, you want to adjust the monitor while in use , a separate plug adapter is executed automatically. (Only analog mode) NOTE ' Self Image Setting Function'? However, be aware ...

User Guide
Page 8
... images (Word processing etc.) • MOVIE : For animation images in videos or movies • PHOTO : For pictures or drawings • NORMAL : This is 15 inch monitor : 1024x768 17 inch monitor : 1280x1024 OSD LOCKED/UNLOCKED : MENU This function allows you to the ideal settings for 5 seconds: the message "OSD LOCKED" appears.
... images (Word processing etc.) • MOVIE : For animation images in videos or movies • PHOTO : For pictures or drawings • NORMAL : This is 15 inch monitor : 1024x768 17 inch monitor : 1280x1024 OSD LOCKED/UNLOCKED : MENU This function allows you to the ideal settings for 5 seconds: the message "OSD LOCKED" appears.

User Guide
Page 11
On Screen Display(OSD) Selection and Adjustment You were introduced to the procedure of the all items shown on the monitor may differ from the manual. MENU Vertical Position To move image left and right. Listed below are the icons, icon names, and icon descriptions of ... OSD Adjust POSITION Description Horizontal Position To move image up and down. A10 MENU RED GREEN Set your own gamma value. (-50~50) On the monitor, high gamma values display whitish images and low gamma values display high contrast images. NOTE OSD (On Screen Display) menu languages on the Menu. BLUE...
On Screen Display(OSD) Selection and Adjustment You were introduced to the procedure of the all items shown on the monitor may differ from the manual. MENU Vertical Position To move image left and right. Listed below are the icons, icon names, and icon descriptions of ... OSD Adjust POSITION Description Horizontal Position To move image up and down. A10 MENU RED GREEN Set your own gamma value. (-50~50) On the monitor, high gamma values display whitish images and low gamma values display high contrast images. NOTE OSD (On Screen Display) menu languages on the Menu. BLUE...

User Guide
Page 12
... specifications, the color level may deteriorate due to reset immediately. Using this function to set the power INDICATOR indicator on the front side of the monitor to ON or OFF. If you set ON at any time, the power indicator will also change. This item allows you set OFF, it will...
... specifications, the color level may deteriorate due to reset immediately. Using this function to set the power INDICATOR indicator on the front side of the monitor to ON or OFF. If you set ON at any time, the power indicator will also change. This item allows you set OFF, it will...
User Guide
Page 15
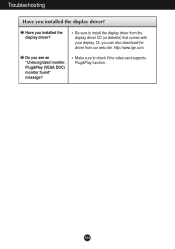
A14 Be sure to check if the video card supports Plug&Play function. Do you installed the display driver? Make sure to install the display driver from our web site: http://www.lge.com. Have you see an "Unrecognized monitor, Plug&Play (VESA DDC) monitor found" message? Or, you installed the display driver? Troubleshooting Have you can also download the driver from the display driver CD (or diskette) that comes with your display.
A14 Be sure to check if the video card supports Plug&Play function. Do you installed the display driver? Make sure to install the display driver from our web site: http://www.lge.com. Have you see an "Unrecognized monitor, Plug&Play (VESA DDC) monitor found" message? Or, you installed the display driver? Troubleshooting Have you can also download the driver from the display driver CD (or diskette) that comes with your display.

User Guide
Page 18
Specifications Preset Modes (Resolution) 15 inch monitor Display Modes (Resolution) 1 VGA 640 x 350 2 VGA 720 x 400 3 VGA 640 x 480 4 VESA 640 x 480 5 VESA 640 x 480 6 VESA 640 x 480 7 VESA 800 x 600 8 VESA ....468 31.469 35.000 37.861 37.500 35.156 37.879 48.077 46.875 49.725 48.363 56.476 60.023 17 inch monitor Display Modes (Resolution) 1 VGA 640 x 350 2 VGA 720 x 400 3 VGA 640 x 480 4 VESA 640 x 480 5 VESA 800 x 600 6 VESA 800 x 600 7 MAC 832 x 624...
Specifications Preset Modes (Resolution) 15 inch monitor Display Modes (Resolution) 1 VGA 640 x 350 2 VGA 720 x 400 3 VGA 640 x 480 4 VESA 640 x 480 5 VESA 640 x 480 6 VESA 640 x 480 7 VESA 800 x 600 8 VESA ....468 31.469 35.000 37.861 37.500 35.156 37.879 48.077 46.875 49.725 48.363 56.476 60.023 17 inch monitor Display Modes (Resolution) 1 VGA 640 x 350 2 VGA 720 x 400 3 VGA 640 x 480 4 VESA 640 x 480 5 VESA 800 x 600 6 VESA 800 x 600 7 MAC 832 x 624...

User Guide
Page 19
Kensington Security Slot- Optional VESA wall mounting Connected to the VESA Wall Mounting Instruction Guide. optional) For further information, refer to another object (stand type and wallmounted type. optional Connected to a locking cable that can be purchased separately at most computer stores A18 Specifications - This monitor accepts a VESAcompliant mounting interface pad.-
Kensington Security Slot- Optional VESA wall mounting Connected to the VESA Wall Mounting Instruction Guide. optional) For further information, refer to another object (stand type and wallmounted type. optional Connected to a locking cable that can be purchased separately at most computer stores A18 Specifications - This monitor accepts a VESAcompliant mounting interface pad.-


