
Owners Manual
Page 1
CON ITI NE Please read the operating instructions care_lly and thoroughly air _nditioner. before installing and safety precautions and operating your room AI IClONA A_ _JAL 8 ©P°ETAH_O= Por favor lea 1as instrucciones de operaci6n y las precauciones de seguridad cuidadosa y totalmente ,antes de instalar y operar su a_ndicionador de aire de ventanao MODEL, MODELO: HBLG1453E Manufactured by LG Elledro,nics
CON ITI NE Please read the operating instructions care_lly and thoroughly air _nditioner. before installing and safety precautions and operating your room AI IClONA A_ _JAL 8 ©P°ETAH_O= Por favor lea 1as instrucciones de operaci6n y las precauciones de seguridad cuidadosa y totalmente ,antes de instalar y operar su a_ndicionador de aire de ventanao MODEL, MODELO: HBLG1453E Manufactured by LG Elledro,nics
Owners Manual
Page 2
...air conditioner, , When the power co_d i[s to, _ rep,la_,, rep,l_cement work sh_ll _ _orm_ by _uth_iz_ _rsennel on_ u_ng _ly genuine rep,la_ part& • _stal_tion work _ _ perforrree in the d_ar"rlOf 1:roublesh_ing tips, If you review our chart ,of purc_'}ase or for service at all PRECAUTION - FOR YOUR RECORDS Write the m,_el arid s.eria_numbers he_e: Mode...not need to call for warranty issues. ,o READ THIS MANUAL Inside you will 'find many i3elpfuI hints on how to c_mmon prob!ems in a_o_ian,_ with • e N_tio_l Elec_ic Code by qua_it_ _n_ _hed_ed pers_ne_ on your part can ...
...air conditioner, , When the power co_d i[s to, _ rep,la_,, rep,l_cement work sh_ll _ _orm_ by _uth_iz_ _rsennel on_ u_ng _ly genuine rep,la_ part& • _stal_tion work _ _ perforrree in the d_ar"rlOf 1:roublesh_ing tips, If you review our chart ,of purc_'}ase or for service at all PRECAUTION - FOR YOUR RECORDS Write the m,_el arid s.eria_numbers he_e: Mode...not need to call for warranty issues. ,o READ THIS MANUAL Inside you will 'find many i3elpfuI hints on how to c_mmon prob!ems in a_o_ian,_ with • e N_tio_l Elec_ic Code by qua_it_ _n_ _hed_ed pers_ne_ on your part can ...

Owners Manual
Page 3
...user or other peop4e a_ _o_ be fo[!owed damage, the following instructions, must • incorrect o_rati,on due to follow the instruction. classified by the foBowing i_iications, • Meanings I 't may cau_ explos.ion or fire. ° it may cause fire and electric shock. • I of s,ym_ls used... in this manua_ are as shown below. Bo o Bie sure to ignoring instruction wi_ _use harm or _mage. The seriousness, is. onot, [] Ins llation • No installation may cause fire and electric shock accident:. °...
...user or other peop4e a_ _o_ be fo[!owed damage, the following instructions, must • incorrect o_rati,on due to follow the instruction. classified by the foBowing i_iications, • Meanings I 't may cau_ explos.ion or fire. ° it may cause fire and electric shock. • I of s,ym_ls used... in this manua_ are as shown below. Bo o Bie sure to ignoring instruction wi_ _use harm or _mage. The seriousness, is. onot, [] Ins llation • No installation may cause fire and electric shock accident:. °...

Owners Manual
Page 4
i Operation , Otherwise, it wil! _use ele_dc s_ck or fire due to heat ,get.ration. , I!twill! cause electdc shock or fire. • It will cause electdc _ock or fire due to heat generation. , It will cause electric shock or fire due to heat gestation • No groundir,_ may cause etectdc shock (See installation Manual). • Othe_ise it wil!lcause eiectric shock or fire due to heat generation_or electric _ock, • it may cau_ fire and electdc shock. • lit will _use electdc shock. o It may cau_ fire and electlic shock accident.
i Operation , Otherwise, it wil! _use ele_dc s_ck or fire due to heat ,get.ration. , I!twill! cause electdc shock or fire. • It will cause electdc _ock or fire due to heat generation. , It will cause electric shock or fire due to heat gestation • No groundir,_ may cause etectdc shock (See installation Manual). • Othe_ise it wil!lcause eiectric shock or fire due to heat generation_or electric _ock, • it may cau_ fire and electdc shock. • lit will _use electdc shock. o It may cau_ fire and electlic shock accident.

Owners Manual
Page 5
It may _use injury, Sharp . • It w[Hcau_ failure of machine • It is concern of damage, due to the falling of produG, • It may cause electric shock an damage. • Prevent accidental sta_up ,andthe possibility of appliance or accident. / / / [] Operation • If _eaving appliance damaged, there is not designed to ca] _e or electric s_ck. entire house. • It may _u_se explosion, fire, and burn. [] Installation CAUT,ON • They are sharp and may cause injury. • it may cause failure of injury,.,
It may _use injury, Sharp . • It w[Hcau_ failure of machine • It is concern of damage, due to the falling of produG, • It may cause electric shock an damage. • Prevent accidental sta_up ,andthe possibility of appliance or accident. / / / [] Operation • If _eaving appliance damaged, there is not designed to ca] _e or electric s_ck. entire house. • It may _u_se explosion, fire, and burn. [] Installation CAUT,ON • They are sharp and may cause injury. • it may cause failure of injury,.,

Owners Manual
Page 6
Water may deteriorate, change color, or develop surfa_ flaws. . Operation 'without filters 'wi[ll _use failure. , The ap_arance of tPe air _ndit[oner may e_,er the unit and degrade the insulation. lit contains containments and will[ make you sick./This _u]d damage your h_]th. . _,ere is an air conditioner, not a precision refrigeration system. . it : may _use an electric shock, . Since the fan rotates at high _ed ,during operation, it is dangerof fireor e]ectdc shock. . It may cause injury. , This _u]d iinjure the _t or plant. .
Water may deteriorate, change color, or develop surfa_ flaws. . Operation 'without filters 'wi[ll _use failure. , The ap_arance of tPe air _ndit[oner may e_,er the unit and degrade the insulation. lit contains containments and will[ make you sick./This _u]d damage your h_]th. . _,ere is an air conditioner, not a precision refrigeration system. . it : may _use an electric shock, . Since the fan rotates at high _ed ,during operation, it is dangerof fireor e]ectdc shock. . It may cause injury. , This _u]d iinjure the _t or plant. .

Owners Manual
Page 7
... installation spec:ialistfor installaSon Piug in such a manner _uld harm such property, Do not:use water to clean inside the air cond tioner,, Exposure to water can destroy _e insulation, leading to possibie electric:shock, '¢_en cleaning the unit, first make sure that the power and breaker are turned off The fan ...inner parts of oxygen deficiency, ventil_e _e room when using t_ethet with stoves or other Do not:use an extension _rd Do not sta_'stop operation by p_ugging/unp_uggingthe _wer cord, _lf cordipllug is ,damaged,replace only with an authorized part Being ex_sed to direct _fflow...
... installation spec:ialistfor installaSon Piug in such a manner _uld harm such property, Do not:use water to clean inside the air cond tioner,, Exposure to water can destroy _e insulation, leading to possibie electric:shock, '¢_en cleaning the unit, first make sure that the power and breaker are turned off The fan ...inner parts of oxygen deficiency, ventil_e _e room when using t_ethet with stoves or other Do not:use an extension _rd Do not sta_'stop operation by p_ugging/unp_uggingthe _wer cord, _lf cordipllug is ,damaged,replace only with an authorized part Being ex_sed to direct _fflow...

Owners Manual
Page 8
The mmo,te control and contro/ _l will look like those repm_nt_ in the fol/owtn'gpictur_ S ® ®
The mmo,te control and contro/ _l will look like those repm_nt_ in the fol/owtn'gpictur_ S ® ®

Owners Manual
Page 9
... _th _tt_ies are new. . REMOTE CONTROL SE_R :i_ Push oL_the cover on a wa!l using the _untabte hield_. _WER Operation _a_s when this button is net going to,be used for energy savi_9n operation, Select fan mode br basic ventilating fan operation, Select dry mode br dry operation FAN SPEED SELECTOR For i_qcreasedpower while cooling!,select a higher fan speed, 3 steps: High e Low e Med ::_ O'_OFF TIMER The timer can be set to start and stop the unit:i,nhourly increments...
... _th _tt_ies are new. . REMOTE CONTROL SE_R :i_ Push oL_the cover on a wa!l using the _untabte hield_. _WER Operation _a_s when this button is net going to,be used for energy savi_9n operation, Select fan mode br basic ventilating fan operation, Select dry mode br dry operation FAN SPEED SELECTOR For i_qcreasedpower while cooling!,select a higher fan speed, 3 steps: High e Low e Med ::_ O'_OFF TIMER The timer can be set to start and stop the unit:i,nhourly increments...

Owners Manual
Page 10
... • Recom_ndi_ orientation of _e air conditioner • Adjustiing Horizonta| Air Flow IDi_tion A_ustJngithe, vertical louvers le_ &qd right will change horizontal aidlow. • Adju_iing V_tica| A|r Flow Direction AdiusSng the hodzontaJ vane up and do_ will change vertical airflow° The vane can _ adjust_ by changing the direction of _e air conditioneCs louvers, This can also increase 9_e coo_ingefficiency...
... • Recom_ndi_ orientation of _e air conditioner • Adjustiing Horizonta| Air Flow IDi_tion A_ustJngithe, vertical louvers le_ &qd right will change horizontal aidlow. • Adju_iing V_tica| A|r Flow Direction AdiusSng the hodzontaJ vane up and do_ will change vertical airflow° The vane can _ adjust_ by changing the direction of _e air conditioneCs louvers, This can also increase 9_e coo_ingefficiency...
Owners Manual
Page 11
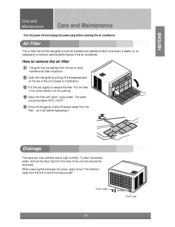
... the unit (based on installation), Pui!the tab siightiy to avoid iniuring yourse#, Turn thepo,_t off and unpl_ th_ powerplug _,to,te cleaning the air condtt_net, The air filter behind the inlet grille should be [below40'_ (104_) ® Ri_se off and gently shake off excess water from the filter. Let it dry bebre replaceing it The base pan may be opened from...
... the unit (based on installation), Pui!the tab siightiy to avoid iniuring yourse#, Turn thepo,_t off and unpl_ th_ powerplug _,to,te cleaning the air condtt_net, The air filter behind the inlet grille should be [below40'_ (104_) ® Ri_se off and gently shake off excess water from the filter. Let it dry bebre replaceing it The base pan may be opened from...

Owners Manual
Page 12
Install the drain pan to the right comer of the drain pan,You can purchase the drain hose or tubing Ioc_ly to the outlet located at the bosom of ;the cabinet with 4 (or 2} screws. Connect the drain hose of 3/5" insi_ diameter to sa_s_ your particular hinds. (Dtsin hose is located in the air Remove the hole rubber from Me base-pan (for sorr_ models}. Theair_nditioneermp...
Install the drain pan to the right comer of the drain pan,You can purchase the drain hose or tubing Ioc_ly to the outlet located at the bosom of ;the cabinet with 4 (or 2} screws. Connect the drain hose of 3/5" insi_ diameter to sa_s_ your particular hinds. (Dtsin hose is located in the air Remove the hole rubber from Me base-pan (for sorr_ models}. Theair_nditioneermp...

Owners Manual
Page 13
CA_ON: Dis appliance should be ins_l|ed in accordance with natioina] wiring regulations, The fo]lo'wlng information serves acts as a guide to help to exp]ain product f_tures, ® ® You can choose be_n _o me_ods below ac_rding to your window stool shape and preference • Fastenthe stopper using 2 screw hol,es,and lead out the _wer cord through sli't "A'_,, * Fasten tildes, topper using lee screw hole, and rotate properly to lead the power cord out _r,o_Jghsift "B' Power _rd
CA_ON: Dis appliance should be ins_l|ed in accordance with natioina] wiring regulations, The fo]lo'wlng information serves acts as a guide to help to exp]ain product f_tures, ® ® You can choose be_n _o me_ods below ac_rding to your window stool shape and preference • Fastenthe stopper using 2 screw hol,es,and lead out the _wer cord through sli't "A'_,, * Fasten tildes, topper using lee screw hole, and rotate properly to lead the power cord out _r,o_Jghsift "B' Power _rd

Owners Manual
Page 14
... There should be n_oolbstades0such as a fence and wall, within 20"' from the bosom of the upper sash to the window stool° Y 29" to the outside air wili greatly reduce the cooling efficiency of the air conditioner, Fence radiation CA_|ON: AIII side louvers of outside oi| the structure, Install the unit a li_le s_antedso the back is designed...
... There should be n_oolbstades0such as a fence and wall, within 20"' from the bosom of the upper sash to the window stool° Y 29" to the outside air wili greatly reduce the cooling efficiency of the air conditioner, Fence radiation CA_|ON: AIII side louvers of outside oi| the structure, Install the unit a li_le s_antedso the back is designed...

Owners Manual
Page 15
... the top oif the _b,i_t with 10 Type, A _rews _. WINF_}W LOCKING BRACKET i3 DRA_N PiPE 14 FRAME GUIDE 15 FOAM PE 2 2 4 _4 7 5 2 2 1 1 1 1 ..........2 1 [ SCREWDRIVER(Philips and F'latead), RLIILER, KNIFE, HAMMER,, PENCIL,, LEVEL ] PREPARATION OF CHASSIS Remove t}-_ _rews which fasten the cabinet at _th ...the Foam-Seal @to the proper ],ength. Cut the window _stl seal to the u_erside of the Upper Guide. 1 FRAME CURTAIN £ SUPPORT B RACK ET 3 SILL BRACKET 4 __._5 6 7 8 9 10 LOCK NUT ._. .° _REW (TYPE Bi SCREW (_'PE C) _REW LTYPIE D) CARRIAGE BOLT ...
... the top oif the _b,i_t with 10 Type, A _rews _. WINF_}W LOCKING BRACKET i3 DRA_N PiPE 14 FRAME GUIDE 15 FOAM PE 2 2 4 _4 7 5 2 2 1 1 1 1 ..........2 1 [ SCREWDRIVER(Philips and F'latead), RLIILER, KNIFE, HAMMER,, PENCIL,, LEVEL ] PREPARATION OF CHASSIS Remove t}-_ _rews which fasten the cabinet at _th ...the Foam-Seal @to the proper ],ength. Cut the window _stl seal to the u_erside of the Upper Guide. 1 FRAME CURTAIN £ SUPPORT B RACK ET 3 SILL BRACKET 4 __._5 6 7 8 9 10 LOCK NUT ._. .° _REW (TYPE Bi SCREW (_'PE C) _REW LTYPIE D) CARRIAGE BOLT ...

Owners Manual
Page 16
... 1/2" e,l water in bottom pialn. _O_n the window, Mark a _ineon the center of _e window stool belbt,_eenthe si_ window stop moldings, Loosely attach the sill brack_ to the suppo_ bracke_ using _e carnage _:_itand the I_k nut, A_aclhthe si_lbracket to the window sill using _e screws (Type B),, Carefuliy ... a_ach the suppo_ bracket to _e cabinet track ho_e, Use the first track hole after the sill bracket on the outer _g,e of Frame cu_ain is d_igned to S-_ewindow stool by driving the screws (Type B) _rough the cabin_ into window stool 2, The cabin_ shou!d be installed wi_ a very slight...
... 1/2" e,l water in bottom pialn. _O_n the window, Mark a _ineon the center of _e window stool belbt,_eenthe si_ window stop moldings, Loosely attach the sill brack_ to the suppo_ bracke_ using _e carnage _:_itand the I_k nut, A_aclhthe si_lbracket to the window sill using _e screws (Type B),, Carefuliy ... a_ach the suppo_ bracket to _e cabinet track ho_e, Use the first track hole after the sill bracket on the outer _g,e of Frame cu_ain is d_igned to S-_ewindow stool by driving the screws (Type B) _rough the cabin_ into window stool 2, The cabin_ shou!d be installed wi_ a very slight...

Owners Manual
Page 17
...ret_ner bar un#l it meets, A_ach each Frame cu_ain the window sash by using screws (Type C,} (See Fig, 6) track Fro_ Angle Q Screw(Ty_ B) Fig. 5, Slide _e unit into the cabi#_et(See Fig, 7! CA_ON: For security purpose, reinstag screws(Type A) at cablnet's sides. _ CUt _rle... Foam=stripto the proper length _d inseA between the upper window sash and _e bwer w_ndowsash(See Fig i8} A_ach 'the Window locking bracket with a screw (Type C,} (See Fig, 9) Power ,Cord Screw ...
...ret_ner bar un#l it meets, A_ach each Frame cu_ain the window sash by using screws (Type C,} (See Fig, 6) track Fro_ Angle Q Screw(Ty_ B) Fig. 5, Slide _e unit into the cabi#_et(See Fig, 7! CA_ON: For security purpose, reinstag screws(Type A) at cablnet's sides. _ CUt _rle... Foam=stripto the proper length _d inseA between the upper window sash and _e bwer w_ndowsash(See Fig i8} A_ach 'the Window locking bracket with a screw (Type C,} (See Fig, 9) Power ,Cord Screw ...

Owners Manual
Page 18
... Push the grille in un_l it snaps into the tabs o# the front of an extension cord. Line Cord Plug ...._.. _. ,ij+ J_._'_l _'_J _Do not under any ircumsta_ces oat or remove the I grounding prong Power supply ,cord w_h 3-prong grounding pilug Use Wall Receptacle Power Supply Standard !25V, 3-wire grounding receptacle rated 15A, 125V AC Use 15, AMP, time delay _se or circuit breaker. However, if...
... Push the grille in un_l it snaps into the tabs o# the front of an extension cord. Line Cord Plug ...._.. _. ,ij+ J_._'_l _'_J _Do not under any ircumsta_ces oat or remove the I grounding prong Power supply ,cord w_h 3-prong grounding pilug Use Wall Receptacle Power Supply Standard !25V, 3-wire grounding receptacle rated 15A, 125V AC Use 15, AMP, time delay _se or circuit breaker. However, if...

Owners Manual
Page 19
... these situations Unplugging _e power cord fr_uen_y can lead to the wall re_ptacle cover screw do_ no_ ground the appliance unless the cover screw ts metal, and not insul_, and the wall receptacle is propedy grounded. The customer should have the circuit choked by a qualified elec¢rician to use an adapter, a TEMPORARY CONNECTION may be replaced by a _ree-s!ot _grounding...
... these situations Unplugging _e power cord fr_uen_y can lead to the wall re_ptacle cover screw do_ no_ ground the appliance unless the cover screw ts metal, and not insul_, and the wall receptacle is propedy grounded. The customer should have the circuit choked by a qualified elec¢rician to use an adapter, a TEMPORARY CONNECTION may be replaced by a _ree-s!ot _grounding...

Owners Manual
Page 20
... can refer to the Energy Star program in fro_ of a power f_lure, set _e power control to OFF° When the power is a normal operatJonai feature. Turn _e knob to prevent the compressor from the rear of • _emanual • After the air conditioner is turned on, you need to give the air _ndihoner some time to coo_the room • Check for open furnace floor res...
... can refer to the Energy Star program in fro_ of a power f_lure, set _e power control to OFF° When the power is a normal operatJonai feature. Turn _e knob to prevent the compressor from the rear of • _emanual • After the air conditioner is turned on, you need to give the air _ndihoner some time to coo_the room • Check for open furnace floor res...


