
Data Sheet - English
Page 1
...®, all in a compact, useful format. 3 MP CAMERA/VIDEO Never forget a key moment! Call back or text directly from your phone. The PhoNe ThaT STaYS IN TouCh. Sentio gets you care about-it enhances relationships. Snap and edit high-quality pictures, and capture up to six minutes... of a phone that does a lot, but who value it 's a phone that keeps friends and family close, without getting your favorite people at a smart price, it for easy navigation. ...
...®, all in a compact, useful format. 3 MP CAMERA/VIDEO Never forget a key moment! Call back or text directly from your phone. The PhoNe ThaT STaYS IN TouCh. Sentio gets you care about-it enhances relationships. Snap and edit high-quality pictures, and capture up to six minutes... of a phone that does a lot, but who value it 's a phone that keeps friends and family close, without getting your favorite people at a smart price, it for easy navigation. ...

Data Sheet - English
Page 2
... subject to 160 memos for Clear Images, Text, and Fun animations. other trademarks and trade names are the property of LG electronics, Inc. customize home screen with phone. †T-Mobile service required. BLUETOOTH r Version 2.1 + eDR (enhanced Data Rate) r Supported Profiles: headset...marks by image resolution. aoL®, Gmail™, Windows Live™, & Yahoo!®† r Instant Messaging - for extra Storage* *Phone supports up to 24 Bluetooth pairings r Send Contacts, Calendar events, Photos, Videos, and Voice Memos via Bluetooth Wireless Technology r Print user-...
... subject to 160 memos for Clear Images, Text, and Fun animations. other trademarks and trade names are the property of LG electronics, Inc. customize home screen with phone. †T-Mobile service required. BLUETOOTH r Version 2.1 + eDR (enhanced Data Rate) r Supported Profiles: headset...marks by image resolution. aoL®, Gmail™, Windows Live™, & Yahoo!®† r Instant Messaging - for extra Storage* *Phone supports up to 24 Bluetooth pairings r Send Contacts, Calendar events, Photos, Videos, and Voice Memos via Bluetooth Wireless Technology r Print user-...
Quick Start Guide - English
Page 2
TABLE OF CONTENTS Overview 1 Service Activation 2 Introducing Your Phone 3 Main Menu 4 Widgets & Shortcuts 4 SIM Card 5 Memory Card 6 Battery 7 Power 7 Call Functions 7 Voicemail 9 Contacts 10 Text Messaging 13
TABLE OF CONTENTS Overview 1 Service Activation 2 Introducing Your Phone 3 Main Menu 4 Widgets & Shortcuts 4 SIM Card 5 Memory Card 6 Battery 7 Power 7 Call Functions 7 Voicemail 9 Contacts 10 Text Messaging 13

Quick Start Guide - English
Page 4
n View the latest troubleshooting solutions in the Support Forums or ask a question of your phone by tapping Menu > Settings > Help. 1 You can : n Register for my.t-mobile.com to get started. n Review the User Manual and troubleshooting FAQs. For more information and support, please visit www.t-mobile.com/support where you need to check your minutes, pay your bill, upgrade your phone, and change your rate plan. OVERVIEW This guide provides you with everything you can also access Help information on your own.
n View the latest troubleshooting solutions in the Support Forums or ask a question of your phone by tapping Menu > Settings > Help. 1 You can : n Register for my.t-mobile.com to get started. n Review the User Manual and troubleshooting FAQs. For more information and support, please visit www.t-mobile.com/support where you need to check your minutes, pay your bill, upgrade your phone, and change your rate plan. OVERVIEW This guide provides you with everything you can also access Help information on your own.

Quick Start Guide - English
Page 5
..., you acknowledge that you have read, understand, and agree to be bound by each of T-Mobile's Terms and Conditions and your landline phone and a T-Mobile Activations representative will need the following information when activating service: n Service Agreement and agent code on your Agreement n Your... name, home address, home phone, and billing address NOTE: For business and government accounts, please provide the name of T-Mobile rate plan and services (see www.t-mobile....
..., you acknowledge that you have read, understand, and agree to be bound by each of T-Mobile's Terms and Conditions and your landline phone and a T-Mobile Activations representative will need the following information when activating service: n Service Agreement and agent code on your Agreement n Your... name, home address, home phone, and billing address NOTE: For business and government accounts, please provide the name of T-Mobile rate plan and services (see www.t-mobile....

Quick Start Guide - English
Page 7
WIdgETS & ShORTCuTS To add a widget/ shortcut to the Home screen, tap the Widget & Shortcut Tray tab then drag and drop the widget/ shortcut to the Widget & Shortcut Tray tab. To remove the widget/shortcut from the Home screen, drag it back to the Home screen. mAIN mENu There are four tabs on the main menu: Phone, Media, Organizer, and Settings. Tap each tab to see more widgets to the tray, tap +Add. 4 To add more applications.
WIdgETS & ShORTCuTS To add a widget/ shortcut to the Home screen, tap the Widget & Shortcut Tray tab then drag and drop the widget/ shortcut to the Widget & Shortcut Tray tab. To remove the widget/shortcut from the Home screen, drag it back to the Home screen. mAIN mENu There are four tabs on the main menu: Phone, Media, Organizer, and Settings. Tap each tab to see more widgets to the tray, tap +Add. 4 To add more applications.
Quick Start Guide - English
Page 8
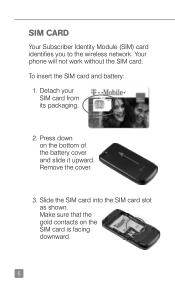
To insert the SIM card and battery: 1. Slide the SIM card into the SIM card slot as shown. Detach your SIM card from its packaging. 2. Press down on the SIM card is facing downward. 5 Your phone will not work without the SIM card. SIm CARd Your Subscriber Identity Module (SIM) card identifies you to the wireless network. Remove the cover. 3. Make sure that the gold contacts on the bottom of the battery cover and slide it upward.
To insert the SIM card and battery: 1. Slide the SIM card into the SIM card slot as shown. Detach your SIM card from its packaging. 2. Press down on the SIM card is facing downward. 5 Your phone will not work without the SIM card. SIm CARd Your Subscriber Identity Module (SIM) card identifies you to the wireless network. Remove the cover. 3. Make sure that the gold contacts on the bottom of the battery cover and slide it upward.
Quick Start Guide - English
Page 9
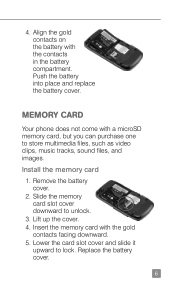
... contacts on the battery with the gold contacts facing downward. 5. Replace the battery cover. 6 Install the memory card 1. Remove the battery cover. 2. mEmORy CARd Your phone does not come with a microSD memory card, but you can purchase one to unlock. 3. Slide the memory card slot cover downward to store multimedia files...
... contacts on the battery with the gold contacts facing downward. 5. Replace the battery cover. 6 Install the memory card 1. Remove the battery cover. 2. mEmORy CARd Your phone does not come with a microSD memory card, but you can purchase one to unlock. 3. Slide the memory card slot cover downward to store multimedia files...

Quick Start Guide - English
Page 10
Plug the other end of the charger into the charging port on your phone. From the Home screen, tap Dialer . 2. To turn the phone on the bottom left side of the connector facing up) into a wall outlet. Power To turn it off, press and hold the End key. Call Functions Make a call 1. Enter the phone number. 3. Press the Send key or tap Call. 7 Battery Lift the charger port cover on , press and hold the End key again. Insert the small end of charger (B side of your phone.
Plug the other end of the charger into the charging port on your phone. From the Home screen, tap Dialer . 2. To turn the phone on the bottom left side of the connector facing up) into a wall outlet. Power To turn it off, press and hold the End key. Call Functions Make a call 1. Enter the phone number. 3. Press the Send key or tap Call. 7 Battery Lift the charger port cover on , press and hold the End key again. Insert the small end of charger (B side of your phone.

Quick Start Guide - English
Page 11
Adjust ring volume Press the Volume key up or down to adjust the call , press the Volume key up or down to adjust ring volume. Tap Sounds. 4. Tap Volume. 5. To end the call , press the Send key or unlock the phone (if locked) and tap Answer. Adjust multimedia volume 1. From the Home screen, tap Menu . 2. Tap Multimedia. 6. Tap Settings. 3. Tap the desired volume level. 7. Adjust call volume While on an active call volume. Answer and end calls To answer a call , press the End key or unlock the phone (if locked) and tap End Call. Tap Done. 8
Adjust ring volume Press the Volume key up or down to adjust the call , press the Volume key up or down to adjust ring volume. Tap Sounds. 4. Tap Volume. 5. To end the call , press the Send key or unlock the phone (if locked) and tap Answer. Adjust multimedia volume 1. From the Home screen, tap Menu . 2. Tap Multimedia. 6. Tap Settings. 3. Tap the desired volume level. 7. Adjust call volume While on an active call volume. Answer and end calls To answer a call , press the End key or unlock the phone (if locked) and tap End Call. Tap Done. 8

Quick Start Guide - English
Page 12
voicemail Use voicemail To call voicemail. 3. Touch and hold 1 to your phone number: 1. From the Home screen, tap Dialer . 2. Tap #793#. 3. To set up voicemail: 1. Tap OK. Use Visual Voicemail Visual Voicemail allows you want to respond ...to set up Visual Voicemail: 1. To reset the voicemail password to the last four digits of your phone, choose how you to play and replay messages in any order, save voice messages to call and set up your voicemail account. Tap Call. 4. From...
voicemail Use voicemail To call voicemail. 3. Touch and hold 1 to your phone number: 1. From the Home screen, tap Dialer . 2. Tap #793#. 3. To set up voicemail: 1. Tap OK. Use Visual Voicemail Visual Voicemail allows you want to respond ...to set up Visual Voicemail: 1. To reset the voicemail password to the last four digits of your phone, choose how you to play and replay messages in any order, save voice messages to call and set up your voicemail account. Tap Call. 4. From...

Quick Start Guide - English
Page 13
...tips and tap Start to worry about losing your contact information if you lose your phone or on my.t-mobile.com. From the Home screen, tap Menu . 2. Tap Reply As. 3. You can manage contacts on your phone. With Mobile Backup, you store contact information on your inbox. Tap Voicemail. 3.... Tap the voicemail message. 4. While in the voicemail message, tap . 2. Tap Call or Text Message to reply with a phone call or to a Visual Voicemail: 1. To check Visual Voicemail: 1. To reply to send a text message. Tap the Arrow icon to use this feature 10 ...
...tips and tap Start to worry about losing your contact information if you lose your phone or on my.t-mobile.com. From the Home screen, tap Menu . 2. Tap Reply As. 3. You can manage contacts on your phone. With Mobile Backup, you store contact information on your inbox. Tap Voicemail. 3.... Tap the voicemail message. 4. While in the voicemail message, tap . 2. Tap Call or Text Message to reply with a phone call or to a Visual Voicemail: 1. To check Visual Voicemail: 1. To reply to send a text message. Tap the Arrow icon to use this feature 10 ...
Quick Start Guide - English
Page 15
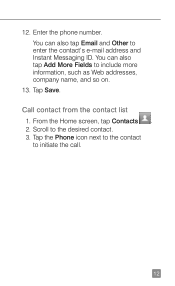
From the Home screen, tap Contacts . 2. Scroll to initiate the call. 12 Enter the phone number. You can also tap Add More Fields to enter the contact's e-mail address and Instant Messaging ID. Tap Save. Tap the Phone icon next to the contact to the desired contact. 3. 12. You can also tap Email and Other to include more information, such as Web addresses, company name, and so on. 13. Call contact from the contact list 1.
From the Home screen, tap Contacts . 2. Scroll to initiate the call. 12 Enter the phone number. You can also tap Add More Fields to enter the contact's e-mail address and Instant Messaging ID. Tap Save. Tap the Phone icon next to the contact to the desired contact. 3. 12. You can also tap Email and Other to include more information, such as Web addresses, company name, and so on. 13. Call contact from the contact list 1.
Quick Start Guide - English
Page 16
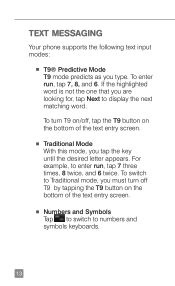
..., tap Next to Traditional mode, you type. To turn off , tap the T9 button on the bottom of the text entry screen. TEXT MESSAGING Your phone supports the following text input modes: n T9® Predictive Mode T9 mode predicts as you must turn T9 on/off T9 by tapping the T9...
..., tap Next to Traditional mode, you type. To turn off , tap the T9 button on the bottom of the text entry screen. TEXT MESSAGING Your phone supports the following text input modes: n T9® Predictive Mode T9 mode predicts as you must turn T9 on/off T9 by tapping the T9...

Quick Start Guide - English
Page 19
... Magnifying Glass icon to select a contact in your Facebook®, MySpace®, and TwitterTM social networking applications. SOCIAL BUZZ View your message. 3. Tap the Phone tab. 3. Tap Send. Set up Social Buzz 1. 7. Enter the password. 8. Enter your social networking applications in one place. Use Social Buzz to... update the mailbox. 9. From the Home screen, tap Menu . 2. While in the phone book. 5. Tap Done. Tap Send To. 4. Tap Social Buzz. 4. Read the License Agreement and tap Accept. 16
... Magnifying Glass icon to select a contact in your Facebook®, MySpace®, and TwitterTM social networking applications. SOCIAL BUZZ View your message. 3. Tap the Phone tab. 3. Tap Send. Set up Social Buzz 1. 7. Enter the password. 8. Enter your social networking applications in one place. Use Social Buzz to... update the mailbox. 9. From the Home screen, tap Menu . 2. While in the phone book. 5. Tap Done. Tap Send To. 4. Tap Social Buzz. 4. Read the License Agreement and tap Accept. 16

Quick Start Guide - English
Page 22
Log in to capture the picture. field. 3. Enter your subject. 3. Press the Camera key on the right side of the phone. 2. Press the Camera key to your Twitter account. 2. CAmERA Take picture Pictures are you doing? Camera Mode 2. Tap Send. 19 To update status: 1. Tap the What are saved to Menu > Media > Album. 1. Send picture 1. Tap Save. Frame your status. 4. Take a picture.
Log in to capture the picture. field. 3. Enter your subject. 3. Press the Camera key on the right side of the phone. 2. Press the Camera key to your Twitter account. 2. CAmERA Take picture Pictures are you doing? Camera Mode 2. Tap Send. 19 To update status: 1. Tap the What are saved to Menu > Media > Album. 1. Send picture 1. Tap Save. Frame your status. 4. Take a picture.
Quick Start Guide - English
Page 23
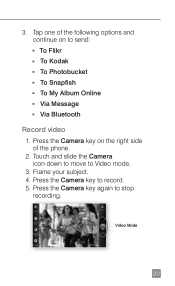
Touch and slide the Camera icon down to move to record. 5. Video Mode 20 Frame your subject. 4. Press the Camera key to Video mode. 3. Press the Camera key again to send: n To Flikr n To Kodak n To Photobucket n To Snapfish n To My Album Online n Via Message n Via Bluetooth Record video 1. 3. Tap one of the following options and continue on the right side of the phone. 2. Press the Camera key on to stop recording.
Touch and slide the Camera icon down to move to record. 5. Video Mode 20 Frame your subject. 4. Press the Camera key to Video mode. 3. Press the Camera key again to send: n To Flikr n To Kodak n To Photobucket n To Snapfish n To My Album Online n Via Message n Via Bluetooth Record video 1. 3. Tap one of the following options and continue on the right side of the phone. 2. Press the Camera key on to stop recording.

Quick Start Guide - English
Page 25
MUSIC PLAYER Transfer music 1. Copy the file and paste into the SD Card drive. From the Home screen, tap Menu . 2. Tap the Media tab. 3. On your computer. 5. Tap the song to view files using the USB cable. 2. Locate the music file on your phone, tap USB Mass Storage. 3. Connect your phone to your computer, click Open folder to play. 22 Play music 1. Tap Music Player. 4. On your computer using Windows Explore and click OK. 4.
MUSIC PLAYER Transfer music 1. Copy the file and paste into the SD Card drive. From the Home screen, tap Menu . 2. Tap the Media tab. 3. On your computer. 5. Tap the song to view files using the USB cable. 2. Locate the music file on your phone, tap USB Mass Storage. 3. Connect your phone to your computer, click Open folder to play. 22 Play music 1. Tap Music Player. 4. On your computer using Windows Explore and click OK. 4.

Quick Start Guide - English
Page 28
Prepare Bluetooth headset To pair your phone with a Bluetooth headset, make sure that your Bluetooth headset's manual for more information. From the Home screen, tap Menu . 2. Tap Search New Device. 6. Tap Bluetooth. 4. ... the PIN or passcode if requested. 8. See your headset is fully charged and that enables a data connection between your phone and a Bluetooth wireless headset and other Bluetooth devices (sold separately). BLuETOOTh® Your phone comes with Bluetooth technology, a wireless technology that you set the headset into pairing mode. Tap OK. 25 Tap...
Prepare Bluetooth headset To pair your phone with a Bluetooth headset, make sure that your Bluetooth headset's manual for more information. From the Home screen, tap Menu . 2. Tap Search New Device. 6. Tap Bluetooth. 4. ... the PIN or passcode if requested. 8. See your headset is fully charged and that enables a data connection between your phone and a Bluetooth wireless headset and other Bluetooth devices (sold separately). BLuETOOTh® Your phone comes with Bluetooth technology, a wireless technology that you set the headset into pairing mode. Tap OK. 25 Tap...

Quick Start Guide - English
Page 29
Visit a Web site 1. Enter the desired Web address. 4. WEB BROWSING Experience the mobile Web like never before with T-Mobile's web2goSM experience. Tap the Address Bar field near the top of the screen. 3. From the Home screen, tap web2go . 2. Tap Go To. 26 For more information about these services visit www.t-mobile.com/shop/addons. Features include a phone browser optimized for the Web, a customizable start page for easy, one-click access to information, a powerful built-in Web search engine, and the ability to manage your account right from your phone.
Visit a Web site 1. Enter the desired Web address. 4. WEB BROWSING Experience the mobile Web like never before with T-Mobile's web2goSM experience. Tap the Address Bar field near the top of the screen. 3. From the Home screen, tap web2go . 2. Tap Go To. 26 For more information about these services visit www.t-mobile.com/shop/addons. Features include a phone browser optimized for the Web, a customizable start page for easy, one-click access to information, a powerful built-in Web search engine, and the ability to manage your account right from your phone.


