
Owners Manual
Page 2
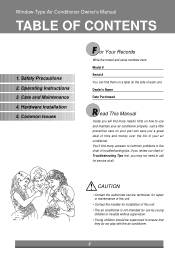
...without supervision. • Young children should be supervised to common problems in the chart of this unit. • Contact the installer for installation of troubleshooting tips. CAUTION • Contact the authorized service technician for repair or maintenance of this unit. • The ...air conditioner is not intended for service at all. Hardware Installation 5. Just a little preventive care on your air conditioner properly. Common Issues F or Your Records Write the model and serial numbers here...
...without supervision. • Young children should be supervised to common problems in the chart of this unit. • Contact the installer for installation of troubleshooting tips. CAUTION • Contact the authorized service technician for repair or maintenance of this unit. • The ...air conditioner is not intended for service at all. Hardware Installation 5. Just a little preventive care on your air conditioner properly. Common Issues F or Your Records Write the model and serial numbers here...

Owners Manual
Page 3
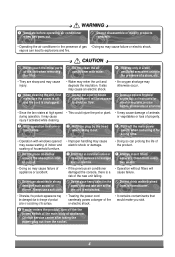
.... ENGLISH ENGLISH Safety Precautions Precautions To prevent injury and property damage, follow these may cause electric shock. Do not allow water to install these instructions. Do not damage or use the power cord near flammable gas or combustibles such as gasoline, benzene, thinner, etc. ...• Doing so may cause fire or electric shock. Keep firearms away. Always install air leakage breaker and a dedicated switching board. • Failure to run into a grounded outlet. • No grounding may cause fire or ...
.... ENGLISH ENGLISH Safety Precautions Precautions To prevent injury and property damage, follow these may cause electric shock. Do not allow water to install these instructions. Do not damage or use the power cord near flammable gas or combustibles such as gasoline, benzene, thinner, etc. ...• Doing so may cause fire or electric shock. Keep firearms away. Always install air leakage breaker and a dedicated switching board. • Failure to run into a grounded outlet. • No grounding may cause fire or ...
Owners Manual
Page 4
... of the outdoor appliance is a cause failure. or electric shock. Do not place heavy object on the power cord and take care so that an installation console of a stove, etc. • They are sharp and may cause injury. • Water may cause failure of appliance or accident. • If the previous...
... of the outdoor appliance is a cause failure. or electric shock. Do not place heavy object on the power cord and take care so that an installation console of a stove, etc. • They are sharp and may cause injury. • Water may cause failure of appliance or accident. • If the previous...

Owners Manual
Page 5
..., food, pets, plants, and art objects). Service For repair and maintenance, contact your health. ENGLISH Safety Precautions Prior to Operation Preparing for operation 1 Contact an installation specialist for installation. 2 Plug in such a manner could be hazardous to your authorized service dealer. 5
..., food, pets, plants, and art objects). Service For repair and maintenance, contact your health. ENGLISH Safety Precautions Prior to Operation Preparing for operation 1 Contact an installation specialist for installation. 2 Plug in such a manner could be hazardous to your authorized service dealer. 5

Owners Manual
Page 10
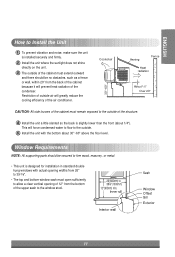
...) 6. POWER CORD 14. CONDENSER 11. HORIZONTAL AIR DEFLECTOR (VERTICAL LOUVER) 4. CONTROL PANEL 8. COMPRESSOR 12. BASE PAN 13. BRACE 15. Hardware Installation Hardware Installation PRreomdoutcet CFeoantturorel sOperations CAUTION This appliance should be installed in accordance with national wiring regulations. FRONT GRILLE 5. The following information serves acts as a guide to help to explain product features...
...) 6. POWER CORD 14. CONDENSER 11. HORIZONTAL AIR DEFLECTOR (VERTICAL LOUVER) 4. CONTROL PANEL 8. COMPRESSOR 12. BASE PAN 13. BRACE 15. Hardware Installation Hardware Installation PRreomdoutcet CFeoantturorel sOperations CAUTION This appliance should be installed in accordance with national wiring regulations. FRONT GRILLE 5. The following information serves acts as a guide to help to explain product features...
Owners Manual
Page 11
... Exterior 11 Window Requirements NOTE: All supporting parts should be secured to firm wood, masonry, or metal. • This unit is installed securely and firmly. 2 Install the unit where the sunlight does not shine directly on the unit. 3 The outside of the cabinet must open sufficiently to allow a..." Cooled air Awning Fence Heat radiation About 1/4" Over 20" CAUTION: All side louvers of the cabinet must remain exposed to the outside . 5 Install the unit with actual opening widths from 26" to 39 3/8". • The top and bottom window sash must extend outward and there should be ...
... Exterior 11 Window Requirements NOTE: All supporting parts should be secured to firm wood, masonry, or metal. • This unit is installed securely and firmly. 2 Install the unit where the sunlight does not shine directly on the unit. 3 The outside of the cabinet must open sufficiently to allow a..." Cooled air Awning Fence Heat radiation About 1/4" Over 20" CAUTION: All side louvers of the cabinet must remain exposed to the outside . 5 Install the unit with actual opening widths from 26" to 39 3/8". • The top and bottom window sash must extend outward and there should be ...

Owners Manual
Page 12
... FIG. 2. If air conditioner is very important. INDOOR CENTER LINE INNER SILL FIG. 2 12 Good installation with pencil on Page 14 before beginning to unit before installing or servicing. Windows used for possible shipping damage. To cool your rooms, cold air must be blown ...from carton, check for installation must be strong enough to fit the underside of the window sash. How to Install 1 Cut the FOAM STRIP (ITEM G) to support the weight of the air conditioner. Installation Kits Contents A B C G F DE H ITEM A B C D E F G ...
... FIG. 2. If air conditioner is very important. INDOOR CENTER LINE INNER SILL FIG. 2 12 Good installation with pencil on Page 14 before beginning to unit before installing or servicing. Windows used for possible shipping damage. To cool your rooms, cold air must be blown ...from carton, check for installation must be strong enough to fit the underside of the window sash. How to Install 1 Cut the FOAM STRIP (ITEM G) to support the weight of the air conditioner. Installation Kits Contents A B C G F DE H ITEM A B C D E F G ...

Owners Manual
Page 13
...of support bracket. Personal injury or property damage may result in unit falling from window. Fasten bracket loosely to window type. ENGLISH 3 Install support bracket on the support bracket as shown in FIG.6. CAUTION During the following step, hold unit firmly until window sash is stopped by... BRACKET (ITEM A) SCREW (ITEM D) INNER WINDOW SILL 1"(25.4mm) CENTER LINE OF WINDOW ADJUSTMENT SLOT LEVELING BOLT (ITEM B or C) FIG. 3 4 INSTALL THE AIR CONDITIONER IN THE WINDOW • Carefully lift the air conditioner and slide it into the open window. This could result in place on...
...of support bracket. Personal injury or property damage may result in unit falling from window. Fasten bracket loosely to window type. ENGLISH 3 Install support bracket on the support bracket as shown in FIG.6. CAUTION During the following step, hold unit firmly until window sash is stopped by... BRACKET (ITEM A) SCREW (ITEM D) INNER WINDOW SILL 1"(25.4mm) CENTER LINE OF WINDOW ADJUSTMENT SLOT LEVELING BOLT (ITEM B or C) FIG. 3 4 INSTALL THE AIR CONDITIONER IN THE WINDOW • Carefully lift the air conditioner and slide it into the open window. This could result in place on...
Owners Manual
Page 14
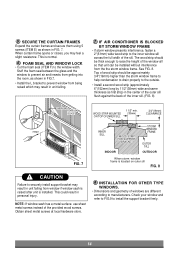
... so that unit can be approximately 3/4"(19mm) higher than the storm window frame to help condensation to drain properly to the outside. • Install a second wood strip (approximately 6"(152mm) long by 11/2"(38mm) wide and same thickness as shown in unit falling. 7 IF AIR CONDITIONER...may feel a slight resistance. See FIG. 8. NOTE: If window sash has a metal surface. Obtain sheet metal screws at local hardware store. 8 INSTALLATION FOR OTHER TYPE WINDOWS. • Dimensions and geometry of the provided wood screws. 5 SECURE THE CURTAIN FRAMES Expand the curtain frames and secure them...
... so that unit can be approximately 3/4"(19mm) higher than the storm window frame to help condensation to drain properly to the outside. • Install a second wood strip (approximately 6"(152mm) long by 11/2"(38mm) wide and same thickness as shown in unit falling. 7 IF AIR CONDITIONER...may feel a slight resistance. See FIG. 8. NOTE: If window sash has a metal surface. Obtain sheet metal screws at local hardware store. 8 INSTALLATION FOR OTHER TYPE WINDOWS. • Dimensions and geometry of the provided wood screws. 5 SECURE THE CURTAIN FRAMES Expand the curtain frames and secure them...
Owners Manual
Page 15
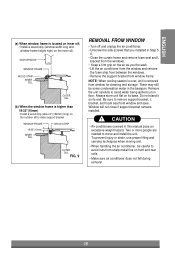
... the air conditioner, be some condensation water in the basepan. NOTE: When cooling season is over, unit is higher than 19/32"(15mm) • Install a wood strip (about 4"(102mm) long) on front and rear coils. • Make sure air conditioner does not fall during removal. 15 Remove the...FRAME WOOD STRIP INNER SILL OUTER SILL (b) When the window frame is removed from window frame. Window will not close if support bracket remains installed. Two or more people are needed to avoid water being spilled out on the inner sill. ENGLISH ENGLISH (a) When window frame is located ...
... the air conditioner, be some condensation water in the basepan. NOTE: When cooling season is over, unit is higher than 19/32"(15mm) • Install a wood strip (about 4"(102mm) long) on front and rear coils. • Make sure air conditioner does not fall during removal. 15 Remove the...FRAME WOOD STRIP INNER SILL OUTER SILL (b) When the window frame is removed from window frame. Window will not close if support bracket remains installed. Two or more people are needed to avoid water being spilled out on the inner sill. ENGLISH ENGLISH (a) When window frame is located ...
Owners Manual
Page 16
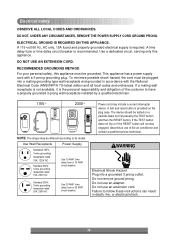
... is recommended. DO NOT USE AN EXTENSION CORD. The device should be tested on the plug case. Failure to have a properly grounded 3-prong wall receptacle installed by first pressing the TEST button and then the RESET button. DO NOT, UNDER ANY CIRCUMSTANCES, REMOVE THE POWER SUPPLY CORD GROUND PRONG.
... is recommended. DO NOT USE AN EXTENSION CORD. The device should be tested on the plug case. Failure to have a properly grounded 3-prong wall receptacle installed by first pressing the TEST button and then the RESET button. DO NOT, UNDER ANY CIRCUMSTANCES, REMOVE THE POWER SUPPLY CORD GROUND PRONG.
Owners Manual
Page 40
... Service trips to your Sales Receipt to the requirements or precautions in the Operating Guide, accident, vermin, fire, flood, improper installation, acts of God, unauthorized modification or alteration, incorrect electrical current or voltage, or commercial use, or use during the warranty period...Purchase. WARRANTY PERIOD: Labor: 5 Year from misuse, abuse, operation outside environmental specifications or contrary to prove date of Purchase. LG ROOM AIR CONDITIONER LIMITED WARRANTY - To Obtain Nearest Authorized Service Center or Sales Dealer, or to be submitted at http://www....
... Service trips to your Sales Receipt to the requirements or precautions in the Operating Guide, accident, vermin, fire, flood, improper installation, acts of God, unauthorized modification or alteration, incorrect electrical current or voltage, or commercial use, or use during the warranty period...Purchase. WARRANTY PERIOD: Labor: 5 Year from misuse, abuse, operation outside environmental specifications or contrary to prove date of Purchase. LG ROOM AIR CONDITIONER LIMITED WARRANTY - To Obtain Nearest Authorized Service Center or Sales Dealer, or to be submitted at http://www....


