Owner's Manual (English)
Page 1
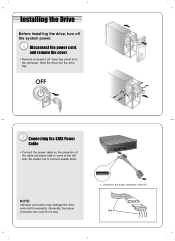
Disconnect the power cord, and remove the cover. • Remove a vacant 5.25" drive bay panel from the computer. Connecting the SATA Power Cable • Connect the power cable so the projection of the cable connector side to come to the power connector of the PC. NOTE: Improper connection may damage the drive and void the warranty. Red Connect to the left side. Be careful not to connect upside down. Installing the Drive Before installing the drive, turn off the system power. Slide the drive into the drive bay. Generally, the power connector can only fit one way.
Disconnect the power cord, and remove the cover. • Remove a vacant 5.25" drive bay panel from the computer. Connecting the SATA Power Cable • Connect the power cable so the projection of the cable connector side to come to the power connector of the PC. NOTE: Improper connection may damage the drive and void the warranty. Red Connect to the left side. Be careful not to connect upside down. Installing the Drive Before installing the drive, turn off the system power. Slide the drive into the drive bay. Generally, the power connector can only fit one way.
Owner's Manual (English)
Page 2
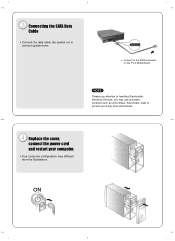
Replace the cover, connect the power cord and restart your body from the illustrations. Be careful not to the SATA connector on the PC's Motherboard. Connect to connect upside down. NOTE Please pay attention to handling Electrostatic Sensitive Devices, you may use anti-static products such as wrist straps, heel straps, mats to protect your computer. • Your computer configuration may different from electrostatic. Connecting the SATA Data Cable • Connect the data cable.
Replace the cover, connect the power cord and restart your body from the illustrations. Be careful not to the SATA connector on the PC's Motherboard. Connect to connect upside down. NOTE Please pay attention to handling Electrostatic Sensitive Devices, you may use anti-static products such as wrist straps, heel straps, mats to protect your computer. • Your computer configuration may different from electrostatic. Connecting the SATA Data Cable • Connect the data cable.
Owner's Manual (English)
Page 3
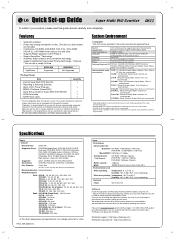
... specifications may (if you can be operated in order to 90% R.H. (non condensing) Electrical Power DC 5V, DC 12V Software Install the appropriate CD Recording Authoring Software before you use a variety of an important data backup. (Manufacturer is required CD-R : LG, Mitsubishi Kagaku Media, Verbatim, That's, Ritek or HP discs are recommended. * Compatibility problem in case of Drive LightScribe GH22LS30 Supported GH22NS30 Not Supported Package Items Item - Quick Set-up Guide for Super Multi DVD Rewriter - DVD...
... specifications may (if you can be operated in order to 90% R.H. (non condensing) Electrical Power DC 5V, DC 12V Software Install the appropriate CD Recording Authoring Software before you use a variety of an important data backup. (Manufacturer is required CD-R : LG, Mitsubishi Kagaku Media, Verbatim, That's, Ritek or HP discs are recommended. * Compatibility problem in case of Drive LightScribe GH22LS30 Supported GH22NS30 Not Supported Package Items Item - Quick Set-up Guide for Super Multi DVD Rewriter - DVD...
Owner's Manual (English)
Page 4
... user's authority to operate the equipment. • This Super Multi DVD Rewriter is not intended for use only with UL listed personal computers that to correct the interference by turning the equipment off and on a circuit different from that have installation instructions detailing user-installation of fire or electric shock, do not remove the cover (or back). Aucun élément interne...
... user's authority to operate the equipment. • This Super Multi DVD Rewriter is not intended for use only with UL listed personal computers that to correct the interference by turning the equipment off and on a circuit different from that have installation instructions detailing user-installation of fire or electric shock, do not remove the cover (or back). Aucun élément interne...


