
Owner's Manual
Page 1
LED LCD MONITOR MODELS E2370V E2770V www.lg.com ENGLISH OWNER'S MANUAL LED LCD MONITOR Please read this manual carefully before operating your set and retain it for future reference.
LED LCD MONITOR MODELS E2370V E2770V www.lg.com ENGLISH OWNER'S MANUAL LED LCD MONITOR Please read this manual carefully before operating your set and retain it for future reference.

Owner's Manual
Page 4
...to disassemble, repair or modify the product yourself. - Too much moisture may damage the TFT-LCD screen. On Disposal (Only, Hg lamp used LCD Monitor) The fluorescent lamp used in Using/Cleaning the Product Warning Do not attempt to the regulations of this product with the product for repair. Precautions...of mercury. Set the appropriate resolution by the warranty on the product. If you look at all times. There is a danger of children. Contact LG Customer Service for a long time. Do not clean with a wet cloth or spray water or other liquids directly onto the product.
...to disassemble, repair or modify the product yourself. - Too much moisture may damage the TFT-LCD screen. On Disposal (Only, Hg lamp used LCD Monitor) The fluorescent lamp used in Using/Cleaning the Product Warning Do not attempt to the regulations of this product with the product for repair. Precautions...of mercury. Set the appropriate resolution by the warranty on the product. If you look at all times. There is a danger of children. Contact LG Customer Service for a long time. Do not clean with a wet cloth or spray water or other liquids directly onto the product.

Owner's Manual
Page 5
... any items are included with ferrite cores to maintain standard compliance for selecting LGE products !!! Please make sure the following items are missing, contact your monitor. Owner's Manual/Cards Power Cord (Depending on the country) 15-pin D-Sub Signal Cable DVI-D Signal Cable (This feature is not available in all countries...
... any items are included with ferrite cores to maintain standard compliance for selecting LGE products !!! Please make sure the following items are missing, contact your monitor. Owner's Manual/Cards Power Cord (Depending on the country) 15-pin D-Sub Signal Cable DVI-D Signal Cable (This feature is not available in all countries...
Owner's Manual
Page 6
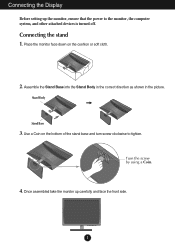
Assemble the Stand Base into the Stand Body in the correct direction as shown in the picture. Place the monitor face down on the bottom of the stand base and turn screw clockwise to the monitor, the computer system, and other attached devices is turned off. Connecting the stand 1. Stand Body Stand Base 3. Use a Coin on the cushion or soft cloth. 2. Once assembled take the monitor up the monitor, ensure that the power to tighten. Connecting the Display Before setting up carefully and face the front side. 5 Turn the screw by using a Coin. 4.
Assemble the Stand Base into the Stand Body in the correct direction as shown in the picture. Place the monitor face down on the bottom of the stand base and turn screw clockwise to the monitor, the computer system, and other attached devices is turned off. Connecting the stand 1. Stand Body Stand Base 3. Use a Coin on the cushion or soft cloth. 2. Once assembled take the monitor up the monitor, ensure that the power to tighten. Connecting the Display Before setting up carefully and face the front side. 5 Turn the screw by using a Coin. 4.
Owner's Manual
Page 7
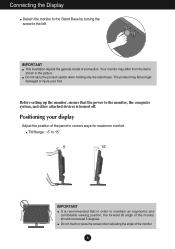
... product may differ from the items shown in various ways for maximum comfort. Before setting up the monitor, ensure that the power to the monitor, the computer system, and other attached devices is recommended that in order to the left. Do not carry the product upside down holding only the ...stand base. Do not touch or press the screen when adjusting the angle of connection. Positioning your foot. Connecting the Display Detach the monitor to the Stand Base by turning the screw to maintain an ergonomic and comfortable viewing position, the forward tilt angle of the...
... product may differ from the items shown in various ways for maximum comfort. Before setting up the monitor, ensure that the power to the monitor, the computer system, and other attached devices is recommended that in order to the left. Do not carry the product upside down holding only the ...stand base. Do not touch or press the screen when adjusting the angle of connection. Positioning your foot. Connecting the Display Detach the monitor to the Stand Base by turning the screw to maintain an ergonomic and comfortable viewing position, the forward tilt angle of the...

Owner's Manual
Page 8
... a general model; Connect signal input cable 1 and power cord 2 in all countries.) Connect the signal input cable and tighten it up the monitor, ensure that the power to the monitor, the computer system, and other attached devices is needed to change the 15 pin high density (3 row) Dsub VGA connector on the...
... a general model; Connect signal input cable 1 and power cord 2 in all countries.) Connect the signal input cable and tighten it up the monitor, ensure that the power to the monitor, the computer system, and other attached devices is needed to change the 15 pin high density (3 row) Dsub VGA connector on the...

Owner's Manual
Page 9
... the power button on , the 'Self Image Setting Function' is turned on the bottom right of the monitor to improve resolution. 8 Connecting the Display 3. When monitor power is executed automatically. (Only Analog Mode) Power Button NOTE ' Self Image Setting Function'? This function ...provides the user with optimal display settings.When the user connects the monitor for the first time, this function automatically...
... the power button on , the 'Self Image Setting Function' is turned on the bottom right of the monitor to improve resolution. 8 Connecting the Display 3. When monitor power is executed automatically. (Only Analog Mode) Power Button NOTE ' Self Image Setting Function'? This function ...provides the user with optimal display settings.When the user connects the monitor for the first time, this function automatically...

Owner's Manual
Page 16
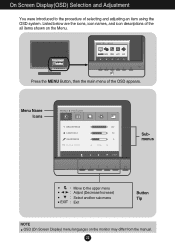
... of selecting and adjusting an item using the OSD system. Press the G-MODE Button, then the main menu of the all items shown on the monitor may differ from the manual. 15 On Screen Display(OSD) Selection and Adjustment You were introduced to the upper menu Adjust (Decrease/Increase) Select another...
... of selecting and adjusting an item using the OSD system. Press the G-MODE Button, then the main menu of the all items shown on the monitor may differ from the manual. 15 On Screen Display(OSD) Selection and Adjustment You were introduced to the upper menu Adjust (Decrease/Increase) Select another...
Owner's Manual
Page 22
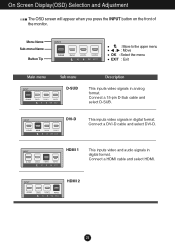
... digital format. On Screen Display(OSD) Selection and Adjustment The OSD screen will appear when you press the INPUT button on the front of the monitor. Connect a HDMI cable and select HDMI. K D-SUB DVI-D OK D-SUB DVI-D OK OK INPUT INPUT INPUT INPUT INPUT D-SUB D-SUB D-SUB D-SUB DVI-D DVI-D DVI...
... digital format. On Screen Display(OSD) Selection and Adjustment The OSD screen will appear when you press the INPUT button on the front of the monitor. Connect a HDMI cable and select HDMI. K D-SUB DVI-D OK D-SUB DVI-D OK OK INPUT INPUT INPUT INPUT INPUT D-SUB D-SUB D-SUB D-SUB DVI-D DVI-D DVI...
Owner's Manual
Page 23
On Screen Display(OSD) Selection and Adjustment You were introduced to the upper menu Adjust (Decrease/Increase) Select another sub-menu Exit Button Tip NOTE OSD (On Screen Display) menu languages on the Menu. Menu Name Icons Submenus Move to the procedure of the OSD appears. Press the MENU Button, then the main menu of selecting and adjusting an item using the OSD system. Listed below are the icons, icon names, and icon descriptions of the all items shown on the monitor may differ from the manual. 22
On Screen Display(OSD) Selection and Adjustment You were introduced to the upper menu Adjust (Decrease/Increase) Select another sub-menu Exit Button Tip NOTE OSD (On Screen Display) menu languages on the Menu. Menu Name Icons Submenus Move to the procedure of the OSD appears. Press the MENU Button, then the main menu of selecting and adjusting an item using the OSD system. Listed below are the icons, icon names, and icon descriptions of the all items shown on the monitor may differ from the manual. 22
Owner's Manual
Page 24
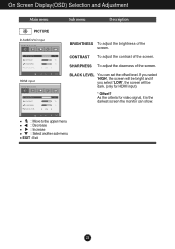
...', the screen will be bright and if you select 'LOW', the screen will be dark. (only for video signal, it is the darkest screen the monitor can set the offset level. CONTRAST To adjust the contrast of the screen. As the criteria for HDMI input) * Offset? SHARPNESS To adjust the clearness...
...', the screen will be bright and if you select 'LOW', the screen will be dark. (only for video signal, it is the darkest screen the monitor can set the offset level. CONTRAST To adjust the contrast of the screen. As the criteria for HDMI input) * Offset? SHARPNESS To adjust the clearness...
Owner's Manual
Page 25
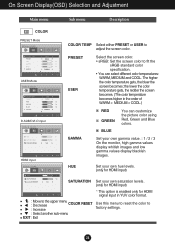
... color using Red, Green and Blue colors. HUE Set your own hue levels. (only for HDMI input) SATURATION Set your own gamma value. : 1 / 2 / 3 On the monitor, high gamma values display whitish images and low gamma values display blackish images. PIP INPUT PIP POSITION PIP POSITION PIP SWAP PPIIPP SSWOAUPND Select the...
... color using Red, Green and Blue colors. HUE Set your own hue levels. (only for HDMI input) SATURATION Set your own gamma value. : 1 / 2 / 3 On the monitor, high gamma values display whitish images and low gamma values display blackish images. PIP INPUT PIP POSITION PIP POSITION PIP SWAP PPIIPP SSWOAUPND Select the...

Owner's Manual
Page 27
... SOUND not improve th3e0 screen image, restore the factory default settings. If you set OFF, it will be turned on the bottom right of the monitor) to reset immediately. PIP ON / OFF FACTORY RESET Restore all factory default settings except "LANGUAGE." This function will go off. POWER INDICATOR : Move to the...
... SOUND not improve th3e0 screen image, restore the factory default settings. If you set OFF, it will be turned on the bottom right of the monitor) to reset immediately. PIP ON / OFF FACTORY RESET Restore all factory default settings except "LANGUAGE." This function will go off. POWER INDICATOR : Move to the...
Owner's Manual
Page 29
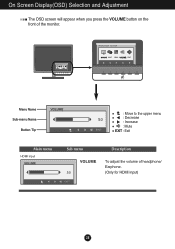
Menu Name Sub-menu Name Button Tip : Move to the upper menu : Decrease : Increase : Mute EXIT : Exit Main menu HDMI input Sub menu Description VOLUME To adjust the volume of the monitor. On Screen Display(OSD) Selection and Adjustment The OSD screen will appear when you press the VOLUME button on the front of headphone/ Earphone. (Only for HDMI input) 28
Menu Name Sub-menu Name Button Tip : Move to the upper menu : Decrease : Increase : Mute EXIT : Exit Main menu HDMI input Sub menu Description VOLUME To adjust the volume of the monitor. On Screen Display(OSD) Selection and Adjustment The OSD screen will appear when you press the VOLUME button on the front of headphone/ Earphone. (Only for HDMI input) 28

Owner's Manual
Page 32
... card supports Plug&Play function. Or, you installed the display driver? • Be sure to install the display driver from our web site: http://www.lg.com. • Make sure to compressed sound format. 31 Troubleshooting Display image is incorrect G The screen color is mono or abnormal. • Check if the... "0". • Check sound muted. • HDMI cable installed properly. • Head phone cable installed properly. • Check sound format. Settings. Do you see an "Unrecognized monitor, Plug&Play (VESA DDC...
... card supports Plug&Play function. Or, you installed the display driver? • Be sure to install the display driver from our web site: http://www.lg.com. • Make sure to compressed sound format. 31 Troubleshooting Display image is incorrect G The screen color is mono or abnormal. • Check if the... "0". • Check sound muted. • HDMI cable installed properly. • Head phone cable installed properly. • Check sound format. Settings. Do you see an "Unrecognized monitor, Plug&Play (VESA DDC...

Owner's Manual
Page 36
Place the monitor face down on the back of the Stand Base and pull it from the Stand Body in the direction shown in the figure below. Loosen the screws on the cushion or soft cloth. 2. Stand Body Stand Base 4. Check the direction of the monitor to remove the Stand Body from the Stand Body, turn the screw counterclockwise using a coin. 3. Installing the Wall mount plate This monitor satisfies the specifications of the Wall mount plate or the interchange device. 1. To remove the Stand Base from the monitor. (E2370V) (E2770V) 35
Place the monitor face down on the back of the Stand Base and pull it from the Stand Body in the direction shown in the figure below. Loosen the screws on the cushion or soft cloth. 2. Stand Body Stand Base 4. Check the direction of the monitor to remove the Stand Body from the Stand Body, turn the screw counterclockwise using a coin. 3. Installing the Wall mount plate This monitor satisfies the specifications of the Wall mount plate or the interchange device. 1. To remove the Stand Base from the monitor. (E2370V) (E2770V) 35

Specification
Page 1
... colors? Thru Mode helps you wanted HD in the first place. The ultimate in real-time without suffering from time delay. MONITOR E2770V 27" Class 1080p LED LCD Monitor (27.0" measured diagonally) FEATURES • SUPER LED Backlighting • Full HD 1080p • Thru Mode • 5M:1...slim profile and delivers amazing brightness, clarity and color detail, as well as greater energy efficiency compared to your games in LG Monitor displays is the reason you save valuable time, making it superior picture quality over standard resolution. OR SOMETHING BETTER? You...
... colors? Thru Mode helps you wanted HD in the first place. The ultimate in real-time without suffering from time delay. MONITOR E2770V 27" Class 1080p LED LCD Monitor (27.0" measured diagonally) FEATURES • SUPER LED Backlighting • Full HD 1080p • Thru Mode • 5M:1...slim profile and delivers amazing brightness, clarity and color detail, as well as greater energy efficiency compared to your games in LG Monitor displays is the reason you save valuable time, making it superior picture quality over standard resolution. OR SOMETHING BETTER? You...
Specification
Page 2
E2770V 27" Class 1080p LED Monitor PANEL SPECIFICATIONS Screen Size Panel Type Aspect Ratio Resolution Brightness Contrast Ratio (DFC) Response Time Viewing Angle (CR>10) Display Colors Panel Surface FREQUENCY (H/V) Analog ...
E2770V 27" Class 1080p LED Monitor PANEL SPECIFICATIONS Screen Size Panel Type Aspect Ratio Resolution Brightness Contrast Ratio (DFC) Response Time Viewing Angle (CR>10) Display Colors Panel Surface FREQUENCY (H/V) Analog ...


