
Owner's Manual
Page 4
...or electric shock can occur. Avoid high temperatures and humidity. Do not press on the panel with both hands to prevent scratching. Keep proper distance from the product and rest from water. - Contact LG Customer Service for a long time. Keep small accessories out of the reach of explosion ...or fire. Do not place the product face down. - This may cause staining. Too much moisture may damage the TFT-LCD screen. Important Precautions Make sure the panel faces forward ...
...or electric shock can occur. Avoid high temperatures and humidity. Do not press on the panel with both hands to prevent scratching. Keep proper distance from the product and rest from water. - Contact LG Customer Service for a long time. Keep small accessories out of the reach of explosion ...or fire. Do not place the product face down. - This may cause staining. Too much moisture may damage the TFT-LCD screen. Important Precautions Make sure the panel faces forward ...
Owner's Manual
Page 7
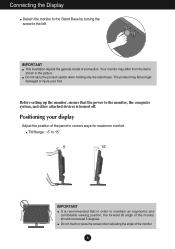
... 5 degrees. Do not carry the product upside down holding only the stand base. Positioning your foot. IMPORTANT This illustration depicts the general model of the panel in the picture. Before setting up the monitor, ensure that in order to the left.
... 5 degrees. Do not carry the product upside down holding only the stand base. Positioning your foot. IMPORTANT This illustration depicts the general model of the panel in the picture. Before setting up the monitor, ensure that in order to the left.

Owner's Manual
Page 11
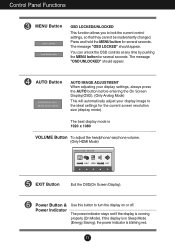
The default setting is automatically detected. When only one signal is connected, it is D-Sub. INPUT Button When two input signals at least are connected, you can (SOURCE Hot key) select the input signal (D-SUB/DVI-D/HDMI1/HDMI2) you want. INPUT D-SUB DVI-D OK 10 INPUT Control Panel Functions Front Panel Controls G-MODE Button Use this button to 20. For more information, refer to page 15 to enter USER MODE, THRU MODE, SUPER+ RESOLUTION, ASPECT RATIO or AUTO BRIGHT menus.
The default setting is automatically detected. When only one signal is connected, it is D-Sub. INPUT Button When two input signals at least are connected, you can (SOURCE Hot key) select the input signal (D-SUB/DVI-D/HDMI1/HDMI2) you want. INPUT D-SUB DVI-D OK 10 INPUT Control Panel Functions Front Panel Controls G-MODE Button Use this button to 20. For more information, refer to page 15 to enter USER MODE, THRU MODE, SUPER+ RESOLUTION, ASPECT RATIO or AUTO BRIGHT menus.
Owner's Manual
Page 12
Control Panel Functions MENU Button OSD LOCKED/UNLOCKED This function allows you to turn the display on or off. The message "OSD UNLOCKED" should appear. Power Button & ...
Control Panel Functions MENU Button OSD LOCKED/UNLOCKED This function allows you to turn the display on or off. The message "OSD UNLOCKED" should appear. Power Button & ...
Owner's Manual
Page 20
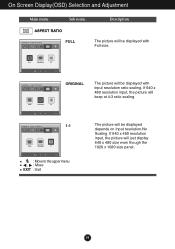
... picture will keep at 4:3 ratio scaling. If 640 x 480 resolution input, the picture will just display 640 x 480 size even though the 1920 x 1080 size panel. 19 FULL ORIGINAL 1:1 FULL ORIGINAL 1:1 G-MODE ASPECT RATIO G-MODE ASPECT RATIO FULL ORIGINAL 1:1 FULL ORIGINAL 1:1 ORIGINAL The picture will be displayed with Full size. G-MODE...
... picture will keep at 4:3 ratio scaling. If 640 x 480 resolution input, the picture will just display 640 x 480 size even though the 1920 x 1080 size panel. 19 FULL ORIGINAL 1:1 FULL ORIGINAL 1:1 G-MODE ASPECT RATIO G-MODE ASPECT RATIO FULL ORIGINAL 1:1 FULL ORIGINAL 1:1 ORIGINAL The picture will be displayed with Full size. G-MODE...

Owner's Manual
Page 31
...not clearly portrayed. • Press the AUTO button to automatically adjust your display image to the ideal setting. • Check Control Panel --> Display --> Settings and adjust the display to the recommended resolution or adjust the display image to the ideal setting. The setting ... may be supported by computer and O/S (Operation System), and resolution mentioned above may not be dimmed, truncated or biased. IMPORTANT Check Control Panel --> Display --> Settings and see if the frequency or the resolution were changed. G Any horizontal noise appearing in any image or characters are...
...not clearly portrayed. • Press the AUTO button to automatically adjust your display image to the ideal setting. • Check Control Panel --> Display --> Settings and adjust the display to the recommended resolution or adjust the display image to the ideal setting. The setting ... may be supported by computer and O/S (Operation System), and resolution mentioned above may not be dimmed, truncated or biased. IMPORTANT Check Control Panel --> Display --> Settings and see if the frequency or the resolution were changed. G Any horizontal noise appearing in any image or characters are...

Owner's Manual
Page 32
... & No sound. • Check whether volume is properly inserted in the slot. • Set the color setting higher than 24 bits (true color) at Control Panel - Do you installed the display driver? • Be sure to install the display driver from our web site: http://www....lg.com. • Make sure to fasten if necessary. • Make sure the video card is "0". • Check sound muted. • HDMI cable installed properly. • ...
... & No sound. • Check whether volume is properly inserted in the slot. • Set the color setting higher than 24 bits (true color) at Control Panel - Do you installed the display driver? • Be sure to install the display driver from our web site: http://www....lg.com. • Make sure to fasten if necessary. • Make sure the video card is "0". • Check sound muted. • HDMI cable installed properly. • ...

Owner's Manual
Page 33
... (13.59 inch) Depth 6.04 cm (2.38 inch) Weight(excl. Specifications E2370V Display Sync Input Video Input TFT (Thin Film Transistor) LCD (Liquid Crystal Display) Panel Anti-Glare coating 23 inch visible diagonal (58.42 cm) 0.2652 mm x 0.2652 mm (Pixel pitch) Horizontal Freq. Input Form Analog,Digital: 30 kHz to...
... (13.59 inch) Depth 6.04 cm (2.38 inch) Weight(excl. Specifications E2370V Display Sync Input Video Input TFT (Thin Film Transistor) LCD (Liquid Crystal Display) Panel Anti-Glare coating 23 inch visible diagonal (58.42 cm) 0.2652 mm x 0.2652 mm (Pixel pitch) Horizontal Freq. Input Form Analog,Digital: 30 kHz to...

Owner's Manual
Page 34
... (25.77 inch) Height 48.85 cm (19.23 inch) Depth 23.08 cm (9.09 inch) Weight(excl. Specifications E2770V Display Sync Input Video Input TFT (Thin Film Transistor) LCD (Liquid Crystal Display) Panel Anti-Glare coating 27 inch visible diagonal (68.6 cm) 0.3114 mm x 0.3114 mm (Pixel pitch) Horizontal Freq. Vertical...
... (25.77 inch) Height 48.85 cm (19.23 inch) Depth 23.08 cm (9.09 inch) Weight(excl. Specifications E2770V Display Sync Input Video Input TFT (Thin Film Transistor) LCD (Liquid Crystal Display) Panel Anti-Glare coating 27 inch visible diagonal (68.6 cm) 0.3114 mm x 0.3114 mm (Pixel pitch) Horizontal Freq. Vertical...
Specification
Page 2
...D-Sub 1 DVI-D 1 HDMI™ 2 Headphone 1 • 5º - 15º • TUV-Type • • Windows 7 • Adapter/100~240V 41W (Typical) E2770V 27" Class 1080p LED Monitor PANEL SPECIFICATIONS Screen Size Panel Type Aspect Ratio Resolution Brightness Contrast Ratio (DFC) Response Time Viewing Angle (CR>10) Display Colors... Panel Surface FREQUENCY (H/V) Analog Digital FEATURES PC Video Sound sRGB DDC/CI HDCP Auto Resolution Remote Control PIP Plug & Play AV INPUTS...
...D-Sub 1 DVI-D 1 HDMI™ 2 Headphone 1 • 5º - 15º • TUV-Type • • Windows 7 • Adapter/100~240V 41W (Typical) E2770V 27" Class 1080p LED Monitor PANEL SPECIFICATIONS Screen Size Panel Type Aspect Ratio Resolution Brightness Contrast Ratio (DFC) Response Time Viewing Angle (CR>10) Display Colors... Panel Surface FREQUENCY (H/V) Analog Digital FEATURES PC Video Sound sRGB DDC/CI HDCP Auto Resolution Remote Control PIP Plug & Play AV INPUTS...
