Owners Manual
Page 1
ENGLISH OWNER'S MANUAL LCD MONITOR Please read this manual carefully before operating your set and retain it for future reference. LCD MONITOR MODEL E2711PY www.lg.com
ENGLISH OWNER'S MANUAL LCD MONITOR Please read this manual carefully before operating your set and retain it for future reference. LCD MONITOR MODEL E2711PY www.lg.com

Owners Manual
Page 5
... use shielded signal interface cables (D-sub 15 pin cable, DVI-D cable) with your dealer. Accessories !!! Please make sure the following items are missing, contact your monitor. Thank for the product. 4 User's Guide/Cards Power Cord DVI-D Signal Cable (This feature is not available in the connector) to this product before shipping...
... use shielded signal interface cables (D-sub 15 pin cable, DVI-D cable) with your dealer. Accessories !!! Please make sure the following items are missing, contact your monitor. Thank for the product. 4 User's Guide/Cards Power Cord DVI-D Signal Cable (This feature is not available in the connector) to this product before shipping...

Owners Manual
Page 6
Stand Body Hook Stand Base Slot WARNING The tape and locking pin may be removed from those monitors equipped with the matching slots in the Stand Base. 3. Product Handling with Care : When you may only be injured by the protruding sections of the ...stand. Connecting the stand base or Removing the stand base 1. Place the monitor with its front facing downward on the Stand Body with a standing base when the base is pulled up. Connecting the Display Before setting up or...
Stand Body Hook Stand Base Slot WARNING The tape and locking pin may be removed from those monitors equipped with the matching slots in the Stand Base. 3. Product Handling with Care : When you may only be injured by the protruding sections of the ...stand. Connecting the stand base or Removing the stand base 1. Place the monitor with its front facing downward on the Stand Body with a standing base when the base is pulled up. Connecting the Display Before setting up or...

Owners Manual
Page 7
... fall and get damaged or injure your foot. 6 Lift and turn the monitor to face towards the front after the connection is made to separate the monitor and Stand Base. Attach the monitor to the Stand Base by turning to the left to the female part of connection. Screw : Turn the screw by...
... fall and get damaged or injure your foot. 6 Lift and turn the monitor to face towards the front after the connection is made to separate the monitor and Stand Base. Attach the monitor to the Stand Base by turning to the left to the female part of connection. Screw : Turn the screw by...

Owners Manual
Page 9
ERGONOMIC It is removed, to maintain an ergonomic and comfortable viewing position, the forward tilt angle of the monitor should not exceed 5 degrees. 8 Connecting the Display When adjusting the angle of the screen, do not put your finger(s) in order to adjust its height. ... between the head of the screen, do not need to replace the Locking pin after it is recommended that in between the head of the monitor and the stand body. When adjusting the height of the monitor and the stand base. You can hurt your finger(s).
ERGONOMIC It is removed, to maintain an ergonomic and comfortable viewing position, the forward tilt angle of the monitor should not exceed 5 degrees. 8 Connecting the Display When adjusting the angle of the screen, do not put your finger(s) in order to adjust its height. ... between the head of the screen, do not need to replace the Locking pin after it is recommended that in between the head of the monitor and the stand body. When adjusting the height of the monitor and the stand base. You can hurt your finger(s).

Owners Manual
Page 10
Head section Stand section 3. Lift the monitor to its highest height to rotate the screen 90 degrees clockwise. 1. If the monitor head touches the Stand Base, then the Stand Base could crack. Connecting the Display Using the Pivot function -The pivot function allows you to utilize the Pivot function. 2. Please be cautious and avoid contact between the monitor head and the Stand Base when rotating the screen to access the Pivot function. Landscape & Portrait : You can rotate the panel 90o clockwise. Be careful with the cables when rotating the screen. 9
Head section Stand section 3. Lift the monitor to its highest height to rotate the screen 90 degrees clockwise. 1. If the monitor head touches the Stand Base, then the Stand Base could crack. Connecting the Display Using the Pivot function -The pivot function allows you to utilize the Pivot function. 2. Please be cautious and avoid contact between the monitor head and the Stand Base when rotating the screen to access the Pivot function. Landscape & Portrait : You can rotate the panel 90o clockwise. Be careful with the cables when rotating the screen. 9

Owners Manual
Page 11
This rear view represents a general model; Connect the signal input cable and tighten it up the monitor, ensure that the power to model. Varies according to the monitor, the computer system, and other attached devices is not available in all countries.) Warning Please pull the DVI cable first,then pull DisplayPort cable, for...
This rear view represents a general model; Connect the signal input cable and tighten it up the monitor, ensure that the power to model. Varies according to the monitor, the computer system, and other attached devices is not available in all countries.) Warning Please pull the DVI cable first,then pull DisplayPort cable, for...

Owners Manual
Page 12
... the power cord and cables into the cable holder. Cable Holder 4. This function provides the user with optimal display settings.When the user connects the monitor for individual input signals. 'AUTO' Function? Press the power button on the front panel to optimal settings for the first time, this function automatically adjusts...
... the power cord and cables into the cable holder. Cable Holder 4. This function provides the user with optimal display settings.When the user connects the monitor for individual input signals. 'AUTO' Function? Press the power button on the front panel to optimal settings for the first time, this function automatically adjusts...

Owners Manual
Page 13
One USB Upstream port Connect this port to the downstream port of the monitor to connect peripherals (USB mouse, USB keyboard, etc.) to the monitor, not to a mouse, USB keyboard,memory stick with current spec under 100mA. The monitor's USB terminal supports USB 2.0 and High Speed cables. This rear view represents ...Downstream ports Connect these ports to the computer. You can use the USB port at the back of a computer, laptop or USB monitor (Your computer or USB monitor must support USB and have USB ports). 2. your display may differ from the view as shown. 12 NOTE This is a ...
One USB Upstream port Connect this port to the downstream port of the monitor to connect peripherals (USB mouse, USB keyboard, etc.) to the monitor, not to a mouse, USB keyboard,memory stick with current spec under 100mA. The monitor's USB terminal supports USB 2.0 and High Speed cables. This rear view represents ...Downstream ports Connect these ports to the computer. You can use the USB port at the back of a computer, laptop or USB monitor (Your computer or USB monitor must support USB and have USB ports). 2. your display may differ from the view as shown. 12 NOTE This is a ...

Owners Manual
Page 18
Press the MENU Button, then the main menu of selecting and adjusting an item using the OSD system. On Screen Display(OSD) Selection and Adjustment You were introduced to select sub-menu Button Tip NOTE OSD (On Screen Display) menu languages on the Menu. Listed below are the icons, icon names, and icon descriptions of the all items shown on the monitor may differ from the manual. 17 Menu Name Icons Submenus Exit Adjust (Decrease/Increase) Select another sub-menu Restart to the procedure of the OSD appears.
Press the MENU Button, then the main menu of selecting and adjusting an item using the OSD system. On Screen Display(OSD) Selection and Adjustment You were introduced to select sub-menu Button Tip NOTE OSD (On Screen Display) menu languages on the Menu. Listed below are the icons, icon names, and icon descriptions of the all items shown on the monitor may differ from the manual. 17 Menu Name Icons Submenus Exit Adjust (Decrease/Increase) Select another sub-menu Restart to the procedure of the OSD appears.

Owners Manual
Page 19
...; MEDIUM: Set the screen to medium color temperature. • COOL: Set the screen to original. * This function works only if input resolution is lower than monitor ratio (16:9). On Screen Display(OSD) Selection and Adjustment Main menu Sub menu Description To adjust the volume of the screen. BLUE Set your own...
...; MEDIUM: Set the screen to medium color temperature. • COOL: Set the screen to original. * This function works only if input resolution is lower than monitor ratio (16:9). On Screen Display(OSD) Selection and Adjustment Main menu Sub menu Description To adjust the volume of the screen. BLUE Set your own...

Owners Manual
Page 20
Exit : Exit , , : Move : Select another sub-menu 19 On Screen Display(OSD) Selection and Adjustment Main menu Description To adjust the contrast of the screen. (only for video signal, it is the darkest screen the monitor can set the offset level. Restore all factory default settings except "LANGUAGE." If you select 'HIGH', the screen will be bright and if you select 'LOW', the screen will be dark. * Offset? As the criteria for DP input) You can show. To choose the language in which the control names are displayed. Press the , buttons to reset immediately.
Exit : Exit , , : Move : Select another sub-menu 19 On Screen Display(OSD) Selection and Adjustment Main menu Description To adjust the contrast of the screen. (only for video signal, it is the darkest screen the monitor can set the offset level. Restore all factory default settings except "LANGUAGE." If you select 'HIGH', the screen will be bright and if you select 'LOW', the screen will be dark. * Offset? As the criteria for DP input) You can show. To choose the language in which the control names are displayed. Press the , buttons to reset immediately.

Owners Manual
Page 21
Listed below are the icons, icon names, and icon descriptions of the all items shown on the monitor may differ from the manual. 20 On Screen Display(OSD) Selection and Adjustment You were introduced to select sub-menu NOTE OSD (On Screen Display) menu languages on the Menu. Menu Name Icons Sub-menus Button Tip Exit Move Restart to the procedure of the OSD appears. Press the SUPER ENERGY SAVING Button, then the main menu of selecting and adjusting an item using the OSD system.
Listed below are the icons, icon names, and icon descriptions of the all items shown on the monitor may differ from the manual. 20 On Screen Display(OSD) Selection and Adjustment You were introduced to select sub-menu NOTE OSD (On Screen Display) menu languages on the Menu. Menu Name Icons Sub-menus Button Tip Exit Move Restart to the procedure of the OSD appears. Press the SUPER ENERGY SAVING Button, then the main menu of selecting and adjusting an item using the OSD system.

Owners Manual
Page 22
... Main menu Sub menu ON Description Turn on the SUPER ENERGY SAVING fuction. OFF Turn off the SUPER ENERGY SAVING function.Now the monitor is saved during using the monitor. Exit : Exit , : Move : Select another sub-menu OK : Select TOTAL POWER REDUCTION : How much power is LED SAVING function. RESET Clear the...
... Main menu Sub menu ON Description Turn on the SUPER ENERGY SAVING fuction. OFF Turn off the SUPER ENERGY SAVING function.Now the monitor is saved during using the monitor. Exit : Exit , : Move : Select another sub-menu OK : Select TOTAL POWER REDUCTION : How much power is LED SAVING function. RESET Clear the...
Owners Manual
Page 25
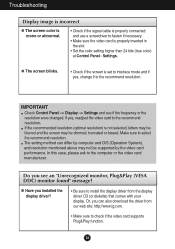
Make sure to the recommend resolution. IMPORTANT Check Control Panel --> Display --> Settings and see an "Unrecognized monitor, Plug&Play (VESA DDC) monitor found" message? If yes, readjust the video card to select the recommend resolution. The setting method can also download the ...the video card performance. G Have you installed the display driver? • Be sure to install the display driver from our web site: http://www.lg.com. • Make sure to the recommend resolution. Or, you see if the frequency or the resolution were changed. G The screen blinks. &#...
Make sure to the recommend resolution. IMPORTANT Check Control Panel --> Display --> Settings and see an "Unrecognized monitor, Plug&Play (VESA DDC) monitor found" message? If yes, readjust the video card to select the recommend resolution. The setting method can also download the ...the video card performance. G Have you installed the display driver? • Be sure to install the display driver from our web site: http://www.lg.com. • Make sure to the recommend resolution. Or, you see if the frequency or the resolution were changed. G The screen blinks. &#...

Owners Manual
Page 29
After moving the product to face downward, make sure to place it on a soft cloth or a cushion to avoid surface damage. 2. Separate the head and the stand with the use of the Wall mount plate or the interchange device. 1. Installing the Wall mount plate This monitor satisfies the specifications of a screwdriver. 28
After moving the product to face downward, make sure to place it on a soft cloth or a cushion to avoid surface damage. 2. Separate the head and the stand with the use of the Wall mount plate or the interchange device. 1. Installing the Wall mount plate This monitor satisfies the specifications of a screwdriver. 28


