
Owners Manual
Page 2
... harmful interference to radio or television reception, which the receiver is no guarantee that interference will not occur in a residential installation. Reorient or relocate the receiving antenna. - Any changes or modifications not expressly approved by the party responsible for a Class B digital device, pursuant to operate the equipment. U.S.A. NO USER SERVICEABLE PARTS INSIDE. NOTE TO CABLE/TV INSTALLER: This reminder is provided...
... harmful interference to radio or television reception, which the receiver is no guarantee that interference will not occur in a residential installation. Reorient or relocate the receiving antenna. - Any changes or modifications not expressly approved by the party responsible for a Class B digital device, pursuant to operate the equipment. U.S.A. NO USER SERVICEABLE PARTS INSIDE. NOTE TO CABLE/TV INSTALLER: This reminder is provided...
Owners Manual
Page 3
... prong is provided for your outlet, consult an electrician for use the attachments / accessories specified by qualified service personnel only. Clean only with the manufacturer's instructions. 8. Do not install near water. 6. Install in the operating instructions unless you are for replacement of the polarized or grounding type plug. Keep these instructions. 2. Apparatus shall not be exposed to do not perform any...
... prong is provided for your outlet, consult an electrician for use the attachments / accessories specified by qualified service personnel only. Clean only with the manufacturer's instructions. 8. Do not install near water. 6. Install in the operating instructions unless you are for replacement of the polarized or grounding type plug. Keep these instructions. 2. Apparatus shall not be exposed to do not perform any...
Owners Manual
Page 5
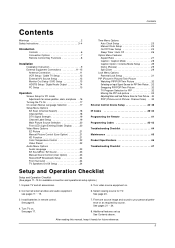
... Function 21 Color Temperature Control 22 Video Preset 22 Audio Menu Options Audio Language 23 EZ SoundRite / EZ Sound 23 Manual Sound Control (User Option 23 Stereo/SAP Broadcasts Setup 24 Front Surround 24 TV Speakers On/Off Setup 24 Time Menu Options Auto Clock Setup 25 Manual Clock Setup 25 On/Off Timer Setup 25 Sleep Timer / Auto Off 26 Option Menu Features Aspect Ratio 27 Caption / Caption Mode 28 Caption Option / Cinema Mode Setup 29 Demo (Review 29 Split Zoom 29 Lock Menu Options Parental Lock Setup 31 PIP (Picture-in remote control.
... Function 21 Color Temperature Control 22 Video Preset 22 Audio Menu Options Audio Language 23 EZ SoundRite / EZ Sound 23 Manual Sound Control (User Option 23 Stereo/SAP Broadcasts Setup 24 Front Surround 24 TV Speakers On/Off Setup 24 Time Menu Options Auto Clock Setup 25 Manual Clock Setup 25 On/Off Timer Setup 25 Sleep Timer / Auto Off 26 Option Menu Features Aspect Ratio 27 Caption / Caption Mode 28 Caption Option / Cinema Mode Setup 29 Demo (Review 29 Split Zoom 29 Lock Menu Options Parental Lock Setup 31 PIP (Picture-in remote control.
Owners Manual
Page 8
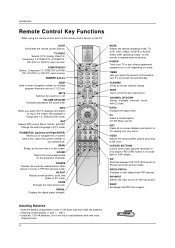
...a program number for the sub picture. with +, - LIGHT Illuminates the remote control buttons. SIGNAL Displays the digital signal strength. COMP/RGB/DVI Selects: Component 1-2, RGB-DTV (or RGB- NUMBER buttons DASH Used to TV viewing from any other operating modes, for the program's character. SOUND Selects the sound appropriate for the remote to navigate the on mode. ADJUST Adjusts screen position, clock, and phase in DTV mode. CHANNEL UP/DOWN Selects available channels found with new ones. RATIO Changes the aspect ratio. VIDEO Adjusts the factory preset picture according...
...a program number for the sub picture. with +, - LIGHT Illuminates the remote control buttons. SIGNAL Displays the digital signal strength. COMP/RGB/DVI Selects: Component 1-2, RGB-DTV (or RGB- NUMBER buttons DASH Used to TV viewing from any other operating modes, for the program's character. SOUND Selects the sound appropriate for the remote to navigate the on mode. ADJUST Adjusts screen position, clock, and phase in DTV mode. CHANNEL UP/DOWN Selects available channels found with new ones. RATIO Changes the aspect ratio. VIDEO Adjusts the factory preset picture according...
Owners Manual
Page 9
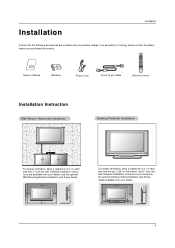
... Desktop Stand Installation and Setup Guide available from the wall. PIPCH+ PIPINPUT FREEZE ZOOM SIGNAL SWAP ADJUST Remote Control Installation Instruction Wall Mount: Horizontal installation Desktop Pedestal Installation For proper ventilation, allow a clearance of 4" on each side and the top, 2.36" on each side and 2" from your plasma display. Owner's Manual 1.5V 1.5V Batteries Power Cord D-sub 15 pin Cable LIGHT MODE POWER TV/VIDEO COMP/RGB/DVI TIMER FLASHBK MUTE VOL SURF CH INFO SAP RATIO CC ENTER MENU SOUND VIDEO EXIT PLAY PAUSE...
... Desktop Stand Installation and Setup Guide available from the wall. PIPCH+ PIPINPUT FREEZE ZOOM SIGNAL SWAP ADJUST Remote Control Installation Instruction Wall Mount: Horizontal installation Desktop Pedestal Installation For proper ventilation, allow a clearance of 4" on each side and the top, 2.36" on each side and 2" from your plasma display. Owner's Manual 1.5V 1.5V Batteries Power Cord D-sub 15 pin Cable LIGHT MODE POWER TV/VIDEO COMP/RGB/DVI TIMER FLASHBK MUTE VOL SURF CH INFO SAP RATIO CC ENTER MENU SOUND VIDEO EXIT PLAY PAUSE...
Owners Manual
Page 12
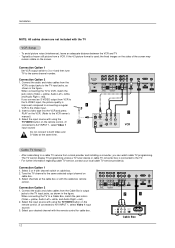
...DVD /DTV INPUT MONITOR OUTPUT A/V INPUT1 (MONO) R AUDIO L VIDEO AUDIO INPUT VIDEO INPUT S-VIDEO 2 Antenna1 DVI INPUT (PC/DTV INPUT) Antenna 2 1 (R) AUDIO (L) VIDEO TV VCR OUTPUT SWITCH 34 RF Cable Cable Box 12 Insert a video tape into the VCR and press PLAY on the screen. If you can watch cable TV programming. Select your local cable TV service provider(s). compared to connecting a regular VCR to VCR, match the jack colors (Video = yellow, Audio Left = white, and Audio Right = red). When connecting the TV to the same channel number. Connection Option 1 Set...
...DVD /DTV INPUT MONITOR OUTPUT A/V INPUT1 (MONO) R AUDIO L VIDEO AUDIO INPUT VIDEO INPUT S-VIDEO 2 Antenna1 DVI INPUT (PC/DTV INPUT) Antenna 2 1 (R) AUDIO (L) VIDEO TV VCR OUTPUT SWITCH 34 RF Cable Cable Box 12 Insert a video tape into the VCR and press PLAY on the screen. If you can watch cable TV programming. Select your local cable TV service provider(s). compared to connecting a regular VCR to VCR, match the jack colors (Video = yellow, Audio Left = white, and Audio Right = red). When connecting the TV to the same channel number. Connection Option 1 Set...

Owners Manual
Page 13
... component video output, use S-Video. NOTE: If your DVD only has an S-Video output jack, connect this to the S-VIDEO input on the TV and connect the DVD audio outputs to the AUDIO INPUT jacks on the remote control. (If connected to the DVD player's manual for Component 2 input source. • Digital Audio operation has priority if Digital Audio and AUDIO L/R are connected at the same time. Component ports on the DVD player, insert a DVD. 2. See the Operating Manual of the second TV or monitor for Monitor out. R AUDIO L VIDEO Monitor Out Setup The TV has a special signal...
... component video output, use S-Video. NOTE: If your DVD only has an S-Video output jack, connect this to the S-VIDEO input on the TV and connect the DVD audio outputs to the AUDIO INPUT jacks on the remote control. (If connected to the DVD player's manual for Component 2 input source. • Digital Audio operation has priority if Digital Audio and AUDIO L/R are connected at the same time. Component ports on the DVD player, insert a DVD. 2. See the Operating Manual of the second TV or monitor for Monitor out. R AUDIO L VIDEO Monitor Out Setup The TV has a special signal...
Owners Manual
Page 14
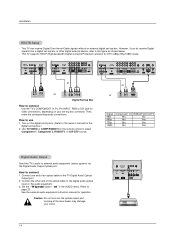
... Yes Yes Digital Audio Output Send the TV's audio to connect 1. Connect the other digital external device, refer to the owner's manual for video connections, depending on the digital set-top box. (Refer to the figure as shown below. - See the external audio equipment instruction manual for DTV (480p,720p,1080i) mode. Turn on your vision. 14 REMOTE CONTROL UPGRADE PORT DVI COMPONENT1 PC/DVI OUTPUT INPUT INPUT AUDIO INPUT DIGITAL AUDIO (OPTICAL) Installation HDSTB Setup - This TV can receive Digital Over-the-air/Cable signals without an external digital set -top box or...
... Yes Yes Digital Audio Output Send the TV's audio to connect 1. Connect the other digital external device, refer to the owner's manual for video connections, depending on the digital set-top box. (Refer to the figure as shown below. - See the external audio equipment instruction manual for DTV (480p,720p,1080i) mode. Turn on your vision. 14 REMOTE CONTROL UPGRADE PORT DVI COMPONENT1 PC/DVI OUTPUT INPUT INPUT AUDIO INPUT DIGITAL AUDIO (OPTICAL) Installation HDSTB Setup - This TV can receive Digital Over-the-air/Cable signals without an external digital set -top box or...
Owners Manual
Page 15
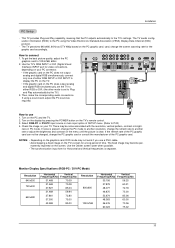
... settings. PC/DVI AUDIO INPUT RGB INPUT (PC/DTV INPUT) COMPONENT 2 COMPONENT 1 R L DVD /DTV INPUT MONITOR OUTPUT A/V INPUT1 (MONO) R AUDIO L VIDEO AUDIO INPUT VIDEO INPUT S-VIDEO Antenna1 DVI INPUT (PC/DTV INPUT) Antenna 2 How to Plug and Play automatically by pressing the POWER button on the TV's remote control. 3. Turn on the screen. If noise is present, change the PC mode to another resolution, change the refresh rate to another rate or adjust the brightness and contrast on the menu until the picture is set to use a DVI-I cable. • Avoid keeping a fixed image...
... settings. PC/DVI AUDIO INPUT RGB INPUT (PC/DTV INPUT) COMPONENT 2 COMPONENT 1 R L DVD /DTV INPUT MONITOR OUTPUT A/V INPUT1 (MONO) R AUDIO L VIDEO AUDIO INPUT VIDEO INPUT S-VIDEO Antenna1 DVI INPUT (PC/DTV INPUT) Antenna 2 How to Plug and Play automatically by pressing the POWER button on the TV's remote control. 3. Turn on the screen. If noise is present, change the PC mode to another resolution, change the refresh rate to another rate or adjust the brightness and contrast on the menu until the picture is set to use a DVI-I cable. • Avoid keeping a fixed image...
Owners Manual
Page 17
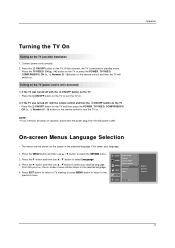
... the screen in the selected language. 4. SETUP Aspect Ratio Caption VIDEO Caption Mode Caption Option AUDIO Language G TIME Cinema Demo OPTION LOCK MENU Prev. Connect power cord correctly. 2. At this point on, the on vacation, disconnect the power plug from the wall power outlet. The menus can be away on -screen menus will switch on the TV. Press the MENU button and then use D / E button to standby mode. Press EXIT button to return to TV viewing or press MENU button to return to turn...
... the screen in the selected language. 4. SETUP Aspect Ratio Caption VIDEO Caption Mode Caption Option AUDIO Language G TIME Cinema Demo OPTION LOCK MENU Prev. Connect power cord correctly. 2. At this point on, the on vacation, disconnect the power plug from the wall power outlet. The menus can be away on -screen menus will switch on the TV. Press the MENU button and then use D / E button to standby mode. Press EXIT button to return to TV viewing or press MENU button to return to turn...
Owners Manual
Page 18
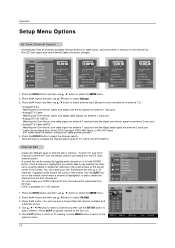
...) channel list" from the default channel list created from the Surf channel list. - A custom list can create your SURF channel list from the channel list memorized from EZ Scan. - Use the SURF button on your connections to select EZ Scan. 3. SETUP VIDEO AUDIO TIME OPTION EZ Scan Ch.Edit DTV Signal Ch. STD 2. Press the G button. Operation Setup Menu Options EZ Scan (Channel Search) - Label Main Input Sub Input Front Display SET ID LOCK ANT 1 ANT 2 Air Select antenna input, press Analog/DTV Air Analog/DTV Cable Analog+DTV Air(ANT2) Analog+DTV Cable...
...) channel list" from the default channel list created from the Surf channel list. - A custom list can create your SURF channel list from the channel list memorized from EZ Scan. - Use the SURF button on your connections to select EZ Scan. 3. SETUP VIDEO AUDIO TIME OPTION EZ Scan Ch.Edit DTV Signal Ch. STD 2. Press the G button. Operation Setup Menu Options EZ Scan (Channel Search) - Label Main Input Sub Input Front Display SET ID LOCK ANT 1 ANT 2 Air Select antenna input, press Analog/DTV Air Analog/DTV Cable Analog+DTV Air(ANT2) Analog+DTV Cable...
Owners Manual
Page 19
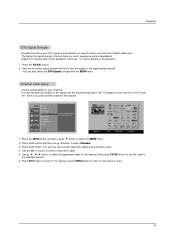
....Label. 3. Use the CH +/- Press the SIGNAL button. 2. nel - Press the MENU button and then use D / E button to the channel logo screen. 1. Label Main Input Sub Input Front Display SET ID LOCK MENU Prev. Choose preset labels for the channel. Press the G button and then use D / E button to the previous menu. 19 Reveals how strong your DTV signal is provided on all programs. 1. G Selection ( G or ) leads you didn't preset a label for your antenna or digital cable input.
....Label. 3. Use the CH +/- Press the SIGNAL button. 2. nel - Press the MENU button and then use D / E button to the channel logo screen. 1. Label Main Input Sub Input Front Display SET ID LOCK MENU Prev. Choose preset labels for the channel. Press the G button and then use D / E button to the previous menu. 19 Reveals how strong your DTV signal is provided on all programs. 1. G Selection ( G or ) leads you didn't preset a label for your antenna or digital cable input.
Owners Manual
Page 20
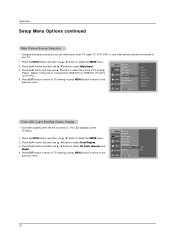
... VIDEO DTV Signal AUDIO Ch. Changes the picture source so you can watch your off-air TV, cable TV, VCR, DVD, or any other devices that are connected to select the SETUP menu. 2. Press the MENU button and then use D / E button to the previous menu. Operation Setup Menu Options continued Main Picture Source Selection - Press the MENU button and then use D / E button to select the SETUP menu. 2. Press the G button and then use D / E button to select Main Input. 3. Press EXIT button to return to TV viewing...
... VIDEO DTV Signal AUDIO Ch. Changes the picture source so you can watch your off-air TV, cable TV, VCR, DVD, or any other devices that are connected to select the SETUP menu. 2. Press the MENU button and then use D / E button to the previous menu. Operation Setup Menu Options continued Main Picture Source Selection - Press the MENU button and then use D / E button to select the SETUP menu. 2. Press the G button and then use D / E button to select Main Input. 3. Press EXIT button to return to TV viewing...
Owners Manual
Page 28
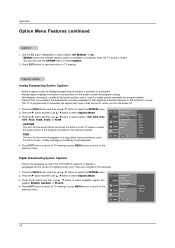
... AUDIO Language G TIME Cinema Demo OPTION LOCK MENU Prev. Caption/Text, if provided by the broadcaster. 4. SETUP Aspect Ratio Caption VIDEO Caption Mode G AUDIO Caption Option Language TIME Cinema Demo OPTION LOCK MENU Prev. Text displays information, usually at any position on the program. 1. CC 1 CC 2 CC 3 CC 4 Text 1 Text 2 Text 3 Text 4 Digital Broadcasting System Captions - Press EXIT button to return to TV viewing or press MENU button to return to the previous menu. Select a caption mode for both digital and analog channels on a program. - Use...
... AUDIO Language G TIME Cinema Demo OPTION LOCK MENU Prev. Caption/Text, if provided by the broadcaster. 4. SETUP Aspect Ratio Caption VIDEO Caption Mode G AUDIO Caption Option Language TIME Cinema Demo OPTION LOCK MENU Prev. Text displays information, usually at any position on the program. 1. CC 1 CC 2 CC 3 CC 4 Text 1 Text 2 Text 3 Text 4 Digital Broadcasting System Captions - Press EXIT button to return to TV viewing or press MENU button to return to the previous menu. Select a caption mode for both digital and analog channels on a program. - Use...
Owners Manual
Page 30
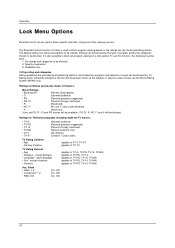
... television movies can be blocked by broadcasting stations. sexual dialogue • Language - adult language • Sex - The Parental Control Function (V-Chip) is to allow all program viewing for a time period. Viewing can be blocked by the type of program and by the categories chosen to TV-Y7) TV Rating General: • Age • Dialogue - Specify a password 3. The default setting is used to block specific channels...
... television movies can be blocked by broadcasting stations. sexual dialogue • Language - adult language • Sex - The Parental Control Function (V-Chip) is to allow all program viewing for a time period. Viewing can be blocked by the type of program and by the categories chosen to TV-Y7) TV Rating General: • Age • Dialogue - Specify a password 3. The default setting is used to block specific channels...
Owners Manual
Page 31
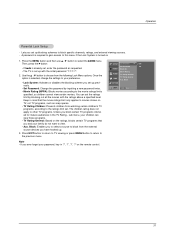
Operation Parental Lock Setup - sub menu, your children can set . Block OPTION LOCK MENU Prev. Press the MENU button and then use D / E button to the previous menu. You can view those programs. • TV Rating-General: Based on TV, not TV programs, such as requested. • The TV is selected, change the settings to the ratings limit set the ratings limit by inputting a new password twice. • Movie Rating (MPPA): Blocks movies according to...
Operation Parental Lock Setup - sub menu, your children can set . Block OPTION LOCK MENU Prev. Press the MENU button and then use D / E button to the previous menu. You can view those programs. • TV Rating-General: Based on TV, not TV programs, such as requested. • The TV is selected, change the settings to the ratings limit set the ratings limit by inputting a new password twice. • Movie Rating (MPPA): Blocks movies according to...
Owners Manual
Page 32
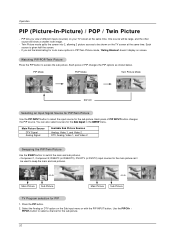
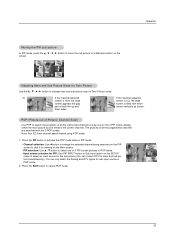
... screen. Each press of PIP INPUT button changes the PIP source. You can 't be used to access the sub picture. Operation PIP (Picture-In-Picture) / POP / Twin Picture - PIP Mode POP Mode FD E TV 2-0 TV 4-0 Twin Picture Mode TV 6-0 PIP Off Selecting an Input Signal Source for PIP/Twin Picture Use the PIP INPUT button to select a channel for the sub picture. Main Picture Sub Picture Main Picture Sub Picture TV Program selection for Lock menu options in the SETUP menu. Each press of PIP changes...
... screen. Each press of PIP INPUT button changes the PIP source. You can 't be used to access the sub picture. Operation PIP (Picture-In-Picture) / POP / Twin Picture - PIP Mode POP Mode FD E TV 2-0 TV 4-0 Twin Picture Mode TV 6-0 PIP Off Selecting an Input Signal Source for PIP/Twin Picture Use the PIP INPUT button to select a channel for the sub picture. Main Picture Sub Picture Main Picture Sub Picture TV Program selection for Lock menu options in the SETUP menu. Each press of PIP changes...
Owners Manual
Page 33
... EXIT button to change main and sub picture sizes in POP mode. 2. Press the PIP button to activate the POP mode while in PIP mode. • Channel selection: Use F button to enlarge the selected channel being searched on the PIP screen to shift it for viewing on the Main screen. • PIP selection: Use D / E button to search the programs of -Picture: Channel Scan) - Operation Adjusting Main and Sub Picture Sizes for PIP: Use PIP INPUT button or Sub Input option on the screen. Use...
... EXIT button to change main and sub picture sizes in POP mode. 2. Press the PIP button to activate the POP mode while in PIP mode. • Channel selection: Use F button to enlarge the selected channel being searched on the PIP screen to shift it for viewing on the Main screen. • PIP selection: Use D / E button to search the programs of -Picture: Channel Scan) - Operation Adjusting Main and Sub Picture Sizes for PIP: Use PIP INPUT button or Sub Input option on the screen. Use...
Owners Manual
Page 41
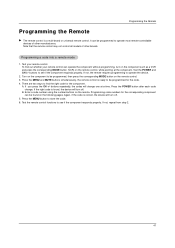
... or universal remote control. Programming a code into a remote mode 1. If not, the remote requires programming to be found , the device will change . There are two ways to store the code. 6. buttons repeatedly, the codes will turn off . Press the MENU button to find out whether your remote control. A. If you press the CH +/- If the right code is correct, the device will turn off . 5. Test the POWER and CH +/- Enter a code number using the number buttons...
... or universal remote control. Programming a code into a remote mode 1. If not, the remote requires programming to be found , the device will change . There are two ways to store the code. 6. buttons repeatedly, the codes will turn off . Press the MENU button to find out whether your remote control. A. If you press the CH +/- If the right code is correct, the device will turn off . 5. Test the POWER and CH +/- Enter a code number using the number buttons...

Owners Manual
Page 44
... appliance or power tool. Picture OK & No sound The remote control doesn't work • Press the VOLUME (G) button. • Sound muted? Please contact your service center, if the picture has not appeared after switching on . • Is the power cord inserted into wall power outlet? • Test the wall power outlet, plug another product's power cord into the outlet where the TV's power cord was plugged in an unusual noise when the plasma display is on...
... appliance or power tool. Picture OK & No sound The remote control doesn't work • Press the VOLUME (G) button. • Sound muted? Please contact your service center, if the picture has not appeared after switching on . • Is the power cord inserted into wall power outlet? • Test the wall power outlet, plug another product's power cord into the outlet where the TV's power cord was plugged in an unusual noise when the plasma display is on...

