
Owners Manual
Page 1
Record model number and serial number of the set . P/NO • 38289UO490B (0509-REVO0) Printed in Korea Retain it for future reference. LCD TV OWNER'S MANUAL MODELS: DU-37LZ55 Internet Home Page • http://www.lge.com http://www.lg.ca Please read this information to your set . See the label attached on the back cover and quote this manual carefully before operating your dealer when you require service.
Record model number and serial number of the set . P/NO • 38289UO490B (0509-REVO0) Printed in Korea Retain it for future reference. LCD TV OWNER'S MANUAL MODELS: DU-37LZ55 Internet Home Page • http://www.lge.com http://www.lg.ca Please read this information to your set . See the label attached on the back cover and quote this manual carefully before operating your dealer when you require service.
Owners Manual
Page 4
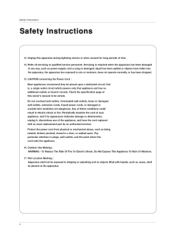
... circuits. Overloaded wall outlets, loose or damaged wall outlets, extension cords, frayed power cords, or damaged or cracked wire insulation are dangerous. Unplug this owner's manual to qualified service personnel. Any of time. 14. Outdoor Use Marking : WARNING - Wet Location Marking : Apparatus shall not be placed upon .
... circuits. Overloaded wall outlets, loose or damaged wall outlets, extension cords, frayed power cords, or damaged or cracked wire insulation are dangerous. Unplug this owner's manual to qualified service personnel. Any of time. 14. Outdoor Use Marking : WARNING - Wet Location Marking : Apparatus shall not be placed upon .

Owners Manual
Page 5
... in remote control. Turn TV on . 2. Additional features set tumbling External Equipment Connections .......... Select viewing source for future reference. After reading this manual, keep it handy for TV. See page 21. 6. See pages 25- 28. 8. Antenna or Cable Connection ........... 10 12-17 12-13...Front Surround 27 TV Speakers On/Off Setup 27 BBE 28 Stereo/SAP Broadcasts Setup 28 Time Menu Options Auto Clock Setup 29 Manual Clock Setup 29 On/Off Timer Setup 29 Sleep Timer / Auto Off 30 Option Menu Features Aspect Ratio Control 31 Cinema ...
... in remote control. Turn TV on . 2. Additional features set tumbling External Equipment Connections .......... Select viewing source for future reference. After reading this manual, keep it handy for TV. See page 21. 6. See pages 25- 28. 8. Antenna or Cable Connection ........... 10 12-17 12-13...Front Surround 27 TV Speakers On/Off Setup 27 BBE 28 Stereo/SAP Broadcasts Setup 28 Time Menu Options Auto Clock Setup 29 Manual Clock Setup 29 On/Off Timer Setup 29 Sleep Timer / Auto Off 30 Option Menu Features Aspect Ratio Control 31 Cinema ...
Owners Manual
Page 7
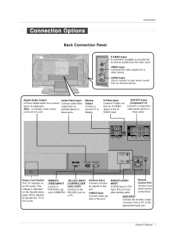
... output from various types of equipment. nals to this port sup- RGB INPUT Connect the monitor output connector from an S-VIDEO device to the S- Owner's Manual 7 Note: In standby mode, these jacks. VIDEO input, I Power Cord Socket This TV operates on DC power. HDMI/DVI (VIDEO)INPUT connect a DVl(Video) signal...
... output from various types of equipment. nals to this port sup- RGB INPUT Connect the monitor output connector from an S-VIDEO device to the S- Owner's Manual 7 Note: In standby mode, these jacks. VIDEO input, I Power Cord Socket This TV operates on DC power. HDMI/DVI (VIDEO)INPUT connect a DVl(Video) signal...
Owners Manual
Page 10
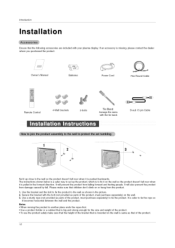
W / / / /' / Owner's Manual Batteries Power Cord 75_ Round Cable Remote Control 4-Wall brackets 2-bolts Tie Band Arrange the wires with the bolt (not provided as parts of the ...
W / / / /' / Owner's Manual Batteries Power Cord 75_ Round Cable Remote Control 4-Wall brackets 2-bolts Tie Band Arrange the wires with the bolt (not provided as parts of the ...
Owners Manual
Page 13
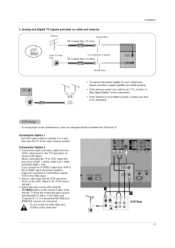
... automatically for two TV's, install a "2Way Signal Splitter" in the figure. Connection Option 2 1. Connect the audio and video cables from VCR to the VCR owner's manual.) 3. compared to connecting a regular VCR to tighten. 3. Analog and Digital TV signals provided on cable and antenna f Antenna Bronze Wire RF Coaxial Wire (75 ohm...
... automatically for two TV's, install a "2Way Signal Splitter" in the figure. Connection Option 2 1. Connect the audio and video cables from VCR to the VCR owner's manual.) 3. compared to connecting a regular VCR to tighten. 3. Analog and Digital TV signals provided on cable and antenna f Antenna Bronze Wire RF Coaxial Wire (75 ohm...
Owners Manual
Page 14
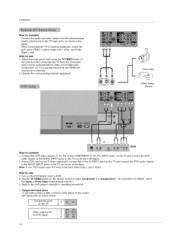
... DVD video outputs (Y, PB, PR) to the COMPONENT (Y, PB, PR) INPUT jacks on the TV, as shown in the figure. 2. Refer to the DVD player's manual for Video, Front Video and Component 1-2. Installation How to connect Connect the audio and video cables from the external equipment's output jacks to the component...
... DVD video outputs (Y, PB, PR) to the COMPONENT (Y, PB, PR) INPUT jacks on the TV, as shown in the figure. 2. Refer to the DVD player's manual for Video, Front Video and Component 1-2. Installation How to connect Connect the audio and video cables from the external equipment's output jacks to the component...
Owners Manual
Page 15
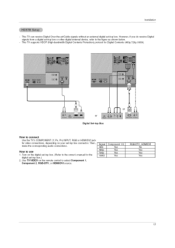
... or HDMI/DVI jack for video connections, depending on the digital set -top box connector. Use TV/VlDEO on the remote control to the owner's manual for Digital Contents (480p,720p,1080i). This TV supports HDCP (High-bandwidth Digital Contents Protection) protocol for the digital set -top box. Signal 480i 480p...
... or HDMI/DVI jack for video connections, depending on the digital set -top box connector. Use TV/VlDEO on the remote control to the owner's manual for Digital Contents (480p,720p,1080i). This TV supports HDCP (High-bandwidth Digital Contents Protection) protocol for the digital set -top box. Signal 480i 480p...
Owners Manual
Page 17
See the Operating Manual of the second TV or monitor for VCR recording. Connect one end of the optical cable to the TV Digital Audio (Optical) Output port. 2. cal) ... look into the optical output port. Connect the other end of an optical cable to the digital audio (opti- See the external audio equipment instruction manual for Monitor out. • When connecting with external audio equipments, such as amplif- Notes: • Component, RGB-PC/RGB-DTV, HDMI/DVI, DTV input sources...
See the Operating Manual of the second TV or monitor for VCR recording. Connect one end of the optical cable to the TV Digital Audio (Optical) Output port. 2. cal) ... look into the optical output port. Connect the other end of an optical cable to the digital audio (opti- See the external audio equipment instruction manual for Monitor out. • When connecting with external audio equipments, such as amplif- Notes: • Component, RGB-PC/RGB-DTV, HDMI/DVI, DTV input sources...
Owners Manual
Page 20
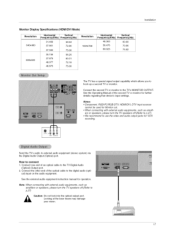
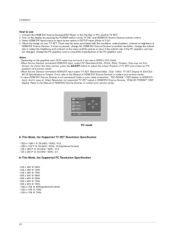
... until the picture is clear. Notes: - In case HDMI/DVI Source Devices is present, change the HDMI/DVl Source Devices to Screen. Refer to the Manual of the PC graphics card. Connect the HDMI/DVl Source Devices(DVD Player or Set Top Box or PC) and the TV SET. 2. When Source... on the TV SET and HDMI/DVl Source Devices remote control. 3. Select HDMI/DVl Input source in HDMI/DVI Input. If not, refer to the Manual of SETUP menu.(Refer to R24) 4. Installation How to use a HDMI to DVI Cable. - There may not fit to Screen. If the refresh rate of...
... until the picture is clear. Notes: - In case HDMI/DVI Source Devices is present, change the HDMI/DVl Source Devices to Screen. Refer to the Manual of the PC graphics card. Connect the HDMI/DVl Source Devices(DVD Player or Set Top Box or PC) and the TV SET. 2. When Source... on the TV SET and HDMI/DVl Source Devices remote control. 3. Select HDMI/DVl Input source in HDMI/DVI Input. If not, refer to the Manual of SETUP menu.(Refer to R24) 4. Installation How to use a HDMI to DVI Cable. - There may not fit to Screen. If the refresh rate of...
Owners Manual
Page 21
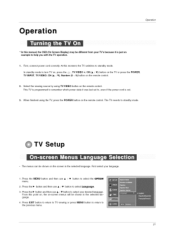
... cord is out. 3. First, connect power cord correctly. Press the MENU button and then use A / • button to select your desired language. Operation * In this manual, the OSD (On Screen Display) may be different from your TV's because it was last set to the previous menu. 21 In standby mode to...
... cord is out. 3. First, connect power cord correctly. Press the MENU button and then use A / • button to select your desired language. Operation * In this manual, the OSD (On Screen Display) may be different from your TV's because it was last set to the previous menu. 21 In standby mode to...
Owners Manual
Page 22
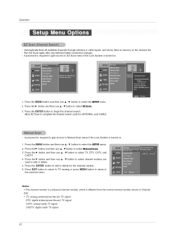
.... A password is required to gain access to select Manuel Scan. 3. button and then use A / • button to select the SETUP menu. 2. Allow EZ Scan to Manual Scan menu if the Lock System is different from the normal channel number shown in memory on . 1.
.... A password is required to gain access to select Manuel Scan. 3. button and then use A / • button to select the SETUP menu. 2. Allow EZ Scan to Manual Scan menu if the Lock System is different from the normal channel number shown in memory on . 1.
Owners Manual
Page 25
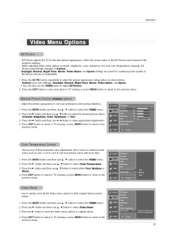
... preset value in the EZ Picture menu based on the program category. - When adjusting Video menu options (contrast, brightness, color, sharpness, tint, and color temperature) manually, EZ Picture automatically changes to select Color Temperature. 3. button and then use the VIDEO menu to see less intense colors with more blue. 1. button to...
... preset value in the EZ Picture menu based on the program category. - When adjusting Video menu options (contrast, brightness, color, sharpness, tint, and color temperature) manually, EZ Picture automatically changes to select Color Temperature. 3. button and then use the VIDEO menu to see less intense colors with more blue. 1. button to...
Owners Manual
Page 26
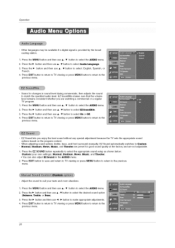
... and then use A / • button to the previous menu, EZ Sound lets you are not adjustable. 1. When adjusting sound options (treble, bass, and front surround) manually, EZ Sound automatically switches to select: English, Spanish, or French. 4. Press EXIT button to return to TV viewing or press MENU button to return to...
... and then use A / • button to the previous menu, EZ Sound lets you are not adjustable. 1. When adjusting sound options (treble, bass, and front surround) manually, EZ Sound automatically switches to select: English, Spanish, or French. 4. Press EXIT button to return to TV viewing or press MENU button to return to...
Owners Manual
Page 29
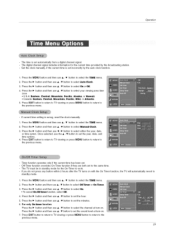
... A / • button to select On. • To cancel On/Off timer function, select Off, 4. Press the IP- button and then use A / • button to select Manual Clock, 3, Press the IP- If you do not press any button within 2 hours after the TV turns on . Press the MENU button and then use... TV must be in standby mode for the current time provided by the auto clock function. 1. Operation The time is wrong, reset the clock manually, 1. Set the clock manually, if the current time is set to select On or Off. 4. Press the IP- Press the IP- button and then use A / • ...
... A / • button to select On. • To cancel On/Off timer function, select Off, 4. Press the IP- button and then use A / • button to select Manual Clock, 3, Press the IP- If you do not press any button within 2 hours after the TV turns on . Press the MENU button and then use... TV must be in standby mode for the current time provided by the auto clock function. 1. Operation The time is wrong, reset the clock manually, 1. Set the clock manually, if the current time is set to select On or Off. 4. Press the IP- Press the IP- button and then use A / • ...


