
Owners Manual
Page 1
Retain it for future reference. P/NO • 38289UO490B (0509-REVO0) Printed in Korea See the label attached on the back cover and quote this manual carefully before operating your dealer when you require service. LCD TV OWNER'S MANUAL MODELS: DU-37LZ55 Internet Home Page • http://www.lge.com http://www.lg.ca Please read this information to your set . Record model number and serial number of the set .
Retain it for future reference. P/NO • 38289UO490B (0509-REVO0) Printed in Korea See the label attached on the back cover and quote this manual carefully before operating your dealer when you require service. LCD TV OWNER'S MANUAL MODELS: DU-37LZ55 Internet Home Page • http://www.lge.com http://www.lg.ca Please read this information to your set . Record model number and serial number of the set .
Owners Manual
Page 4
... as vases, shall be exposed to plugs, wall outlets, and the point where the cord exits the appliance. 16. SafetIynstructions ons f 13. Unplug this owner's manual to qualified service personnel. CAUTION concerning the Power Cord : Most appliances recommend they be certain. that appliance and has no objects filled with an exact...
... as vases, shall be exposed to plugs, wall outlets, and the point where the cord exits the appliance. 16. SafetIynstructions ons f 13. Unplug this owner's manual to qualified service personnel. CAUTION concerning the Power Cord : Most appliances recommend they be certain. that appliance and has no objects filled with an exact...

Owners Manual
Page 5
... 2. Fine-tune source image and sound to protect the set up See Contents above. Connect all accessories. 5. See page 21. 6. After reading this manual, keep it handy for TV. Turn video source equipment on . see pages 12-17. 3 Install batteries in remote control. See pages 24. 7. See ...26 Front Surround 27 TV Speakers On/Off Setup 27 BBE 28 Stereo/SAP Broadcasts Setup 28 Time Menu Options Auto Clock Setup 29 Manual Clock Setup 29 On/Off Timer Setup 29 Sleep Timer / Auto Off 30 Option Menu Features Aspect Ratio Control 31 Cinema 3:2 Mode...
... 2. Fine-tune source image and sound to protect the set up See Contents above. Connect all accessories. 5. See page 21. 6. After reading this manual, keep it handy for TV. Turn video source equipment on . see pages 12-17. 3 Install batteries in remote control. See pages 24. 7. See ...26 Front Surround 27 TV Speakers On/Off Setup 27 BBE 28 Stereo/SAP Broadcasts Setup 28 Time Menu Options Auto Clock Setup 29 Manual Clock Setup 29 On/Off Timer Setup 29 Sleep Timer / Auto Off 30 Option Menu Features Aspect Ratio Control 31 Cinema 3:2 Mode...
Owners Manual
Page 7
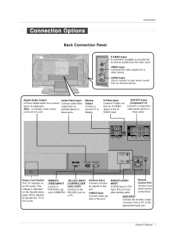
... your wired remote plies Analog audio, control here. Monitor Output Connect a second TV or Monitor. air signals to this jack. nals to this jack. Owner's Manual 7 I DVD/DTV Input (Component 1-2) Connect a component video/audio device to operate the TV on an AC power. RGB/DVI AUDIO Remote INPUT Control Port In...
... your wired remote plies Analog audio, control here. Monitor Output Connect a second TV or Monitor. air signals to this jack. nals to this jack. Owner's Manual 7 I DVD/DTV Input (Component 1-2) Connect a component video/audio device to operate the TV on an AC power. RGB/DVI AUDIO Remote INPUT Control Port In...
Owners Manual
Page 10
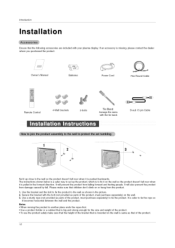
It will also prevent the product from damage caused by fall. It is pulled in the picture. 2. W / / / /' / Owner's Manual Batteries Power Cord 75_ Round Cable Remote Control 4-Wall brackets 2-bolts Tie Band Arrange the wires with your plasma display. It will prevent the product ...
It will also prevent the product from damage caused by fall. It is pulled in the picture. 2. W / / / /' / Owner's Manual Batteries Power Cord 75_ Round Cable Remote Control 4-Wall brackets 2-bolts Tie Band Arrange the wires with your plasma display. It will prevent the product ...
Owners Manual
Page 13
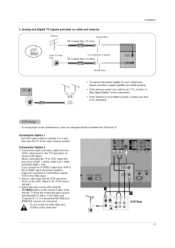
.../DVl sources are connected. ,_ SD-oVindoeto coantntehcet staombeothtimVei.deo and VCR Rear 13 3. Connect the audio and video cables from VCR to the VCR owner's manual.) 3. It is improved; To avoid picture noise (interference), leave an adequate distance between the VCR and TV Connection Option 1 Set VCR output switch to channel...
.../DVl sources are connected. ,_ SD-oVindoeto coantntehcet staombeothtimVei.deo and VCR Rear 13 3. Connect the audio and video cables from VCR to the VCR owner's manual.) 3. It is improved; To avoid picture noise (interference), leave an adequate distance between the VCR and TV Connection Option 1 Set VCR output switch to channel...
Owners Manual
Page 14
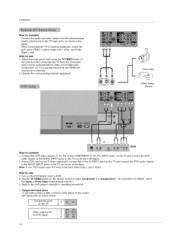
... operating instructions. 1 or Component 2. (If connected to S-VIDEO, select • Component Input ports To get better picture quality, connect a DVD player to the DVD player's manual for Video, Front Video and Component 1-2. Refer to the component input ports as shown in the figure. Turn on DVD player 14 When connecting the...
... operating instructions. 1 or Component 2. (If connected to S-VIDEO, select • Component Input ports To get better picture quality, connect a DVD player to the DVD player's manual for Video, Front Video and Component 1-2. Refer to the component input ports as shown in the figure. Turn on DVD player 14 When connecting the...
Owners Manual
Page 15
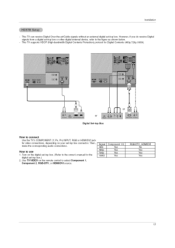
... Component 1/2 Yes Yes Yes Yes RGB-DTV, HDMI!DVl No Yes Yes Yes 15 Turn on the digital set-top box. (Refer to the owner's manual for Digital Contents (480p,720p,1080i). Installation - How to the figure as shown below. - This TV can receive Digital Over-the-air/Cable signals without...
... Component 1/2 Yes Yes Yes Yes RGB-DTV, HDMI!DVl No Yes Yes Yes 15 Turn on the digital set-top box. (Refer to the owner's manual for Digital Contents (480p,720p,1080i). Installation - How to the figure as shown below. - This TV can receive Digital Over-the-air/Cable signals without...
Owners Manual
Page 17
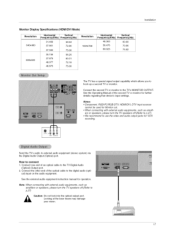
... the optical cable to the TV Digital Audio (Optical) Output port. 2. Connect one end of the second TV or monitor for operation. See the Operating Manual of an optical cable to the digital audio (opti- Looking at the laser beam may damage your vision. 17 Monitor Display Specifications (HDMI/DVI Mode... you to the TV's MONITOR OUTPUT. Connect the second TV or monitor to hook up a second TV or monitor. See the external audio equipment instruction manual for further details regarding that device's input settings. cal) input on the audio equipment.
... the optical cable to the TV Digital Audio (Optical) Output port. 2. Connect one end of the second TV or monitor for operation. See the Operating Manual of an optical cable to the digital audio (opti- Looking at the laser beam may damage your vision. 17 Monitor Display Specifications (HDMI/DVI Mode... you to the TV's MONITOR OUTPUT. Connect the second TV or monitor to hook up a second TV or monitor. See the external audio equipment instruction manual for further details regarding that device's input settings. cal) input on the audio equipment.
Owners Manual
Page 20
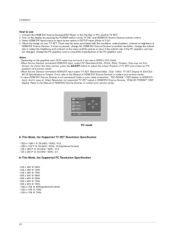
Turn on the display by pressing the POWER button on the menu until the picture is clear. If not, refer to the Manual of SETUP menu.(Refer to another resolution, change the refresh rate or adjust the brightness and contrast on the TV SET and HDMI/DVl Source ...-B Specification to Screen. Notes: - Depending on your service center. As shown the lower picture, press the ADJUST button to DVI Cable. - Installation How to the Manual of the PC graphics card. Connect the HDMI/DVl Source Devices(DVD Player or Set Top Box or PC) and the TV SET. 2. There may...
Turn on the display by pressing the POWER button on the menu until the picture is clear. If not, refer to the Manual of SETUP menu.(Refer to another resolution, change the refresh rate or adjust the brightness and contrast on the TV SET and HDMI/DVl Source ...-B Specification to Screen. Notes: - Depending on your service center. As shown the lower picture, press the ADJUST button to DVI Cable. - Installation How to the Manual of the PC graphics card. Connect the HDMI/DVl Source Devices(DVD Player or Set Top Box or PC) and the TV SET. 2. There may...
Owners Manual
Page 21
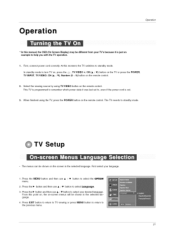
Operation * In this manual, the OSD (On Screen Display) may be shown in the selected language. This TV is programmed to remember which power state it is just an ...
Operation * In this manual, the OSD (On Screen Display) may be shown in the selected language. This TV is programmed to remember which power state it is just an ...
Owners Manual
Page 22
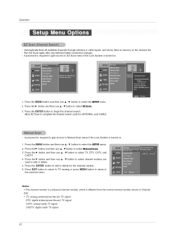
... button to the previous menu. Press the I ,- Press the I ,- Press the I ,- A password is turned on . 1. Press the MENU button and then use A / • button to Manual Scan menu if the Lock System is required to gain access to select the SETUP menu. 2. Notes: • This channel number is a physical channel number...
... button to the previous menu. Press the I ,- Press the I ,- Press the I ,- A password is turned on . 1. Press the MENU button and then use A / • button to Manual Scan menu if the Lock System is required to gain access to select the SETUP menu. 2. Notes: • This channel number is a physical channel number...
Owners Manual
Page 25
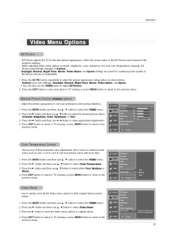
... TV viewing or press MENU button to return to the previous menu. When adjusting Video menu options (contrast, brightness, color, sharpness, tint, and color temperature) manually, EZ Picture automatically changes to the previous menu. button and then use A / • button to make appropriate adjustments. 4. Choose one of three automatic color adjustments...
... TV viewing or press MENU button to return to the previous menu. When adjusting Video menu options (contrast, brightness, color, sharpness, tint, and color temperature) manually, EZ Picture automatically changes to the previous menu. button and then use A / • button to make appropriate adjustments. 4. Choose one of three automatic color adjustments...
Owners Manual
Page 26
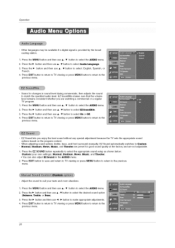
...; button to select the AUDIO menu. 2. button and then use A /• button to the previous menu. When adjusting sound options (treble, bass, and front surround) manually, EZ Sound automatically switches to select EZ SoundRite. 3. button to the previous menu. 26 Press the I ,- Press the I ,- Press EXIT button to return to TV...
...; button to select the AUDIO menu. 2. button and then use A /• button to the previous menu. When adjusting sound options (treble, bass, and front surround) manually, EZ Sound automatically switches to select EZ SoundRite. 3. button to the previous menu. 26 Press the I ,- Press the I ,- Press EXIT button to return to TV...
Owners Manual
Page 29
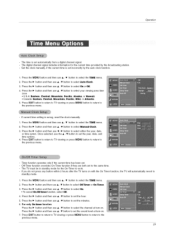
... the current time is wrong, reset the clock manually, 1. button and then use A / • button to select Auto Clock, 3. Press the IP- Timer function operates only if the current time has been set automatically ... then use A/• button to set to select Off Timer or On Timer. 3. The digital channel signal includes information for the On-Timer to select Manual Clock, 3, Press the IP- button and then use A / • button to work. - Press the IP- Press the MENU button and then use A / • button to...
... the current time is wrong, reset the clock manually, 1. button and then use A / • button to select Auto Clock, 3. Press the IP- Timer function operates only if the current time has been set automatically ... then use A/• button to set to select Off Timer or On Timer. 3. The digital channel signal includes information for the On-Timer to select Manual Clock, 3, Press the IP- button and then use A / • button to work. - Press the IP- Press the MENU button and then use A / • button to...


