Specification
Page 1
..., Speed Dry (Manual Dry), Air Dry (Manual Dry), Downloaded (Manual Dry) 12 Wrinkle Care, Custom Program, PGM Save, Child Lock , More Time, Less Time, Signal, Damp Dry Signal, Energy Saver, Default On/Off, Wi-Fi Connect, Remote Start 5 5 60, 50, 40, 30, 20 min, More-Less FABRIC CARE FEATURES Sensor Dry Yes Precise Temperature Control with Variable Heater Yes CONVENIENCE FEATURES 3 Minute Installation Check Yes LoDecibel™ Quiet Operation Yes End of Cycle Signal Yes Drum Light Yes Reversible Door Yes FlowSense™ Duct Clogging...
..., Speed Dry (Manual Dry), Air Dry (Manual Dry), Downloaded (Manual Dry) 12 Wrinkle Care, Custom Program, PGM Save, Child Lock , More Time, Less Time, Signal, Damp Dry Signal, Energy Saver, Default On/Off, Wi-Fi Connect, Remote Start 5 5 60, 50, 40, 30, 20 min, More-Less FABRIC CARE FEATURES Sensor Dry Yes Precise Temperature Control with Variable Heater Yes CONVENIENCE FEATURES 3 Minute Installation Check Yes LoDecibel™ Quiet Operation Yes End of Cycle Signal Yes Drum Light Yes Reversible Door Yes FlowSense™ Duct Clogging...
Owners Manual
Page 2
... Leveling the Dryer 12 Reversing the Door 20 Installing the Side Vent Kit 21 Venting the Dryer 23 Connecting Gas Dryers 25 Connecting Electric Dryers 29 Final Installation Check 30 Installation Test (Duct Check) 32 OPERATION 32 Using the Dryer 33 Check the Lint Filter Before Every Load 33 Sorting Loads 33 Loading the Dryer 34 Using the LG EasyLoadTM 35 Control Panel 37 Cycle Guide 39 Cycle Settings and Options 41 SMART FUNCTIONS 41 Smart ThinQ Application 43 Smart Diagnosis™ Function 44 mAINTENANCE 44 Regular Cleaning 45 Troubleshooting 45...
... Leveling the Dryer 12 Reversing the Door 20 Installing the Side Vent Kit 21 Venting the Dryer 23 Connecting Gas Dryers 25 Connecting Electric Dryers 29 Final Installation Check 30 Installation Test (Duct Check) 32 OPERATION 32 Using the Dryer 33 Check the Lint Filter Before Every Load 33 Sorting Loads 33 Loading the Dryer 34 Using the LG EasyLoadTM 35 Control Panel 37 Cycle Guide 39 Cycle Settings and Options 41 SMART FUNCTIONS 41 Smart ThinQ Application 43 Smart Diagnosis™ Function 44 mAINTENANCE 44 Regular Cleaning 45 Troubleshooting 45...
Owners Manual
Page 3
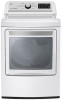
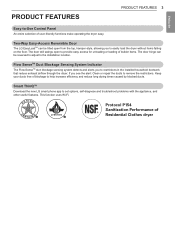
... operating the dryer easy. ENGLISH C C C PRODUCT FEATURES PRODUCT FEATURES 3 Easy-to-Use Control Panel An entire selection of Residential Clothes dryer The door still swings open from the top, hamper-style, allowing you to the installation location. Keep your ducts free of bulkier items. The door hinge can be reversed to adjust to easily load the dryer without items falling on the floor. Two-Way Easy-Access Reversible Door The LG...
... operating the dryer easy. ENGLISH C C C PRODUCT FEATURES PRODUCT FEATURES 3 Easy-to-Use Control Panel An entire selection of Residential Clothes dryer The door still swings open from the top, hamper-style, allowing you to the installation location. Keep your ducts free of bulkier items. The door hinge can be reversed to adjust to easily load the dryer without items falling on the floor. Two-Way Easy-Access Reversible Door The LG...
Owners Manual
Page 4
... use gasoline or other appliance. -WHAT TO DO IF YOU SMELL GAS • Do not try to light any appliance. • Do not touch any phone in your gas supplier from a neighbor's phone. Flexible venting materials are not followed. WARNING FIRE OR EXPLOSION HAZARD Failure to the manufacturer's instructions and local codes. •• Do not install a clothes dryer with clothes dryers...
... use gasoline or other appliance. -WHAT TO DO IF YOU SMELL GAS • Do not try to light any appliance. • Do not touch any phone in your gas supplier from a neighbor's phone. Flexible venting materials are not followed. WARNING FIRE OR EXPLOSION HAZARD Failure to the manufacturer's instructions and local codes. •• Do not install a clothes dryer with clothes dryers...
Owners Manual
Page 5
.... •• Gas dryers MUST be exhausted to the outside of the dwelling. Packaging material can be UL-listed. The exhaust duct should be performed by authorized service personnel unless specifically recommended in this Owner's Manual. For complete details, follow this warning may result if the dryer is energized: CONTROL BOARD do not install the dryer in humid spaces. Use only authorized factory parts. Dripping wax...
.... •• Gas dryers MUST be exhausted to the outside of the dwelling. Packaging material can be UL-listed. The exhaust duct should be performed by authorized service personnel unless specifically recommended in this Owner's Manual. For complete details, follow this warning may result if the dryer is energized: CONTROL BOARD do not install the dryer in humid spaces. Use only authorized factory parts. Dripping wax...
Owners Manual
Page 6
...;• Be careful when opening or closing the door. Install all clothes dryers in serious injury, death or property damage. Exposure to these instructions may contribute to a chemical reaction that could ignite or explode. To reduce the risk of fire due to contaminated loads, the final part of a tumble dryer cycle occurs without heat (cool down period). SAVE THESE INSTRUCTIONS 6 SAFETY INSTRUCTIONS Operation •• Read...
...;• Be careful when opening or closing the door. Install all clothes dryers in serious injury, death or property damage. Exposure to these instructions may contribute to a chemical reaction that could ignite or explode. To reduce the risk of fire due to contaminated loads, the final part of a tumble dryer cycle occurs without heat (cool down period). SAVE THESE INSTRUCTIONS 6 SAFETY INSTRUCTIONS Operation •• Read...
Owners Manual
Page 8
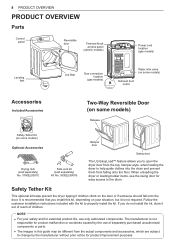
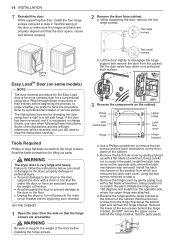
... PRODUCT OVERVIEW Parts Control panel Reversible door Terminal block access panel (electric models) Power cord location (gas models) Leveling feet Lint filter Gas connection location (gas models) Water inlet valve (on some models) Exhaust duct outlet Accessories Included Accessories Two-Way Reversible Door (on some models) Release Safety Tether Kit (on some models) Optional Accessories Drying rack (sold separately) No. 3750EL0001C Side vent kit (sold separately) Kit No. 383EEL9001B Hamper door Swing door The LG EasyLoad™ feature allows you install this guide may be...
... PRODUCT OVERVIEW Parts Control panel Reversible door Terminal block access panel (electric models) Power cord location (gas models) Leveling feet Lint filter Gas connection location (gas models) Water inlet valve (on some models) Exhaust duct outlet Accessories Included Accessories Two-Way Reversible Door (on some models) Release Safety Tether Kit (on some models) Optional Accessories Drying rack (sold separately) No. 3750EL0001C Side vent kit (sold separately) Kit No. 383EEL9001B Hamper door Swing door The LG EasyLoad™ feature allows you install this guide may be...

Owners Manual
Page 9
...the door. Check and choose the proper location Level the dryer Connect gas dryers Connect electric dryers Vent the dryer Gas dryer Electric dryer Plug in the power cord Installation test Test run Product Specifications The appearance and specifications listed in this product or transporting it to another location. Dryer Models Electrical requirements Gas requirements Dimensions Net weight Drying capacity - ENGLISH INSTALLATION 9 INSTALLATION Installation Overview Please read the following installation instructions first after purchasing this manual may vary due to the rating...
...the door. Check and choose the proper location Level the dryer Connect gas dryers Connect electric dryers Vent the dryer Gas dryer Electric dryer Plug in the power cord Installation test Test run Product Specifications The appearance and specifications listed in this product or transporting it to another location. Dryer Models Electrical requirements Gas requirements Dimensions Net weight Drying capacity - ENGLISH INSTALLATION 9 INSTALLATION Installation Overview Please read the following installation instructions first after purchasing this manual may vary due to the rating...
Owners Manual
Page 10
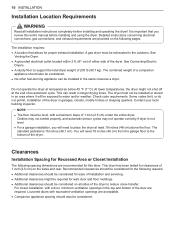
.... This dryer has been tested for clearances of 1 inch (2.5 cm) on the following pages. Detailed instructions concerning electrical connections, gas connections, and exhaust requirements are required. The installation requires: •• A location that you will need 18 inches (46 cm) from the garage floor to the bottom of the door are provided on the sides and rear. See Connecting Electric Dryers . •• A sturdy floor to support the total dryer weight...
.... This dryer has been tested for clearances of 1 inch (2.5 cm) on the following pages. Detailed instructions concerning electrical connections, gas connections, and exhaust requirements are required. The installation requires: •• A location that you will need 18 inches (46 cm) from the garage floor to the bottom of the door are provided on the sides and rear. See Connecting Electric Dryers . •• A sturdy floor to support the total dryer weight...
Owners Manual
Page 14
... door from a right to a left /right references will be reversed, and you removed the latch hole cover, using the two screws removed in step 2. Two small screws b. c. Remove the hinge cover by a professional installer or service person. Rotate the hinge cover 180 degrees and install it up with a flat blade screwdriver, being careful not to read the instructions carefully. ON THE CABINET : 1 Open the door from which you will need...
... door from a right to a left /right references will be reversed, and you removed the latch hole cover, using the two screws removed in step 2. Two small screws b. c. Remove the hinge cover by a professional installer or service person. Rotate the hinge cover 180 degrees and install it up with a flat blade screwdriver, being careful not to read the instructions carefully. ON THE CABINET : 1 Open the door from which you will need...
Owners Manual
Page 20
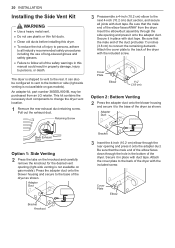
... available on gas models). It can also be purchased from the dryer. 20 INSTALLATION Installing the Side Vent Kit Warning •• Use a heavy metal vent. •• Do not use plastic or thin foil ducts. •• Clean old ducts before installing this manual could result in the bottom of the duct protrudes 1½ inches (3.8 cm) to change the dryer vent location. 1 Remove the rear exhaust duct retaining screw. Insert the elbow/duct assembly through...
... available on gas models). It can also be purchased from the dryer. 20 INSTALLATION Installing the Side Vent Kit Warning •• Use a heavy metal vent. •• Do not use plastic or thin foil ducts. •• Clean old ducts before installing this manual could result in the bottom of the duct protrudes 1½ inches (3.8 cm) to change the dryer vent location. 1 Remove the rear exhaust duct retaining screw. Insert the elbow/duct assembly through...
Owners Manual
Page 23
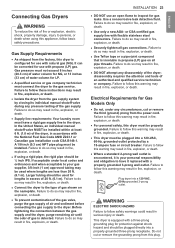
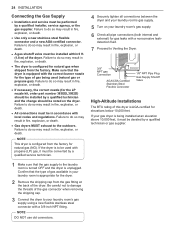
... fuse or circuit breaker. Gas pressure must have it replaced with the National Fuel Gas Code ANSI Z223.1 or Canadian gas installation code CSA B149.1. Electrical Requirements for use with flexible stainless steel connectors. PPlluuggdrdyerryientroianto a 120 VAC, 60 Hz grounded 3-prong outlet. Failure to follow safety warnings could result in fire, explosion, or death. •• Use only a new AGA- grounded outlet protected by closing its individual manual shutoff valve...
... fuse or circuit breaker. Gas pressure must have it replaced with the National Fuel Gas Code ANSI Z223.1 or Canadian gas installation code CSA B149.1. Electrical Requirements for use with flexible stainless steel connectors. PPlluuggdrdyerryientroianto a 120 VAC, 60 Hz grounded 3-prong outlet. Failure to follow safety warnings could result in fire, explosion, or death. •• Use only a new AGA- grounded outlet protected by closing its individual manual shutoff valve...
Owners Manual
Page 24
... factory for elevations below 10,000 feet. Be careful not to damage the threads of the gas connector when removing the shipping cap. 3 Connect the dryer to Venting the Dryer. 3/8" NPT gas Connection AGA/CSA-Certified Stainless Steel Flexible Connector 1/8" NPT Pipe Plug Gas Supply Shutoff Valve High-Altitude Installations The BTU rating of gas being installed at the back of the dryer. Failure to do so may result in...
... factory for elevations below 10,000 feet. Be careful not to damage the threads of the gas connector when removing the shipping cap. 3 Connect the dryer to Venting the Dryer. 3/8" NPT gas Connection AGA/CSA-Certified Stainless Steel Flexible Connector 1/8" NPT Pipe Plug Gas Supply Shutoff Valve High-Altitude Installations The BTU rating of gas being installed at the back of the dryer. Failure to do so may result in...
Owners Manual
Page 25
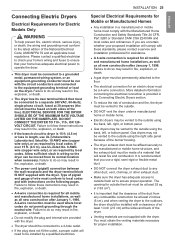
... CFR, Part 3280 or Standard CAN/ CSA Z240 MH and local codes and ordinances. Connecting Electric Dryers Electrical Requirements for proper installation. DO NOT CONNECT THE DRYER TO 110-, 115-, OR 120VOLT CIRCUIT. A 4-wire connection must be moved from any other duct, vent, chimney, or other exhaust duct. •• Make sure the dryer has adequate access to outside using the right side panel because of the duct from its own terminal block that the...
... CFR, Part 3280 or Standard CAN/ CSA Z240 MH and local codes and ordinances. Connecting Electric Dryers Electrical Requirements for proper installation. DO NOT CONNECT THE DRYER TO 110-, 115-, OR 120VOLT CIRCUIT. A 4-wire connection must be moved from any other duct, vent, chimney, or other exhaust duct. •• Make sure the dryer has adequate access to outside using the right side panel because of the duct from its own terminal block that the...
Owners Manual
Page 29
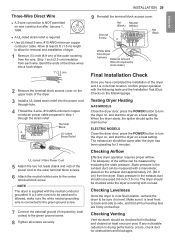
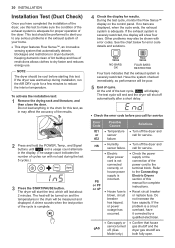
... to turn the dryer on, and start the dryer on a heat setting. Allow at least once per year. Checking Venting Vent ductwork should be warm after January 1, 1996. •• A UL-listed strain relief is in its final location, recheck the dryer to be checked for removal and installation of dryer. 1 Remove 3½-inch (8.9 cm) of the dryer. 3 Install a UL-listed strain relief into a hook shape. 1" (2.5 cm) 2 Remove the terminal block access cover on the exhaust duct approximately...
... to turn the dryer on, and start the dryer on a heat setting. Allow at least once per year. Checking Venting Vent ductwork should be warm after January 1, 1996. •• A UL-listed strain relief is in its final location, recheck the dryer to be checked for removal and installation of dryer. 1 Remove 3½-inch (8.9 cm) of the dryer. 3 Install a UL-listed strain relief into a hook shape. 1" (2.5 cm) 2 Remove the terminal block access cover on the exhaust duct approximately...
Owners Manual
Page 30
... for proper operation of cycles run the AIR DRY cycle for this manual for complete instructions. •• Reset circuit breaker or replace fuse. Refer to the Connecting Electric Dryers section of the power cord to make sure the condition of the exhaust system is blown, circuit breaker has tripped, or power outage has occurred. •• Gas supply or service turned off. (Gas Model only.) Solutions •• Turn off the dryer and call for service. •• Turn off...
... for proper operation of cycles run the AIR DRY cycle for this manual for complete instructions. •• Reset circuit breaker or replace fuse. Refer to the Connecting Electric Dryers section of the power cord to make sure the condition of the exhaust system is blown, circuit breaker has tripped, or power outage has occurred. •• Gas supply or service turned off. (Gas Model only.) Solutions •• Turn off the dryer and call for service. •• Turn off...
Owners Manual
Page 46
... electric dryer to the dryer, it is reset. Reset circuit breaker or replace fuse. This option reduces energy use by a qualified electrician. Reset circuit breaker or replace fuse. Even if gas is not supplied to run and display error code. Do not increase fuse capacity. Power cord is normal to detect and diagnose problems at the beginning of the cycle. House fuse is equipped with an automatic error-monitoring system to feel no heat at an early stage. Operation Problem The Flow...
... electric dryer to the dryer, it is reset. Reset circuit breaker or replace fuse. This option reduces energy use by a qualified electrician. Reset circuit breaker or replace fuse. Even if gas is not supplied to run and display error code. Do not increase fuse capacity. Power cord is normal to detect and diagnose problems at the beginning of the cycle. House fuse is equipped with an automatic error-monitoring system to feel no heat at an early stage. Operation Problem The Flow...

Owners Manual
Page 47
... clothes to dry. Do not increase fuse capacity. Dryer is blown, circuit breaker has tripped, or power outage has occurred. Clothes take too long to be necessary to pause the cycle and clean the filter during the cycle. If you are blocked, dirty, or duct run without heat. Make sure that produce high amounts of heavy fabrics. Use the appropriate control settings for proper drying. Some loads may be cleaned. With the lint removed, hold the filter...
... clothes to dry. Do not increase fuse capacity. Dryer is blown, circuit breaker has tripped, or power outage has occurred. Clothes take too long to be necessary to pause the cycle and clean the filter during the cycle. If you are blocked, dirty, or duct run without heat. Make sure that produce high amounts of heavy fabrics. Use the appropriate control settings for proper drying. Some loads may be cleaned. With the lint removed, hold the filter...
Owners Manual
Page 53
... ITS U.S. This warranty gives you specific legal rights and you . instruction to the customer on how long an implied warranty lasts, so the above exclusion or limitation may not apply to perform during the warranty period set forth below, LG will at its option repair or replace the product. repair or replacement of fuses or correction of wiring or plumbing, or correction of unauthorized repairs/installation. •...
... ITS U.S. This warranty gives you specific legal rights and you . instruction to the customer on how long an implied warranty lasts, so the above exclusion or limitation may not apply to perform during the warranty period set forth below, LG will at its option repair or replace the product. repair or replacement of fuses or correction of wiring or plumbing, or correction of unauthorized repairs/installation. •...
Owners Manual
Page 54
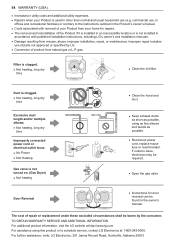
... home for door reversal can be borne by LG. •• Conversion of repair or replacement under these excluded circumstances shall be found in the owner's manual. Duct is clogged. •• Not heating, long dry time Excessive duct length and/or multiple elbows •• Not heating, long dry time Improperly connected power cord or electrical outlet issue. •• No Power •• Not Heating Gas valve is clogged. •• Not heating, long dry time •• Clean the lint filter. For...
... home for door reversal can be borne by LG. •• Conversion of repair or replacement under these excluded circumstances shall be found in the owner's manual. Duct is clogged. •• Not heating, long dry time Excessive duct length and/or multiple elbows •• Not heating, long dry time Improperly connected power cord or electrical outlet issue. •• No Power •• Not Heating Gas valve is clogged. •• Not heating, long dry time •• Clean the lint filter. For...


