

Owners Manual
Page 1
For more information, visit our website at http:iius.lge.com P/No.: 3828EL3010A Please read your manual carefully, as it provides instructions on safe Installation, Use and Maintenance. 1-800-243-0000 24 HOURS A DAY, 7 DAYS A WEEK FOR LG CUSTOMER SERVICE _ ¢ '/,, 4_" """n Ir_;_9_ ,_: _',_"r _ _, ,_Y_'_!,i,rsi,_[ ,'_;"i r,±j, ElectricandGasDryer DLE7177WNl/DLG7188WiVi DLE7177NiVI/DLG7188NM DLE7177RIVI/DLG7188RM Thank you for future reference. Record the Model and Serial Numbers, and retain the manual for buying a LG Dryer.
For more information, visit our website at http:iius.lge.com P/No.: 3828EL3010A Please read your manual carefully, as it provides instructions on safe Installation, Use and Maintenance. 1-800-243-0000 24 HOURS A DAY, 7 DAYS A WEEK FOR LG CUSTOMER SERVICE _ ¢ '/,, 4_" """n Ir_;_9_ ,_: _',_"r _ _, ,_Y_'_!,i,rsi,_[ ,'_;"i r,±j, ElectricandGasDryer DLE7177WNl/DLG7188WiVi DLE7177NiVI/DLG7188NM DLE7177RIVI/DLG7188RM Thank you for future reference. Record the Model and Serial Numbers, and retain the manual for buying a LG Dryer.
Owners Manual
Page 4
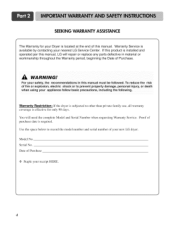
... or explosion, electric shock or to record the model number and serial number of your new LG dryer. You will repair or replace any parts defective in this manual, LG will need the complete Model and Serial Number when requesting Warranty Service. Use the space below ...or death when using your appliance foffow basic precautions, including the following. Date of this manual. A WARNING! Serial No. Proof of Purchase. Warranty Service is required. Warranty Restriction: If the dryer is subjected to other than private family use, all warranty coverage is located at the...
... or explosion, electric shock or to record the model number and serial number of your new LG dryer. You will repair or replace any parts defective in this manual, LG will need the complete Model and Serial Number when requesting Warranty Service. Use the space below ...or death when using your appliance foffow basic precautions, including the following. Date of this manual. A WARNING! Serial No. Proof of Purchase. Warranty Service is required. Warranty Restriction: If the dryer is subjected to other than private family use, all warranty coverage is located at the...
Owners Manual
Page 6
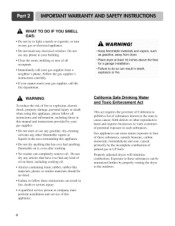
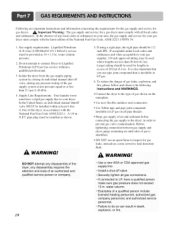
...touch any phone in your building. • Clear the room, building or area of all instructions and information, including those in this manual and instructions provided by the incomplete combustion of fire or explosion, electric shock, property damage, personal injury or death when using this ...as gasoline, away from a neighbor's phone. Follow the gas supplier's instructions carefully. ° If you cannot reach your gas supplier from dryer. • Place dryer at least 18 inches above the floor for a garage installation. • Failure to light a match or cigarette, or turn on them...
...touch any phone in your building. • Clear the room, building or area of all instructions and information, including those in this manual and instructions provided by the incomplete combustion of fire or explosion, electric shock, property damage, personal injury or death when using this ...as gasoline, away from a neighbor's phone. Follow the gas supplier's instructions carefully. ° If you cannot reach your gas supplier from dryer. • Place dryer at least 18 inches above the floor for a garage installation. • Failure to light a match or cigarette, or turn on them...
Owners Manual
Page 7
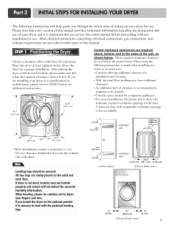
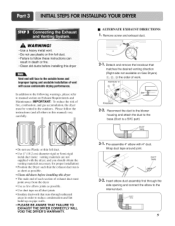
Choose a location with elbow. After placing the dryer in the desired location, please make sure that you review this entire manual before proceeding with the pedestal levNing legs. 24*'2 (155 cm_).. (7.6 cm) ventilation hole "i _ (2.54cm) 29.9" (76.1 cm) (2.54cm) 0" _ (0 cm) 27" _1_0" (...above the floor for a garage installation. Those required minimum clearances are provided in other parts of this manual provides important information regarding the preparation and use of your dryer, and it is important that it is nessary to injure your lingers and toes. When leveling, please...
Choose a location with elbow. After placing the dryer in the desired location, please make sure that you review this entire manual before proceeding with the pedestal levNing legs. 24*'2 (155 cm_).. (7.6 cm) ventilation hole "i _ (2.54cm) 29.9" (76.1 cm) (2.54cm) 0" _ (0 cm) 27" _1_0" (...above the floor for a garage installation. Those required minimum clearances are provided in other parts of this manual provides important information regarding the preparation and use of your dryer, and it is important that it is nessary to injure your lingers and toes. When leveling, please...
Owners Manual
Page 8
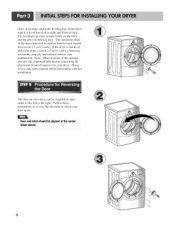
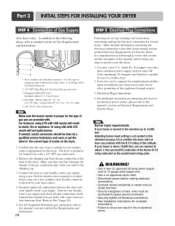
...to the left to right or front to back should not rock. If the dryer is level from left or the right. The leveling legs must remain firmly on your dryer. The maximum slope of the dryer from left to right and front to reverse the direction in position, adjust ...the leveling legs of the dryer until it is not level, and if the slope exceeds 2.5 cm (1 inch), a load may not tumble properly and internal sensors may malfunction. Follow these instructions to back. Please review this manual also provide important information concerning the placement of this...
...to the left to right or front to back should not rock. If the dryer is level from left or the right. The leveling legs must remain firmly on your dryer. The maximum slope of the dryer from left to right and front to reverse the direction in position, adjust ...the leveling legs of the dryer until it is not level, and if the slope exceeds 2.5 cm (1 inch), a load may not tumble properly and internal sensors may malfunction. Follow these instructions to back. Please review this manual also provide important information concerning the placement of this...
Owners Manual
Page 9
... WILL VOID THE DRYER'S WARRANTY. • ALTERNATE EXHAUST DIRECTIONS ]. DUCT TAPE 3-2° Insert elbow duct assembly first through unheated areas in death or fire. • Clean old ducts before installing this manual very carefully. • Do not use Plastic or thin foil duct. • Use 4" (10... improper taping and unstable installation of vent will cause undesirable drying performance, In addition to the following warnings, please refer to manual section on Gas Dryers) 0), @), _3)the order of exhaust duct must be vented to the outdoors. Reconnect the duct to the blower housing...
... WILL VOID THE DRYER'S WARRANTY. • ALTERNATE EXHAUST DIRECTIONS ]. DUCT TAPE 3-2° Insert elbow duct assembly first through unheated areas in death or fire. • Clean old ducts before installing this manual very carefully. • Do not use Plastic or thin foil duct. • Use 4" (10... improper taping and unstable installation of vent will cause undesirable drying performance, In addition to the following warnings, please refer to manual section on Gas Dryers) 0), @), _3)the order of exhaust duct must be vented to the outdoors. Reconnect the duct to the blower housing...
Owners Manual
Page 10
...be done by a qualified service technician and mark or put the label of the current type of dryer 4. Confirm that section and the remainder of this manual, beti)re taking any problemwith the B,T.Urating at this altitudel If your house is proper for gas...connector. • Securely tighten all connections between the dryer and your laundry room is provided in the manual section entitled Electrical Requirements for complete instructions. • Failure to manual section on Electrical Requirements and Electric Dryer. Adjustingburner input setting is important that you don't...
...be done by a qualified service technician and mark or put the label of the current type of dryer 4. Confirm that section and the remainder of this manual, beti)re taking any problemwith the B,T.Urating at this altitudel If your house is proper for gas...connector. • Securely tighten all connections between the dryer and your laundry room is provided in the manual section entitled Electrical Requirements for complete instructions. • Failure to manual section on Electrical Requirements and Electric Dryer. Adjustingburner input setting is important that you don't...
Owners Manual
Page 11
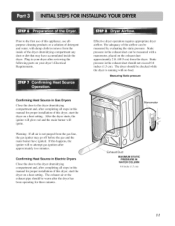
... in the exhaust duct should be measured by evaluating the static pressure. Effective dryer operation requires appropriate dryer airflow. Measuring Static pressure Confirming Heat Source in this manual for three minutes. The dryer should be measured with no load. After the dryer starts, the igniter will glow red and the main burner will re-attempt...
... in the exhaust duct should be measured by evaluating the static pressure. Effective dryer operation requires appropriate dryer airflow. Measuring Static pressure Confirming Heat Source in this manual for three minutes. The dryer should be measured with no load. After the dryer starts, the igniter will glow red and the main burner will re-attempt...

Owners Manual
Page 12
... or other exhaust duct. 8) Make sure the dryer has adequate access to outside fresh air to ensure proper operation. The following instructions are not supplied with a clearance of 1 inch at the manual section entitled Electrical Requirements for Electric Dryer 3) To reduce the risk of combustion and fire..., the dryer must be vented to the outside. 4) Electric dryers may be vented to the outside using the right side panel ...
... or other exhaust duct. 8) Make sure the dryer has adequate access to outside fresh air to ensure proper operation. The following instructions are not supplied with a clearance of 1 inch at the manual section entitled Electrical Requirements for Electric Dryer 3) To reduce the risk of combustion and fire..., the dryer must be vented to the outside. 4) Electric dryers may be vented to the outside using the right side panel ...

Owners Manual
Page 16
... Strip 5 inches of appliance and connect it to center screw. 4. Connect red and black wire to the same color screw in damages on manual is prohibited for (1) new branch-circuit installations, (2) mobile homes, and (3) recreational vehicles, and (4) areas where local codes prohibit grounding through the...neutral wire(white) of power cord External ground connector Colored wire should be using a UL listed, 120/240 volt minimum, 30 amp, dryer power supply cord. Center terminal block screw(silver) Neutral grounding wire(white) Neutral wire (white or center wire) Strain relief Green wire...
... Strip 5 inches of appliance and connect it to center screw. 4. Connect red and black wire to the same color screw in damages on manual is prohibited for (1) new branch-circuit installations, (2) mobile homes, and (3) recreational vehicles, and (4) areas where local codes prohibit grounding through the...neutral wire(white) of power cord External ground connector Colored wire should be using a UL listed, 120/240 volt minimum, 30 amp, dryer power supply cord. Center terminal block screw(silver) Neutral grounding wire(white) Neutral wire (white or center wire) Strain relief Green wire...
Owners Manual
Page 19
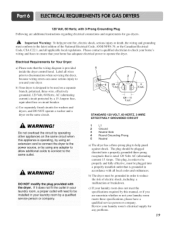
... STANDARD 120 VOLT, 60 HERTZ, 3-WIRE EFFECTIVELY GROUNDED CIRCUIT 1 L1 2 Ground 3 Neutral Side 4 Round Grounding Prong 5 Neutral a) The dryer has a three-prong plug to be grounded in accordance with 3-Prong Grounding Plug Following are uncertain whether or not your home has adequate electrical power... connect the dryer to the power source, or by operating other appliances on the same circuit. This plug, in your dryer. Review your laundry room's electrical supply for washers and dryers, and DO NOT operate a washer and a dryer on the same circuit when this manual, or if...
... STANDARD 120 VOLT, 60 HERTZ, 3-WIRE EFFECTIVELY GROUNDED CIRCUIT 1 L1 2 Ground 3 Neutral Side 4 Round Grounding Prong 5 Neutral a) The dryer has a three-prong plug to be grounded in accordance with 3-Prong Grounding Plug Following are uncertain whether or not your home has adequate electrical power... connect the dryer to the power source, or by operating other appliances on the same circuit. This plug, in your dryer. Review your laundry room's electrical supply for washers and dryers, and DO NOT operate a washer and a dryer on the same circuit when this manual, or if...
Owners Manual
Page 20
Do not attempt to connect Dryer to prevent gas valve contamination. Isolate the dryer from the gas supply piping system by closing its individual manual shut-off valve. • Securely tighten all pipe threads. pipe plug must be used for gas leaks, instead use pipe joint compound that you use a ...
Do not attempt to connect Dryer to prevent gas valve contamination. Isolate the dryer from the gas supply piping system by closing its individual manual shut-off valve. • Securely tighten all pipe threads. pipe plug must be used for gas leaks, instead use pipe joint compound that you use a ...

Owners Manual
Page 24
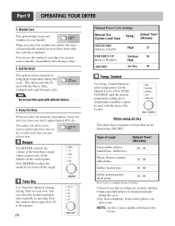
... you are drying. Cotton/Towels Use for drying denims, towels, heavy cottons Normal Use for drying sturdy fabrics such as work clothes. Manual Dry Cycles Use Manual Cycles to the load you to match the cycle to select a specific amount of drying time and a drying temperature. You can change...Dry Cycles Load Type HEAVY DUTY Jeans, heavyweight COTTON/TOWELS Towel, denim pants NORMAL Work clothes,corduroys PERM. Time change the actual time in the dryer too king. Selection • By dialing the knob, select the desired cycle based on laundry types and conditions. 1. Use the Air Dry ...
... you are drying. Cotton/Towels Use for drying denims, towels, heavy cottons Normal Use for drying sturdy fabrics such as work clothes. Manual Dry Cycles Use Manual Cycles to the load you to match the cycle to select a specific amount of drying time and a drying temperature. You can change...Dry Cycles Load Type HEAVY DUTY Jeans, heavyweight COTTON/TOWELS Towel, denim pants NORMAL Work clothes,corduroys PERM. Time change the actual time in the dryer too king. Selection • By dialing the knob, select the desired cycle based on laundry types and conditions. 1. Use the Air Dry ...
Owners Manual
Page 26
When you select the wrinkle free option, the dryer will allow you to dry. You can be dried using AIR DRY. ...bacteria by pressing Time Dry button which ranges from 20 to see that can select the desired operation time manually by using Air Dry This chart shows examples of the buttons on your laundry. Foam rubber-pillows, ...temperatures for up to adjust the sound level or turn off the signal. This notice will periodically tumble for the Manual Cycles. Default Time* (Minutes) SPEED DRY SMALL LOADS High 25 FRESHEN UP Medium 20 Remove Wrinkles High AIR DRY...
When you select the wrinkle free option, the dryer will allow you to dry. You can be dried using AIR DRY. ...bacteria by pressing Time Dry button which ranges from 20 to see that can select the desired operation time manually by using Air Dry This chart shows examples of the buttons on your laundry. Foam rubber-pillows, ...temperatures for up to adjust the sound level or turn off the signal. This notice will periodically tumble for the Manual Cycles. Default Time* (Minutes) SPEED DRY SMALL LOADS High 25 FRESHEN UP Medium 20 Remove Wrinkles High AIR DRY...
Owners Manual
Page 27
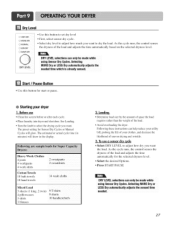
...See Loading. • Turn the knob to select the drying cycle you want to dry the load. Foaowmg are sample loads for Super Capacity Dryers: Heavy Work Clothes 4 jeans 4 workpants 4 work shirts Cotton/Towels 10 bath towels 10 hand towels 2 sweatpants 2 sweatshirts 14 wash cloths ...3 sheets (1 king, 2 twin} 4 pillowcases 3 shirts 3 blouses 9 T-shirts 9 shorts 10 handkerchiefs 2. The preset setting for Sensor Dry Cycles or Manual Cycles will show in minutes) will glow. The estimated or actual cycle time (in the display. Before use a sensor dry cycle • Select DRY ...
...See Loading. • Turn the knob to select the drying cycle you want to dry the load. Foaowmg are sample loads for Super Capacity Dryers: Heavy Work Clothes 4 jeans 4 workpants 4 work shirts Cotton/Towels 10 bath towels 10 hand towels 2 sweatpants 2 sweatshirts 14 wash cloths ...3 sheets (1 king, 2 twin} 4 pillowcases 3 shirts 3 blouses 9 T-shirts 9 shorts 10 handkerchiefs 2. The preset setting for Sensor Dry Cycles or Manual Cycles will show in minutes) will glow. The estimated or actual cycle time (in the display. Before use a sensor dry cycle • Select DRY ...
Owners Manual
Page 28
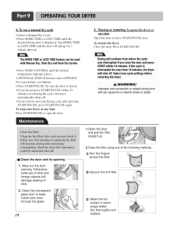
The MORE TIME or LESS TIME feature canbe used with Manual Dry, Time Dry and Rack Dry Cycles. • Press TEMR CONTROL until the desired drying time is displayed. For more than 10 minutes, the dryer will shut off . • If you close the door and press STARTwithin 10 ...cycle after pressing START/PAUSE, press START/PAUSE again. Clean the transparent glass door to end your dryer at any time Press START/PAUSE or open the door. 5. To use a manual dry cycle • Select a Manual Dry Cycle. • Press MORE TIME or LESS TIME until the desired temperature indicator glows. ...
The MORE TIME or LESS TIME feature canbe used with Manual Dry, Time Dry and Rack Dry Cycles. • Press TEMR CONTROL until the desired drying time is displayed. For more than 10 minutes, the dryer will shut off . • If you close the door and press STARTwithin 10 ...cycle after pressing START/PAUSE, press START/PAUSE again. Clean the transparent glass door to end your dryer at any time Press START/PAUSE or open the door. 5. To use a manual dry cycle • Select a Manual Dry Cycle. • Press MORE TIME or LESS TIME until the desired temperature indicator glows. ...
Owners Manual
Page 30
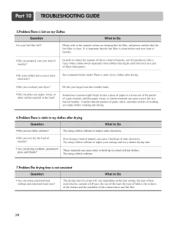
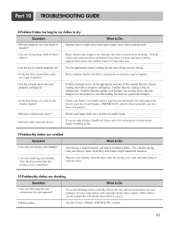
...and this paper, tissue, or similar material can cause a build up of the exhaust ducts find consistent load sizes'? Confirm that might forget to the manual section on the heat setting, the type of heat used (electric, natural or LP gas), the size of the load, the type of fabrics, the... a person might catch lint (such as a pair of black linen pants). • Do your clothes have excess static electricity? • Did you overload your dryer? • Did you over dry the load of laundry can cause excess lint in the load? 5.Problem:There is Linton my Clothes • Is your...
...and this paper, tissue, or similar material can cause a build up of the exhaust ducts find consistent load sizes'? Confirm that might forget to the manual section on the heat setting, the type of heat used (electric, natural or LP gas), the size of the load, the type of fabrics, the... a person might catch lint (such as a pair of black linen pants). • Do your clothes have excess static electricity? • Did you overload your dryer? • Did you over dry the load of laundry can cause excess lint in the load? 5.Problem:There is Linton my Clothes • Is your...
Owners Manual
Page 31
...retain a slight amount of moisture. • Are you removing your laundry from light weight items when Creating loads. See the Owner's Manual of heavy fabrics? time, and remove items while they tend to help reduce find heavy fabrics, separate these items into a number of this...tumbling action. 9.Problem:My clothes are drying. • Is the lint filter clean before each new load of a consistent size. • Are the dryer controls properly set against the dampers. • Is the fuse blown, or is properly configured, Confirm that ae venting !S free Of Obstructions, C0nfirm ...
...retain a slight amount of moisture. • Are you removing your laundry from light weight items when Creating loads. See the Owner's Manual of heavy fabrics? time, and remove items while they tend to help reduce find heavy fabrics, separate these items into a number of this...tumbling action. 9.Problem:My clothes are drying. • Is the lint filter clean before each new load of a consistent size. • Are the dryer controls properly set against the dampers. • Is the fuse blown, or is properly configured, Confirm that ae venting !S free Of Obstructions, C0nfirm ...


