
Owners Manual
Page 2
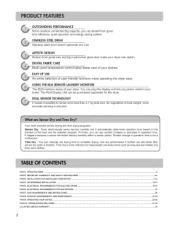
.... TROUBLESHOOTING GUIDE ...LG DRYER LIMITED WARRANTY ...2 3 4-6 7-12 13-14 15-18 lg 20 21-22 23-30 31-33 34 ARTISTICDESIGN Modern front panel look and big crystal-clear glass door make operating the dryer easy. You can see sudden increase or decrease in operation time is finished. GAS REQUIREMENTS AND INSTRUCTIONS ...PART8. So regardless of your dryer look stylish. STAINLESSSTEELDRUM Stainless steel drum doesn't generate any power outlet...
.... TROUBLESHOOTING GUIDE ...LG DRYER LIMITED WARRANTY ...2 3 4-6 7-12 13-14 15-18 lg 20 21-22 23-30 31-33 34 ARTISTICDESIGN Modern front panel look and big crystal-clear glass door make operating the dryer easy. You can see sudden increase or decrease in operation time is finished. GAS REQUIREMENTS AND INSTRUCTIONS ...PART8. So regardless of your dryer look stylish. STAINLESSSTEELDRUM Stainless steel drum doesn't generate any power outlet...
Owners Manual
Page 4
.... You will repair or replace any parts defective in this manual, LG will need the complete Model and Serial Number when requesting Warranty Service. Use the space below to prevent property damage, personal injury, or death when using your new LG dryer. Serial No. Date of purchase date is required. For your Dryer is installed and operated per this manual must be followed. Model No. If this manual. SEEKING WARRANTY ASSISTANCE The Warranty for only...
.... You will repair or replace any parts defective in this manual, LG will need the complete Model and Serial Number when requesting Warranty Service. Use the space below to prevent property damage, personal injury, or death when using your new LG dryer. Serial No. Date of purchase date is required. For your Dryer is installed and operated per this manual must be followed. Model No. If this manual. SEEKING WARRANTY ASSISTANCE The Warranty for only...
Owners Manual
Page 5
... cooking oils in accordance with all instructions beti_re using the appliance. 4) Before the appliance is removed li'om service or discarded, remove the door to the drying compartment. 5) Do not reach into an appropriate outlet that is equipped with controls. 8) Do not repair or replace any part of electric shock. This appliance must be connected to a grounded metal, permanent wiring system or an equipment-grounding...
... cooking oils in accordance with all instructions beti_re using the appliance. 4) Before the appliance is removed li'om service or discarded, remove the door to the drying compartment. 5) Do not reach into an appropriate outlet that is equipped with controls. 8) Do not repair or replace any part of electric shock. This appliance must be connected to a grounded metal, permanent wiring system or an equipment-grounding...
Owners Manual
Page 6
...8226; A qualified service person or company must perform installation and service of this appliance. • Do not dry anything that have ever had anything flammable on any gas or electrical appliance. • Do not touch any other reproductive harm and requires businesses to warn customers...manual and instructions provided by properly venting the dryer to light a match or cigarette, or turn on it, even after washing. • No washer can result in death explosion or fire. Do not dry any articles that has ever had any phone in the area surrounding this appliance. Do not use...
...8226; A qualified service person or company must perform installation and service of this appliance. • Do not dry anything that have ever had anything flammable on any gas or electrical appliance. • Do not touch any other reproductive harm and requires businesses to warn customers...manual and instructions provided by properly venting the dryer to light a match or cigarette, or turn on it, even after washing. • No washer can result in death explosion or fire. Do not dry any articles that has ever had any phone in the area surrounding this appliance. Do not use...
Owners Manual
Page 8
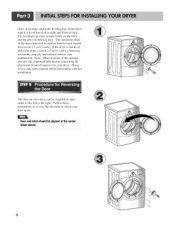
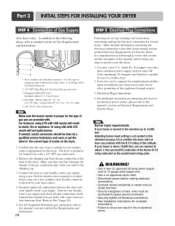
Please review this manual also provide important information concerning the placement of and clearances for your door opens: Door and latch should be installed to open either to reverse the direction in position, adjust the leveling legs of the dryer until it is not level, and if the slope exceeds 2.5 cm (1 inch), a load may not tumble properly and internal sensors may malfunction. Note...
Please review this manual also provide important information concerning the placement of and clearances for your door opens: Door and latch should be installed to open either to reverse the direction in position, adjust the leveling legs of the dryer until it is not level, and if the slope exceeds 2.5 cm (1 inch), a load may not tumble properly and internal sensors may malfunction. Note...
Owners Manual
Page 10
...'s gas supply. Refer to manual section on the dryer. 1. Adjustingburner input setting is required li)r manufactured (mobile) home installations and where local codes do so can result in your local codes). 4. New stainless steel flexible connector. Installed within 6' (1.8 m) of this manual, beti)re taking any problemwith the B,T.Urating at this appliance through neutral. 3. Use only a new U.L. Four-wire cord is not needed , nozzle conversion should be connected...
...'s gas supply. Refer to manual section on the dryer. 1. Adjustingburner input setting is required li)r manufactured (mobile) home installations and where local codes do so can result in your local codes). 4. New stainless steel flexible connector. Installed within 6' (1.8 m) of this manual, beti)re taking any problemwith the B,T.Urating at this appliance through neutral. 3. Use only a new U.L. Four-wire cord is not needed , nozzle conversion should be connected...
Owners Manual
Page 11
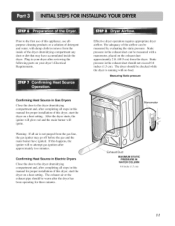
... reviewing the following parts on the exhaust duct approximately 2 ft. (60.9 cm) from the dryer. Warning: If all air is running with no load. Confirming Heat Source in Electric Dryers Close the door to the dryer drum/drying compartment and, after completing all steps in Gas Dryers Close the door to the dryer drum/drying compartment and, after the dryer has been operating for proper installation of this dryer, start the dryer on a heat setting. Prior to the first use...
... reviewing the following parts on the exhaust duct approximately 2 ft. (60.9 cm) from the dryer. Warning: If all air is running with no load. Confirming Heat Source in Electric Dryers Close the door to the dryer drum/drying compartment and, after completing all steps in Gas Dryers Close the door to the dryer drum/drying compartment and, after the dryer has been operating for proper installation of this dryer, start the dryer on a heat setting. Prior to the first use...

Owners Manual
Page 12
... at the manual section entitled Electrical Requirements for Electric Dryer 3) To reduce the risk of a material that will comply with any other duct, vent, chimney, or other exhaust duct. 8) Make sure the dryer has adequate access to outside using the back, left, or bottom panel. WARNING! The following instructions apply to any installation of the dryer in a manufactured or mobile home: 1) The gas dryer must be a 4-wire connection. More detailed...
... at the manual section entitled Electrical Requirements for Electric Dryer 3) To reduce the risk of a material that will comply with any other duct, vent, chimney, or other exhaust duct. 8) Make sure the dryer has adequate access to outside using the back, left, or bottom panel. WARNING! The following instructions apply to any installation of the dryer in a manufactured or mobile home: 1) The gas dryer must be a 4-wire connection. More detailed...
Owners Manual
Page 15
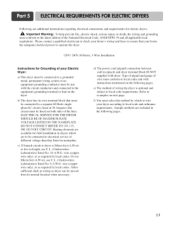
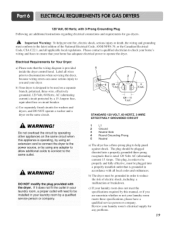
... are additional instructions regarding electrical connections and requirements for Grounding of wire must select the method by local codes. d) The power cord (pigtail) connection between wall receptacle and dryer terminal block IS NOT supplied with the circuit conductors and connected to the equipment-grounding dryer. Following are to be connected to electrical service of different voltage than that listed on nameplate. ELECTRICAL SERVICE FOR THE DRYER SHOULD BE OF MAXIMUM RATE VOLTAGE LISTED ON...
... are additional instructions regarding electrical connections and requirements for Grounding of wire must select the method by local codes. d) The power cord (pigtail) connection between wall receptacle and dryer terminal block IS NOT supplied with the circuit conductors and connected to the equipment-grounding dryer. Following are to be connected to electrical service of different voltage than that listed on nameplate. ELECTRICAL SERVICE FOR THE DRYER SHOULD BE OF MAXIMUM RATE VOLTAGE LISTED ON...
Owners Manual
Page 19
... rated 120 Volts AC (alternating current) 15 Amps. Review your laundry room's electrical supply for Your Dryer: a) Please note that your home has adequate electrical power to you are additional instructions regarding electrical connections and requirements for washers and dryers, and DO NOT operate a washer and a dryer on a separate branch, polarized, three-wire, effectively grounded, 120 Volt, 60 Hertz, AC (alternating current) circuit protected by using an extension cord...
... rated 120 Volts AC (alternating current) 15 Amps. Review your laundry room's electrical supply for Your Dryer: a) Please note that your home has adequate electrical power to you are additional instructions regarding electrical connections and requirements for washers and dryers, and DO NOT operate a washer and a dryer on a separate branch, polarized, three-wire, effectively grounded, 120 Volt, 60 Hertz, AC (alternating current) circuit protected by using an extension cord...
Owners Manual
Page 20
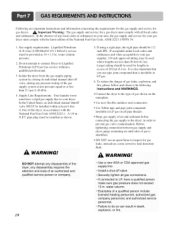
... the nameplate. water column pressure. 2. Supply Line Requirements. WARNING! A 1/8 in order to Liquified Petroleum (LP Gas) Gas service without a qualified professkmal. 3. If using a rigid pipe, the rigid pipe should be installed as shown. . in . N.P.T. Gas supply requirements: Liquefied Petroleum (L.P.) Gas (2,500 Btu/ft3 (93.1 MJ/m3)) service must be used where lengths are important instructions and information concerning the requirements for the gas supply and service for gas dryers. _ hnportant Warning...
... the nameplate. water column pressure. 2. Supply Line Requirements. WARNING! A 1/8 in order to Liquified Petroleum (LP Gas) Gas service without a qualified professkmal. 3. If using a rigid pipe, the rigid pipe should be installed as shown. . in . N.P.T. Gas supply requirements: Liquefied Petroleum (L.P.) Gas (2,500 Btu/ft3 (93.1 MJ/m3)) service must be used where lengths are important instructions and information concerning the requirements for the gas supply and service for gas dryers. _ hnportant Warning...
Owners Manual
Page 21
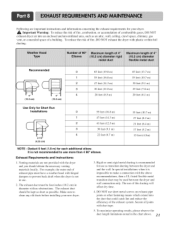
... ducting between the dryer and wall connection only. Venting materials are important instructions and information concerning the exhaust requirements for your new dryer. 3. The exhaust duct should obtain the necessary venting materials locally. It is recommended for each additional elbow. Following are not provided with plastic or thin foil ducting. Rigid or semi-rigid metal ducting is not recommended to clean any old ducts before installing...
... ducting between the dryer and wall connection only. Venting materials are important instructions and information concerning the exhaust requirements for your new dryer. 3. The exhaust duct should obtain the necessary venting materials locally. It is recommended for each additional elbow. Following are not provided with plastic or thin foil ducting. Rigid or semi-rigid metal ducting is not recommended to clean any old ducts before installing...
Owners Manual
Page 22
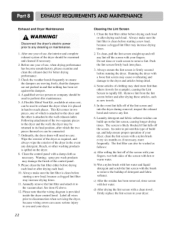
... the control panel. 9. This Kit comes in two pieces, one year of the dryer in your dryer. 22 Cleaning the Lint Screen 1. Exhaust and Dryer Maintenance WARNINGs i i i ii Disconnect the dryer's electric power prior to any lint. . In the event lint falls off the screen with your dryer, clean the lint screen with the brush to remove the buildup of clothing may damage the finish of the dryer should be connected. 7. b) Wet a nylon brush with hot water and...
... the control panel. 9. This Kit comes in two pieces, one year of the dryer in your dryer. 22 Cleaning the Lint Screen 1. Exhaust and Dryer Maintenance WARNINGs i i i ii Disconnect the dryer's electric power prior to any lint. . In the event lint falls off the screen with your dryer, clean the lint screen with the brush to remove the buildup of clothing may damage the finish of the dryer should be connected. 7. b) Wet a nylon brush with hot water and...
Owners Manual
Page 25
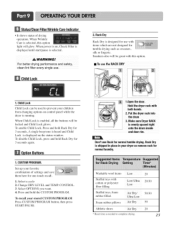
... PROGRAM button, then press START/PAUSE. 1.0pen the door. To disable Child Lock, press and hold the CUSTOM PROGRAM. _lb recall your favorite combination of drying operation. Select OPTIONS you want. 4. When Wrinkle Care is selected. When power is on control panel while the dryer is evenly spaced right onto the drum inside and door rim, Don t use with both hands, 2, Put the dryer rack into the drum 3, Make sure Dryer RACK is running. CONTROL. 3.
... PROGRAM button, then press START/PAUSE. 1.0pen the door. To disable Child Lock, press and hold the CUSTOM PROGRAM. _lb recall your favorite combination of drying operation. Select OPTIONS you want. 4. When Wrinkle Care is selected. When power is on control panel while the dryer is evenly spaced right onto the drum inside and door rim, Don t use with both hands, 2, Put the dryer rack into the drum 3, Make sure Dryer RACK is running. CONTROL. 3.
Owners Manual
Page 26
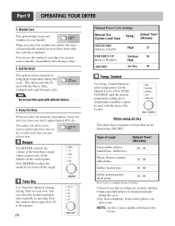
... Reset cycle to complete drying, if needed. • Check to dry. Anti Bacterial This option reduces bacteria by using Air Dry This chart shows examples of the buttons on your own. This notice will periodically tumble for the Manual Cycles. Press TEMR CONTROL until the desired temperature setting glows. 3. You can be dried using AIR DRY. Foam rubber pillows are securely stitched. • Shake and fluff pillows by pressing Time Dry button...
... Reset cycle to complete drying, if needed. • Check to dry. Anti Bacterial This option reduces bacteria by using Air Dry This chart shows examples of the buttons on your own. This notice will periodically tumble for the Manual Cycles. Press TEMR CONTROL until the desired temperature setting glows. 3. You can be dried using AIR DRY. Foam rubber pillows are securely stitched. • Shake and fluff pillows by pressing Time Dry button...
Owners Manual
Page 28
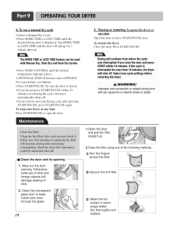
... pull the filter straight up 2.Clean the filter using one of door. 2. Clean the transparent glass door to end your dryer at any time Press START/PAUSE or open the door. 5. Drying will damage sealing of the following methods. (_ Run the fingers across the filter Vacuum the lint filter Wash the lint screen in warm, soapy water. 4. To use a manual dry cycle • Select a Manual Dry Cycle. • Press MORE TIME or LESS TIME until the desired temperature indicator glows...
... pull the filter straight up 2.Clean the filter using one of door. 2. Clean the transparent glass door to end your dryer at any time Press START/PAUSE or open the door. 5. Drying will damage sealing of the following methods. (_ Run the fingers across the filter Vacuum the lint filter Wash the lint screen in warm, soapy water. 4. To use a manual dry cycle • Select a Manual Dry Cycle. • Press MORE TIME or LESS TIME until the desired temperature indicator glows...

Owners Manual
Page 29
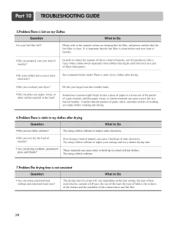
...'s power outlet Check your fabric soflener product'? • Are you are being completely cleaned. 4. Problem:My Dryer Displayed Error !t is displayed when thermistor is short. tE2 it is displayed when thermistor is not disconnected: ! Review the charts on My Clothes , Did yOUfollow the !nstmcti0n s On your home's or laundry room's fuse box/circuit breaker box and replace the fuse or reset the circuit breaker. (IMPORTANT: electric dryers generally use your dryer to use two fuses or breakers.) 2.Problem...
...'s power outlet Check your fabric soflener product'? • Are you are being completely cleaned. 4. Problem:My Dryer Displayed Error !t is displayed when thermistor is short. tE2 it is displayed when thermistor is not disconnected: ! Review the charts on My Clothes , Did yOUfollow the !nstmcti0n s On your home's or laundry room's fuse box/circuit breaker box and replace the fuse or reset the circuit breaker. (IMPORTANT: electric dryers generally use your dryer to use two fuses or breakers.) 2.Problem...
Owners Manual
Page 30
... load of the exhaust ducts find consistent load sizes'? i :_ : ; : 11 , i ,..i ;2 press and blends'. ? ' l_nesemat;erla!sc,a.,ncau: sesta,u_cior)mloupmaloaoo[orleaclomes lry using a fabric softener to the manual section on the heat setting, the type of heat used (electric, natural or LP gas), the size of the load, the type of fabrics, the wetness of the clothes find drying. 6.Problem:There is static in my clothesafter drying "Did you use a shorter drying time. ' Are you drying...
... load of the exhaust ducts find consistent load sizes'? i :_ : ; : 11 , i ,..i ;2 press and blends'. ? ' l_nesemat;erla!sc,a.,ncau: sesta,u_cior)mloupmaloaoo[orleaclomes lry using a fabric softener to the manual section on the heat setting, the type of heat used (electric, natural or LP gas), the size of the load, the type of fabrics, the wetness of the clothes find drying. 6.Problem:There is static in my clothesafter drying "Did you use a shorter drying time. ' Are you drying...
Owners Manual
Page 31
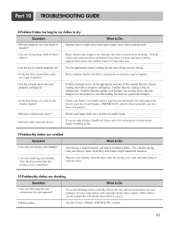
... when Creating loads. Check your home's or laundry room's fuse box/circuit breaker box and replace the fuse or reset the circuit breaker. (IMPORTANT: electric dryers generally use instructions for my clothesto dry -- --E , Did you under load your dryer? . time, and remove items while they tend to dry because they still retain a slight amount of moisture. • Are you are wrinkled ,Are YOUOyer drying_0ur laundrY? _ over drying _a load of laundry? , Are the exhaust ducts clear...
... when Creating loads. Check your home's or laundry room's fuse box/circuit breaker box and replace the fuse or reset the circuit breaker. (IMPORTANT: electric dryers generally use instructions for my clothesto dry -- --E , Did you under load your dryer? . time, and remove items while they tend to dry because they still retain a slight amount of moisture. • Are you are wrinkled ,Are YOUOyer drying_0ur laundrY? _ over drying _a load of laundry? , Are the exhaust ducts clear...

Owners Manual
Page 32
.../or install the product, instruct, or replace house fuses or correct wiring, or correction of Purchase. To Obtain NearestAuthorizedServiceCenterorSales Dealer,ortoObtainProduct,Customer,orService Assistance Carl 1-800-243-0000 (24 hrs a day, 7 days per week) and choose the appropriate prompt from the Date of unauthorized repairs; All Parts:1Year from the menu, and have product type (Dryer), model number, serial number, and ZiP code ready. LG...
.../or install the product, instruct, or replace house fuses or correct wiring, or correction of Purchase. To Obtain NearestAuthorizedServiceCenterorSales Dealer,ortoObtainProduct,Customer,orService Assistance Carl 1-800-243-0000 (24 hrs a day, 7 days per week) and choose the appropriate prompt from the Date of unauthorized repairs; All Parts:1Year from the menu, and have product type (Dryer), model number, serial number, and ZiP code ready. LG...


