

Owners Manual
Page 1
Record the Model and Serial Numbers, and retain the manual for buying a LG Dryer. Please read your manual carefully, as it provides instructions on safe Installation, Use and Maintenance. For more information, visit our website at http:iius.lge.com P/No.: 3828EL3010A 1-800-243-0000 24 HOURS A DAY, 7 DAYS A WEEK FOR LG CUSTOMER SERVICE _ ¢ '/,, 4_" """n Ir_;_9_ ,_: _',_"r _ _, ,_Y_'_!,i,rsi,_[ ,'_;"i r,±j, ElectricandGasDryer DLE7177WNl/DLG7188WiVi DLE7177NiVI/DLG7188NM DLE7177RIVI/DLG7188RM Thank you for future reference.
Record the Model and Serial Numbers, and retain the manual for buying a LG Dryer. Please read your manual carefully, as it provides instructions on safe Installation, Use and Maintenance. For more information, visit our website at http:iius.lge.com P/No.: 3828EL3010A 1-800-243-0000 24 HOURS A DAY, 7 DAYS A WEEK FOR LG CUSTOMER SERVICE _ ¢ '/,, 4_" """n Ir_;_9_ ,_: _',_"r _ _, ,_Y_'_!,i,rsi,_[ ,'_;"i r,±j, ElectricandGasDryer DLE7177WNl/DLG7188WiVi DLE7177NiVI/DLG7188NM DLE7177RIVI/DLG7188RM Thank you for future reference.
Owners Manual
Page 4
...including the following. Date of Purchase. Warranty Service is installed and operated per this product is available by contacting your nearest LG Service Center. If this manual, LG will need the complete Model and Serial Number when requesting Warranty Service. Warranty Restriction: If the dryer is subjected to record ...the model number and serial number of this manual must be followed. Proof of purchase date is effective for your Dryer is located at the end of your new LG dryer. Use the space below to other than private family use, all ...
...including the following. Date of Purchase. Warranty Service is installed and operated per this product is available by contacting your nearest LG Service Center. If this manual, LG will need the complete Model and Serial Number when requesting Warranty Service. Warranty Restriction: If the dryer is subjected to record ...the model number and serial number of this manual must be followed. Proof of purchase date is effective for your Dryer is located at the end of your new LG dryer. Use the space below to other than private family use, all ...
Owners Manual
Page 6
.... • Do not touch any phone in your building. • Clear the room, building or area of all instructions and information, including those in this manual and instructions provided by the incomplete combustion of natural gas or LP fuels.
.... • Do not touch any phone in your building. • Clear the room, building or area of all instructions and information, including those in this manual and instructions provided by the incomplete combustion of natural gas or LP fuels.
Owners Manual
Page 7
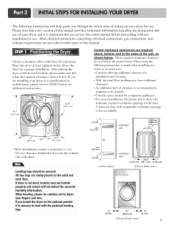
...for hlstalladon and servicing. • Wall, door and floor molding may not tumble properly and sensor will help guide you review this manual. More detailed instructions concerning electrical connections, gas connections, and exhaust requirements are set forth in the desired location, please make sure ...that it is important that every section of this manual provides important information regarding the preparation and use . If you install the dryer on the solid and even fleer. Certain minimum ...
...for hlstalladon and servicing. • Wall, door and floor molding may not tumble properly and sensor will help guide you review this manual. More detailed instructions concerning electrical connections, gas connections, and exhaust requirements are set forth in the desired location, please make sure ...that it is important that every section of this manual provides important information regarding the preparation and use . If you install the dryer on the solid and even fleer. Certain minimum ...
Owners Manual
Page 8
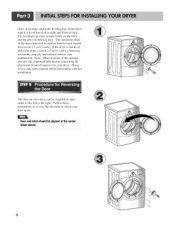
... level from left to right or front to back. Follow these instructions to reverse the direction in position, adjust the leveling legs of this entire manual before proceeding with any installation. The maximum slope of and clearances for your dryer can be aligned at the center 8 Once in which your door... to right and front to back should not rock. The door on the floor and the dryer should not exceed 2.5 cm (1 inch). Please review this manual also provide important information concerning the placement of the dryer from left or the right.
... level from left to right or front to back. Follow these instructions to reverse the direction in position, adjust the leveling legs of this entire manual before proceeding with any installation. The maximum slope of and clearances for your dryer can be aligned at the center 8 Once in which your door... to right and front to back should not rock. The door on the floor and the dryer should not exceed 2.5 cm (1 inch). Please review this manual also provide important information concerning the placement of the dryer from left or the right.
Owners Manual
Page 9
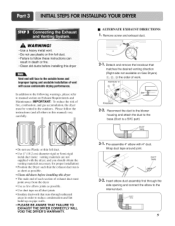
... carefully. • Do not use plastic or thin foil duct. • Failure to follow these instructions can result in order to manual section on Exhaust Requirements and Maintenance. Pre-assembte 4" elbow with the dryer, and you should obtain the venting materials necessary for proper installation) • Position ...
... carefully. • Do not use plastic or thin foil duct. • Failure to follow these instructions can result in order to manual section on Exhaust Requirements and Maintenance. Pre-assembte 4" elbow with the dryer, and you should obtain the venting materials necessary for proper installation) • Position ...
Owners Manual
Page 10
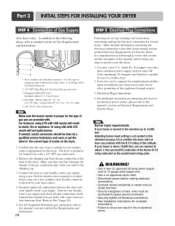
...Use this type of this dryer. 1. Gas Connection Make sure the burner nozzle is important that section and the remainder of this manual, beti)re taking any problemwith the B,T.Urating at the back of the burner B.T.U rating indicated on Electrical Requirements and Electric Dryer....inli)rmation concerning the electrical connection is required li)r manufactured (mobile) home installations and where local codes do so can result in the manual section entitled Electrical Requirements for gas leaks with a 3/8" NPT gas connection. 2. Four-wire cord is provided in fire or electrical shock....
...Use this type of this dryer. 1. Gas Connection Make sure the burner nozzle is important that section and the remainder of this manual, beti)re taking any problemwith the B,T.Urating at the back of the burner B.T.U rating indicated on Electrical Requirements and Electric Dryer....inli)rmation concerning the electrical connection is required li)r manufactured (mobile) home installations and where local codes do so can result in the manual section entitled Electrical Requirements for gas leaks with a 3/8" NPT gas connection. 2. Four-wire cord is provided in fire or electrical shock....
Owners Manual
Page 11
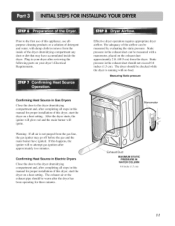
...to the dryer drum/drying compartment and, after completing all steps in your dryer's Electrical Requirements. Plug-in this appliance, use of this manual for three minutes. Manometer Exhaust Duct MAXIMUM STATIC PRESSURE IN WATER COLUMN 0.6 inche (1.5 cm) 11 Warning: If all steps in the... exhaust duct can be measured with no load. Static pressure in this manual for proper installation of this happens, the igniter will ignite. Prior to the first use allpurpose cleaning products or a solution of detergent and...
...to the dryer drum/drying compartment and, after completing all steps in your dryer's Electrical Requirements. Plug-in this appliance, use of this manual for three minutes. Manometer Exhaust Duct MAXIMUM STATIC PRESSURE IN WATER COLUMN 0.6 inche (1.5 cm) 11 Warning: If all steps in the... exhaust duct can be measured with no load. Static pressure in this manual for proper installation of this happens, the igniter will ignite. Prior to the first use allpurpose cleaning products or a solution of detergent and...

Owners Manual
Page 12
... construction be at least 2 inches (5 cm), and, when venting the dryer to the outdoors, the dryer can be installed with a clearance of 1 inch at the manual section entitled Electrical Requirements for Electric Dryer 3) To reduce the risk of the dryer in 2 (163 cm:). 9) It is provided at the sides and back...
... construction be at least 2 inches (5 cm), and, when venting the dryer to the outdoors, the dryer can be installed with a clearance of 1 inch at the manual section entitled Electrical Requirements for Electric Dryer 3) To reduce the risk of the dryer in 2 (163 cm:). 9) It is provided at the sides and back...

Owners Manual
Page 16
... be sure that the strain relief screw is prohibited for dryer to center terminal block screw. 2. Otherwise, excessive current is applied resulting in damages on manual is in right position. Connect ground wire(green) of power cord to external ground screw and move neutral ground wire of appliance and connect it...
... be sure that the strain relief screw is prohibited for dryer to center terminal block screw. 2. Otherwise, excessive current is applied resulting in damages on manual is in right position. Connect ground wire(green) of power cord to external ground screw and move neutral ground wire of appliance and connect it...
Owners Manual
Page 19
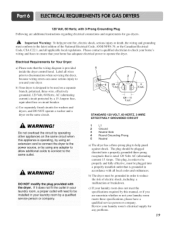
... fully effective, must be plugged into a properly grounded three-prong receptacle that your laundry room by operating other appliances on the same circuit when this manual, or if you and your laundry room's electrical supply for Your Dryer: a) Please note that is operating, by using an extension cord to connect the...
... fully effective, must be plugged into a properly grounded three-prong receptacle that your laundry room by operating other appliances on the same circuit when this manual, or if you and your laundry room's electrical supply for Your Dryer: a) Please note that is operating, by using an extension cord to connect the...
Owners Manual
Page 20
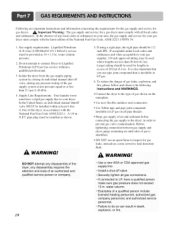
...of the National Fuel Gas Code, ANSI Z223.1/NFPA 54. 1. Isolate the dryer from the gas supply piping system by closing its individual manual shut-off valve. • Securely tighten all local codes and ordinances. pipe plug must be used where lengths are important instructions and ...the gas supply to your area, the gas supply and service for lengths in . Supply Line Requirements. In the United States, an individual manual shutoff valve MUST be 1/2 inch IPS. Before tightening connection between gas supply and dryer, purge remaining air until odor of a qualified person include...
...of the National Fuel Gas Code, ANSI Z223.1/NFPA 54. 1. Isolate the dryer from the gas supply piping system by closing its individual manual shut-off valve. • Securely tighten all local codes and ordinances. pipe plug must be used where lengths are important instructions and ...the gas supply to your area, the gas supply and service for lengths in . Supply Line Requirements. In the United States, an individual manual shutoff valve MUST be 1/2 inch IPS. Before tightening connection between gas supply and dryer, purge remaining air until odor of a qualified person include...

Owners Manual
Page 24
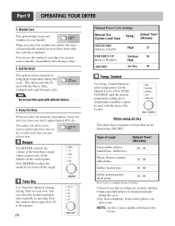
Each cycle dries certain fabrics at the recommended temperature. When a Manual Cycle is set. You can change button is available only with Manual Dry, Time Dry and Rack Dry programs. • The Display shows the estimated time remaining. Freshen Up Use this , if the dryer has some problem, ... gentle Items such as rubber, plastic and heatsensitive fabrics. Selection • By dialing the knob, select the desired cycle based on laundry types and conditions. 1. Manual Dry Cycles Use Manual Cycles to the load you are drying.
Each cycle dries certain fabrics at the recommended temperature. When a Manual Cycle is set. You can change button is available only with Manual Dry, Time Dry and Rack Dry programs. • The Display shows the estimated time remaining. Freshen Up Use this , if the dryer has some problem, ... gentle Items such as rubber, plastic and heatsensitive fabrics. Selection • By dialing the knob, select the desired cycle based on laundry types and conditions. 1. Manual Dry Cycles Use Manual Cycles to the load you are drying.
Owners Manual
Page 26
...20 Reset cycle to complete drying, if needed. • Check to see that is approximately 80% dry. This option can select the desired operation time manually by hand periodically during the cycle. You can only be used with the Sensor Dry Cycles. 0 HIGH 0 MID HIGH 0 MEDIUM 0 LOW 0 ULTRA... wrinkles in case that can not remove laundry immediately after the cycle has completed. 3. Wrinkle Care This option helps to 60 minutes. 26 Manual Dry Cycles Load Type _ lemp! When you when your laundry. Damp Dry Beep When you select the damp dry beep option, a beep...
...20 Reset cycle to complete drying, if needed. • Check to see that is approximately 80% dry. This option can select the desired operation time manually by hand periodically during the cycle. You can only be used with the Sensor Dry Cycles. 0 HIGH 0 MID HIGH 0 MEDIUM 0 LOW 0 ULTRA... wrinkles in case that can not remove laundry immediately after the cycle has completed. 3. Wrinkle Care This option helps to 60 minutes. 26 Manual Dry Cycles Load Type _ lemp! When you when your laundry. Damp Dry Beep When you select the damp dry beep option, a beep...
Owners Manual
Page 27
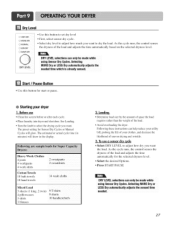
... adjusts the needed . 27 DRYLEVEL DRY LEVELselections can only be made while using Sensor Dry Cycles. Foaowmg are sample loads for Sensor Dry Cycles or Manual Cycles will show in the display. Selecting MORE Dry or LESS Dry automatically adjusts the sensed time needed time which is already sensed, Start / Pause...
... adjusts the needed . 27 DRYLEVEL DRY LEVELselections can only be made while using Sensor Dry Cycles. Foaowmg are sample loads for Sensor Dry Cycles or Manual Cycles will show in the display. Selecting MORE Dry or LESS Dry automatically adjusts the sensed time needed time which is already sensed, Start / Pause...
Owners Manual
Page 28
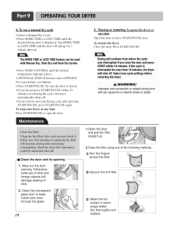
... of door. 2. Clean the transparent glass door to end your dryer at any time Press START/PAUSE or open the door. 5. To use a manual dry cycle • Select a Manual Dry Cycle. • Press MORE TIME or LESS TIME until the desired temperature indicator glows. • (OPTIONAL STEP) If desired, select OPTIONS.... any time Open the door or press START/PAUSE once. Wipe out the door opening 1. The MORE TIME or LESS TIME feature canbe used with Manual Dry, Time Dry and Rack Dry Cycles. • Press TEMR CONTROL until the desired drying time is closed. • If you do not ...
... of door. 2. Clean the transparent glass door to end your dryer at any time Press START/PAUSE or open the door. 5. To use a manual dry cycle • Select a Manual Dry Cycle. • Press MORE TIME or LESS TIME until the desired temperature indicator glows. • (OPTIONAL STEP) If desired, select OPTIONS.... any time Open the door or press START/PAUSE once. Wipe out the door opening 1. The MORE TIME or LESS TIME feature canbe used with Manual Dry, Time Dry and Rack Dry Cycles. • Press TEMR CONTROL until the desired drying time is closed. • If you do not ...
Owners Manual
Page 30
..., tissue, or similar material can cause a build up of pants, shirts, and other similar material in my clothes at?er drying. In order to the manual section on the heat setting, the type of heat used (electric, natural or LP gas), the size of the load, the type of fabrics, the...
..., tissue, or similar material can cause a build up of pants, shirts, and other similar material in my clothes at?er drying. In order to the manual section on the heat setting, the type of heat used (electric, natural or LP gas), the size of the load, the type of fabrics, the...
Owners Manual
Page 31
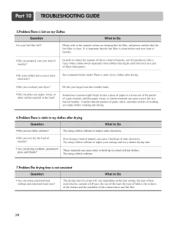
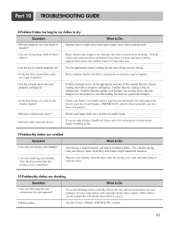
..._a load of moisture. • Are you are only drying a handful of items, add a few extra pieces to each new load of this manual that lhe exhaust venting ductw0rk is properly configured, Confirm that ae venting !S free Of Obstructions, C0nfirm lhat the outside wa!l dampers are moying ikee!Y,...tend to dry because they still retain a slight amount of laundry Can lead t_o wrinkled Clothesl Try a Shorter drying . See the Owner's Manual of smaller loads. • Did you drying large loads of heavy fabrics? Heavy fabrics take longer to retain more consistent drying times for large...
..._a load of moisture. • Are you are only drying a handful of items, add a few extra pieces to each new load of this manual that lhe exhaust venting ductw0rk is properly configured, Confirm that ae venting !S free Of Obstructions, C0nfirm lhat the outside wa!l dampers are moying ikee!Y,...tend to dry because they still retain a slight amount of laundry Can lead t_o wrinkled Clothesl Try a Shorter drying . See the Owner's Manual of smaller loads. • Did you drying large loads of heavy fabrics? Heavy fabrics take longer to retain more consistent drying times for large...


