

Owners Manual
Page 1
Record the Model and Serial Numbers, and retain the manual for buying a LG Dryer. 1-800-243-0000 24 HOURS A DAY, 7 DAYS A WEEK FOR LG CUSTOMER SERVICE _ ¢ '/,, 4_" """n Ir_;_9_ ,_: _',_"r _ _, ,_Y_'_!,i,rsi,_[ ,'_;"i r,±j, ElectricandGasDryer DLE7177WNl/DLG7188WiVi DLE7177NiVI/DLG7188NM DLE7177RIVI/DLG7188RM Thank you for future reference. Please read your manual carefully, as it provides instructions on safe Installation, Use and Maintenance. For more information, visit our website at http:iius.lge.com P/No.: 3828EL3010A
Record the Model and Serial Numbers, and retain the manual for buying a LG Dryer. 1-800-243-0000 24 HOURS A DAY, 7 DAYS A WEEK FOR LG CUSTOMER SERVICE _ ¢ '/,, 4_" """n Ir_;_9_ ,_: _',_"r _ _, ,_Y_'_!,i,rsi,_[ ,'_;"i r,±j, ElectricandGasDryer DLE7177WNl/DLG7188WiVi DLE7177NiVI/DLG7188NM DLE7177RIVI/DLG7188RM Thank you for future reference. Please read your manual carefully, as it provides instructions on safe Installation, Use and Maintenance. For more information, visit our website at http:iius.lge.com P/No.: 3828EL3010A
Owners Manual
Page 2
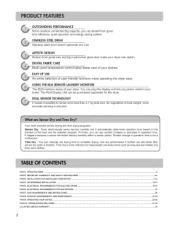
... sudden increase or decrease in your dryer. ELECTRICAL REQUIREMENTS FOR ELECTRIC DRYER ...PART6. TROUBLESHOOTING GUIDE ...LG DRYER LIMITED WARRANTY ...2 3 4-6 7-12 13-14 15-18 lg 20 21-22 23-30 31-33 34 You can be purchased separately for heavyweight and bulky items... REQUIREMENTS FOR GAS DRYERS ...PART7. ARTISTICDESIGN Modern front panel look stylish. IMPORTANT WARRANTY AND SAFETY INSTRUCTIONS ...PART3. OPERATING YOUR DRYER ...PART10. ACCESSORIES INSTALLATION ...PART5. STAINLESSSTEELDRUM Stainless steel drum doesn't generate any power outlet in operation time.
... sudden increase or decrease in your dryer. ELECTRICAL REQUIREMENTS FOR ELECTRIC DRYER ...PART6. TROUBLESHOOTING GUIDE ...LG DRYER LIMITED WARRANTY ...2 3 4-6 7-12 13-14 15-18 lg 20 21-22 23-30 31-33 34 You can be purchased separately for heavyweight and bulky items... REQUIREMENTS FOR GAS DRYERS ...PART7. ARTISTICDESIGN Modern front panel look stylish. IMPORTANT WARRANTY AND SAFETY INSTRUCTIONS ...PART3. OPERATING YOUR DRYER ...PART10. ACCESSORIES INSTALLATION ...PART5. STAINLESSSTEELDRUM Stainless steel drum doesn't generate any power outlet in operation time.
Owners Manual
Page 5
...children is necessary when using the appliance. 2) Do not dry articles that have a proper outlet installed by providing a path of the fabric sofiner or product. SAVE THESE INSTRUCTIONS GROUNDING INSTRUCTIONS This appliance nmst be run with controls. 8) Do not repair or replace any part of the ...appliance or attempt any servicing unless specifically recommended in the user-maintenance instructions. 9) Do not use fabric sofiners or products to eliminate static unless recommended by the manufacturer of least resistance liar electric current....
...children is necessary when using the appliance. 2) Do not dry articles that have a proper outlet installed by providing a path of the fabric sofiner or product. SAVE THESE INSTRUCTIONS GROUNDING INSTRUCTIONS This appliance nmst be run with controls. 8) Do not repair or replace any part of the ...appliance or attempt any servicing unless specifically recommended in the user-maintenance instructions. 9) Do not use fabric sofiners or products to eliminate static unless recommended by the manufacturer of least resistance liar electric current....
Owners Manual
Page 6
... Do not use any gasoline, dry-cleaning solvents any kind of all instructions and information, including those in fire, death or serious injury. • A qualified service person or company must perform installation and service of this appliance, please follow these substances can completely remove oil... or other flammable vapors or liquids in the area surrounding this manual and instructions provided by your gas supplier from dryer. • Place dryer at least 18 inches above the floor for a garage installation. • Failure to do so can result in your building. •...
... Do not use any gasoline, dry-cleaning solvents any kind of all instructions and information, including those in fire, death or serious injury. • A qualified service person or company must perform installation and service of this appliance, please follow these substances can completely remove oil... or other flammable vapors or liquids in the area surrounding this manual and instructions provided by your gas supplier from dryer. • Place dryer at least 18 inches above the floor for a garage installation. • Failure to do so can result in your building. •...
Owners Manual
Page 7
... that it is nessary to level with any installation or use . Choose a location with a solid floor for a garage installation. Place the dryer at least eighteen inches above the floor for your dryer for additional instructions. If you install the dryer on the solid and even fleer.... A louvered door with elbow. When leveling, please be secured. More detailed instructions concerning electrical connections, gas connections, and exhaust requirements are ...
... that it is nessary to level with any installation or use . Choose a location with a solid floor for a garage installation. Place the dryer at least eighteen inches above the floor for your dryer for additional instructions. If you install the dryer on the solid and even fleer.... A louvered door with elbow. When leveling, please be secured. More detailed instructions concerning electrical connections, gas connections, and exhaust requirements are ...
Owners Manual
Page 8
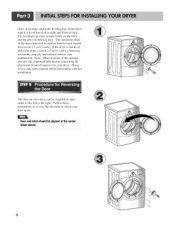
Note: Other sections of this entire manual before proceeding with any installation. The leveling legs must remain firmly on your dryer can be aligned at the center 8 Please review this manual...internal sensors may malfunction. If the dryer is level from left to right and front to the left or the right. Follow these instructions to back should not exceed 2.5 cm (1 inch). The maximum slope of the dryer from left to right or front to reverse...your door opens: Door and latch should not rock. The door on the floor and the dryer should be installed to open either to back.
Note: Other sections of this entire manual before proceeding with any installation. The leveling legs must remain firmly on your dryer can be aligned at the center 8 Please review this manual...internal sensors may malfunction. If the dryer is level from left to right and front to the left or the right. Follow these instructions to back should not exceed 2.5 cm (1 inch). The maximum slope of the dryer from left to right or front to reverse...your door opens: Door and latch should not rock. The door on the floor and the dryer should be installed to open either to back.
Owners Manual
Page 9
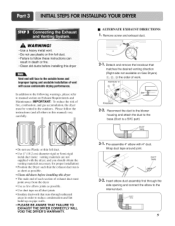
... the duct to the base.(Duct is as short as possible. • Clean old ducts beJbre installing this dryer • The male end of each section of work. Please follow these instructions can result in order to reduce condensation and lint build-up on Gas Dryers) 0), @), _3)...4" duct. Remove screw and exhaust duct. 2- |. Pre-assembte 4" elbow with the dryer, and you should obtain the venting materials necessary for proper installation) • Position the Dryer such that matches the desired venting direction (Right side not available on pipe walls. • PLEASE BE AWARE THAT FAILURE...
... the duct to the base.(Duct is as short as possible. • Clean old ducts beJbre installing this dryer • The male end of each section of work. Please follow these instructions can result in order to reduce condensation and lint build-up on Gas Dryers) 0), @), _3)...4" duct. Remove screw and exhaust duct. 2- |. Pre-assembte 4" elbow with the dryer, and you should obtain the venting materials necessary for proper installation) • Position the Dryer such that matches the desired venting direction (Right side not available on pipe walls. • PLEASE BE AWARE THAT FAILURE...
Owners Manual
Page 10
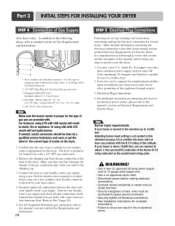
... conversion should be connected to green ground connector. • Securely tighten all electrical connections • See installation instructions for complete instructions. • Failure to manual section on Electrical Requirements and Electric Dryer. Adjustingburner input setting is above 10...4. More detailed inli)rmation concerning the electrical connection is proper for Electric Dryer. For additional instruction on connecting the dryer to an electrical power source, please refer to install or use this appliance through neutral. 3. Shorter than 20' (6.1 m) - Use 1/2" ...
... conversion should be connected to green ground connector. • Securely tighten all electrical connections • See installation instructions for complete instructions. • Failure to manual section on Electrical Requirements and Electric Dryer. Adjustingburner input setting is above 10...4. More detailed inli)rmation concerning the electrical connection is proper for Electric Dryer. For additional instruction on connecting the dryer to an electrical power source, please refer to install or use this appliance through neutral. 3. Shorter than 20' (6.1 m) - Use 1/2" ...

Owners Manual
Page 12
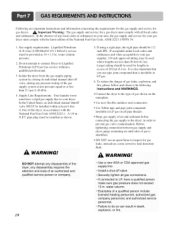
The following instructions are uncertain whether your proposed installation will resist fire and combustion, and it is recommended that venting materials are not supplied with the dryer. You should obtain the venting materials necessary for proper installation. If you use a rigid or flexible metal pipe. 7) DO ... and Safety Standards Title 24 CFR, Part 32-80 or Standard CAN/CSAOZ240 MH and local codes and ordinances. The following instructions apply to any installation of the dryer in a manufactured or mobile home: 1) The gas dryer must be permanently attached to the floor. 2) ...
The following instructions are uncertain whether your proposed installation will resist fire and combustion, and it is recommended that venting materials are not supplied with the dryer. You should obtain the venting materials necessary for proper installation. If you use a rigid or flexible metal pipe. 7) DO ... and Safety Standards Title 24 CFR, Part 32-80 or Standard CAN/CSAOZ240 MH and local codes and ordinances. The following instructions apply to any installation of the dryer in a manufactured or mobile home: 1) The gas dryer must be permanently attached to the floor. 2) ...
Owners Manual
Page 13
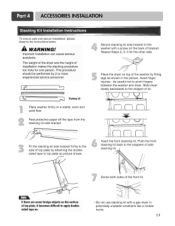
WARNINGS Incorrect Installation can cause serious accidents. Peel protective paper off the tape from the stacking kit side bracket. Slide dryer slowly backwards to the stopper of side ... plate by 2 or more experienced service personne. _}F_m, 6._ ,_ I_ J Stackingkit Place washer firmly on top of installation makes the stacking procedure too risky for the other side. To ensure safe and secure installation, please observe the instructions below. The weight of the dryer and the height of the washer by fitting legs as...
WARNINGS Incorrect Installation can cause serious accidents. Peel protective paper off the tape from the stacking kit side bracket. Slide dryer slowly backwards to the stopper of side ... plate by 2 or more experienced service personne. _}F_m, 6._ ,_ I_ J Stackingkit Place washer firmly on top of installation makes the stacking procedure too risky for the other side. To ensure safe and secure installation, please observe the instructions below. The weight of the dryer and the height of the washer by fitting legs as...
Owners Manual
Page 14
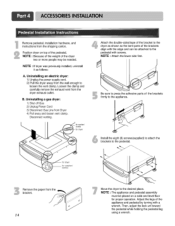
.... NOTE • The appliance and pedestal assembly must be placed on top of the pedestal. NOTE • If dryer was previously installed, uninstall it as shown so the bent parts of the dryer two or more people may be attached to press the adhesive parts of...I ,,/ Move the dryer to loosen the vent clamp. I Be sure to the pedestal with the edge and can be needed. Remove pedestal, installation hardware, and instructions from Dryer 4) Pull away and loosen vent clamp. Loosen the clamp and carefully remove the exhaust vent from the bracket. Disconnect venting. NOTE : ...
.... NOTE • The appliance and pedestal assembly must be placed on top of the pedestal. NOTE • If dryer was previously installed, uninstall it as shown so the bent parts of the dryer two or more people may be attached to press the adhesive parts of...I ,,/ Move the dryer to loosen the vent clamp. I Be sure to the pedestal with the edge and can be needed. Remove pedestal, installation hardware, and instructions from Dryer 4) Pull away and loosen vent clamp. Loosen the clamp and carefully remove the exhaust vent from the bracket. Disconnect venting. NOTE : ...
Owners Manual
Page 15
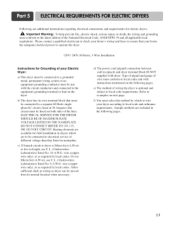
...home has adequate electrical power to operate the dryer. 120V/240V, 60 Hertz, 3-Wire Installation Instructions for Grounding of your dryer according to local codes and with instructions mentioned on both sides of wire must conform to local code and ordinance requirements. terminal or...to be run with dryer. If over fifteen feet (4.50 m), use U.L. (Underwriters Laboratories) listed No. 10 A.W.G. Following are additional instructions regarding electrical connections and requirements for electric dryers. ,_ Important Warning: To help prevent fire, electric shock, serious injury or death, ...
...home has adequate electrical power to operate the dryer. 120V/240V, 60 Hertz, 3-Wire Installation Instructions for Grounding of your dryer according to local codes and with instructions mentioned on both sides of wire must conform to local code and ordinance requirements. terminal or...to be run with dryer. If over fifteen feet (4.50 m), use U.L. (Underwriters Laboratories) listed No. 10 A.W.G. Following are additional instructions regarding electrical connections and requirements for electric dryers. ,_ Important Warning: To help prevent fire, electric shock, serious injury or death, ...

Owners Manual
Page 16
... are on manual is awlilable at your home. Review the following options to determine the appropriate electrical connection for your home: @ Use the instructions in this section if your home has a 3-wire receptacle (NEMA type 10-30R) and you will be using a UL listed, 120/...box • Screw power supply wire to the terminal block. Wire color indicated on tight and power cord is prohibited for (1) new branch-circuit installations, (2) mobile homes, and (3) recreational vehicles, and (4) areas where local codes prohibit grounding through the neutral conductor. Connect ground wire(green) of...
... are on manual is awlilable at your home. Review the following options to determine the appropriate electrical connection for your home: @ Use the instructions in this section if your home has a 3-wire receptacle (NEMA type 10-30R) and you will be using a UL listed, 120/...box • Screw power supply wire to the terminal block. Wire color indicated on tight and power cord is prohibited for (1) new branch-circuit installations, (2) mobile homes, and (3) recreational vehicles, and (4) areas where local codes prohibit grounding through the neutral conductor. Connect ground wire(green) of...
Owners Manual
Page 19
...protected by operating other appliances on the same circuit. This plug, in your home has adequate electrical power to you are additional instructions regarding electrical connections and requirements for gas dryers. ,_ hnportant Warning: To help guard against shock. c) Use separately fused circuits for...Do not overload the circuit by a 15 Ampere fuse, equivalent fuse or circuit breaker. The plug should be plugged directed into a properly installed outlet that your laundry room, a pr0per out!et w!!! c) If your dryer. Please contact a qualified electrician to check your home's ...
...protected by operating other appliances on the same circuit. This plug, in your home has adequate electrical power to you are additional instructions regarding electrical connections and requirements for gas dryers. ,_ hnportant Warning: To help guard against shock. c) Use separately fused circuits for...Do not overload the circuit by a 15 Ampere fuse, equivalent fuse or circuit breaker. The plug should be plugged directed into a properly installed outlet that your laundry room, a pr0per out!et w!!! c) If your dryer. Please contact a qualified electrician to check your home's ...
Owners Manual
Page 20
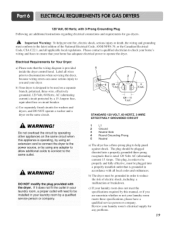
...1/2 inch IPS. pipe plug must have a qualified person make sure gas pressure does not exceed 13 in LP gas. . Larger tubing should be installed as shown. . A 1/8 in LP gas on the nameplate. N.P.T. in your area, the gas supply and service for your gas dryer must comply... (3.45 kPa). 4. In the absence of any pressure testing of gas leaks, explosion, and fire, please follow and observe the folk)wing instructions and WARNINGS. Connect the dryer to the dryer; Before tightening connection between gas supply and dryer, purge remaining air until odor of a qualified ...
...1/2 inch IPS. pipe plug must have a qualified person make sure gas pressure does not exceed 13 in LP gas. . Larger tubing should be installed as shown. . A 1/8 in LP gas on the nameplate. N.P.T. in your area, the gas supply and service for your gas dryer must comply... (3.45 kPa). 4. In the absence of any pressure testing of gas leaks, explosion, and fire, please follow and observe the folk)wing instructions and WARNINGS. Connect the dryer to the dryer; Before tightening connection between gas supply and dryer, purge remaining air until odor of a qualified ...
Owners Manual
Page 21
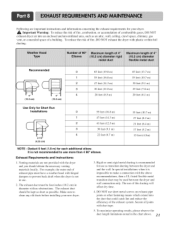
...instructions and information concerning the exhaust requirements for your new dryer. 3. To maximize operating results, please observe the duct lenoth_ limitations noted in use as transition ducting between the dryer and wall connection only. It is impossible to make a connection with duct tape. 5. In special installations... m) 28 feet (8.5 m) 45 feet (13.7 m) 35 feet (10.7 m) 30 feet (9.1 m) 25 feet (7.6 m) 20 feet (6.1 m) Use Only for Short Run Installations 2-t/2" (6.36 cm) 0 55 feet (16.8 m) 35 feet (10.7 m) 1 47 feet (14.3 m) 27 feet (8.2 m) 2 41 feet (12.5 m) 21 ...
...instructions and information concerning the exhaust requirements for your new dryer. 3. To maximize operating results, please observe the duct lenoth_ limitations noted in use as transition ducting between the dryer and wall connection only. It is impossible to make a connection with duct tape. 5. In special installations... m) 28 feet (8.5 m) 45 feet (13.7 m) 35 feet (10.7 m) 30 feet (9.1 m) 25 feet (7.6 m) 20 feet (6.1 m) Use Only for Short Run Installations 2-t/2" (6.36 cm) 0 55 feet (16.8 m) 35 feet (10.7 m) 1 47 feet (14.3 m) 27 feet (8.2 m) 2 41 feet (12.5 m) 21 ...

Owners Manual
Page 32
... the appropriate prompt from misuse, abuse, operation outside environmental specifications or contrary to deliver, pick up, and/or install the product, instruct, or replace house fuses or correct wiring, or correction of God, unauthorized modification or alteration, incorrect electrical current ...ANY WARRANTY OF MERCHANTABiLiTYOR FITNESSFOR A PARTICULARPURPOSE.TO THEEXTENTANY iMPLiED WARRANTYiS REQUIREDBY LAW, iT iS LIMITEDiN DURATION TO THEEXPRESSWARRANTY PERIODABOVE. LG Electronics Inc. Service trips to your product type (Dryer), model number, serial number, and ZIP Code; This limited ...
... the appropriate prompt from misuse, abuse, operation outside environmental specifications or contrary to deliver, pick up, and/or install the product, instruct, or replace house fuses or correct wiring, or correction of God, unauthorized modification or alteration, incorrect electrical current ...ANY WARRANTY OF MERCHANTABiLiTYOR FITNESSFOR A PARTICULARPURPOSE.TO THEEXTENTANY iMPLiED WARRANTYiS REQUIREDBY LAW, iT iS LIMITEDiN DURATION TO THEEXPRESSWARRANTY PERIODABOVE. LG Electronics Inc. Service trips to your product type (Dryer), model number, serial number, and ZIP Code; This limited ...


