
Specification (English)
Page 1
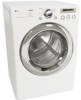
Pearl Gray White LGusa.com L A U N D RY ELECTRIC/GAS DRYERS D L E 5 955 DLG5966 Performance • XL Load Capacity with NeveRust™ Stainless Steel Drum (7.3 cu.ft.) • Sensor Dry System for Intelligent Fabric Care and Energy ... Dual LED Display and Dial-A-Cycle™ • Large Chrome Rimmed Door with Clear Glass • Stackable with Matching Washer (WM2455H) • Optional Matching Drawer Pedestal Technology Benefits • LoDecibel™ Quiet Operation DLE5955 DLG5966
Pearl Gray White LGusa.com L A U N D RY ELECTRIC/GAS DRYERS D L E 5 955 DLG5966 Performance • XL Load Capacity with NeveRust™ Stainless Steel Drum (7.3 cu.ft.) • Sensor Dry System for Intelligent Fabric Care and Energy ... Dual LED Display and Dial-A-Cycle™ • Large Chrome Rimmed Door with Clear Glass • Stackable with Matching Washer (WM2455H) • Optional Matching Drawer Pedestal Technology Benefits • LoDecibel™ Quiet Operation DLE5955 DLG5966
Specification (English)
Page 2
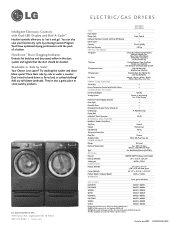
...Cliffs, NJ All Rights Reserved. Add our tall drawer pedestals. Place them side by pressing Custom Program. LG ELECTRONICS INC. 1000 Sylvan Ave., Englewood Cliffs, NJ 07632 800.243.0000 LGusa.com ELECTRIC/GAS DRYERS DLE5955 DLG5966 TYPE Front Loader Design Look Front Control Intelligent...DLG5966W 048231 009164 WDP3W 048231 008556 WSTK1 048231 008327 DLE5955G 048231 009188 DLG5966G 048231 009195 WDP3G 048231 009201 GSTK1 048231 009218 Design and specifications are property of their respective owners. Stackable or Side by Side? More space? Your Choice. Less space? LG...
...Cliffs, NJ All Rights Reserved. Add our tall drawer pedestals. Place them side by pressing Custom Program. LG ELECTRONICS INC. 1000 Sylvan Ave., Englewood Cliffs, NJ 07632 800.243.0000 LGusa.com ELECTRIC/GAS DRYERS DLE5955 DLG5966 TYPE Front Loader Design Look Front Control Intelligent...DLG5966W 048231 009164 WDP3W 048231 008556 WSTK1 048231 008327 DLE5955G 048231 009188 DLG5966G 048231 009195 WDP3G 048231 009201 GSTK1 048231 009218 Design and specifications are property of their respective owners. Stackable or Side by Side? More space? Your Choice. Less space? LG...

User Guide
Page 2
.... INTRODUCTION IMPORTANT SAFETY INSTRUCTIONS Basic Safety Precautions 3 What to the LG family. By following the operating and care instructions in this manual, your purchase and welcome to Do if You Smell Gas 4 Grounding Instructions 5 Safety Instructions for Installation 5, 6 Safety Instructions...Clearances 10 Installation With Optional Pedestal Base or Stacking Kit 11 Leveling the Dryer 12 Reversing the Door Swing 12 Changing the Dryer Vent Location 13 Venting the Dryer 14, 15 Connecting Gas Dryers 16 17 Connecting Electric Dryers 18 Special Requirements for Manufactured...
.... INTRODUCTION IMPORTANT SAFETY INSTRUCTIONS Basic Safety Precautions 3 What to the LG family. By following the operating and care instructions in this manual, your purchase and welcome to Do if You Smell Gas 4 Grounding Instructions 5 Safety Instructions for Installation 5, 6 Safety Instructions...Clearances 10 Installation With Optional Pedestal Base or Stacking Kit 11 Leveling the Dryer 12 Reversing the Door Swing 12 Changing the Dryer Vent Location 13 Venting the Dryer 14, 15 Connecting Gas Dryers 16 17 Connecting Electric Dryers 18 Special Requirements for Manufactured...
User Guide
Page 11
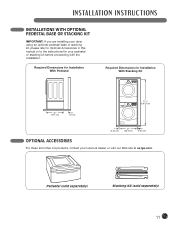
... (sold separately) 11 Required Dimensions for Installation With Pedestal Required Dimensions for your local LG dealer, or visit our Web site at us.lge.com. INSTALLATION INSTRUCTIONS INSTALLATIONS WITH OPTIONAL PEDESTAL BASE OR STACKING KIT IMPORTANT: If you are installing your dryer using an optional pedestal base or stacking kit, please refer to Optional Accessories...
... (sold separately) 11 Required Dimensions for Installation With Pedestal Required Dimensions for your local LG dealer, or visit our Web site at us.lge.com. INSTALLATION INSTRUCTIONS INSTALLATIONS WITH OPTIONAL PEDESTAL BASE OR STACKING KIT IMPORTANT: If you are installing your dryer using an optional pedestal base or stacking kit, please refer to Optional Accessories...
User Guide
Page 12
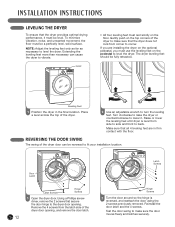
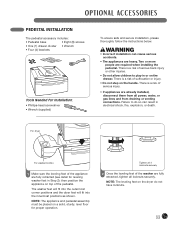
...level. Place a level across the top of the dryer to corner. Turn clockwise to raise the dryer or counterclockwise to lower it must use the leveling feet on the pedestal to fit your installation location. Raise or lower the leveling feet until dryer is reversed, and reattach the door using the ... Make sure that all 4 leveling feet are installing the dryer on the optional pedestal, you are in the final location. Door Latch Latch Screws Hinge Screws 1 Open the dryer door. Test the door swing to make sure that the dryer does not rock from side to side and front to vibrate...
...level. Place a level across the top of the dryer to corner. Turn clockwise to raise the dryer or counterclockwise to lower it must use the leveling feet on the pedestal to fit your installation location. Raise or lower the leveling feet until dryer is reversed, and reattach the door using the ... Make sure that all 4 leveling feet are installing the dryer on the optional pedestal, you are in the final location. Door Latch Latch Screws Hinge Screws 1 Open the dryer door. Test the door swing to make sure that the dryer does not rock from side to side and front to vibrate...
User Guide
Page 32
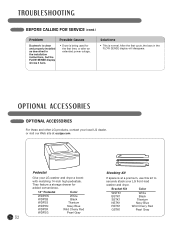
...display will disappear. They feature a storage drawer for the first time, or after an extended power outage. Pedestal Give your LG front-load washer and dryer. Bracket Kit Color WSTK1 BSTK1 SSTK1 NSTK1 RSTK1 GSTK1 White Black Titanium Navy Blue Wild Cherry Red Pearl Gray Solutions &#...com. OPTIONAL ACCESSORIES OPTIONAL ACCESSORIES For these and other LG products, contact your local LG dealer, or visit our Web site at a premium, use this kit to securely stack your LG washer and dryer a boost with matching 14-inch high pedestals. After the first cycle, the bars ...
...display will disappear. They feature a storage drawer for the first time, or after an extended power outage. Pedestal Give your LG front-load washer and dryer. Bracket Kit Color WSTK1 BSTK1 SSTK1 NSTK1 RSTK1 GSTK1 White Black Titanium Navy Blue Wild Cherry Red Pearl Gray Solutions &#...com. OPTIONAL ACCESSORIES OPTIONAL ACCESSORIES For these and other LG products, contact your local LG dealer, or visit our Web site at a premium, use this kit to securely stack your LG washer and dryer a boost with matching 14-inch high pedestals. After the first cycle, the bars ...
User Guide
Page 33
... washer feet in Step 2); Failure to play in electrical shock, fire, explosion, or death. NOTE: The appliance and pedestal assembly must be placed on the dryer do so can cause serious accidents. • The appliances are heavy. Tighten all 4 locknuts securely 2 Once the leveling..., water, or gas lines and from draining or venting connections. wWARNING • Incorrect installation can result in or on the handle. There is a risk of the washer are already installed, disconnect them from all locknuts securely. There is a risk of the pedestal. NOTE: The leveling...
... washer feet in Step 2); Failure to play in electrical shock, fire, explosion, or death. NOTE: The appliance and pedestal assembly must be placed on the dryer do so can cause serious accidents. • The appliances are heavy. Tighten all 4 locknuts securely 2 Once the leveling..., water, or gas lines and from draining or venting connections. wWARNING • Incorrect installation can result in or on the handle. There is a risk of the washer are already installed, disconnect them from all locknuts securely. There is a risk of the pedestal. NOTE: The leveling...

User Guide
Page 34
OPTIONAL ACCESSORIES PEDESTAL INSTALLATION (cont.) 3 Make sure the side surface of the appliance. Be sure to remove paper backing and to install the brackets. Be sure to connect the appliances to all screws to use all water, power, or gas lines and draining or venting connections before ...operation. Repeat steps 2-4 to lower. Turn clockwise to raise or counterclockwise to attach the other brackets. Once properly attached, firmly press the top part of the bracket with the double-sided tape to the pedestal. Move ...
OPTIONAL ACCESSORIES PEDESTAL INSTALLATION (cont.) 3 Make sure the side surface of the appliance. Be sure to remove paper backing and to install the brackets. Be sure to connect the appliances to all screws to use all water, power, or gas lines and draining or venting connections before ...operation. Repeat steps 2-4 to lower. Turn clockwise to raise or counterclockwise to attach the other brackets. Once properly attached, firmly press the top part of the bracket with the double-sided tape to the pedestal. Move ...

