Specification (English)
Page 2
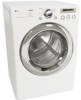
...x 43 5/16" x 31 5/16" Product Weight / Shipping Weight 126 lbs / 144 lbs WARRANTY 1 year (parts and labor) UPC CODES DLE5955W 048231 009157 DLG5966W 048231 009164 WDP3W 048231 008556 WSTK1 048231 008327 DLE5955G 048231 009188 DLG5966G 048231 009195 WDP3G 048231 009201 GSTK1 048231 009218 Design ...you to change without notice. ©2007 LG Electronics U.S.A., Inc., Englewood Cliffs, NJ All Rights Reserved. LG ELECTRONICS INC. 1000 Sylvan Ave., Englewood Cliffs, NJ 07632 800.243.0000 LGusa.com ELECTRIC/GAS DRYERS DLE5955 DLG5966 TYPE Front Loader Design Look Front ...
...x 43 5/16" x 31 5/16" Product Weight / Shipping Weight 126 lbs / 144 lbs WARRANTY 1 year (parts and labor) UPC CODES DLE5955W 048231 009157 DLG5966W 048231 009164 WDP3W 048231 008556 WSTK1 048231 008327 DLE5955G 048231 009188 DLG5966G 048231 009195 WDP3G 048231 009201 GSTK1 048231 009218 Design ...you to change without notice. ©2007 LG Electronics U.S.A., Inc., Englewood Cliffs, NJ All Rights Reserved. LG ELECTRONICS INC. 1000 Sylvan Ave., Englewood Cliffs, NJ 07632 800.243.0000 LGusa.com ELECTRIC/GAS DRYERS DLE5955 DLG5966 TYPE Front Loader Design Look Front ...

User Guide
Page 2
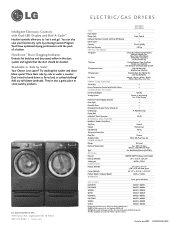
... operation and high efficiency. Your new LG Dryer combines the most advanced drying sensor technology with many years of reliable service. INTRODUCTION IMPORTANT SAFETY INSTRUCTIONS Basic Safety Precautions 3 What to the LG family. By following the operating and care...Parts and Components 9 INSTALLATION INSTRUCTIONS Choose the Proper Location 10 Clearances 10 Installation With Optional Pedestal Base or Stacking Kit 11 Leveling the Dryer 12 Reversing the Door Swing 12 Changing the Dryer Vent Location 13 Venting the Dryer 14, 15 Connecting Gas Dryers 16 17 Connecting Electric Dryers...
... operation and high efficiency. Your new LG Dryer combines the most advanced drying sensor technology with many years of reliable service. INTRODUCTION IMPORTANT SAFETY INSTRUCTIONS Basic Safety Precautions 3 What to the LG family. By following the operating and care...Parts and Components 9 INSTALLATION INSTRUCTIONS Choose the Proper Location 10 Clearances 10 Installation With Optional Pedestal Base or Stacking Kit 11 Leveling the Dryer 12 Reversing the Door Swing 12 Changing the Dryer Vent Location 13 Venting the Dryer 14, 15 Connecting Gas Dryers 16 17 Connecting Electric Dryers...

User Guide
Page 3
... give off vapors that could ignite or explode. • Do not reach into the dryer if the drum or any part of fire, electric shock, or injury to persons when using the dryer. • Before use, the dryer must be followed to minimize the risk of fire or explosion, electric shock, ... washed in, soaked in, or spotted with controls. • Before the dryer is moving. • Do not repair or replace any other part is removed from the accumulation of lint, dust, and dirt. • The interior of the dryer and exhaust vent should be properly installed as described in this Use and...
... give off vapors that could ignite or explode. • Do not reach into the dryer if the drum or any part of fire, electric shock, or injury to persons when using the dryer. • Before use, the dryer must be followed to minimize the risk of fire or explosion, electric shock, ... washed in, soaked in, or spotted with controls. • Before the dryer is moving. • Do not repair or replace any other part is removed from the accumulation of lint, dust, and dirt. • The interior of the dryer and exhaust vent should be properly installed as described in this Use and...

User Guide
Page 5
... injury, or loss of least resistance for a garage installation. Use only authorized factory parts. Failure to follow this warning can result in death, explosion, fire or burns. • Place dryer at least 18 in. above the floor for electric current. There is properly...grounding will not be exposed to temperatures below freezing or exposed to whether the appliance is not properly grounded. • Install and store the dryer where it will not fit the outlet, have a proper outlet installed by a qualified electrician. Failure to follow basic precautions...
... injury, or loss of least resistance for a garage installation. Use only authorized factory parts. Failure to follow this warning can result in death, explosion, fire or burns. • Place dryer at least 18 in. above the floor for electric current. There is properly...grounding will not be exposed to temperatures below freezing or exposed to whether the appliance is not properly grounded. • Install and store the dryer where it will not fit the outlet, have a proper outlet installed by a qualified electrician. Failure to follow basic precautions...

User Guide
Page 8
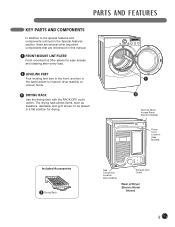
... Door swing can improve operating efficiency and help minimize service calls, saving you to blockages in the filter and ductwork that illuminates when the dryer door is open and turns off when the door is closed. 4 FLOWSENSE™ DUCT/FILTER BLOCKAGE SENSING SYSTEM The FlowSense™ duct/filter...-large stainless steel drum offers superior durability. Adjust settings and add cycle options with a yellow light that reduce exhaust flow from the dryer. PARTS AND FEATURES SPECIAL FEATURES 1 EASY-TO-USE CONTROL PANEL Rotate the Cycle Selector Knob to adjust for loading and unloading.
... Door swing can improve operating efficiency and help minimize service calls, saving you to blockages in the filter and ductwork that illuminates when the dryer door is open and turns off when the door is closed. 4 FLOWSENSE™ DUCT/FILTER BLOCKAGE SENSING SYSTEM The FlowSense™ duct/filter...-large stainless steel drum offers superior durability. Adjust settings and add cycle options with a yellow light that reduce exhaust flow from the dryer. PARTS AND FEATURES SPECIAL FEATURES 1 EASY-TO-USE CONTROL PANEL Rotate the Cycle Selector Knob to adjust for loading and unloading.
User Guide
Page 9
... position for drying. 1 2 Terminal Block Access Panel (Electric Models) Power Cord Location (Gas Models) Included Accessories 3 Drying Rack Gas Connection Location (Gas Models) Exhaust Duct Outlet Rear of Dryer (Electric Model Shown) 9 PARTS AND FEATURES KEY PARTS AND COMPONENTS In addition to improve dryer stability on uneven floors. 3 DRYING RACK Use the drying rack with the RACK...
... position for drying. 1 2 Terminal Block Access Panel (Electric Models) Power Cord Location (Gas Models) Included Accessories 3 Drying Rack Gas Connection Location (Gas Models) Exhaust Duct Outlet Rear of Dryer (Electric Model Shown) 9 PARTS AND FEATURES KEY PARTS AND COMPONENTS In addition to improve dryer stability on uneven floors. 3 DRYING RACK Use the drying rack with the RACK...
User Guide
Page 13
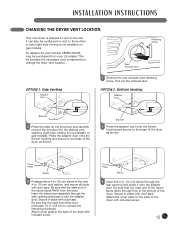
... back of the dryer with included screw. Attach cover plate to the base of the dryer as shown. Be sure that the male end of the elbow faces AWAY from your LG retailer. OPTION 2:...the next 4-in the bottom of the dryer. Retaining Screw Rear Exhaust Duct OPTION 1: Side Venting Adapter duct 1 Remove the rear exhaust duct retaining screw. An adapter kit, part number 383EEL9001B, may be configured to vent ... end of the elbow faces down through the rear opening (right-side venting is not available on gas models). Cover Plate Elbow 3 Insert the 4-in. (10 cm) elbow through hole in . ...
... back of the dryer with included screw. Attach cover plate to the base of the dryer as shown. Be sure that the male end of the elbow faces AWAY from your LG retailer. OPTION 2:...the next 4-in the bottom of the dryer. Retaining Screw Rear Exhaust Duct OPTION 1: Side Venting Adapter duct 1 Remove the rear exhaust duct retaining screw. An adapter kit, part number 383EEL9001B, may be configured to vent ... end of the elbow faces down through the rear opening (right-side venting is not available on gas models). Cover Plate Elbow 3 Insert the 4-in. (10 cm) elbow through hole in . ...
User Guide
Page 17
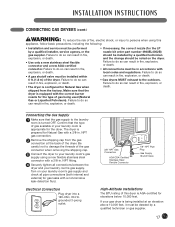
... for elevations below 10,000 feet. Make sure that the type of gas available in your laundry room is turned OFF. Failure to the laundry room is appropriate for the LP nozzle kit order part number 4948EL4002B) should be installed by a qualified technician and the...following: • Installation and service must be in fire, explosion, or death. • If necessary, the correct nozzle (for the dryer. INSTALLATION INSTRUCTIONS CONNECTING GAS DRYERS (cont.) wWARNING: To reduce the risk of fire, electric shock, or injury to do so can result in fire, explosion, or ...
... for elevations below 10,000 feet. Make sure that the type of gas available in your laundry room is turned OFF. Failure to the laundry room is appropriate for the LP nozzle kit order part number 4948EL4002B) should be installed by a qualified technician and the...following: • Installation and service must be in fire, explosion, or death. • If necessary, the correct nozzle (for the dryer. INSTALLATION INSTRUCTIONS CONNECTING GAS DRYERS (cont.) wWARNING: To reduce the risk of fire, electric shock, or injury to do so can result in fire, explosion, or ...
User Guide
Page 18
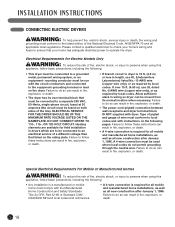
...pages. Please contact a qualified electrician to check your home has adequate electrical power to the equipment-grounding terminal or lead on the dryer. rounding conductor must be connected to an electrical service of fire, electric shock, or injury to persons when using this appliance, ...re, explosion, or death. • The power cord (pigtail) connection between wall receptacle and dryer terminal block IS NOT supplied with the Manufactured Home Construction and Safety Standards Title 24 CFR, Part 32-80 or Standard CAN/ CSA0Z240 MH and local codes and ordinances. • A 4-wire...
...pages. Please contact a qualified electrician to check your home has adequate electrical power to the equipment-grounding terminal or lead on the dryer. rounding conductor must be connected to an electrical service of fire, electric shock, or injury to persons when using this appliance, ...re, explosion, or death. • The power cord (pigtail) connection between wall receptacle and dryer terminal block IS NOT supplied with the Manufactured Home Construction and Safety Standards Title 24 CFR, Part 32-80 or Standard CAN/ CSA0Z240 MH and local codes and ordinances. • A 4-wire...
User Guide
Page 19
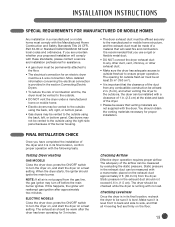
...vented to ensure proper operation. The adequacy of the burner housing. • The dryer exhaust duct must comply with these standards, please contact a service and installation professional for assistance. • A gas dryer must be vented to the outside using the back, left , or bottom panel.... Construction and Safety Standards Title 24 CFR, Part 32-80 or Standard CAN/CSA0Z240 MH and local codes and ordinances. INSTALLATION INSTRUCTIONS SPECIAL REQUIREMENTS FOR MANUFACTURED OR MOBILE HOMES Any installation in . (1.5 cm). Gas dryers may turn off before the main burner ignites...
...vented to ensure proper operation. The adequacy of the burner housing. • The dryer exhaust duct must comply with these standards, please contact a service and installation professional for assistance. • A gas dryer must be vented to the outside using the back, left , or bottom panel.... Construction and Safety Standards Title 24 CFR, Part 32-80 or Standard CAN/CSA0Z240 MH and local codes and ordinances. INSTALLATION INSTRUCTIONS SPECIAL REQUIREMENTS FOR MANUFACTURED OR MOBILE HOMES Any installation in . (1.5 cm). Gas dryers may turn off before the main burner ignites...

User Guide
Page 34
...brackets. Be sure to remove paper backing and to use all screws to the pedestal. The bent part of the bracket should rest along the edge of the pedestal, and the holes in the bottom part of the pedestal until you can turn them with the holes in the pedestal. 5 Install 2 ...is excessive vibration during the first operation after installation, slightly adjust the leveling feet. Remove paper backing from the tape on all water, power, or gas lines and draining or venting connections before operation. Repeat steps 2-4 to all 4 leveling feet of the bracket should align with the wrench.
...brackets. Be sure to remove paper backing and to use all screws to the pedestal. The bent part of the bracket should rest along the edge of the pedestal, and the holes in the bottom part of the pedestal until you can turn them with the holes in the pedestal. 5 Install 2 ...is excessive vibration during the first operation after installation, slightly adjust the leveling feet. Remove paper backing from the tape on all water, power, or gas lines and draining or venting connections before operation. Repeat steps 2-4 to all 4 leveling feet of the bracket should align with the wrench.
User Guide
Page 37
... the normal service area, any cost of transportation involved in the repair of the product or replacement of Purchase. LG DRYER LIMITED WARRANTY - WARRANTY PERIOD: LABOR: Two Years from the Date of a defective part shall be defective in materials or workmanship under normal use or contrary to territory. No other warranty is provided...
... the normal service area, any cost of transportation involved in the repair of the product or replacement of Purchase. LG DRYER LIMITED WARRANTY - WARRANTY PERIOD: LABOR: Two Years from the Date of a defective part shall be defective in materials or workmanship under normal use or contrary to territory. No other warranty is provided...


