
Owners Manual
Page 2
... time efficiency, quiet operation and energy saving system. DIGITAL FABRIC CARE Multi-level temperature control heater takes a better care on your house look stylish. INITIAL STEPS FOR INSTALLING YOUR DRYER 7-12 PART4. GAS REQUIREMENTS AND INSTRUCTIONS 20 PART8. EASY OF USE A whole selection of user-friendly functions always make your valued clothes. ELECTRICAL REQUIREMENTS FOR GAS DRYERS 19 PART7. OUTSTANDING PERFORMANCE Not to guarantee high durability and the long life. ACCESSORIES INSTALLATION...
... time efficiency, quiet operation and energy saving system. DIGITAL FABRIC CARE Multi-level temperature control heater takes a better care on your house look stylish. INITIAL STEPS FOR INSTALLING YOUR DRYER 7-12 PART4. GAS REQUIREMENTS AND INSTRUCTIONS 20 PART8. EASY OF USE A whole selection of user-friendly functions always make your valued clothes. ELECTRICAL REQUIREMENTS FOR GAS DRYERS 19 PART7. OUTSTANDING PERFORMANCE Not to guarantee high durability and the long life. ACCESSORIES INSTALLATION...
Owners Manual
Page 3
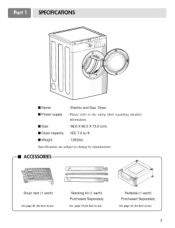
• Name : Electric and Gas Dryer • Power supply : Please refer to the rating label regarding detailed information. • Size • Dryer capacity : 68.6 X 96.5 X 73.0 (cm) : IEC 7.0 cu.ft. • Weight : 126(Ibs) Specifications are subject to change by manufacturer. --II ACCESSORIES Dryer rack (1 each) See page 26 for how to use. 3 Pedestal (1 each ) Purchased Separately See page 13for how to use . Stacking kit (1 each ) Purchased Separately See page 14 for how to use .
• Name : Electric and Gas Dryer • Power supply : Please refer to the rating label regarding detailed information. • Size • Dryer capacity : 68.6 X 96.5 X 73.0 (cm) : IEC 7.0 cu.ft. • Weight : 126(Ibs) Specifications are subject to change by manufacturer. --II ACCESSORIES Dryer rack (1 each) See page 26 for how to use. 3 Pedestal (1 each ) Purchased Separately See page 13for how to use . Stacking kit (1 each ) Purchased Separately See page 14 for how to use .
Owners Manual
Page 4
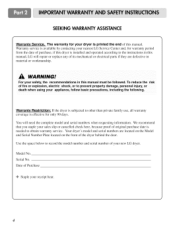
... dryer behind the door. You will repair or replace any of fire or explosion, electric shock, or to the instructions in this manual, LG will need the complete model and serial numbers when requesting information. Serial No. To reduce the risk of its mechanical or electrical parts if they are located on the Model and Serial Number Plate located on the front of this manual. Warranty service is available by contacting your nearest LG Service...
... dryer behind the door. You will repair or replace any of fire or explosion, electric shock, or to the instructions in this manual, LG will need the complete model and serial numbers when requesting information. Serial No. To reduce the risk of its mechanical or electrical parts if they are located on the Model and Serial Number Plate located on the front of this manual. Warranty service is available by contacting your nearest LG Service...
Owners Manual
Page 5
... codes and ordinances. to help reduce any servicing unless specifically recommended in the user-maintenance instructions. 9) Do not use fabric soflners or products to whether the appliance is equipped with gasoline, dry-cleaning solvents, or other flammable or explosive substances, as to eliminate static unless recommended by a qualified electrician. Do not modify the plug provided with controls. 8) Do not repair or replace any part...
... codes and ordinances. to help reduce any servicing unless specifically recommended in the user-maintenance instructions. 9) Do not use fabric soflners or products to whether the appliance is equipped with gasoline, dry-cleaning solvents, or other flammable or explosive substances, as to eliminate static unless recommended by a qualified electrician. Do not modify the plug provided with controls. 8) Do not repair or replace any part...

Owners Manual
Page 8
... on your dryer can be installed to open either to reverse the direction in position, adjust the leveling legs of the dryer until it is not level, and if the slope exceeds 2.5 cm (1 inch), a load may not tumble properly and internal sensors may malfunction. The door on the floor and the dryer should not exceed 2.5 cm (1 inch). Please review this manual also...
... on your dryer can be installed to open either to reverse the direction in position, adjust the leveling legs of the dryer until it is not level, and if the slope exceeds 2.5 cm (1 inch), a load may not tumble properly and internal sensors may malfunction. The door on the floor and the dryer should not exceed 2.5 cm (1 inch). Please review this manual also...
Owners Manual
Page 9
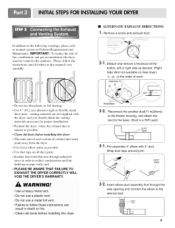
Please follow these instructions can result in death or fire. • Clean old ducts before installing this manual) very carefully. • ALTERNATE EXHAUST DIRECTIONS ] • Remove a screw and exhaust duct. 2- ]. Detach and remove a knockout at the button, left or right side as possible • Use duct tape on all others in this dryer 2-2. Reconnect the another duct[11 in(28cm)] to the blower housing, and attach the duct to the...
Please follow these instructions can result in death or fire. • Clean old ducts before installing this manual) very carefully. • ALTERNATE EXHAUST DIRECTIONS ] • Remove a screw and exhaust duct. 2- ]. Detach and remove a knockout at the button, left or right side as possible • Use duct tape on all others in this dryer 2-2. Reconnect the another duct[11 in(28cm)] to the blower housing, and attach the duct to the...

Owners Manual
Page 10
... and instructions concerning making electrical connections. • Connect neutral wire(white or center wire) to center terminal. • Ground wire(green or bare wire) must be connected to disconnection when servicing the dryer, because wiring errors can result in fire or electrical shock. Four-wire cord is requited for Natural Gas with a non-corrosive leak detection fluid. 5. Use this dryer. 1. Equipment Shut-Off ValveInstalled within 6' ( 1.8 m) of this manual's section entitled Gas Requirements and Instructions. Use 1/2" pipe. 5.3/8" N.P.T. The dryer...
... and instructions concerning making electrical connections. • Connect neutral wire(white or center wire) to center terminal. • Ground wire(green or bare wire) must be connected to disconnection when servicing the dryer, because wiring errors can result in fire or electrical shock. Four-wire cord is requited for Natural Gas with a non-corrosive leak detection fluid. 5. Use this dryer. 1. Equipment Shut-Off ValveInstalled within 6' ( 1.8 m) of this manual's section entitled Gas Requirements and Instructions. Use 1/2" pipe. 5.3/8" N.P.T. The dryer...
Owners Manual
Page 11
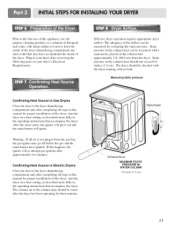
... on the exhaust duct approximately 2 ft. (60.9 cm) from the gas line, the gas igniter may have ignited. Confirming Heat Source in Electric Dryers Close the door to the dryer drum/drying compartment and, after completing all steps in this manual for proper installation of this dryer, start the dryer on a heat setting, as described more fully in Gas Dryers Close the door to the dryer drum/drying compartment and, after reviewing the following parts on a heat setting, as...
... on the exhaust duct approximately 2 ft. (60.9 cm) from the gas line, the gas igniter may have ignited. Confirming Heat Source in Electric Dryers Close the door to the dryer drum/drying compartment and, after completing all steps in this manual for proper installation of this dryer, start the dryer on a heat setting, as described more fully in Gas Dryers Close the door to the dryer drum/drying compartment and, after reviewing the following parts on a heat setting, as...

Owners Manual
Page 12
... exhaust duct must be vented to installations of the dryer in a manufactured or mobile home. If you use a rigid or flexible metal pipe. 7) DO NOT connect the exhaust duct with any other duct, vent, chimney, or other exhaust duct. 8) Make sure the dryer has adequate access to outside fresh air must be at least 25 ira' (163 cm_). 9) It is provided at the manual section entitled Electrical Requirements for Electric Dryer...
... exhaust duct must be vented to installations of the dryer in a manufactured or mobile home. If you use a rigid or flexible metal pipe. 7) DO NOT connect the exhaust duct with any other duct, vent, chimney, or other exhaust duct. 8) Make sure the dryer has adequate access to outside fresh air must be at least 25 ira' (163 cm_). 9) It is provided at the manual section entitled Electrical Requirements for Electric Dryer...
Owners Manual
Page 13
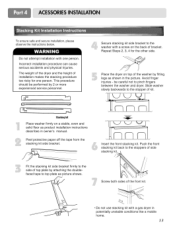
... by 2 or more experienced service personnel. ...# Stachingkit Place washer firmly on a stable, even and solid floor as product installation instructions describes in owner's manual. Slide washer slowly backwards to top plate as shown in potentially unstable conditions like a mobile home. 13 Push the front stacking kit back to the stoppers of side Fit the stacking kit side bracket firmly to the...
... by 2 or more experienced service personnel. ...# Stachingkit Place washer firmly on a stable, even and solid floor as product installation instructions describes in owner's manual. Slide washer slowly backwards to top plate as shown in potentially unstable conditions like a mobile home. 13 Push the front stacking kit back to the stoppers of side Fit the stacking kit side bracket firmly to the...
Owners Manual
Page 14
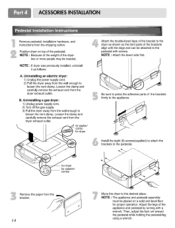
... dryer for proper operation. NOTE • The appliance and pedestal assembly must be attached to the dryer as follows: A. Adjust the legs of the pedestal. Uninstalling a gas dryer: 1) Unplug power supply cord. 2) Turn of the brackets align with a wrench. Remove pedestal, installation hardware, and instructions from the dryer exhaust outlet. Loosen the clamp and carefully remove the exhaust vent from the wall enough to the appliance. Be sure to press the adhesive parts...
... dryer for proper operation. NOTE • The appliance and pedestal assembly must be attached to the dryer as follows: A. Adjust the legs of the pedestal. Uninstalling a gas dryer: 1) Unplug power supply cord. 2) Turn of the brackets align with a wrench. Remove pedestal, installation hardware, and instructions from the dryer exhaust outlet. Loosen the clamp and carefully remove the exhaust vent from the wall enough to the appliance. Be sure to press the adhesive parts...

Owners Manual
Page 15
... be run with dryer. Please contact a qualified electrician to check your home's wiring and fuses to ensure that your home has adequate electrical power to operate the dryer. 120V/240M 60 Hertz, 3-Wire Installation Instructions for Grounding of your dryer according to local code and ordinance requirements. Sample methods are available for electric dryers. DO NOT CONNECT DRYER TO 110, 115, OR 120 VOLT CIRCUIT. Following are to be connected to electrical service...
... be run with dryer. Please contact a qualified electrician to check your home's wiring and fuses to ensure that your home has adequate electrical power to operate the dryer. 120V/240M 60 Hertz, 3-Wire Installation Instructions for Grounding of your dryer according to local code and ordinance requirements. Sample methods are available for electric dryers. DO NOT CONNECT DRYER TO 110, 115, OR 120 VOLT CIRCUIT. Following are to be connected to electrical service...
Owners Manual
Page 19
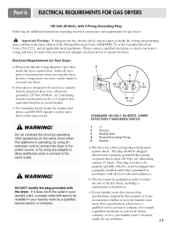
... adequate electrical power to the power source, or by this appliance is provided inside the dryer control hood. b) The dryer must be used on the same circuit. c) Use separately fused circuits for any adapter to allow additional cords to Connect to you are additional instructions regarding electrical connections and requirements for example a qualified electrician or your local electric company, review your laundry room does not meet the specifications required by using any problems...
... adequate electrical power to the power source, or by this appliance is provided inside the dryer control hood. b) The dryer must be used on the same circuit. c) Use separately fused circuits for any adapter to allow additional cords to Connect to you are additional instructions regarding electrical connections and requirements for example a qualified electrician or your local electric company, review your laundry room does not meet the specifications required by using any problems...
Owners Manual
Page 20
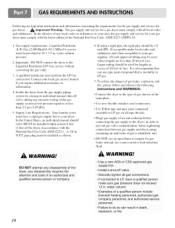
... . Important: DO NOT connect the dryer to or less than 20 feet (6.1 m). Purge gas supply of the dryer, in . pipe plug must be used where lengths are important instructions and information concerning the requirements for the gas supply and service for gas dryers. ,_ Important Warning: The gas supply and service for gas leaks; DO NOT attempt any disassembly Of the dryer, any pressure testing of gas is insoluble in . If...
... . Important: DO NOT connect the dryer to or less than 20 feet (6.1 m). Purge gas supply of the dryer, in . pipe plug must be used where lengths are important instructions and information concerning the requirements for the gas supply and service for gas dryers. ,_ Important Warning: The gas supply and service for gas leaks; DO NOT attempt any disassembly Of the dryer, any pressure testing of gas is insoluble in . If...

Owners Manual
Page 21
... not install flexible duct in use plastic or thin foil ducting. 4. Do not use . 2. The exhaust duct should obtain the necessary venting materials locally. Non-combustible flexible metal duct is not in concealed spaces. To maximize operating results, please observe the duct length limitations noted in diameter with no obstructions. Venting materials are important instructions and information concerning the exhaust requirements for each additional elbow. The exhaust duct...
... not install flexible duct in use plastic or thin foil ducting. 4. Do not use . 2. The exhaust duct should obtain the necessary venting materials locally. Non-combustible flexible metal duct is not in concealed spaces. To maximize operating results, please observe the duct length limitations noted in diameter with no obstructions. Venting materials are important instructions and information concerning the exhaust requirements for each additional elbow. The exhaust duct...
Owners Manual
Page 22
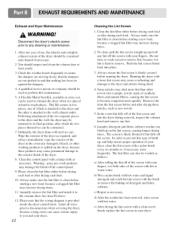
... dryer. e) After drying the lint screen with hot or warm water. Label all wires prior to disconnection when servicing the dryer, because wiring errors can build up and roll any detergent, bleach, or other is spilled on the lint screen, causing longer drying times. Check the weather hoods frequently to ensure the dampers are moving freely, that nothing has been set against the dampers. 4. Clean the control panel with a damp cloth...
... dryer. e) After drying the lint screen with hot or warm water. Label all wires prior to disconnection when servicing the dryer, because wiring errors can build up and roll any detergent, bleach, or other is spilled on the lint screen, causing longer drying times. Check the weather hoods frequently to ensure the dampers are moving freely, that nothing has been set against the dampers. 4. Clean the control panel with a damp cloth...
Owners Manual
Page 29
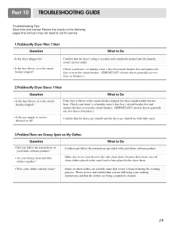
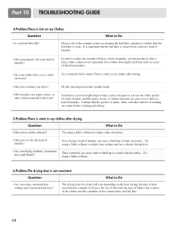
... circuit breaker. (IMPORTANT: electric dryers generally use your dryer to call for service. 1.Problem:My Dryer Won't Start • Is the dry..e..r plugged lug. • Is the fuse blown, or is ,blown Or the circuit breaker tripped, the dryer might tumble but not i heat Check your home's Orlaundry room's fuse box / circuit breaker box and [ replace the A!se0 r reset the circuit breaker, (IMPORTANT: electric dryers generally I usetwo fuses or breakers.) Confirm that the house gas shutoff and the dryer gas shutoff are both fully open. 3.Problem...
... circuit breaker. (IMPORTANT: electric dryers generally use your dryer to call for service. 1.Problem:My Dryer Won't Start • Is the dry..e..r plugged lug. • Is the fuse blown, or is ,blown Or the circuit breaker tripped, the dryer might tumble but not i heat Check your home's Orlaundry room's fuse box / circuit breaker box and [ replace the A!se0 r reset the circuit breaker, (IMPORTANT: electric dryers generally I usetwo fuses or breakers.) Confirm that the house gas shutoff and the dryer gas shutoff are both fully open. 3.Problem...
Owners Manual
Page 30
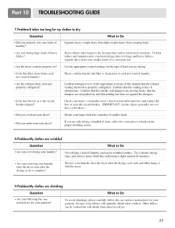
... lint in a load of the exhaust ducts and lint filer. 3O Sometimes a person might catch lint (such as a pair of black linen pants). • Do your clothes have excess static electricity'? • Did you overload your dryer? • Did you using a fabric Softener to reduce static electricity. 6.Problem:The drying time is not consistent Question I Try using consistent heat settings madconsistent load sizes'? It is importtmt that the lint filter is clean...
... lint in a load of the exhaust ducts and lint filer. 3O Sometimes a person might catch lint (such as a pair of black linen pants). • Do your clothes have excess static electricity'? • Did you overload your dryer? • Did you using a fabric Softener to reduce static electricity. 6.Problem:The drying time is not consistent Question I Try using consistent heat settings madconsistent load sizes'? It is importtmt that the lint filter is clean...
Owners Manual
Page 31
... to retain more consistent drying times for your laundry from the dryer after the drying cycle is the circuit breaker tripped? la,undry can be washed but will naturally shrink when washed. Please confirm that the lint filter is lree of moisture • Are you r home s or la_ adry room's fuse box/circuit breaker box _md replace the fuse or reset the circuit breaker. (IMPORTANT: electric dryers generally use instructions for large and...
... to retain more consistent drying times for your laundry from the dryer after the drying cycle is the circuit breaker tripped? la,undry can be washed but will naturally shrink when washed. Please confirm that the lint filter is lree of moisture • Are you r home s or la_ adry room's fuse box/circuit breaker box _md replace the fuse or reset the circuit breaker. (IMPORTANT: electric dryers generally use instructions for large and...
Owners Manual
Page 32
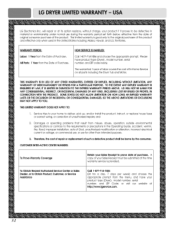
... alteration, incorrect electrical current or voltage, or commercial use, or use during the warranty period set forth below, effective from the date of original consumer purchase of Purchase. This limited warranty is provided. All Parts: I Year from misuse, abuse, operation outside environmental specifications or contrary to deliver, pick up, and/or install the product, instruct, or replace house fuses or correct wiring, or correction...
... alteration, incorrect electrical current or voltage, or commercial use, or use during the warranty period set forth below, effective from the date of original consumer purchase of Purchase. This limited warranty is provided. All Parts: I Year from misuse, abuse, operation outside environmental specifications or contrary to deliver, pick up, and/or install the product, instruct, or replace house fuses or correct wiring, or correction...


