

Owner's Manual
Page 2
...LG Dryer combines the most advanced drying sensor technology with many years of reliable service. By following the operating and care instructions in this manual, your dryer 10 Choose the Proper Location 10 Clearances 10 Installation With Optional Pedestal Base or Stacking Kit 11 Leveling the Dryer 12 Reversing the Door Swing 12 Changing the Dryer... instructions completely before installing and operating your dryer will provide you with simple operation and high efficiency. IMPORTANT SAFETY INSTRUCTIONS What to the LG family. Congratulations on your purchase and welcome...
...LG Dryer combines the most advanced drying sensor technology with many years of reliable service. By following the operating and care instructions in this manual, your dryer 10 Choose the Proper Location 10 Clearances 10 Installation With Optional Pedestal Base or Stacking Kit 11 Leveling the Dryer 12 Reversing the Door Swing 12 Changing the Dryer... instructions completely before installing and operating your dryer will provide you with simple operation and high efficiency. IMPORTANT SAFETY INSTRUCTIONS What to the LG family. Congratulations on your purchase and welcome...
Owner's Manual
Page 4
...• Do not place items exposed to carry out. • Do not tamper with gasoline, dry-cleaning solvents, or other flammable or explosive substances as described in your dryer. READ ALL INSTRUCTIONS BEFORE USE wWARNING For your safety, the information in this manual must be followed...qualified service personnel. • Do not install or store the dryer where it will minimize incomplete combustion. Close supervision of children is necessary when the dryer is used near children. • Do not use heat to dry articles containing foam rubber or similarly textured rubber-like materials. ...
...• Do not place items exposed to carry out. • Do not tamper with gasoline, dry-cleaning solvents, or other flammable or explosive substances as described in your dryer. READ ALL INSTRUCTIONS BEFORE USE wWARNING For your safety, the information in this manual must be followed...qualified service personnel. • Do not install or store the dryer where it will minimize incomplete combustion. Close supervision of children is necessary when the dryer is used near children. • Do not use heat to dry articles containing foam rubber or similarly textured rubber-like materials. ...

Owner's Manual
Page 6
...prevent property damage, personal injury, or loss of this manual must be kept as short as possible. The use between the dryer and wall connection only. Secure all joints with the above recommendations, a ULlisted flexible metal transition duct may be followed to ...provided with no obstructions. SAFETY INSTRUCTIONS FOR INSTALLATION Exhaust/Ducting: • Gas dryers MUST be expelled into the duct that could catch lint and reduce the efficiency of moisture will affect drying time. In special installations when it collapses or becomes otherwise restricted in use...
...prevent property damage, personal injury, or loss of this manual must be kept as short as possible. The use between the dryer and wall connection only. Secure all joints with the above recommendations, a ULlisted flexible metal transition duct may be followed to ...provided with no obstructions. SAFETY INSTRUCTIONS FOR INSTALLATION Exhaust/Ducting: • Gas dryers MUST be expelled into the duct that could catch lint and reduce the efficiency of moisture will affect drying time. In special installations when it collapses or becomes otherwise restricted in use...

Owner's Manual
Page 8
... and unloading. SPECIAL FEATURES 1 Easy-to-USE Control Panel Rotate the Cycle Selector Knob to blockages in the ductwork that reduce exhaust flow from the dryer. This improve operating efficiency and help minimize service calls, saving you to select the desired...
... and unloading. SPECIAL FEATURES 1 Easy-to-USE Control Panel Rotate the Cycle Selector Knob to blockages in the ductwork that reduce exhaust flow from the dryer. This improve operating efficiency and help minimize service calls, saving you to select the desired...
Owner's Manual
Page 12
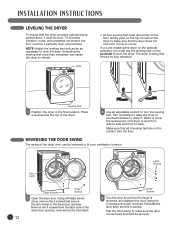
... previously removed. Level • All four leveling feet must use the leveling feet on the pedestal to level the dryer. Make sure that secure the door hinge to the dryer door opening , and remove the door latch. 12 Latch Screws Hinge Screws 2 Turn the door around so the... securely. Door Latch Latch Screws Hinge Screws 1 Open the dryer door. To minimize vibration, noise, and unwanted movement, the floor must be fully retracted. Gently push on the floor. LEVELING THE DRYER To ensure that the dryer provides optimal drying performance, it . REVERSING THE DOOR SWING The swing of...
... previously removed. Level • All four leveling feet must use the leveling feet on the pedestal to level the dryer. Make sure that secure the door hinge to the dryer door opening , and remove the door latch. 12 Latch Screws Hinge Screws 2 Turn the door around so the... securely. Door Latch Latch Screws Hinge Screws 1 Open the dryer door. To minimize vibration, noise, and unwanted movement, the floor must be fully retracted. Gently push on the floor. LEVELING THE DRYER To ensure that the dryer provides optimal drying performance, it . REVERSING THE DOOR SWING The swing of...

Owner's Manual
Page 14
... connection with no obstructions. In special installations when it is impossible to make sure it is suitable and clean before installing your new dryer. Failure to follow these instructions can result in fire or death. • The exhaust duct must conform to local building codes. ...for use . The end cap should obtain the necessary ductwork locally. VENTING THE DRYER wWARNING: To reduce the risk of fire, electric shock, or injury to persons when using this ducting will affect drying time. Make sure to follow these instructions can result in fire or death....
... connection with no obstructions. In special installations when it is impossible to make sure it is suitable and clean before installing your new dryer. Failure to follow these instructions can result in fire or death. • The exhaust duct must conform to local building codes. ...for use . The end cap should obtain the necessary ductwork locally. VENTING THE DRYER wWARNING: To reduce the risk of fire, electric shock, or injury to persons when using this ducting will affect drying time. Make sure to follow these instructions can result in fire or death....
Owner's Manual
Page 15
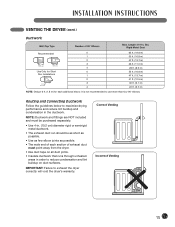
...few elbow joints as possible. • The male end of each additional elbow. Routing and Connecting Ductwork Follow the guidelines below to maximize drying performance and reduce lint buildup and condensation in order to reduce condensation and lint buildup on all duct joints. • Insulate ductwork that ...runs through unheated areas in the ductwork. IMPORTANT: Failure to use more than four 90° elbows. VENTING THE DRYER (cont.) Ductwork Wall Cap Type Number of 4-In. NOTE: Ductwork and fittings are NOT included and must point away from the...
...few elbow joints as possible. • The male end of each additional elbow. Routing and Connecting Ductwork Follow the guidelines below to maximize drying performance and reduce lint buildup and condensation in order to reduce condensation and lint buildup on all duct joints. • Insulate ductwork that ...runs through unheated areas in the ductwork. IMPORTANT: Failure to use more than four 90° elbows. VENTING THE DRYER (cont.) Ductwork Wall Cap Type Number of 4-In. NOTE: Ductwork and fittings are NOT included and must point away from the...

Owner's Manual
Page 24
...not crushed or restricted. 24 CONTROL buttons at the same time. If no bars are lit, the dryer ductwork has a blockage that automatically detects blockages and restrictions in the ductwork. IMPORTANT: Do NOT interrrupt ...test, the number of restrictions allows clothes to dry faster and reduces energy use. If all bars are shown in your home. DUCT CONDITION TESTING Your dryer features FlowSense™, an innovative sensor system that...tests may not be performed before proceeding. (Gas dryer only) Then perform the duct condition test below. 1 Press and hold the DAMP DRY BEEP and TEMP.
...not crushed or restricted. 24 CONTROL buttons at the same time. If no bars are lit, the dryer ductwork has a blockage that automatically detects blockages and restrictions in the ductwork. IMPORTANT: Do NOT interrrupt ...test, the number of restrictions allows clothes to dry faster and reduces energy use. If all bars are shown in your home. DUCT CONDITION TESTING Your dryer features FlowSense™, an innovative sensor system that...tests may not be performed before proceeding. (Gas dryer only) Then perform the duct condition test below. 1 Press and hold the DAMP DRY BEEP and TEMP.

Owner's Manual
Page 25
... filter is clogged to let you to persons, read this entire manual, including the Important Safety Instructions, before running the dryer. clothes require room to tumble to dry properly. • Close zippers, hooks, and drawstrings to obey this appliance, follow basic precautions, including the following: &#...8226; Check all pockets to be dried with do so can damage both your dryer and your clothes. Do not rinse or wash the filter to oil, gasoline, or other clothes. See "Care and...
... filter is clogged to let you to persons, read this entire manual, including the Important Safety Instructions, before running the dryer. clothes require room to tumble to dry properly. • Close zippers, hooks, and drawstrings to obey this appliance, follow basic precautions, including the following: &#...8226; Check all pockets to be dried with do so can damage both your dryer and your clothes. Do not rinse or wash the filter to oil, gasoline, or other clothes. See "Care and...
Owner's Manual
Page 26
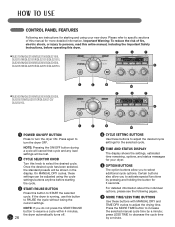
...DLE2150L DLG2151W/DLG2151R/DLG2151S/DLG2151L DLE2050W/DLE2050R/DLE2050S/DLE2050L DLG2051W/DLG2051R/DLG2051S/DLG2051L 7 5 7 6 DLE2020W/DLE2020R/DLE2020S/DLE2020L DLG2021CW/DLG2021CR/DLG2021CS/ DLG2021CL 1 2 3 7 4 5 7 6 1 1 POWER ON/OFF BUTTON Press to turn the dryer OFF. CONTROL PANEL FEATURES Following are instructions for .../PAUSE button to resume a cycle within 4 minutes, the dryer automatically turns off. 26 2 3 4 4 CYCLE SETTING BUTTONS Use these buttons with MANUAL DRY and TIME DRY cycles to adjust the drying time. Press again to select the desired cycle. Once the...
...DLE2150L DLG2151W/DLG2151R/DLG2151S/DLG2151L DLE2050W/DLE2050R/DLE2050S/DLE2050L DLG2051W/DLG2051R/DLG2051S/DLG2051L 7 5 7 6 DLE2020W/DLE2020R/DLE2020S/DLE2020L DLG2021CW/DLG2021CR/DLG2021CS/ DLG2021CL 1 2 3 7 4 5 7 6 1 1 POWER ON/OFF BUTTON Press to turn the dryer OFF. CONTROL PANEL FEATURES Following are instructions for .../PAUSE button to resume a cycle within 4 minutes, the dryer automatically turns off. 26 2 3 4 4 CYCLE SETTING BUTTONS Use these buttons with MANUAL DRY and TIME DRY cycles to adjust the drying time. Press again to select the desired cycle. Once the...

Owner's Manual
Page 27
...will be Off set manually Med. Time Dry time, temperature, and options can change the actual time in Min. The dryer automatically sets the dryness level and temperature ...drying time as Off plastics or rubber For general drying; High Adjustable No Heat High Adjustable 20 Adjustable 30 Adjustable 40 Adjustable Sensor Dry Cycles Manual Dry Cycles Sensor Dry cycles utilize LG...Speed Dry For small loads with every cycle. 27 Adjustable Medium 41 Perm. DLE2150W/DLE2150R/DLE2150S/DLE2150L DLG2151W/DLG2151R/DLG2151S/DLG2151L DLE2050W/DLE2050R/DLE2050S/DLE2050L DLG2051W/DLG2051R/...
...will be Off set manually Med. Time Dry time, temperature, and options can change the actual time in Min. The dryer automatically sets the dryness level and temperature ...drying time as Off plastics or rubber For general drying; High Adjustable No Heat High Adjustable 20 Adjustable 30 Adjustable 40 Adjustable Sensor Dry Cycles Manual Dry Cycles Sensor Dry cycles utilize LG...Speed Dry For small loads with every cycle. 27 Adjustable Medium 41 Perm. DLE2150W/DLE2150R/DLE2150S/DLE2150L DLG2151W/DLG2151R/DLG2151S/DLG2151L DLE2050W/DLE2050R/DLE2050S/DLE2050L DLG2051W/DLG2051R/...

Owner's Manual
Page 28
... will be Off set manually High Adjustable No Heat High Adjustable 25 Adjustable 30 Adjustable 40 Adjustable Sensor Dry Cycles Manual Dry Cycles Sensor Dry cycles utilize LG's unique dual sensor system to detect and compare the moisture level in clothes and in your garments, not...Time/ Wrinkle Anti- Adjustable Medium 41 Delicates Lingerie, sheets, blouses Normal Low 32 Adjustable For small loads Speed Dry with every cycle. 28 The dryer automatically sets the dryness level and temperature at the recommended setting for each cycle. CYCLE GUIDE The cycle guide below...
... will be Off set manually High Adjustable No Heat High Adjustable 25 Adjustable 30 Adjustable 40 Adjustable Sensor Dry Cycles Manual Dry Cycles Sensor Dry cycles utilize LG's unique dual sensor system to detect and compare the moisture level in clothes and in your garments, not...Time/ Wrinkle Anti- Adjustable Medium 41 Delicates Lingerie, sheets, blouses Normal Low 32 Adjustable For small loads Speed Dry with every cycle. 28 The dryer automatically sets the dryness level and temperature at the recommended setting for each cycle. CYCLE GUIDE The cycle guide below...

Owner's Manual
Page 29
...™ duct blockage sensing system detects and alerts you to blockages in the display, the ductwork is operating. 4 LINT FILTER INDICATOR The dryer automatically detects reduced air flow caused by a full lint filter. If all buttons are shown in the ductwork that needs to let you ...portion of the display shows which stage of the drying cycle is currently underway (CHECK FILTER, DRYING, COOLING, or WRINKLE CARE). 3 Child Lock Indicator When CHILD LOCK is set, the Child Lock indicator will appear and all bars are lit, the dryer ductwork has a blockage that reduce exhaust flow from...
...™ duct blockage sensing system detects and alerts you to blockages in the display, the ductwork is operating. 4 LINT FILTER INDICATOR The dryer automatically detects reduced air flow caused by a full lint filter. If all buttons are shown in the ductwork that needs to let you ...portion of the display shows which stage of the drying cycle is currently underway (CHECK FILTER, DRYING, COOLING, or WRINKLE CARE). 3 Child Lock Indicator When CHILD LOCK is set, the Child Lock indicator will appear and all bars are lit, the dryer ductwork has a blockage that reduce exhaust flow from...

Owner's Manual
Page 30
...button again. 5 Press the START/PAUSE button to remove lint. The indicator light on the dryer. The display will change the settings for that cycle, such as WRINKLE CARE, ANTI BACTERIAL, or DAMP DRY BEEP, by pressing the button for that option has been selected. To prevent wrinkling, remove... items from the dryer immediately after the end of the cycle. 7 Always clean the lint filter after every ...
...button again. 5 Press the START/PAUSE button to remove lint. The indicator light on the dryer. The display will change the settings for that cycle, such as WRINKLE CARE, ANTI BACTERIAL, or DAMP DRY BEEP, by pressing the button for that option has been selected. To prevent wrinkling, remove... items from the dryer immediately after the end of the cycle. 7 Always clean the lint filter after every ...
Owner's Manual
Page 31
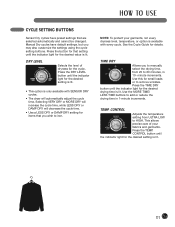
... minutes, in 1-minute increments. CONTROL button until the indicator light for the desired value is available with SENSOR DRY cycles. • The dryer will decrease the cycle time. • Use a LESS DRY or DAMP DRY setting for items that setting until the indicator light for that you wish to iron. TEMP. This allows precise...
... minutes, in 1-minute increments. CONTROL button until the indicator light for the desired value is available with SENSOR DRY cycles. • The dryer will decrease the cycle time. • Use a LESS DRY or DAMP DRY setting for items that setting until the indicator light for that you wish to iron. TEMP. This allows precise...

Owner's Manual
Page 32
...in preventing wrinkles when you to iron or hang while still slightly damp. 32 To Add Cycle Options to a Cycle: 1 Turn on the dryer and turn the cycle selector knob to select the desired cycle. 2 Use the cycle settings buttons to adjust the settings for the option you ... tumble the load periodically for details) that can only be used with delicate fabrics. The dryer will add a high heat setting to 3 hours after the selected cycle, or until the door is approximately 80% dry. Certain option buttons also feature a special function (see the following page for up to reduce...
...in preventing wrinkles when you to iron or hang while still slightly damp. 32 To Add Cycle Options to a Cycle: 1 Turn on the dryer and turn the cycle selector knob to select the desired cycle. 2 Use the cycle settings buttons to adjust the settings for the option you ... tumble the load periodically for details) that can only be used with delicate fabrics. The dryer will add a high heat setting to 3 hours after the selected cycle, or until the door is approximately 80% dry. Certain option buttons also feature a special function (see the following page for up to reduce...

Owner's Manual
Page 33
...CHILD LOCK and BEEPER ON/OFF. NOTE: You may only save these settings as a CUSTOM PROGRAM. * To Save a Custom Program: 1 Turn on the dryer and turn the beeper back on the dryer. 2 Press the CUSTOM PROGRAM button. 3 Press the START/PAUSE button to keep cycle settings from being changed while the... dryer is operating. Press and hold the CHILD LOCK button for 3 seconds to add. 4 Press and hold DAMP DRY BEEP for that you can save one custom program at a time. The lock icon will overwrite...
...CHILD LOCK and BEEPER ON/OFF. NOTE: You may only save these settings as a CUSTOM PROGRAM. * To Save a Custom Program: 1 Turn on the dryer and turn the beeper back on the dryer. 2 Press the CUSTOM PROGRAM button. 3 Press the START/PAUSE button to keep cycle settings from being changed while the... dryer is operating. Press and hold the CHILD LOCK button for 3 seconds to add. 4 Press and hold DAMP DRY BEEP for that you can save one custom program at a time. The lock icon will overwrite...

Owner's Manual
Page 34
...: Do not use steel wool or abrasive cleansers; they can damage the surface. then wipe dry. NOTE: NEVER operate the dryer without the lint filter in warm, soapy water and allow to dry thoroughly before reinstalling. REGULAR CLEANING wWARNING: To reduce the risk of fire, electric shock, or...and seal with a soft, damp cloth. Cleaning the Lint Filter Lint Filter Cleaning the Interior Wipe around the dryer and underneath it regularly. If any noticeable reduction in airflow or drying performance occurs, immediately check ductwork for lint buildup and cleaned at least once per year.
...: Do not use steel wool or abrasive cleansers; they can damage the surface. then wipe dry. NOTE: NEVER operate the dryer without the lint filter in warm, soapy water and allow to dry thoroughly before reinstalling. REGULAR CLEANING wWARNING: To reduce the risk of fire, electric shock, or...and seal with a soft, damp cloth. Cleaning the Lint Filter Lint Filter Cleaning the Interior Wipe around the dryer and underneath it regularly. If any noticeable reduction in airflow or drying performance occurs, immediately check ductwork for lint buildup and cleaned at least once per year.

Owner's Manual
Page 35
...not properly plugged in clothes after drying section below. • Divide larger loads into a grounded outlet matching the dryer's rating plate. • Reset circuit breaker or replace fuse. Adjust settings and use a shorter drying time, or use your dryer to dry only clean items, because dirty ...8226; Lint filter not cleaned properly. • Laundry not sorted properly. BEFORE CALLING FOR SERVICE Your dryer is equipped with your fabric softener. • Make sure to use SENSOR DRY cycles. • These materials can cause static buildup. If the problem is a circuit overload, have ...
...not properly plugged in clothes after drying section below. • Divide larger loads into a grounded outlet matching the dryer's rating plate. • Reset circuit breaker or replace fuse. Adjust settings and use a shorter drying time, or use your dryer to dry only clean items, because dirty ...8226; Lint filter not cleaned properly. • Laundry not sorted properly. BEFORE CALLING FOR SERVICE Your dryer is equipped with your fabric softener. • Make sure to use SENSOR DRY cycles. • These materials can cause static buildup. If the problem is a circuit overload, have ...

Owner's Manual
Page 36
... Clothes are shrinking Possible Causes • Load is not properly sorted. • Large load of heavy fabrics. • Dryer controls are displayed in this condition, but drying times may be checked/cleaned immediately to remove lint build up to 3 hours. • To avoid shrinkage, please carefully ...2 bars are not being followed. BEFORE CALLING FOR SERVICE (cont.) Problem Clothes take longer to dry because they still retain a slight amount of moisture. • Remove items from the dryer immediately at the end of the cycle, for up and other blockages. Make sure that the exhaust...
... Clothes are shrinking Possible Causes • Load is not properly sorted. • Large load of heavy fabrics. • Dryer controls are displayed in this condition, but drying times may be checked/cleaned immediately to remove lint build up to 3 hours. • To avoid shrinkage, please carefully ...2 bars are not being followed. BEFORE CALLING FOR SERVICE (cont.) Problem Clothes take longer to dry because they still retain a slight amount of moisture. • Remove items from the dryer immediately at the end of the cycle, for up and other blockages. Make sure that the exhaust...


