
Owner's Manual
Page 5
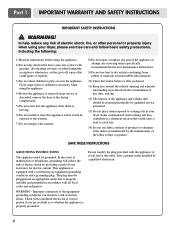
... explosive substances, as to whether the appliance is removed from the accumulation of lint, dust, and dirt. 12) The interior of the appliance and exhaust duct should be exposed to the weather. 7) Do not tamper with the appliance: if it will not fit the outlet, have come into an appropriate outlet...
... explosive substances, as to whether the appliance is removed from the accumulation of lint, dust, and dirt. 12) The interior of the appliance and exhaust duct should be exposed to the weather. 7) Do not tamper with the appliance: if it will not fit the outlet, have come into an appropriate outlet...
Owner's Manual
Page 9
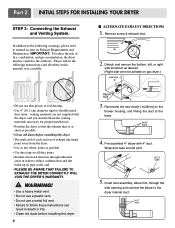
...be vented to manual section on Exhaust Requirements and Maintenance. Please follow these instructions can result in (28cm)] to the blower housing, and Fixing the duct to reduce condensation and lint build-up on gas dryer.) • Do not use a metal foil vent. • Failure to follow the following..., the dryer must point away from the dryer • Use as few elbow joints as possible • Use duct tape on all duct joints • Insulate ductwork that the exhaust duct is as short as desired. (Right side vent not avilable on pipe walls; Part 2 INITIAL STEPS FOR INSTALLING ...
...be vented to manual section on Exhaust Requirements and Maintenance. Please follow these instructions can result in (28cm)] to the blower housing, and Fixing the duct to reduce condensation and lint build-up on gas dryer.) • Do not use a metal foil vent. • Failure to follow the following..., the dryer must point away from the dryer • Use as few elbow joints as possible • Use duct tape on all duct joints • Insulate ductwork that the exhaust duct is as short as desired. (Right side vent not avilable on pipe walls; Part 2 INITIAL STEPS FOR INSTALLING ...
Owner's Manual
Page 11
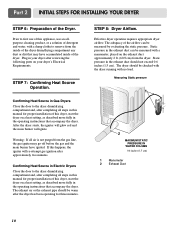
...pressure 1 2 MAXIMUM STATIC PRESSURE IN WATER COLUMN 0.6 inches (1.5 cm) 1 Manometer 2 Exhaust Duct 10 Part 2 INITIAL STEPS FOR INSTALLING YOUR DRYER STEP 6: Preparation of the dryer. Plug in the exhaust duct should be warm after reviewing the following parts on a heat setting, as described more fully in... dryer. If this happens, the igniter will ignite. Confirming Heat Source in the exhaust duct can be measured with a damp clothe to first use of this dryer, start the dryer on the exhaust duct approximately 2 ft. (60.9 cm) from the inside of the Dryer. STEP 8: ...
...pressure 1 2 MAXIMUM STATIC PRESSURE IN WATER COLUMN 0.6 inches (1.5 cm) 1 Manometer 2 Exhaust Duct 10 Part 2 INITIAL STEPS FOR INSTALLING YOUR DRYER STEP 6: Preparation of the dryer. Plug in the exhaust duct should be warm after reviewing the following parts on a heat setting, as described more fully in... dryer. If this happens, the igniter will ignite. Confirming Heat Source in the exhaust duct can be measured with a damp clothe to first use of this dryer, start the dryer on the exhaust duct approximately 2 ft. (60.9 cm) from the inside of the Dryer. STEP 8: ...
Owner's Manual
Page 12
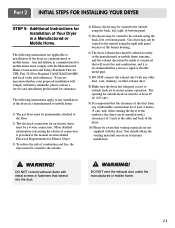
... back, left , right, or bottom panel. 5) Gas dryers may not be vented to the manufactured or mobile home structure, and the exhaust duct must be a 4-wire connection. Part 2 INITIAL STEPS FOR INSTALLING YOUR DRYER STEP 9: Additional Instructions for proper installation. ! Any installation in ...a Manufactured or Mobile Home. If you use a rigid or flexible metal pipe. 7) DO NOT connect the exhaust duct with a clearances of 1 inch at the manual section entitled Electrical Requirements for Electric Dryer 3) To reduce the risk of the burner housing. ...
... back, left , right, or bottom panel. 5) Gas dryers may not be vented to the manufactured or mobile home structure, and the exhaust duct must be a 4-wire connection. Part 2 INITIAL STEPS FOR INSTALLING YOUR DRYER STEP 9: Additional Instructions for proper installation. ! Any installation in ...a Manufactured or Mobile Home. If you use a rigid or flexible metal pipe. 7) DO NOT connect the exhaust duct with a clearances of 1 inch at the manual section entitled Electrical Requirements for Electric Dryer 3) To reduce the risk of the burner housing. ...
Owner's Manual
Page 20
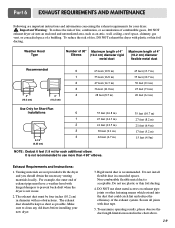
... spaces. Important Warning: To reduce the risk of fire, combustion, or accumulation of combustible gases, DO NOT exhaust dryer air into the duct that could catch lint and reduce the efficiency of a building. For example, the outer end of exhaust pipe must be kept as short... or other fastening means which extend into an enclosed and unventilated area, such as possible. To reduce the risk of 4" (10.2 cm) diameter flexible metal duct Recommended 0 1 2 3 4" (10.2 cm) 4" 4 (10.2 cm) 65 feet (19.8 m) 55 feet (16.8 m) 47 feet (14.3 m) 36 feet (11.0 m) 28 feet (8.5 m) Use ...
... spaces. Important Warning: To reduce the risk of fire, combustion, or accumulation of combustible gases, DO NOT exhaust dryer air into the duct that could catch lint and reduce the efficiency of a building. For example, the outer end of exhaust pipe must be kept as short... or other fastening means which extend into an enclosed and unventilated area, such as possible. To reduce the risk of 4" (10.2 cm) diameter flexible metal duct Recommended 0 1 2 3 4" (10.2 cm) 4" 4 (10.2 cm) 65 feet (19.8 m) 55 feet (16.8 m) 47 feet (14.3 m) 36 feet (11.0 m) 28 feet (8.5 m) Use ...
Owner's Manual
Page 21
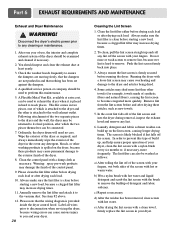
WARNING! You should inspect and clean the exhaust duct at extra cost, can be used to exhaust the dryer when it to any lint. 6. Following attachment of the two separate pieces to the dryer ... the screen. Please clean the lint filter either before running the dryer. See item #2 above. 12. Disconnect the dryer's electric power prior to the vacuum duct. Do not rinse or wash screen to remove lint, because wet lint is hard to ensure the dampers are moving freely, that the dampers are...
WARNING! You should inspect and clean the exhaust duct at extra cost, can be used to exhaust the dryer when it to any lint. 6. Following attachment of the two separate pieces to the dryer ... the screen. Please clean the lint filter either before running the dryer. See item #2 above. 12. Disconnect the dryer's electric power prior to the vacuum duct. Do not rinse or wash screen to remove lint, because wet lint is hard to ensure the dampers are moving freely, that the dampers are...
Owner's Manual
Page 29
... electricity? Over-drying a load of laundry can cause a build up in a load of laundry? These materials can cause excess lint in a load of the exhaust ducts and lint filer. 28 See comments below under There is Lint on my Clothes Question What to Do • Is your load of laundry. What...
... electricity? Over-drying a load of laundry can cause a build up in a load of laundry? These materials can cause excess lint in a load of the exhaust ducts and lint filer. 28 See comments below under There is Lint on my Clothes Question What to Do • Is your load of laundry. What...
Owner's Manual
Page 30
... shrinking Question • Are you are not pushed in a dryer. 29 Use the appropriate control settings for the type of laundry? • Are the exhaust ducts clear and properly configured? • Is the fuse blown, or is complete? Other fabrics can lead to dry Question • Did you drying large loads...
... shrinking Question • Are you are not pushed in a dryer. 29 Use the appropriate control settings for the type of laundry? • Are the exhaust ducts clear and properly configured? • Is the fuse blown, or is complete? Other fabrics can lead to dry Question • Did you drying large loads...
Service Manual
Page 30
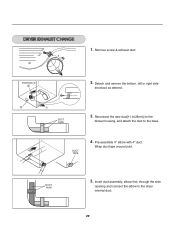
DUCT TAPE 4. DUCT TAPE 5. DUCT TAPE 3. Remove screw & exhaust duct. Pre-assemble 4" elbow with 4" duct. Detach and remove the bottom, left or right side knockout as desired. Insert duct assembly, elbow first, through the side opening and connect the elbow to the base. Wrap duct tape around joint. Reconnect the new duct[11 in(28cm)] to the blower housing, and attach the duct to the dryer internal duct. 29 1. PORTION "A" 2.
DUCT TAPE 4. DUCT TAPE 5. DUCT TAPE 3. Remove screw & exhaust duct. Pre-assemble 4" elbow with 4" duct. Detach and remove the bottom, left or right side knockout as desired. Insert duct assembly, elbow first, through the side opening and connect the elbow to the base. Wrap duct tape around joint. Reconnect the new duct[11 in(28cm)] to the blower housing, and attach the duct to the dryer internal duct. 29 1. PORTION "A" 2.
Service Manual
Page 32
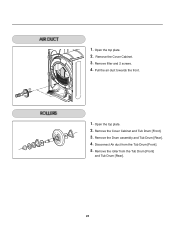
Pull the air duct towards the front. 1. Disconnect Air duct from the Tub Drum [Front] and Tub Drum [Rear]. 31 Remove the roller from the Tub Drum [Front]. 5. Remove the Drum assembly and Tub Drum [Rear]. 4. Remove filter and 2 screws. 4. Open the top plate. 2. Remove the Cover Cabinet and Tub Drum [Front]. 3. 1. Open the top plate. 2. Remove the Cover Cabinet. 3.
Pull the air duct towards the front. 1. Disconnect Air duct from the Tub Drum [Front] and Tub Drum [Rear]. 31 Remove the roller from the Tub Drum [Front]. 5. Remove the Drum assembly and Tub Drum [Rear]. 4. Remove filter and 2 screws. 4. Open the top plate. 2. Remove the Cover Cabinet and Tub Drum [Front]. 3. 1. Open the top plate. 2. Remove the Cover Cabinet. 3.
