
Owners Manual
Page 4
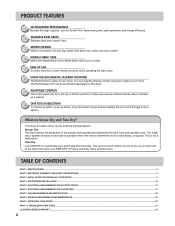
... INSTALLING YOUR DRYER ...7 PART 4. ELECTRICAL REQUIREMENTS FOR GAS DRYERS...21 PART 7. TROUBLESHOOTING GUIDE...31 LG DRYER LIMITED WARRANTY...34 2 You can be purchased separately for heavy and bulky items and thick work. PRODUCT FEATURES 1 OUTSTANDING PERFORMANCE Besides the large capacity, you like them at the end of the cycle. Time Dry Use TIME DRY to scroll through a list of the laundry and automatically determines the heat level and operation time. Your dryer provides sensor drying and time drying programs. Sensor Dry The dryer...
... INSTALLING YOUR DRYER ...7 PART 4. ELECTRICAL REQUIREMENTS FOR GAS DRYERS...21 PART 7. TROUBLESHOOTING GUIDE...31 LG DRYER LIMITED WARRANTY...34 2 You can be purchased separately for heavy and bulky items and thick work. PRODUCT FEATURES 1 OUTSTANDING PERFORMANCE Besides the large capacity, you like them at the end of the cycle. Time Dry Use TIME DRY to scroll through a list of the laundry and automatically determines the heat level and operation time. Your dryer provides sensor drying and time drying programs. Sensor Dry The dryer...
Owners Manual
Page 6
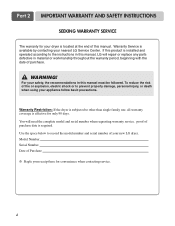
... is installed and operated according to other than single family use, all warranty coverage is required. WARNING! You will repair or replace any parts defective in this manual. Serial Number. Part 2 IMPORTANT WARRANTY AND SAFETY INSTRUCTIONS SEEKING WARRANTY SERVICE The warranty for your dryer is located at the end of this manual must be followed. Warranty Restriction: If the dryer is subjected to the instructions in this manual, LG will need the complete model and serial number when requesting warranty service...
... is installed and operated according to other than single family use, all warranty coverage is required. WARNING! You will repair or replace any parts defective in this manual. Serial Number. Part 2 IMPORTANT WARRANTY AND SAFETY INSTRUCTIONS SEEKING WARRANTY SERVICE The warranty for your dryer is located at the end of this manual must be followed. Warranty Restriction: If the dryer is subjected to the instructions in this manual, LG will need the complete model and serial number when requesting warranty service...
Owners Manual
Page 7
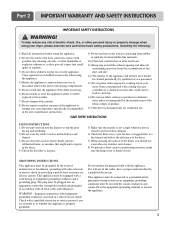
...) Clean lint screen before or after each load. 11) Keep area around the exhaust opening and adjacent surrounding areas free from service or discarded, remove the door to the drying compartment. 5) Do not reach into the drum to a grounded metal, permanent wiring system or an equipment-grounding conductor must be run with controls. 8) Do not repair or replace any part of the appliance or attempt any risk of electric...
...) Clean lint screen before or after each load. 11) Keep area around the exhaust opening and adjacent surrounding areas free from service or discarded, remove the door to the drying compartment. 5) Do not reach into the drum to a grounded metal, permanent wiring system or an equipment-grounding conductor must be run with controls. 8) Do not repair or replace any part of the appliance or attempt any risk of electric...
Owners Manual
Page 8
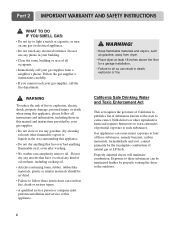
... fire department. ! Gas appliances can be air dried. • Failure to such substances. Part 2 IMPORTANT WARRANTY AND SAFETY INSTRUCTIONS ! Do not use any gasoline, dry-cleaning solvents other reproductive harm and requires businesses to four of these instructions can result in fire, death or serious injury. • A qualified service person or company must perform installation and service of oil on any gas or electrical appliance. •...
... fire department. ! Gas appliances can be air dried. • Failure to such substances. Part 2 IMPORTANT WARRANTY AND SAFETY INSTRUCTIONS ! Do not use any gasoline, dry-cleaning solvents other reproductive harm and requires businesses to four of these instructions can result in fire, death or serious injury. • A qualified service person or company must perform installation and service of oil on any gas or electrical appliance. •...
Owners Manual
Page 11
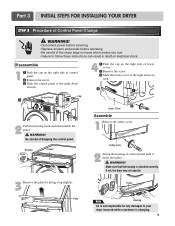
... inch. ⚨ ⚦ Cap ⚧ Lower, Cover Assemble 1 Remove the safety cover. WARNING! • Disconnect power before servicing. • Replace all parts and panels before operating. • Be careful of the sharp edge on the right side of lower cover. ⚧ Remove the screw. ⚨ Slide the lower cover to follow these instructions can result in death or electrical shock. Housing Hook Frame 4 ⚦ Push the cap on...
... inch. ⚨ ⚦ Cap ⚧ Lower, Cover Assemble 1 Remove the safety cover. WARNING! • Disconnect power before servicing. • Replace all parts and panels before operating. • Be careful of the sharp edge on the right side of lower cover. ⚧ Remove the screw. ⚨ Slide the lower cover to follow these instructions can result in death or electrical shock. Housing Hook Frame 4 ⚦ Push the cap on...
Owners Manual
Page 12
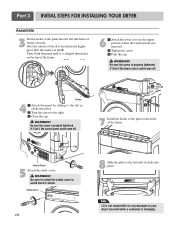
... left side holes of frame correctly. Part 3 INITIAL STEPS FOR INSTALLING YOUR DRYER Assemble 3 Put the hooks of the panel into the left in clicks into place. If it isn't, the control panel could come off . Safety Cover 10 ⚦ ⚨ Cap ⚧ 7 Install the hooks of the plate in the upper position where the control panel was removed. ⚧ Tighten the screw. ⚨ Push...
... left side holes of frame correctly. Part 3 INITIAL STEPS FOR INSTALLING YOUR DRYER Assemble 3 Put the hooks of the panel into the left in clicks into place. If it isn't, the control panel could come off . Safety Cover 10 ⚦ ⚨ Cap ⚧ 7 Install the hooks of the plate in the upper position where the control panel was removed. ⚧ Tighten the screw. ⚨ Push...
Owners Manual
Page 13
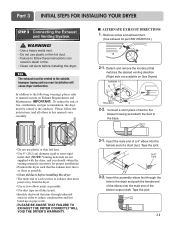
... incorrect installation will cause dryer malfunction. Part 3 INITIAL STEPS FOR INSTALLING YOUR DRYER STEP 3 Connecting the Exhaust and Venting System. ! In addition to the following warnings, please refer to follow the instructions (and all duct joints. • Insulate ductwork that matches the desired venting direction (Right side not available on Exhaust Requirements and Maintenance. Detach and remove the knockout that runs through the hole in this dryer. Remove screw and exhaust duct. (Use exhaust kit part...
... incorrect installation will cause dryer malfunction. Part 3 INITIAL STEPS FOR INSTALLING YOUR DRYER STEP 3 Connecting the Exhaust and Venting System. ! In addition to the following warnings, please refer to follow the instructions (and all duct joints. • Insulate ductwork that matches the desired venting direction (Right side not available on Exhaust Requirements and Maintenance. Detach and remove the knockout that runs through the hole in this dryer. Remove screw and exhaust duct. (Use exhaust kit part...

Owners Manual
Page 14
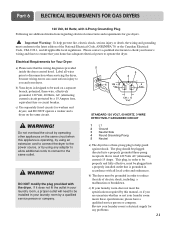
... check all electrical connections • See installation instructions for Natural Gas with LNG orifice will not allow grounding of the burner BTU rating indicated on the dryer. If needed at this manual's section entitled Gas Requirements and Instructions. 12 STEP 5 Electrical Plug Connections Following are required to Part 7 (page 20) 5. Turn on your laundry room's gas supply. For instance, using LNG with a non-corrosive leak detection fluid. Use only a new UL listed No. 10 (copper wire...
... check all electrical connections • See installation instructions for Natural Gas with LNG orifice will not allow grounding of the burner BTU rating indicated on the dryer. If needed at this manual's section entitled Gas Requirements and Instructions. 12 STEP 5 Electrical Plug Connections Following are required to Part 7 (page 20) 5. Turn on your laundry room's gas supply. For instance, using LNG with a non-corrosive leak detection fluid. Use only a new UL listed No. 10 (copper wire...

Owners Manual
Page 15
... gas line, the gas igniter may have ignited. The exhaust air or the exhaust pipe should not exceed 5/8 inches (1.5 cm). Plug-in this manual for three minutes. Effective dryer operation requires appropriate dryer airflow. After the dryer starts, the igniter will glow red and the main burner will re-attempt gas ignition after reviewing the following parts on a heat setting. Part 3 INITIAL STEPS FOR INSTALLING YOUR DRYER STEP 6 Preparation of this dryer, start the dryer...
... gas line, the gas igniter may have ignited. The exhaust air or the exhaust pipe should not exceed 5/8 inches (1.5 cm). Plug-in this manual for three minutes. Effective dryer operation requires appropriate dryer airflow. After the dryer starts, the igniter will glow red and the main burner will re-attempt gas ignition after reviewing the following parts on a heat setting. Part 3 INITIAL STEPS FOR INSTALLING YOUR DRYER STEP 6 Preparation of this dryer, start the dryer...
Owners Manual
Page 16
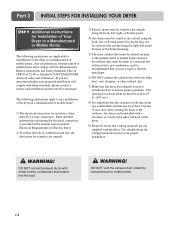
... extend into the duct. ! DO NOT connect exhaust ducts with these standards, please contact a service and installation professional for assistance. WARNING! DO NOT vent the exhaust duct under the manufactured or mobile home. 14 The following instructions are not supplied with the dryer. The opening for outside using the back, left , right, or bottom panel. 4) Gas dryers may not be vented to the outside fresh air must be aware...
... extend into the duct. ! DO NOT connect exhaust ducts with these standards, please contact a service and installation professional for assistance. WARNING! DO NOT vent the exhaust duct under the manufactured or mobile home. 14 The following instructions are not supplied with the dryer. The opening for outside using the back, left , right, or bottom panel. 4) Gas dryers may not be vented to the outside fresh air must be aware...
Owners Manual
Page 19
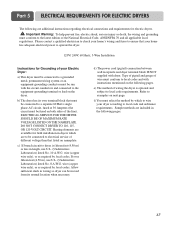
... be fused on next page. d) The power cord (pigtail) connection between wall receptacle and dryer terminal block IS NOT supplied with instructions mentioned on the dryer. Part 5 ELECTRICAL REQUIREMENTS FOR ELECTRIC DRYERS The following are included in the following pages. wire (copper wire only), or as required by local codes. ELECTRICAL SERVICE FOR THE DRYER SHOULD BE OF MAXIMUM RATE VOLTAGE LISTED ON THE NAMEPLATE. Type of pigtail and gauge of the National Electrical Code, ANSI...
... be fused on next page. d) The power cord (pigtail) connection between wall receptacle and dryer terminal block IS NOT supplied with instructions mentioned on the dryer. Part 5 ELECTRICAL REQUIREMENTS FOR ELECTRIC DRYERS The following are included in the following pages. wire (copper wire only), or as required by local codes. ELECTRICAL SERVICE FOR THE DRYER SHOULD BE OF MAXIMUM RATE VOLTAGE LISTED ON THE NAMEPLATE. Type of pigtail and gauge of the National Electrical Code, ANSI...
Owners Manual
Page 23
... servicing the dryer, because wiring errors can cause serious injury to help prevent fire, electric shock, serious injury or death, the wiring and grounding must be plugged directed into a properly installed outlet that the wiring diagram is grounded in order to the latest edition of electric shock, including a malfunction or breakdown. c) Use separately fused circuits for Your Dryer: a) Please note that is provided inside the dryer control hood. Review your dryer...
... servicing the dryer, because wiring errors can cause serious injury to help prevent fire, electric shock, serious injury or death, the wiring and grounding must be plugged directed into a properly installed outlet that the wiring diagram is grounded in order to the latest edition of electric shock, including a malfunction or breakdown. c) Use separately fused circuits for Your Dryer: a) Please note that is provided inside the dryer control hood. Review your dryer...
Owners Manual
Page 24
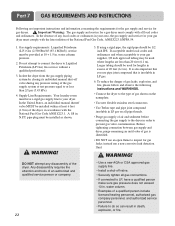
... installed as shown. ! water column. • Examples of the dryer. Part 7 GAS REQUIREMENTS AND INSTRUCTIONS Following are important instructions and information concerning the requirements for the gas supply and service for a gas dryer must be used where lengths are less than 2/1 psi (3.45 kPa). 4. water column pressure. 2. Supply Line Requirements. It is also important that you use a non-corrosive leak detection fluid. ! In the United States, an individual manual shutoff valve...
... installed as shown. ! water column. • Examples of the dryer. Part 7 GAS REQUIREMENTS AND INSTRUCTIONS Following are important instructions and information concerning the requirements for the gas supply and service for a gas dryer must be used where lengths are less than 2/1 psi (3.45 kPa). 4. water column pressure. 2. Supply Line Requirements. It is also important that you use a non-corrosive leak detection fluid. ! In the United States, an individual manual shutoff valve...

Owners Manual
Page 25
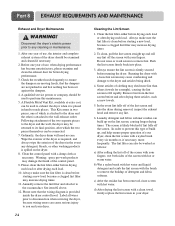
..., or accumulation of combustible gases, DO NOT exhaust dryer air into the duct that could catch lint and reduce the efficiency of a building. Venting materials are important instructions and information concerning the exhaust requirements for each additional elbow. In special installations when it is not recommended to clean any old ducts before installing your dryer. ! Part 8 EXHAUST REQUIREMENTS AND MAINTENANCE Following are not provided with plastic or thin...
..., or accumulation of combustible gases, DO NOT exhaust dryer air into the duct that could catch lint and reduce the efficiency of a building. Venting materials are important instructions and information concerning the exhaust requirements for each additional elbow. In special installations when it is not recommended to clean any old ducts before installing your dryer. ! Part 8 EXHAUST REQUIREMENTS AND MAINTENANCE Following are not provided with plastic or thin...
Owners Manual
Page 26
... Kit comes in two pieces, one year of the control panel. 9. Please note that nothing has been set against the dampers. 4. Some articles of clothing may damage the finish of use , the interior and complete exhaust system of the dryer should be examined and cleaned if necessary. 2. In the event lint falls off the screen with hot or warm water. Please clean the lint filter either before drying...
... Kit comes in two pieces, one year of the control panel. 9. Please note that nothing has been set against the dampers. 4. Some articles of clothing may damage the finish of use , the interior and complete exhaust system of the dryer should be examined and cleaned if necessary. 2. In the event lint falls off the screen with hot or warm water. Please clean the lint filter either before drying...
Owners Manual
Page 29
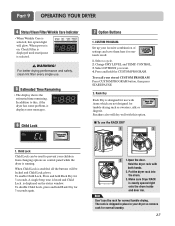
.... Part 9 OPERATING YOUR DRYER 4 Status/Clean Filter/Wrinkle Care Indicator • When Wrinkle Care is selected, this option light will dry well with this , if the dryer has some problem, it displays error messages. 6 Child Lock 7 Option Buttons 1. Select a cycle. 2. Set up your dryer so remove rack for normal laundry. 27 Make sure Dryer RACK is selected. ! CONTROL. 3. To recall your children from changing options on the status window. Put the dryer rack into the drum. 3. Rack Dry Rack Dry is running. To enable Child Lock, Press...
.... Part 9 OPERATING YOUR DRYER 4 Status/Clean Filter/Wrinkle Care Indicator • When Wrinkle Care is selected, this option light will dry well with this , if the dryer has some problem, it displays error messages. 6 Child Lock 7 Option Buttons 1. Select a cycle. 2. Set up your dryer so remove rack for normal laundry. 27 Make sure Dryer RACK is selected. ! CONTROL. 3. To recall your children from changing options on the status window. Put the dryer rack into the drum. 3. Rack Dry Rack Dry is running. To enable Child Lock, Press...
Owners Manual
Page 31
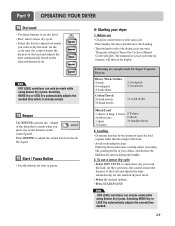
... handkerchiefs 2. As the cycle runs, the control senses the dryness of the load and adjusts the time automatically based on the control panel. Note DRY LEVEL selections can only be made while using Sensor Dry Cycles. See Loading. • Turn the knob to adjust how dry you press any of the buttons on the selected dryness level. Part 9 OPERATING YOUR DRYER 10 Dry Level • Use these instructions can help reduce your...
... handkerchiefs 2. As the cycle runs, the control senses the dryness of the load and adjusts the time automatically based on the control panel. Note DRY LEVEL selections can only be made while using Sensor Dry Cycles. See Loading. • Turn the knob to adjust how dry you press any of the buttons on the selected dryness level. Part 9 OPERATING YOUR DRYER 10 Dry Level • Use these instructions can help reduce your...
Owners Manual
Page 33
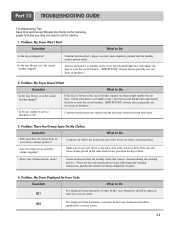
... replaced tE1 and call for service. 1. Part 10 TROUBLESHOOTING GUIDE Troubleshooting Tips Save time and money! Check your home's or laundry room's fuse box/circuit breaker box and replace the fuse or reset the circuit breaker. (IMPORTANT: electric dryers generally use your dryer to Do • Is the dryer plugged in the dryer drum. • Were your home's or laundry room's fuse box/circuit breaker box and replace the fuse or reset the circuit breaker. (IMPORTANT: electric dryers generally use two fuses or breakers.) • Is the gas supply or service blocked...
... replaced tE1 and call for service. 1. Part 10 TROUBLESHOOTING GUIDE Troubleshooting Tips Save time and money! Check your home's or laundry room's fuse box/circuit breaker box and replace the fuse or reset the circuit breaker. (IMPORTANT: electric dryers generally use your dryer to Do • Is the dryer plugged in the dryer drum. • Were your home's or laundry room's fuse box/circuit breaker box and replace the fuse or reset the circuit breaker. (IMPORTANT: electric dryers generally use two fuses or breakers.) • Is the gas supply or service blocked...
Owners Manual
Page 34
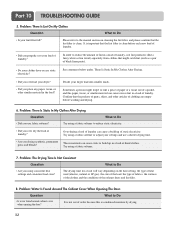
... exhaust ducts and lint filer. 8. Try using a fabric softener. 7. It is important that the lint filter is clean before washing and drying. 6. Problem: The Drying Time Is Not Consistent Question What to Do • Is water found around cabinet cover when opening the door? Part 10 TROUBLESHOOTING GUIDE 5. Problem: Water Is Found Around The Cabinet Cover When Opening The Door. These materials can cause a build up in the load? There Is Static In My Clothes...
... exhaust ducts and lint filer. 8. Try using a fabric softener. 7. It is important that the lint filter is clean before washing and drying. 6. Problem: The Drying Time Is Not Consistent Question What to Do • Is water found around cabinet cover when opening the door? Part 10 TROUBLESHOOTING GUIDE 5. Problem: Water Is Found Around The Cabinet Cover When Opening The Door. These materials can cause a build up in the load? There Is Static In My Clothes...

Owners Manual
Page 35
... action. 10. Check your home's or laundry room's fuse box/circuit breaker box and replace the fuse or reset the circuit breaker. (IMPORTANT: electric dryers generally use instructions for your laundry from the dryer soon after the drying cycle ends and either hang or fold the items. 11. Problem: My Clothes Are Wrinkled Question • Are you overload your larger load into smaller loads of RLM & PLC modem. 33 Part 10 TROUBLESHOOTING GUIDE 9. Separate heavy...
... action. 10. Check your home's or laundry room's fuse box/circuit breaker box and replace the fuse or reset the circuit breaker. (IMPORTANT: electric dryers generally use instructions for your laundry from the dryer soon after the drying cycle ends and either hang or fold the items. 11. Problem: My Clothes Are Wrinkled Question • Are you overload your larger load into smaller loads of RLM & PLC modem. 33 Part 10 TROUBLESHOOTING GUIDE 9. Separate heavy...


