
Owners Manual
Page 4
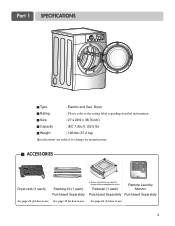
... Dryer rack (1 each) Stacking kit (1 each ) Remote Laundry Monitor Purchased Separately Purchased Separately See page 26 for how to the rating label regarding detailed information. Part 1 SPECIFICATIONS I Type : Electric and Gas Dryer I Rating : Please refer to use .
... Dryer rack (1 each) Stacking kit (1 each ) Remote Laundry Monitor Purchased Separately Purchased Separately See page 26 for how to the rating label regarding detailed information. Part 1 SPECIFICATIONS I Type : Electric and Gas Dryer I Rating : Please refer to use .
Owners Manual
Page 5
If this product is installed and operated per this manual, LG will need the complete Model and Serial Number when requesting Warranty Service. Proof of Purchase. ! You will repair or replace any parts defective in this manual. Warranty Restriction: If the dryer is subjected to other than ...private family use, all warranty coverage is effective for your Dryer is available by contacting your nearest LG Service Center. Model No. Use the space...
If this product is installed and operated per this manual, LG will need the complete Model and Serial Number when requesting Warranty Service. Proof of Purchase. ! You will repair or replace any parts defective in this manual. Warranty Restriction: If the dryer is subjected to other than ...private family use, all warranty coverage is effective for your Dryer is available by contacting your nearest LG Service Center. Model No. Use the space...
Owners Manual
Page 6
... using the appliance. 2) Do not dry articles that is properly installed and grounded in accordance with controls. 8) Do not repair or replace any part of the appliance or attempt any risk of the appliance and exhaust duct should be grounded. Improper connection of the equipmentgrounding conductor can result in... an appropriate outlet that have a proper outlet installed by qualified service personnel. 13) Do not place items exposed to play on the appliance. 5 Part 2 IMPORTANT WARRANTY AND SAFETY INSTRUCTIONS IMPORTANT SAFETY INSTRUCTIONS ! In the event of electric shock.
... using the appliance. 2) Do not dry articles that is properly installed and grounded in accordance with controls. 8) Do not repair or replace any part of the appliance or attempt any risk of the appliance and exhaust duct should be grounded. Improper connection of the equipmentgrounding conductor can result in... an appropriate outlet that have a proper outlet installed by qualified service personnel. 13) Do not place items exposed to play on the appliance. 5 Part 2 IMPORTANT WARRANTY AND SAFETY INSTRUCTIONS IMPORTANT SAFETY INSTRUCTIONS ! In the event of electric shock.
Owners Manual
Page 7
Part 2 IMPORTANT WARRANTY AND SAFETY INSTRUCTIONS ! WARNING To reduce the risk of potential exposure to such substances. WARNING! • Keep flammable materials and vapors, such as ...
Part 2 IMPORTANT WARRANTY AND SAFETY INSTRUCTIONS ! WARNING To reduce the risk of potential exposure to such substances. WARNING! • Keep flammable materials and vapors, such as ...
Owners Manual
Page 8
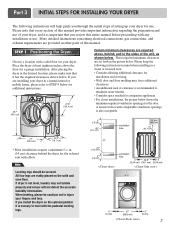
... the dryer at least eighteen inches above , behind the dryer for a garage installation. All four legs are provided in other parts of setting up your dryer for use. It is important that you through the initial steps of this manual. ventilation hole ventilation... hole 7 If you are installing your dryer, and it has the required clearances shown below. Part 3 INITIAL STEPS FOR INSTALLING YOUR DRYER The following instructions in mind when installing in a closet or recessed area: • Consider allowing additional...
... the dryer at least eighteen inches above , behind the dryer for a garage installation. All four legs are provided in other parts of setting up your dryer for use. It is important that you through the initial steps of this manual. ventilation hole ventilation... hole 7 If you are installing your dryer, and it has the required clearances shown below. Part 3 INITIAL STEPS FOR INSTALLING YOUR DRYER The following instructions in mind when installing in a closet or recessed area: • Consider allowing additional...
Owners Manual
Page 9
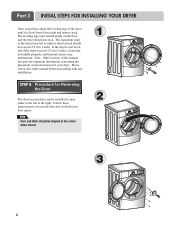
... of the dryer until it is not level, and if the slope exceeds 2.5 cm (1 inch), a load may not tumble properly and internal sensors may malfunction. Part 3 INITIAL STEPS FOR INSTALLING YOUR DRYER Once in which your dryer can be aligned at the center when closed. 1 2 3 8 Follow these instructions to the left...
... of the dryer until it is not level, and if the slope exceeds 2.5 cm (1 inch), a load may not tumble properly and internal sensors may malfunction. Part 3 INITIAL STEPS FOR INSTALLING YOUR DRYER Once in which your dryer can be aligned at the center when closed. 1 2 3 8 Follow these instructions to the left...
Owners Manual
Page 10
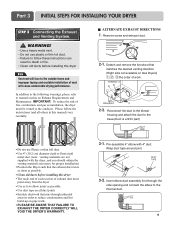
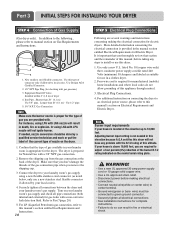
...In addition to the following warnings, please refer to the outdoors. Detach and remove the knockout that the exhaust duct run is a SVC part) • Do not use plastic or thin foil duct. • Failure to follow the instructions (and all duct joints • ...the side opening and connect the elbow to reduce condensation and lint build-up on Exhaust Requirements and Maintenance. Wrap duct tape around joint. 3-2. Part 3 INITIAL STEPS FOR INSTALLING YOUR DRYER STEP 3 Connecting the Exhaust and Venting System. ! I ALTERNATE EXHAUST DIRECTIONS 1. IMPORTANT: To reduce the...
...In addition to the following warnings, please refer to the outdoors. Detach and remove the knockout that the exhaust duct run is a SVC part) • Do not use plastic or thin foil duct. • Failure to follow the instructions (and all duct joints • ...the side opening and connect the elbow to reduce condensation and lint build-up on Exhaust Requirements and Maintenance. Wrap duct tape around joint. 3-2. Part 3 INITIAL STEPS FOR INSTALLING YOUR DRYER STEP 3 Connecting the Exhaust and Venting System. ! I ALTERNATE EXHAUST DIRECTIONS 1. IMPORTANT: To reduce the...
Owners Manual
Page 11
... Plug Connections. 4. Installed within 6' (1.8 m) of Gas Supply (Gas dryer only). Remove the shipping cap from the gas connection at this dryer will not ignite burner. Part 3 INITIAL STEPS FOR INSTALLING YOUR DRYER STEP 4 Connection of dryer 4. In addition to the following, please refer to...
... Plug Connections. 4. Installed within 6' (1.8 m) of Gas Supply (Gas dryer only). Remove the shipping cap from the gas connection at this dryer will not ignite burner. Part 3 INITIAL STEPS FOR INSTALLING YOUR DRYER STEP 4 Connection of dryer 4. In addition to the following, please refer to...
Owners Manual
Page 12
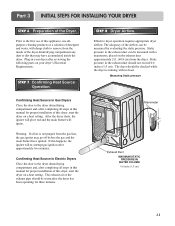
... Close the door to the first use allpurpose cleaning products or a solution of the Dryer. Effective dryer operation requires appropriate dryer airflow. STEP 8 Dryer Airflow. Part 3 INITIAL STEPS FOR INSTALLING YOUR DRYER STEP 6 Preparation of detergent and water, with a manometer, placed on the exhaust duct approximately 2 ft. (60.9 cm) from the... off before the gas and the main burner have accumulated inside the dryer. Prior to the dryer drum/drying compartment and, after reviewing the following parts on your dryer's Electrical Requirements.
... Close the door to the first use allpurpose cleaning products or a solution of the Dryer. Effective dryer operation requires appropriate dryer airflow. STEP 8 Dryer Airflow. Part 3 INITIAL STEPS FOR INSTALLING YOUR DRYER STEP 6 Preparation of detergent and water, with a manometer, placed on the exhaust duct approximately 2 ft. (60.9 cm) from the... off before the gas and the main burner have accumulated inside the dryer. Prior to the dryer drum/drying compartment and, after reviewing the following parts on your dryer's Electrical Requirements.

Owners Manual
Page 13
...connect the exhaust duct with metal screws or fasteners that will comply with the Manufactured Home Construction and Safety Standards Title 24 CFR, Part 32-80 or Standard CAN/CSA0Z240 MH and local codes and ordinances. You should obtain the venting materials necessary for an electric dryer...whether your proposed installation will resist fire and combustion, and it is important that venting materials are not supplied with the dryer. Part 3 INITIAL STEPS FOR INSTALLING YOUR DRYER STEP 9 Additional Instructions for assistance. DO NOT vent the exhaust duct under the manufactured or mobile...
...connect the exhaust duct with metal screws or fasteners that will comply with the Manufactured Home Construction and Safety Standards Title 24 CFR, Part 32-80 or Standard CAN/CSA0Z240 MH and local codes and ordinances. You should obtain the venting materials necessary for an electric dryer...whether your proposed installation will resist fire and combustion, and it is important that venting materials are not supplied with the dryer. Part 3 INITIAL STEPS FOR INSTALLING YOUR DRYER STEP 9 Additional Instructions for assistance. DO NOT vent the exhaust duct under the manufactured or mobile...

Owners Manual
Page 14
be performed by 2 or more experienced service personnel. 4 Secure stacking kit side bracket to the washer with a gas dryer in the picture. Part 4 ACCESSORIES INSTALLATION Stacking Kit Installation Instructions To ensure safe and secure installation, please observe the instructions below. ! This procedure should be careful not to the ...
be performed by 2 or more experienced service personnel. 4 Secure stacking kit side bracket to the washer with a gas dryer in the picture. Part 4 ACCESSORIES INSTALLATION Stacking Kit Installation Instructions To ensure safe and secure installation, please observe the instructions below. ! This procedure should be careful not to the ...

Owners Manual
Page 15
Part 4 ACCESSORIES INSTALLATION Pedestal Installation Instructions 1 4 2 1) Shut off Gas 2) Unplug Power Cord 3) Disconnect Gas Line from Dryer 4) Pull away and loosen vent clamp. Disconnect venting. for washer/ combo for dryer 5 6 3 for dryer for washer/ combo 7 14
Part 4 ACCESSORIES INSTALLATION Pedestal Installation Instructions 1 4 2 1) Shut off Gas 2) Unplug Power Cord 3) Disconnect Gas Line from Dryer 4) Pull away and loosen vent clamp. Disconnect venting. for washer/ combo for dryer 5 6 3 for dryer for washer/ combo 7 14

Owners Manual
Page 16
... electric dryers. ! b) The dryer has its normal location when necessary. ELECTRICAL SERVICE FOR THE DRYER SHOULD BE OF MAXIMUM RATE VOLTAGE LISTED ON THE NAMEPLATE. Part 5 ELECTRICAL REQUIREMENTS FOR ELECTRIC DRYERS Following are included in the following pages. d) The power cord (pigtail) connection between wall receptacle and dryer terminal block IS...
... electric dryers. ! b) The dryer has its normal location when necessary. ELECTRICAL SERVICE FOR THE DRYER SHOULD BE OF MAXIMUM RATE VOLTAGE LISTED ON THE NAMEPLATE. Part 5 ELECTRICAL REQUIREMENTS FOR ELECTRIC DRYERS Following are included in the following pages. d) The power cord (pigtail) connection between wall receptacle and dryer terminal block IS...
Owners Manual
Page 17
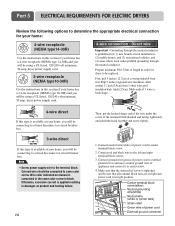
.... Connect ground wire(green) of power cord to external ground screw and move neutral ground wire of appliance and connect it to the terminal block. Part 5 ELECTRICAL REQUIREMENTS FOR ELECTRIC DRYERS Review the following options to determine the appropriate electrical connection for your home: 4-wire receptacle (NEMA type14-30R) Use the...
.... Connect ground wire(green) of power cord to external ground screw and move neutral ground wire of appliance and connect it to the terminal block. Part 5 ELECTRICAL REQUIREMENTS FOR ELECTRIC DRYERS Review the following options to determine the appropriate electrical connection for your home: 4-wire receptacle (NEMA type14-30R) Use the...

Owners Manual
Page 18
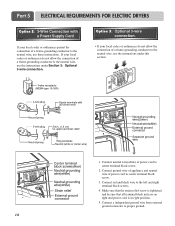
Part 5 ELECTRICAL REQUIREMENTS FOR ELECTRIC DRYERS 3-wire connection : Direct wire Important : Grounding through the neutral conductor. Then, put the hooked shape end of the wire under ...
Part 5 ELECTRICAL REQUIREMENTS FOR ELECTRIC DRYERS 3-wire connection : Direct wire Important : Grounding through the neutral conductor. Then, put the hooked shape end of the wire under ...
Owners Manual
Page 19
Connect ground wire of appliance and neutral wire of power cord to center terminal block screw. 2. Connect red and black wire to proper ground. 18 Part 5 ELECTRICAL REQUIREMENTS FOR ELECTRIC DRYERS Option 2: 3-Wire Connection with a Power Supply Cord lf your local codes or ordinances do not allow the connection of a frame-...
Connect ground wire of appliance and neutral wire of power cord to center terminal block screw. 2. Connect red and black wire to proper ground. 18 Part 5 ELECTRICAL REQUIREMENTS FOR ELECTRIC DRYERS Option 2: 3-Wire Connection with a Power Supply Cord lf your local codes or ordinances do not allow the connection of a frame-...
Owners Manual
Page 20
... dryer must be grounded in your laundry room meets these specifications, please have a qualified service person or company. Important Warning: To help guard against shock. Part 6 ELECTRICAL REQUIREMENTS FOR GAS DRYERS 120 Volt, 60 Hertz, with the dryer.
... dryer must be grounded in your laundry room meets these specifications, please have a qualified service person or company. Important Warning: To help guard against shock. Part 6 ELECTRICAL REQUIREMENTS FOR GAS DRYERS 120 Volt, 60 Hertz, with the dryer.
Owners Manual
Page 21
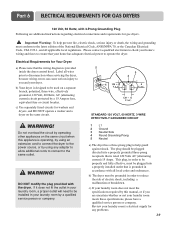
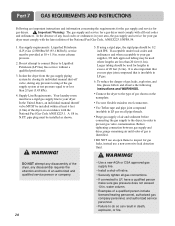
Part 7 GAS REQUIREMENTS AND INSTRUCTIONS Following are less than 2/1 psi (3.45 kPa). 4. In the United States, an individual manual shutoff valve MUST be used where lengths ...
Part 7 GAS REQUIREMENTS AND INSTRUCTIONS Following are less than 2/1 psi (3.45 kPa). 4. In the United States, an individual manual shutoff valve MUST be used where lengths ...
Owners Manual
Page 22
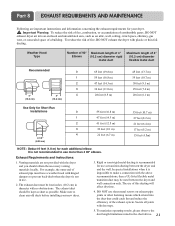
... NOT use . 2. The exhaust duct must have a weather hood with plastic or thin foil ducting. The exhaust duct should obtain the necessary venting materials locally. Part 8 EXHAUST REQUIREMENTS AND MAINTENANCE Following are not provided with duct tape. 5. In special installations when it is not recommended to clean any old ducts before...
... NOT use . 2. The exhaust duct must have a weather hood with plastic or thin foil ducting. The exhaust duct should obtain the necessary venting materials locally. Part 8 EXHAUST REQUIREMENTS AND MAINTENANCE Following are not provided with duct tape. 5. In special installations when it is not recommended to clean any old ducts before...
Owners Manual
Page 23
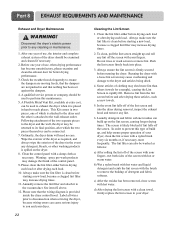
... the dampers. 4. Do not rinse or wash screen to remove the buildup of the dryer as necessary. Wipe the exterior of detergent and fabric softener. Part 8 EXHAUST REQUIREMENTS AND MAINTENANCE Exhaust and Dryer Maintenance !
... the dampers. 4. Do not rinse or wash screen to remove the buildup of the dryer as necessary. Wipe the exterior of detergent and fabric softener. Part 8 EXHAUST REQUIREMENTS AND MAINTENANCE Exhaust and Dryer Maintenance !


