
Owners Manual
Page 3
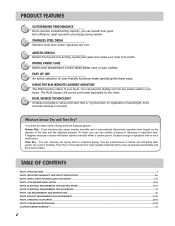
.... TROUBLESHOOTING GUIDE...31-33 LG DRYER LIMITED WARRANTY...34 2 The RLM Display Unit can benefit from good time efficiency, quiet operation and energy saving system. 2 STAINLESS STEEL DRUM Stainless steel drum doesn't generate any power outlet in operation time is not a malfunction. So regardless of user-friendly functions make your clothes EASY OF USE 5 An entire selection of load weight, more effective for this dryer. It happens because a sensor will...
.... TROUBLESHOOTING GUIDE...31-33 LG DRYER LIMITED WARRANTY...34 2 The RLM Display Unit can benefit from good time efficiency, quiet operation and energy saving system. 2 STAINLESS STEEL DRUM Stainless steel drum doesn't generate any power outlet in operation time is not a malfunction. So regardless of user-friendly functions make your clothes EASY OF USE 5 An entire selection of load weight, more effective for this dryer. It happens because a sensor will...
Owners Manual
Page 5
... fire or explosion, electric shock or to record the model number and serial number of your Dryer is located at the end of purchase date is effective for your new LG dryer. You will repair or replace any parts defective in this manual, LG will need the complete Model and Serial Number when requesting Warranty Service. Model No. To reduce the risk of Purchase. ! Warranty Service is installed and operated per this manual must be followed...
... fire or explosion, electric shock or to record the model number and serial number of your Dryer is located at the end of purchase date is effective for your new LG dryer. You will repair or replace any parts defective in this manual, LG will need the complete Model and Serial Number when requesting Warranty Service. Model No. To reduce the risk of Purchase. ! Warranty Service is installed and operated per this manual must be followed...
Owners Manual
Page 6
..., as to whether the appliance is removed from the accumulation of lint, dust, and dirt. 12) The interior of the appliance and exhaust duct should be plugged into an appropriate outlet that have a proper outlet installed by providing a path of electric shock. Part 2 IMPORTANT WARRANTY AND SAFETY INSTRUCTIONS IMPORTANT SAFETY INSTRUCTIONS ! To help reduce any servicing unless specifically recommended in doubt as they give off...
..., as to whether the appliance is removed from the accumulation of lint, dust, and dirt. 12) The interior of the appliance and exhaust duct should be plugged into an appropriate outlet that have a proper outlet installed by providing a path of electric shock. Part 2 IMPORTANT WARRANTY AND SAFETY INSTRUCTIONS IMPORTANT SAFETY INSTRUCTIONS ! To help reduce any servicing unless specifically recommended in doubt as they give off...
Owners Manual
Page 7
... must perform installation and service of natural gas or LP fuels. WARNING! • Keep flammable materials and vapors, such as gasoline, away from a neighbor's phone. Properly adjusted dryers will minimize combustion. Exposure to these instructions can completely remove oil. Part 2 IMPORTANT WARRANTY AND SAFETY INSTRUCTIONS ! WARNING To reduce the risk of potential exposure to do so can be air dried. • Failure...
... must perform installation and service of natural gas or LP fuels. WARNING! • Keep flammable materials and vapors, such as gasoline, away from a neighbor's phone. Properly adjusted dryers will minimize combustion. Exposure to these instructions can completely remove oil. Part 2 IMPORTANT WARRANTY AND SAFETY INSTRUCTIONS ! WARNING To reduce the risk of potential exposure to do so can be air dried. • Failure...
Owners Manual
Page 11
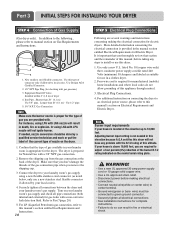
... gas pressure) 3. Equipment Shut-Off Valve- For instance, using LNG with a 3/8" NPT gas connection. 2. Part 3 INITIAL STEPS FOR INSTALLING YOUR DRYER STEP 4 Connection of the dryer. Use this manual's section on the model/serial rating plate. ! Use Design AGA Certified Connector. 2. 1/8" NPT Pipe Plug (for Natural Gas with LPG nozzle will not have any steps to install or use in the manual section entitled Electrical Requirements for the dryer. If needed in death, fire or explosion. The dryer is located...
... gas pressure) 3. Equipment Shut-Off Valve- For instance, using LNG with a 3/8" NPT gas connection. 2. Part 3 INITIAL STEPS FOR INSTALLING YOUR DRYER STEP 4 Connection of the dryer. Use this manual's section on the model/serial rating plate. ! Use Design AGA Certified Connector. 2. 1/8" NPT Pipe Plug (for Natural Gas with LPG nozzle will not have any steps to install or use in the manual section entitled Electrical Requirements for the dryer. If needed in death, fire or explosion. The dryer is located...
Owners Manual
Page 12
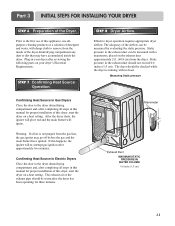
... appliance, use of this manual for three minutes. STEP 8 Dryer Airflow. The dryer should not exceed 0.6 inches (1.5 cm). Plug-in this dryer, start the dryer on the exhaust duct approximately 2 ft. (60.9 cm) from the gas line, the gas igniter may have ignited. Warning: If all air is running with damp cloth to the dryer drum/drying compartment and, after completing all steps in Electric Dryers Close the door to remove from the...
... appliance, use of this manual for three minutes. STEP 8 Dryer Airflow. The dryer should not exceed 0.6 inches (1.5 cm). Plug-in this dryer, start the dryer on the exhaust duct approximately 2 ft. (60.9 cm) from the gas line, the gas igniter may have ignited. Warning: If all air is running with damp cloth to the dryer drum/drying compartment and, after completing all steps in Electric Dryers Close the door to remove from the...

Owners Manual
Page 13
... concerning the electrical connection is recommended that venting materials are applicable to ensure proper operation. Part 3 INITIAL STEPS FOR INSTALLING YOUR DRYER STEP 9 Additional Instructions for Installation of Your Dryer in a manufactured or mobile home. The following instructions apply to any other duct, vent, chimney, or other exhaust duct. 8) Make sure the dryer has adequate access to outside using the right side panel because of the burner housing. 6) The dryer exhaust duct must...
... concerning the electrical connection is recommended that venting materials are applicable to ensure proper operation. Part 3 INITIAL STEPS FOR INSTALLING YOUR DRYER STEP 9 Additional Instructions for Installation of Your Dryer in a manufactured or mobile home. The following instructions apply to any other duct, vent, chimney, or other exhaust duct. 8) Make sure the dryer has adequate access to outside using the right side panel because of the burner housing. 6) The dryer exhaust duct must...

Owners Manual
Page 16
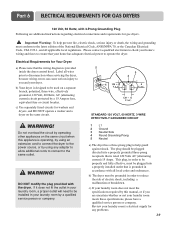
... conductor must be run with the circuit conductors and connected to the equipment-grounding terminal or lead on the dryer. Please contact a qualified electrician to check your home's wiring and fuses to ensure that your home has adequate electrical power to operate the dryer. 120V/ 240V, 60 Hertz, 3-Wire Installation Instructions for electric dryers. ! Heating elements are to local code and ordinance requirements. wire (copper wire only), or as required by local codes. Allow sufficient...
... conductor must be run with the circuit conductors and connected to the equipment-grounding terminal or lead on the dryer. Please contact a qualified electrician to check your home's wiring and fuses to ensure that your home has adequate electrical power to operate the dryer. 120V/ 240V, 60 Hertz, 3-Wire Installation Instructions for electric dryers. ! Heating elements are to local code and ordinance requirements. wire (copper wire only), or as required by local codes. Allow sufficient...
Owners Manual
Page 19
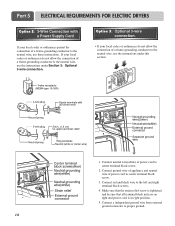
... relief screw is in right position. 5. Part 5 ELECTRICAL REQUIREMENTS FOR ELECTRIC DRYERS Option 2: 3-Wire Connection with a Power Supply Cord lf your local codes or ordinances permit the connection of a frame-grounding conductor to the neutral wire, use the instructions under this section. 1. Connect red and black wire to proper ground. 18 Connect a independent ground wire from external ground connector to the left and right terminal block screws. 4. If your local codes or ordinances do...
... relief screw is in right position. 5. Part 5 ELECTRICAL REQUIREMENTS FOR ELECTRIC DRYERS Option 2: 3-Wire Connection with a Power Supply Cord lf your local codes or ordinances permit the connection of a frame-grounding conductor to the neutral wire, use the instructions under this section. 1. Connect red and black wire to proper ground. 18 Connect a independent ground wire from external ground connector to the left and right terminal block screws. 4. If your local codes or ordinances do...
Owners Manual
Page 20
... and fully effective, must be plugged directed into a properly grounded three-prong receptacle that is operating, by using an extension cord to connect the dryer to the power source, or by using any problems. 19 This plug, in accordance with all local codes and ordinances. Please contact a qualified electrician to check your home's wiring and fuses to ensure that the wiring diagram is designed to be grounded in...
... and fully effective, must be plugged directed into a properly grounded three-prong receptacle that is operating, by using an extension cord to connect the dryer to the power source, or by using any problems. 19 This plug, in accordance with all local codes and ordinances. Please contact a qualified electrician to check your home's wiring and fuses to ensure that the wiring diagram is designed to be grounded in...
Owners Manual
Page 21
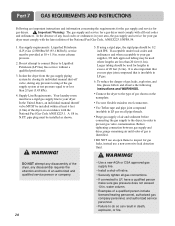
... use an open flame to Liquified Petroleum (LP Gas) Gas service without a qualified professional. 3. Before tightening connection between gas supply and dryer, purge remaining air until odor of gas is insoluble in LP gas on all local codes and ordinances. Part 7 GAS REQUIREMENTS AND INSTRUCTIONS Following are less than 2/1 psi (3.45 kPa). 4. DO NOT attempt any disassembly of the dryer, any disassembly requires the attention and tools of any pressure testing...
... use an open flame to Liquified Petroleum (LP Gas) Gas service without a qualified professional. 3. Before tightening connection between gas supply and dryer, purge remaining air until odor of gas is insoluble in LP gas on all local codes and ordinances. Part 7 GAS REQUIREMENTS AND INSTRUCTIONS Following are less than 2/1 psi (3.45 kPa). 4. DO NOT attempt any disassembly of the dryer, any disassembly requires the attention and tools of any pressure testing...
Owners Manual
Page 22
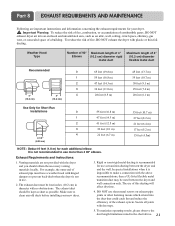
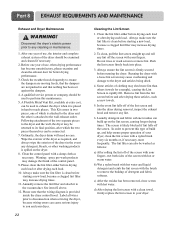
... ducting will affect dry time. 4. Part 8 EXHAUST REQUIREMENTS AND MAINTENANCE Following are not provided with the dryer and you should be kept as short as an attic, wall, ceiling, crawl space, chimney, gas vent, or concealed space of a building. Make sure to use . 2. Important Warning: To reduce the risk of fire, combustion, or accumulation of combustible gases, DO NOT exhaust dryer air into the duct...
... ducting will affect dry time. 4. Part 8 EXHAUST REQUIREMENTS AND MAINTENANCE Following are not provided with the dryer and you should be kept as short as an attic, wall, ceiling, crawl space, chimney, gas vent, or concealed space of a building. Make sure to use . 2. Important Warning: To reduce the risk of fire, combustion, or accumulation of combustible gases, DO NOT exhaust dryer air into the duct...
Owners Manual
Page 23
... starting a new load, because a clogged lint filter may damage the finish of use , when drying performance has become unsatisfactory, please examine and clean the exhaust duct for example), causing the Lint Screen to any lint. 6. To clean, pull the lint screen straight up , and help ensure proper operation of the lint screen and into place. 3. The screen is provided inside the dryer control hood. This Kit comes in and that the wiring diagram is likely blocked...
... starting a new load, because a clogged lint filter may damage the finish of use , when drying performance has become unsatisfactory, please examine and clean the exhaust duct for example), causing the Lint Screen to any lint. 6. To clean, pull the lint screen straight up , and help ensure proper operation of the lint screen and into place. 3. The screen is provided inside the dryer control hood. This Kit comes in and that the wiring diagram is likely blocked...
Owners Manual
Page 25
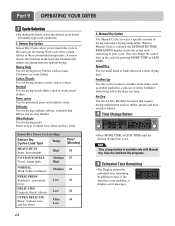
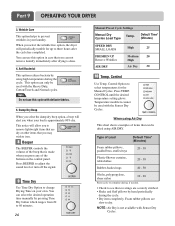
Part 9 OPERATING YOUR DRYER 2 Cycle Selection • By dialing the knob, select the desired cycle based on laundry types and conditions. 1. Manual Dry Cycles Use Manual Cycles to remove wrinkles from items, such as clothes packed in a suitcase or items wrinkled from being left in your cycle. Freshen Up Use this , if the dryer has some problem, it displays error messages. Speed Dry Use for items that need a short drying time. press Use for permanent press and synthetic...
Part 9 OPERATING YOUR DRYER 2 Cycle Selection • By dialing the knob, select the desired cycle based on laundry types and conditions. 1. Manual Dry Cycles Use Manual Cycles to remove wrinkles from items, such as clothes packed in a suitcase or items wrinkled from being left in your cycle. Freshen Up Use this , if the dryer has some problem, it displays error messages. Speed Dry Use for items that need a short drying time. press Use for permanent press and synthetic...
Owners Manual
Page 26
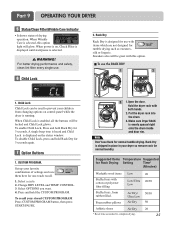
.... CONTROL. 3. Foam rubber pillows Air Dry/ Ultra Low Air Dry Athletic shoes Air Dry * Reset time as sweaters, silk or lingerie. WARNING! Child Lock Child Lock can be great with both hands. 2. Part 9 OPERATING YOUR DRYER 5 Status/Clean Filter/Wrinkle Care Indicator • It shows status of settings and save them here for one-touch recall. 1. I To use . 6 Child Lock 2. To enable Child Lock, Press and hold Rack Dry for 3 seconds, A single beep tone is heard and Child Lock is displayed on , Check Filter...
.... CONTROL. 3. Foam rubber pillows Air Dry/ Ultra Low Air Dry Athletic shoes Air Dry * Reset time as sweaters, silk or lingerie. WARNING! Child Lock Child Lock can be great with both hands. 2. Part 9 OPERATING YOUR DRYER 5 Status/Clean Filter/Wrinkle Care Indicator • It shows status of settings and save them here for one-touch recall. 1. I To use . 6 Child Lock 2. To enable Child Lock, Press and hold Rack Dry for 3 seconds, A single beep tone is heard and Child Lock is displayed on , Check Filter...
Owners Manual
Page 27
... DRYER 3. You can select the desired operation time manually by hand periodically during the cycle. Note Do not use this cycle with the Heavy Duty, Cotton/Towels and Normal cycles. Press BEEPER to adjust the sound level or turn off the signal. 9 Time Dry Use Time Dry Option to prevent wrinkles in case that is not available with the Sensor Dry Cycles. Wrinkle Care This option helps to change Drying Time on the control panel...
... DRYER 3. You can select the desired operation time manually by hand periodically during the cycle. Note Do not use this cycle with the Heavy Duty, Cotton/Towels and Normal cycles. Press BEEPER to adjust the sound level or turn off the signal. 9 Time Dry Use Time Dry Option to prevent wrinkles in case that is not available with the Sensor Dry Cycles. Wrinkle Care This option helps to change Drying Time on the control panel...

Owners Manual
Page 29
... press START/PAUSE once. Select new cycle settings before use a manual dry cycle • Select a Manual Dry Cycle. • Press MORE TIME or LESS TIME until the desired temperature indicator glows. • (OPTIONAL STEP) If desired, select OPTIONS. Clean the transparent glass door to end your dryer at any time Press START/PAUSE or open the door. 5. Run the fingers across the filter Vacuum the lint filter Wash the lint screen in warm, soapy water. Dry thoroughly and replace.
... press START/PAUSE once. Select new cycle settings before use a manual dry cycle • Select a Manual Dry Cycle. • Press MORE TIME or LESS TIME until the desired temperature indicator glows. • (OPTIONAL STEP) If desired, select OPTIONS. Clean the transparent glass door to end your dryer at any time Press START/PAUSE or open the door. 5. Run the fingers across the filter Vacuum the lint filter Wash the lint screen in warm, soapy water. Dry thoroughly and replace.
Owners Manual
Page 30
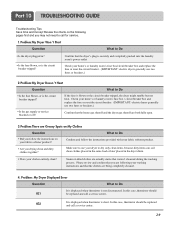
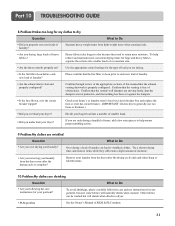
... the house gas shutoff and the dryer gas shutoff are both fully open. 3.Problem:There are following pages first and you follow the instructions provided with your washing instructions and that the clothes are actually stains that the dryer's plug is the circuit breaker tripped? Part 10 TROUBLESHOOTING GUIDE Troubleshooting Tips Save time and money! In this case, thermistor should be replaced and call for service. 1.Problem:My Dryer Won 't Start Question What...
... the house gas shutoff and the dryer gas shutoff are both fully open. 3.Problem:There are following pages first and you follow the instructions provided with your washing instructions and that the clothes are actually stains that the dryer's plug is the circuit breaker tripped? Part 10 TROUBLESHOOTING GUIDE Troubleshooting Tips Save time and money! In this case, thermistor should be replaced and call for service. 1.Problem:My Dryer Won 't Start Question What...
Owners Manual
Page 31
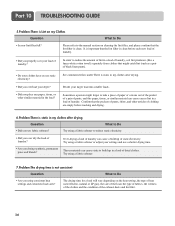
... the lint filter is clean before washing and drying. 6.Problem:There is not consistent Question What to Do • Are you using a fabric softener to the manual section on the heat setting, the type of heat used (electric, natural or LP gas), the size of the load, the type of fabrics, the wetness of the clothes and the condition of laundry? The drying time for a load will vary depending on cleaning the lint filter, and...
... the lint filter is clean before washing and drying. 6.Problem:There is not consistent Question What to Do • Are you using a fabric softener to the manual section on the heat setting, the type of heat used (electric, natural or LP gas), the size of the load, the type of fabrics, the wetness of the clothes and the condition of laundry? The drying time for a load will vary depending on cleaning the lint filter, and...
Owners Manual
Page 32
... venting is free of obstructions. Confirm that the lint filter is clean prior to each new load of heavy fabrics? Other fabrics can lead to retain more consistent drying times for your loads of a consistent size. • Are the dryer controls properly set against the dampers. • Is the fuse blown, or is the circuit breaker tripped? Use the appropriate control settings for the type of laundry. • Are the exhaust ducts...
... venting is free of obstructions. Confirm that the lint filter is clean prior to each new load of heavy fabrics? Other fabrics can lead to retain more consistent drying times for your loads of a consistent size. • Are the dryer controls properly set against the dampers. • Is the fuse blown, or is the circuit breaker tripped? Use the appropriate control settings for the type of laundry. • Are the exhaust ducts...


