

Owner's Manual (English)
Page 2
...drying time manually. Use TIME DRY for heavy and bulky items and thick work. INITIAL STEPS FOR INSTALLING YOUR DRYER ...9 PART 4. TROUBLESHOOTING GUIDE...31 LG DRYER LIMITED WARRANTY...34 2 Your dryer provides sensor drying and time drying programs. Sensor Dry The dryer senses the dampness ... big capacity, you like them at the end of the cycle. GAS REQUIREMENTS AND INSTRUCTIONS ...22 PART 8. EXHAUST REQUIREMENTS AND MAINTENANCE ...23 PART 9. IMPORTANT WARRANTY AND SAFETY INSTRUCTIONS ...3 PART 2. What are not as dry as you can be used if clothes are Sensor Dry and Time...
...drying time manually. Use TIME DRY for heavy and bulky items and thick work. INITIAL STEPS FOR INSTALLING YOUR DRYER ...9 PART 4. TROUBLESHOOTING GUIDE...31 LG DRYER LIMITED WARRANTY...34 2 Your dryer provides sensor drying and time drying programs. Sensor Dry The dryer senses the dampness ... big capacity, you like them at the end of the cycle. GAS REQUIREMENTS AND INSTRUCTIONS ...22 PART 8. EXHAUST REQUIREMENTS AND MAINTENANCE ...23 PART 9. IMPORTANT WARRANTY AND SAFETY INSTRUCTIONS ...3 PART 2. What are not as dry as you can be used if clothes are Sensor Dry and Time...

Owner's Manual (English)
Page 3
... to potential hazards that can be killed or seriously injured if you don't follow basic precautions, including the following : 1. All safety messages will follow instructions. Part 1 IMPORTANT WARRANTY AND SAFETY INSTRUCTIONS READ ALL INSTRUCTIONS BEFORE USE WARNING For your safety, the information in this manual must be easily crushed, and trap...
... to potential hazards that can be killed or seriously injured if you don't follow basic precautions, including the following : 1. All safety messages will follow instructions. Part 1 IMPORTANT WARRANTY AND SAFETY INSTRUCTIONS READ ALL INSTRUCTIONS BEFORE USE WARNING For your safety, the information in this manual must be easily crushed, and trap...

Owner's Manual (English)
Page 4
...caused primarily by a qualified electrician. If it will minimize incomplete combustion. Properly adjusted dryers will be plugged into the dryer while parts are in doubt as to whether the appliance is properly installed and grounded in accordance with all instructions before or after each load...could cause a load to prevent property damage, personal injury, or loss of fire or explosion, electric shock, or to catch fire. Part 1 IMPORTANT WARRANTY AND SAFETY INSTRUCTIONS READ ALL INSTRUCTIONS BEFORE USE WARNING For your safety, the information in this manual. • Do not...
...caused primarily by a qualified electrician. If it will minimize incomplete combustion. Properly adjusted dryers will be plugged into the dryer while parts are in doubt as to whether the appliance is properly installed and grounded in accordance with all instructions before or after each load...could cause a load to prevent property damage, personal injury, or loss of fire or explosion, electric shock, or to catch fire. Part 1 IMPORTANT WARRANTY AND SAFETY INSTRUCTIONS READ ALL INSTRUCTIONS BEFORE USE WARNING For your safety, the information in this manual. • Do not...

Owner's Manual (English)
Page 5
Use only authorized factory parts. The dryer is not properly grounded. • Before use, the dryer must be expelled into the laundry area. Use of plastic or other combustible ductwork ... is not provided with the dryer, and you should be performed by an authorized servicer unless specifically recommended in diameter with all shipping materials properly. Part 1 IMPORTANT WARRANTY AND SAFETY INSTRUCTIONS READ ALL INSTRUCTIONS BEFORE USE WARNING For your new dryer. Electrical shock can result if the dryer is not exhausted...
Use only authorized factory parts. The dryer is not properly grounded. • Before use, the dryer must be expelled into the laundry area. Use of plastic or other combustible ductwork ... is not provided with the dryer, and you should be performed by an authorized servicer unless specifically recommended in diameter with all shipping materials properly. Part 1 IMPORTANT WARRANTY AND SAFETY INSTRUCTIONS READ ALL INSTRUCTIONS BEFORE USE WARNING For your new dryer. Electrical shock can result if the dryer is not exhausted...

Owner's Manual (English)
Page 6
... be followed to minimize the risk of fire or explosion, electric shock, or to do so can be used between the dryer and the wall. Part 1 IMPORTANT WARRANTY AND SAFETY INSTRUCTIONS READ ALL INSTRUCTIONS BEFORE USE WARNING For your safety, the information in this manual must be properly grounded.
... be followed to minimize the risk of fire or explosion, electric shock, or to do so can be used between the dryer and the wall. Part 1 IMPORTANT WARRANTY AND SAFETY INSTRUCTIONS READ ALL INSTRUCTIONS BEFORE USE WARNING For your safety, the information in this manual must be properly grounded.

Owner's Manual (English)
Page 7
... need the complete model and serial number when requesting warranty service. WARNING! To reduce the risk of Purchase Staple your nearest LG Service Center. You will repair or replace any parts defective in this manual. Date of fire or explosion, electric shock or to other than single family use, all warranty coverage...
... need the complete model and serial number when requesting warranty service. WARNING! To reduce the risk of Purchase Staple your nearest LG Service Center. You will repair or replace any parts defective in this manual. Date of fire or explosion, electric shock or to other than single family use, all warranty coverage...
Owner's Manual (English)
Page 8
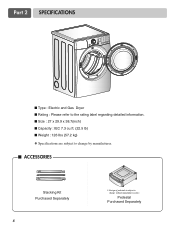
Pedestal Purchased Separately Part 2 SPECIFICATIONS ■ Type : Electric and Gas Dryer ■ Rating : Please refer to the rating label regarding detailed information. ■ Size : 27 x 29.9 x 38.7(inch) ■ Capacity : IEC 7.3 cu.ft. (22.5 lb) ■ Weight : 126 Ibs (57.2 kg) ❋ Specifications are subject to change by manufacturer. ■ ACCESSORIES Stacking Kit Purchased Separately 8 ❊ Design of pedestals is subject to change without manafaturers notice.
Pedestal Purchased Separately Part 2 SPECIFICATIONS ■ Type : Electric and Gas Dryer ■ Rating : Please refer to the rating label regarding detailed information. ■ Size : 27 x 29.9 x 38.7(inch) ■ Capacity : IEC 7.3 cu.ft. (22.5 lb) ■ Weight : 126 Ibs (57.2 kg) ❋ Specifications are subject to change by manufacturer. ■ ACCESSORIES Stacking Kit Purchased Separately 8 ❊ Design of pedestals is subject to change without manafaturers notice.

Owner's Manual (English)
Page 9
More detailed instructions concerning electrical connections, gas connections, and exhaust requirements are provided in other parts of this entire manual before proceeding with a solid floor for your dryer, and it has the required clearances shown below ....your dryer for use . A louvered door with elbow. Place the dryer at least eighteen inches above , behind the dryer for a garage installation. Part 3 INITIAL STEPS FOR INSTALLING YOUR DRYER The following instructions in mind when installing in a closet or recessed area: • Consider allowing additional clearance ...
More detailed instructions concerning electrical connections, gas connections, and exhaust requirements are provided in other parts of this entire manual before proceeding with a solid floor for your dryer, and it has the required clearances shown below ....your dryer for use . A louvered door with elbow. Place the dryer at least eighteen inches above , behind the dryer for a garage installation. Part 3 INITIAL STEPS FOR INSTALLING YOUR DRYER The following instructions in mind when installing in a closet or recessed area: • Consider allowing additional clearance ...

Owner's Manual (English)
Page 10
... of the dryer until it is not level, and if the slope exceeds 2.5 cm (1 inch), a load may not tumble properly and internal sensors may malfunction. Part 3 INITIAL STEPS FOR INSTALLING YOUR DRYER Once in which your dryer can be aligned at the center when closed. 1 2 3 10 If the dryer is level...
... of the dryer until it is not level, and if the slope exceeds 2.5 cm (1 inch), a load may not tumble properly and internal sensors may malfunction. Part 3 INITIAL STEPS FOR INSTALLING YOUR DRYER Once in which your dryer can be aligned at the center when closed. 1 2 3 10 If the dryer is level...

Owner's Manual (English)
Page 11
Part 3 INITIAL STEPS FOR INSTALLING YOUR DRYER STEP 3 Connecting the Exhaust and Venting System. In addition to the following warnings, please refer to manual section on ... dryer. • Use as few elbow joints as transition ducting between the dryer and wall connection only. Remove screw and exhaust duct. (Use exhaust kit part #3911EZ9131X.) 2-1. Insert the male end of a 4" elbow into the female end of duct to the blower housing and attach the duct to follow the instructions...
Part 3 INITIAL STEPS FOR INSTALLING YOUR DRYER STEP 3 Connecting the Exhaust and Venting System. In addition to the following warnings, please refer to manual section on ... dryer. • Use as few elbow joints as transition ducting between the dryer and wall connection only. Remove screw and exhaust duct. (Use exhaust kit part #3911EZ9131X.) 2-1. Insert the male end of a 4" elbow into the female end of duct to the blower housing and attach the duct to follow the instructions...

Owner's Manual (English)
Page 12
...to ignite. If needed at this elevation because AGA certifies this appliance through neutral. 3. If changing the orifice, also adjust the gas valve. 1. Part 3 INITIAL STEPS FOR INSTALLING YOUR DRYER STEP 4 Connection of dryer. 4. A four-wire cord is prepared for use a new stainless steel flexible... to the following, please refer to this altitude. Gas Connection. Note Make sure the burner orifice is located at the elevations up to Part 7 (page 20) 5. For instance, using a new flexible stainless steel connector (as suitable for Natural Gas with LNG orifice will not...
...to ignite. If needed at this elevation because AGA certifies this appliance through neutral. 3. If changing the orifice, also adjust the gas valve. 1. Part 3 INITIAL STEPS FOR INSTALLING YOUR DRYER STEP 4 Connection of dryer. 4. A four-wire cord is prepared for use a new stainless steel flexible... to the following, please refer to this altitude. Gas Connection. Note Make sure the burner orifice is located at the elevations up to Part 7 (page 20) 5. For instance, using a new flexible stainless steel connector (as suitable for Natural Gas with LNG orifice will not...

Owner's Manual (English)
Page 13
... dryer after approximately two minutes. Measuring Static pressure 1 Manometer 2 Exhaust Duct MAXIMUM STATIC PRESSURE IN WATER COLUMN 5/8 inches (1.5 cm) 13 Part 3 INITIAL STEPS FOR INSTALLING YOUR DRYER STEP 6 Preparation of this happens, the igniter will ignite. Confirming Heat Source in your dryer's Electrical...airflow. After the dryer starts, the igniter will glow red and the main burner will re-attempt gas ignition after reviewing the following parts on the exhaust duct approximately 2 ft. (60.9 cm) from the dryer. The exhaust air or the exhaust pipe should not...
... dryer after approximately two minutes. Measuring Static pressure 1 Manometer 2 Exhaust Duct MAXIMUM STATIC PRESSURE IN WATER COLUMN 5/8 inches (1.5 cm) 13 Part 3 INITIAL STEPS FOR INSTALLING YOUR DRYER STEP 6 Preparation of this happens, the igniter will ignite. Confirming Heat Source in your dryer's Electrical...airflow. After the dryer starts, the igniter will glow red and the main burner will re-attempt gas ignition after reviewing the following parts on the exhaust duct approximately 2 ft. (60.9 cm) from the dryer. The exhaust air or the exhaust pipe should not...

Owner's Manual (English)
Page 14
... can result in a manufactured or mobile home: 1) The electrical connection for an electric dryer must be a 4-wire connection. Any installation in a Manufactured or Mobile Home. Part 3 INITIAL STEPS FOR INSTALLING YOUR DRYER STEP 9 Additional Instructions for Installation of Your Dryer in a manufactured or mobile home must comply with the Manufactured Home...
... can result in a manufactured or mobile home: 1) The electrical connection for an electric dryer must be a 4-wire connection. Any installation in a Manufactured or Mobile Home. Part 3 INITIAL STEPS FOR INSTALLING YOUR DRYER STEP 9 Additional Instructions for Installation of Your Dryer in a manufactured or mobile home must comply with the Manufactured Home...
Owner's Manual (English)
Page 15
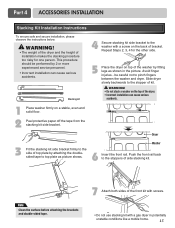
... too risky for the other side. 5 Place the dryer on the back of the dryer. • Incorrect installation can cause serious accidents. Avoid finger injuries - Part 4 ACCESSORIES INSTALLATION Stacking Kit Installation Instructions To ensure safe and secure installation, please observe the instructions below.
... too risky for the other side. 5 Place the dryer on the back of the dryer. • Incorrect installation can cause serious accidents. Avoid finger injuries - Part 4 ACCESSORIES INSTALLATION Stacking Kit Installation Instructions To ensure safe and secure installation, please observe the instructions below.

Owner's Manual (English)
Page 16
... to securely attach the appliance to the pedestal. Move the appliance to the desired location. 5 Loosen the locknuts on the pedestal align with the wrench. Part 4 ACCESSORIES INSTALLATION Pedestal Installation Instructions The pedestal accessory includes: • Drawer divider (1) • Wrench (1) • Screws (18) † • Retainers (4) †† † Dryer installation...
... to securely attach the appliance to the pedestal. Move the appliance to the desired location. 5 Loosen the locknuts on the pedestal align with the wrench. Part 4 ACCESSORIES INSTALLATION Pedestal Installation Instructions The pedestal accessory includes: • Drawer divider (1) • Wrench (1) • Screws (18) † • Retainers (4) †† † Dryer installation...
Owner's Manual (English)
Page 17
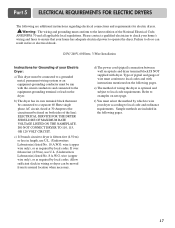
.... Sample methods are additional instructions regarding electrical connections and requirements for Grounding of the National Electrical Code, ANSI/NFPA 70 and all applicable local regulations. Part 5 ELECTRICAL REQUIREMENTS FOR ELECTRIC DRYERS The following are included in the following pages. Please contact a qualified electrician to check your home's wiring and fuses to...
.... Sample methods are additional instructions regarding electrical connections and requirements for Grounding of the National Electrical Code, ANSI/NFPA 70 and all applicable local regulations. Part 5 ELECTRICAL REQUIREMENTS FOR ELECTRIC DRYERS The following are included in the following pages. Please contact a qualified electrician to check your home's wiring and fuses to...

Owner's Manual (English)
Page 18
... 14-30R) and you will be connected to center terminal block screw. 2. Make ends of covering material from 3 other wires peel insulation back 1 inch (2.5 cm). Part 5 ELECTRICAL REQUIREMENTS FOR ELECTRIC DRYERS Review the following options to the same color screw in block. First, peel 5 inches (12.7 cm) of 3 wires a hook shape...
... 14-30R) and you will be connected to center terminal block screw. 2. Make ends of covering material from 3 other wires peel insulation back 1 inch (2.5 cm). Part 5 ELECTRICAL REQUIREMENTS FOR ELECTRIC DRYERS Review the following options to the same color screw in block. First, peel 5 inches (12.7 cm) of 3 wires a hook shape...
Owner's Manual (English)
Page 19
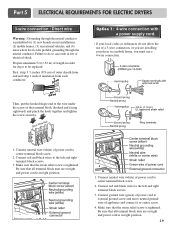
... external ground screw and move neutral ground wire of appliance and connect it to do not allow the use of length in right position. 19 Part 5 ELECTRICAL REQUIREMENTS FOR ELECTRIC DRYERS 3-wire connection : Direct wire Warning : Grounding through the neutral conductor is prohibited for dryer to be replaced. Option 1: 4-wire connection...
... external ground screw and move neutral ground wire of appliance and connect it to do not allow the use of length in right position. 19 Part 5 ELECTRICAL REQUIREMENTS FOR ELECTRIC DRYERS 3-wire connection : Direct wire Warning : Grounding through the neutral conductor is prohibited for dryer to be replaced. Option 1: 4-wire connection...
Owner's Manual (English)
Page 20
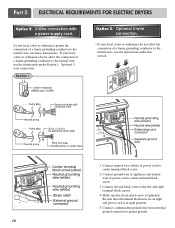
... and neutral wire of a frame-grounding conductor to center terminal block screw. 2. Connect a independent ground wire from external ground connector to center terminal block screw. 3. Part 5 ELECTRICAL REQUIREMENTS FOR ELECTRIC DRYERS Option 2: 3-Wire connection with a power supply cord. Connect neutral wire (white) of a frame-grounding conductor to the neutral wire, use...
... and neutral wire of a frame-grounding conductor to center terminal block screw. 2. Connect a independent ground wire from external ground connector to center terminal block screw. 3. Part 5 ELECTRICAL REQUIREMENTS FOR ELECTRIC DRYERS Option 2: 3-Wire connection with a power supply cord. Connect neutral wire (white) of a frame-grounding conductor to the neutral wire, use...

Owner's Manual (English)
Page 21
... circuit breaker. Review your dryer. b) The dryer must be plugged into a properly grounded three-prong receptacle that your laundry room by using any problems. 21 Part 6 ELECTRICAL REQUIREMENTS FOR GAS DRYERS 120 Volt, 60 Hertz, with 3-Prong Grounding Plug Following are uncertain whether or not your laundry room does not meet...
... circuit breaker. Review your dryer. b) The dryer must be plugged into a properly grounded three-prong receptacle that your laundry room by using any problems. 21 Part 6 ELECTRICAL REQUIREMENTS FOR GAS DRYERS 120 Volt, 60 Hertz, with 3-Prong Grounding Plug Following are uncertain whether or not your laundry room does not meet...


