Service Manual
Page 44
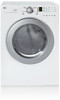
... RACK A800 SIDE VENTING KIT 6871EC1120A 6871EC1120A 3750EL1001B 3750EL1001B 383EEL9001B 383EEL9001B 43 QTY 1 1 2 2 4 1 1 1 1 1 1 1 1 1 2 1 1 1 1 1 2 3 1 1 1 2 1 1 2 1 1 1 2 1 1 1 1 1 1 1 1 1 1 1 1 1 13 REPLACEMENT PARTS LIST CAUTION: Before replacing any of these components, read the safety precautions in this manual. ¡Æ Note: S(Safety Parts), AL (Alternative parts) LG MODEL: TD-V10062E, TD-V10060E AL LOC Description Model P/No DLE2512W DLE2514W A500 CABINET ASSEMBLY...
... RACK A800 SIDE VENTING KIT 6871EC1120A 6871EC1120A 3750EL1001B 3750EL1001B 383EEL9001B 383EEL9001B 43 QTY 1 1 2 2 4 1 1 1 1 1 1 1 1 1 2 1 1 1 1 1 2 3 1 1 1 2 1 1 2 1 1 1 2 1 1 1 1 1 1 1 1 1 1 1 1 1 13 REPLACEMENT PARTS LIST CAUTION: Before replacing any of these components, read the safety precautions in this manual. ¡Æ Note: S(Safety Parts), AL (Alternative parts) LG MODEL: TD-V10062E, TD-V10060E AL LOC Description Model P/No DLE2512W DLE2514W A500 CABINET ASSEMBLY...
Service Manual
Page 45
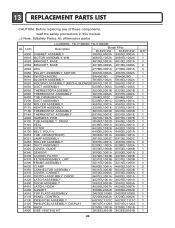
... 3750EL1001B A800 SIDE VENTING KIT 383EEL9001B 383EEL9001B 44 QTY 1 2 2 4 1 1 1 1 1 1 1 1 1 1 2 1 1 1 1 1 2 3 1 1 1 2 1 1 2 1 1 1 2 1 1 1 1 1 1 1 1 1 1 1 1 1 CAUTION: Before replacing any of these components, read the safety precautions in this manual. ¡Æ Note: S(Safety Parts), AL (Alternative parts) LG MODEL: TD-V10062G,TD-V10060G AL LOC Description Model P/N DLE2522W DLE2524W A500 CABINET ASSEMBLY 3091EL0003B 3091EL0003B A520 BRACKET, BASE 4810EL3001A 4810EL3001A A530...
... 3750EL1001B A800 SIDE VENTING KIT 383EEL9001B 383EEL9001B 44 QTY 1 2 2 4 1 1 1 1 1 1 1 1 1 1 2 1 1 1 1 1 2 3 1 1 1 2 1 1 2 1 1 1 2 1 1 1 1 1 1 1 1 1 1 1 1 1 CAUTION: Before replacing any of these components, read the safety precautions in this manual. ¡Æ Note: S(Safety Parts), AL (Alternative parts) LG MODEL: TD-V10062G,TD-V10060G AL LOC Description Model P/N DLE2522W DLE2524W A500 CABINET ASSEMBLY 3091EL0003B 3091EL0003B A520 BRACKET, BASE 4810EL3001A 4810EL3001A A530...
Owners Manual
Page 2
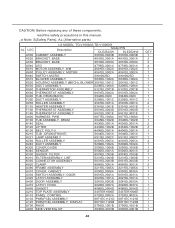
... and bulky items and thick work. GAS REQUIREMENTS AND INSTRUCTIONS ...19 PART 8. TROUBLESHOOTING GUIDE...28 LG DRYER LIMITED WARRANTY...31 2 EXHAUST REQUIREMENTS AND MAINTENANCE ...20 PART 9. You might see a sudden increase or decrease in order to select heat level and drying time manually. PRODUCT FEATURES 1 OUTSTANDING PERFORMANCE Not to mention unmatched big capacity, you...
... and bulky items and thick work. GAS REQUIREMENTS AND INSTRUCTIONS ...19 PART 8. TROUBLESHOOTING GUIDE...28 LG DRYER LIMITED WARRANTY...31 2 EXHAUST REQUIREMENTS AND MAINTENANCE ...20 PART 9. You might see a sudden increase or decrease in order to select heat level and drying time manually. PRODUCT FEATURES 1 OUTSTANDING PERFORMANCE Not to mention unmatched big capacity, you...

Owners Manual
Page 3
...suitable for use gasoline or other flammable vapors and liquids in this appliance or any phone in your safety, the information in this manual must be killed or seriously injured if you don't Immediately follow basic precautions, including the following : • Do not install ...a clothes dryer with clothes dryers. If you to the manufacturer's instructions and local codes. Part 1 IMPORTANT WARRANTY AND SAFETY INSTRUCTIONS READ ALL INSTRUCTIONS BEFORE USE WARNING For your building. 3. Your Safety and the safety of fire, electric ...
...suitable for use gasoline or other flammable vapors and liquids in this appliance or any phone in your safety, the information in this manual must be killed or seriously injured if you don't Immediately follow basic precautions, including the following : • Do not install ...a clothes dryer with clothes dryers. If you to the manufacturer's instructions and local codes. Part 1 IMPORTANT WARRANTY AND SAFETY INSTRUCTIONS READ ALL INSTRUCTIONS BEFORE USE WARNING For your building. 3. Your Safety and the safety of fire, electric ...
Owners Manual
Page 4
...THESE INSTRUCTIONS GROUNDING INSTRUCTIONS This appliance must be exposed to the weather. • Do not reach into the dryer while parts are in doubt as described in this manual. • Do not place items exposed to persons when using your appliance, follow basic precautions, including the following :... contribute to a chemical reaction that you are moving . • Do not repair or replace any part of the dryer or attempt any servicing unless specifically recommended in this manual must be properly installed as to whether the appliance is moving . • Always check the inside...
...THESE INSTRUCTIONS GROUNDING INSTRUCTIONS This appliance must be exposed to the weather. • Do not reach into the dryer while parts are in doubt as described in this manual. • Do not place items exposed to persons when using your appliance, follow basic precautions, including the following :... contribute to a chemical reaction that you are moving . • Do not repair or replace any part of the dryer or attempt any servicing unless specifically recommended in this manual must be properly installed as to whether the appliance is moving . • Always check the inside...
Owners Manual
Page 5
Part 1 IMPORTANT WARRANTY AND SAFETY INSTRUCTIONS READ ALL INSTRUCTIONS BEFORE USE WARNING For your new dryer. SAFETY INSTRUCTION FOR INSTALLATION WARNING To reduce the risk of life. Electrical shock can result in death, explosion, fire or burns. • Place dryer at least 18 in this manual. ...Install and store the dryer where it collapses or becomes otherwise restricted in any old ducts before installing your safety, the information in this manual must be followed to minimize the risk of fire or explosion, electric shock, or to prevent property damage, personal injury, or loss...
Part 1 IMPORTANT WARRANTY AND SAFETY INSTRUCTIONS READ ALL INSTRUCTIONS BEFORE USE WARNING For your new dryer. SAFETY INSTRUCTION FOR INSTALLATION WARNING To reduce the risk of life. Electrical shock can result in death, explosion, fire or burns. • Place dryer at least 18 in this manual. ...Install and store the dryer where it collapses or becomes otherwise restricted in any old ducts before installing your safety, the information in this manual must be followed to minimize the risk of fire or explosion, electric shock, or to prevent property damage, personal injury, or loss...
Owners Manual
Page 6
... and wall connection only. Electrical shock can result in electrical shock or injury • Refer to the installation instructions in this manual for specific electrical requirements for use of the core, resulting in electrical shock. • Repair or replace immediately all joints with... SAFETY INSTRUCTION FOR CONNECTING ELECTRICITY WARNING To reduce the risk of life. Part 1 IMPORTANT WARRANTY AND SAFETY INSTRUCTIONS READ ALL INSTRUCTIONS BEFORE USE WARNING For your safety, the information in this manual must be followed to minimize the risk of fire or explosion, electric...
... and wall connection only. Electrical shock can result in electrical shock or injury • Refer to the installation instructions in this manual for specific electrical requirements for use of the core, resulting in electrical shock. • Repair or replace immediately all joints with... SAFETY INSTRUCTION FOR CONNECTING ELECTRICITY WARNING To reduce the risk of life. Part 1 IMPORTANT WARRANTY AND SAFETY INSTRUCTIONS READ ALL INSTRUCTIONS BEFORE USE WARNING For your safety, the information in this manual must be followed to minimize the risk of fire or explosion, electric...
Owners Manual
Page 7
... to the instructions in this manual, LG will need the complete model and serial number when requesting warranty service. Model Number. Date of purchase. You will repair or replace any parts defective in this manual. Serial Number. For your nearest LG Service Center. proof of purchase...date of Purchase Staple your dryer is subjected to prevent property damage, personal injury, or death when using your new LG dryer. Part 1 IMPORTANT WARRANTY AND SAFETY INSTRUCTIONS SEEKING WARRANTY SERVICE The warranty for your receipt here for only 90 days. Warranty Service is...
... to the instructions in this manual, LG will need the complete model and serial number when requesting warranty service. Model Number. Date of purchase. You will repair or replace any parts defective in this manual. Serial Number. For your nearest LG Service Center. proof of purchase...date of Purchase Staple your dryer is subjected to prevent property damage, personal injury, or death when using your new LG dryer. Part 1 IMPORTANT WARRANTY AND SAFETY INSTRUCTIONS SEEKING WARRANTY SERVICE The warranty for your receipt here for only 90 days. Warranty Service is...
Owners Manual
Page 9
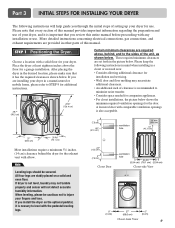
...If dryer is not level, laundry may necessitate additional clearances. • An additional inch of clearance is recommended to level with elbow. Part 3 INITIAL STEPS FOR INSTALLING YOUR DRYER The following instructions in mind when installing in a closet or recessed area: • Consider allowing...detect accurate humidity information. All four legs are set forth in the desired location, please make sure that every section of this manual provides important information regarding the preparation and use . Please note that it is nessary to minimize noise transfer. • Consider space...
...If dryer is not level, laundry may necessitate additional clearances. • An additional inch of clearance is recommended to level with elbow. Part 3 INITIAL STEPS FOR INSTALLING YOUR DRYER The following instructions in mind when installing in a closet or recessed area: • Consider allowing...detect accurate humidity information. All four legs are set forth in the desired location, please make sure that every section of this manual provides important information regarding the preparation and use . Please note that it is nessary to minimize noise transfer. • Consider space...
Owners Manual
Page 10
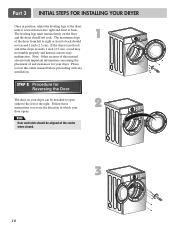
... Door The door on the floor and the dryer should not rock. Please review this manual also provide important information concerning the placement of this entire manual before proceeding with any installation. 1 STEP 2 Procedure for your dryer. Part 3 INITIAL STEPS FOR INSTALLING YOUR DRYER Once in which your door opens: Note Door and...
... Door The door on the floor and the dryer should not rock. Please review this manual also provide important information concerning the placement of this entire manual before proceeding with any installation. 1 STEP 2 Procedure for your dryer. Part 3 INITIAL STEPS FOR INSTALLING YOUR DRYER Once in which your door opens: Note Door and...
Owners Manual
Page 11
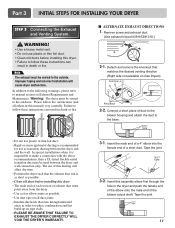
...: The dryer must point away from the dryer. • Use as few elbow joints as possible. • Clean old ducts before installing this manual) very carefully. Detach and remove the knockout that runs through the hole in this dryer. • Failure to the outside. Tape the joint. ...3-2. Remove screw and exhaust duct. (Use exhaust kit part #3911EZ9131X.) 2-1. Note The exhaust must be used between the dryer and and the wall. Please follow these instructions can result in death or fire...
...: The dryer must point away from the dryer. • Use as few elbow joints as possible. • Clean old ducts before installing this manual) very carefully. Detach and remove the knockout that runs through the hole in this dryer. • Failure to the outside. Tape the joint. ...3-2. Remove screw and exhaust duct. (Use exhaust kit part #3911EZ9131X.) 2-1. Note The exhaust must be used between the dryer and and the wall. Please follow these instructions can result in death or fire...
Owners Manual
Page 12
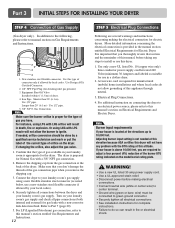
.... Note Burner input requirements If your laundry room is prepared for Electric Dryer. Use this manual's section entitled Gas Requirements and Instructions. 12 STEP 5 Electrical Plug Connections Following are required to manual section on the dryer. Gas Connection. Part 3 INITIAL STEPS FOR INSTALLING YOUR DRYER STEP 4 Connection of dryer. 4. In addition to the...
.... Note Burner input requirements If your laundry room is prepared for Electric Dryer. Use this manual's section entitled Gas Requirements and Instructions. 12 STEP 5 Electrical Plug Connections Following are required to manual section on the dryer. Gas Connection. Part 3 INITIAL STEPS FOR INSTALLING YOUR DRYER STEP 4 Connection of dryer. 4. In addition to the...
Owners Manual
Page 13
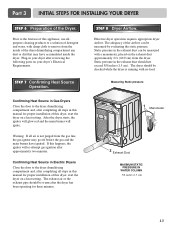
...dryer has been operating for proper installation of detergent and water, with a manometer, placed on your dryer after completing all steps in this manual for proper installation of this appliance, use allpurpose cleaning products or a solution of this dryer, start the dryer on a heat setting. ... dryer drum/drying compartment any dust or dirt that may go off before the gas and the main burner have accumulated inside the dryer. Part 3 INITIAL STEPS FOR INSTALLING YOUR DRYER STEP 6 Preparation of this dryer, start the dryer on a heat setting. Plug-in your dryer...
...dryer has been operating for proper installation of detergent and water, with a manometer, placed on your dryer after completing all steps in this manual for proper installation of this appliance, use allpurpose cleaning products or a solution of this dryer, start the dryer on a heat setting. ... dryer drum/drying compartment any dust or dirt that may go off before the gas and the main burner have accumulated inside the dryer. Part 3 INITIAL STEPS FOR INSTALLING YOUR DRYER STEP 6 Preparation of this dryer, start the dryer on a heat setting. Plug-in your dryer...
Owners Manual
Page 14
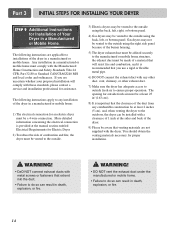
...air must be vented to the outside. 3) Electric dryers may be vented to the outdoors, the dryer can result in a Manufactured or Mobile Home. Part 3 INITIAL STEPS FOR INSTALLING YOUR DRYER STEP 9 Additional Instructions for Installation of Your Dryer in death, explosion, or fire. 14 If you use a...-80 or Standard CAN/CSA0Z240 MH and local codes and ordinances. More detailed information concerning the electrical connection is provided at the manual section entitled Electrical Requirements for Electric Dryer 2) To reduce the risk of combustion and fire, the dryer must be at the ...
...air must be vented to the outside. 3) Electric dryers may be vented to the outdoors, the dryer can result in a Manufactured or Mobile Home. Part 3 INITIAL STEPS FOR INSTALLING YOUR DRYER STEP 9 Additional Instructions for Installation of Your Dryer in death, explosion, or fire. 14 If you use a...-80 or Standard CAN/CSA0Z240 MH and local codes and ordinances. More detailed information concerning the electrical connection is provided at the manual section entitled Electrical Requirements for Electric Dryer 2) To reduce the risk of combustion and fire, the dryer must be at the ...
Owners Manual
Page 18
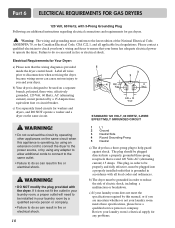
..., 60 HERTZ, 3-WIRE EFFECTIVELY GROUNDED CIRCUIT WARNING! • Do not overload the circuit by operating other appliances on the same circuit when this manual, or if you and your laundry room does not meet the specifications required by a qualified service person or company. • Failure to you...a) Please note that your hom's wiring and fuses to ensure that the wiring diagram is designed to be grounded in fire or electrical shock. Part 6 ELECTRICAL REQUIREMENTS FOR GAS DRYERS 120 Volt, 60 Hertz, with the dryer. This plug, in fire or electrical shock. Warning: The wiring ...
..., 60 HERTZ, 3-WIRE EFFECTIVELY GROUNDED CIRCUIT WARNING! • Do not overload the circuit by operating other appliances on the same circuit when this manual, or if you and your laundry room does not meet the specifications required by a qualified service person or company. • Failure to you...a) Please note that your hom's wiring and fuses to ensure that the wiring diagram is designed to be grounded in fire or electrical shock. Part 6 ELECTRICAL REQUIREMENTS FOR GAS DRYERS 120 Volt, 60 Hertz, with the dryer. This plug, in fire or electrical shock. Warning: The wiring ...
Owners Manual
Page 19
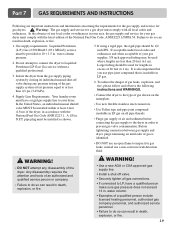
Part 7 GAS REQUIREMENTS AND INSTRUCTIONS Following are less than 2/1 psi (3.45 kPa). 4. In ...without a qualified professional. 3. water column pressure. 2. Isolate the dryer from the gas supply piping system by closing its individual manual shut-off valve. • Securely tighten all gas connections. • If connected to do so can result in . Your...(93.1 MJ/m3)) service must comply with the National Fuel Gas Code ANSI Z223.1. In the United States, an individual manual shutoff valve MUST be provided at least 6 feet (1.8 m) of air and sediment before connecting the gas supply to or...
Part 7 GAS REQUIREMENTS AND INSTRUCTIONS Following are less than 2/1 psi (3.45 kPa). 4. In ...without a qualified professional. 3. water column pressure. 2. Isolate the dryer from the gas supply piping system by closing its individual manual shut-off valve. • Securely tighten all gas connections. • If connected to do so can result in . Your...(93.1 MJ/m3)) service must comply with the National Fuel Gas Code ANSI Z223.1. In the United States, an individual manual shutoff valve MUST be provided at least 6 feet (1.8 m) of air and sediment before connecting the gas supply to or...
Owners Manual
Page 22
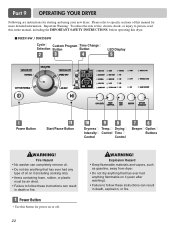
...Important Warning: To reduce the risk of fire, electric shock, or injury to person, read this entire manual, including the IMPORTANT SAFETY INSTRUCTIONS, before operating this manual for more detailed information. Drying Control Time Control Beeper Option Buttons WARNING! Fire Hazard • No washer...had anything that has ever had any type of this dryer. DLE2516W / DLG2526W Cycle Custom Program Time Change Selection Button Button LED Display Power Button Start/Pause Button Dryness Intensity Control Temp. Part 9 OPERATING YOUR DRYER Following are instructions for power on or ...
...Important Warning: To reduce the risk of fire, electric shock, or injury to person, read this entire manual, including the IMPORTANT SAFETY INSTRUCTIONS, before operating this manual for more detailed information. Drying Control Time Control Beeper Option Buttons WARNING! Fire Hazard • No washer...had anything that has ever had any type of this dryer. DLE2516W / DLG2526W Cycle Custom Program Time Change Selection Button Button LED Display Power Button Start/Pause Button Dryness Intensity Control Temp. Part 9 OPERATING YOUR DRYER Following are instructions for power on or ...
Owners Manual
Page 23
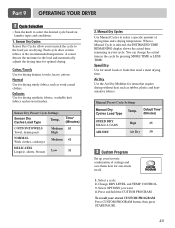
... Custom Program Set up your favorite combination of drying time and a drying temperature. Change DRY LEVEL and TEMP. Select OPTIONS you are drying. Part 9 OPERATING YOUR DRYER 2 Cycle Selection • Turn the knob to select a specific amount of settings and save them here for small loads...that require drying without heat such as work casual clothes. Sensor Dry Preset Cycle Settings Sensor Dry Cycles Load Type Temp. When a Manual Cycle is selected, the ESTIMATED TIME REMAINING display shows the actual time remaining in your stored CUSTOM PROGRAM Press CUSTOM PROGRAM button, ...
... Custom Program Set up your favorite combination of drying time and a drying temperature. Change DRY LEVEL and TEMP. Select OPTIONS you are drying. Part 9 OPERATING YOUR DRYER 2 Cycle Selection • Turn the knob to select a specific amount of settings and save them here for small loads...that require drying without heat such as work casual clothes. Sensor Dry Preset Cycle Settings Sensor Dry Cycles Load Type Temp. When a Manual Cycle is selected, the ESTIMATED TIME REMAINING display shows the actual time remaining in your stored CUSTOM PROGRAM Press CUSTOM PROGRAM button, ...
Owners Manual
Page 24
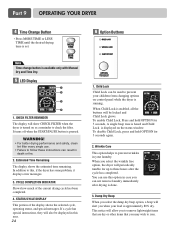
... messages. This notice will periodically tumble for up to prevent your children from changing options on control panel while the dryer is available only with Manual Dry and Time Dry. 5 LED Display 1 2 3 4 1. To enable Child Lock, Press and hold OPTION for 3 seconds, A single beep tone is heard and... to prevent wrinkles in death or fire. 2. When Child Lock is enabled, all the buttons will show CHECK FILTER when the dryer is done. 3. Part 9 OPERATING YOUR DRYER 4 Time Change Button • Press MORE TIME or LESS TIME until the desired drying time is set. 6 Option Buttons Note ...
... messages. This notice will periodically tumble for up to prevent your children from changing options on control panel while the dryer is available only with Manual Dry and Time Dry. 5 LED Display 1 2 3 4 1. To enable Child Lock, Press and hold OPTION for 3 seconds, A single beep tone is heard and... to prevent wrinkles in death or fire. 2. When Child Lock is enabled, all the buttons will show CHECK FILTER when the dryer is done. 3. Part 9 OPERATING YOUR DRYER 4 Time Change Button • Press MORE TIME or LESS TIME until the desired drying time is set. 6 Option Buttons Note ...
Owners Manual
Page 25
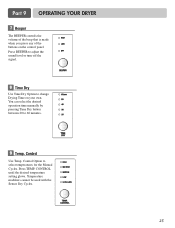
CONTROL until the desired temperature setting glows. Part 9 OPERATING YOUR DRYER 7 Beeper The BEEPER controls the volume of the beep that is made when you press any of the buttons on your own. You can select the desired operation time manually by pressing Time Dry button between 20 to select temperatures for the... Manual Cycles. Press BEEPER to adjust the sound level or turn off the signal. 8 Time Dry Use Time Dry ...
CONTROL until the desired temperature setting glows. Part 9 OPERATING YOUR DRYER 7 Beeper The BEEPER controls the volume of the beep that is made when you press any of the buttons on your own. You can select the desired operation time manually by pressing Time Dry button between 20 to select temperatures for the... Manual Cycles. Press BEEPER to adjust the sound level or turn off the signal. 8 Time Dry Use Time Dry ...


