Specification
Page 2
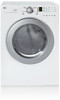
... Time/Less Time FABRIC CARE FEATURES Sensor Dry CONVENIENCE FEATURES End of Cycle Beeper Child Lock Venting Option 4-way Venting Option (electric) 3-way Venting Option (gas) Drum Light Heater Multi-Level Control Reversible Door Remaining Time Display/Status Indicator Leveling Legs 4 Adjustable Legs LoDecibel™ Quiet Operation MATERIALS AND FINISHES Drum Alloy Coated Cabinet Top White Powder Coat Transparent Glass Window Door Door Rim Silver Cabinet Painted Steel Control Panel Plastic Colors White (W) POWER SOURCE Ratings UL Listed Electrical Requirements...
... Time/Less Time FABRIC CARE FEATURES Sensor Dry CONVENIENCE FEATURES End of Cycle Beeper Child Lock Venting Option 4-way Venting Option (electric) 3-way Venting Option (gas) Drum Light Heater Multi-Level Control Reversible Door Remaining Time Display/Status Indicator Leveling Legs 4 Adjustable Legs LoDecibel™ Quiet Operation MATERIALS AND FINISHES Drum Alloy Coated Cabinet Top White Powder Coat Transparent Glass Window Door Door Rim Silver Cabinet Painted Steel Control Panel Plastic Colors White (W) POWER SOURCE Ratings UL Listed Electrical Requirements...
Service Manual
Page 4
DRYER CYCLE PROCESS ...13 5. DIAGNOSTIC TEST ...20 9-1. TEST 2 THERMISTOR TEST 24 9-3. TEST 5 DOOR SWITCH TEST 27 9-6. CHANGE GAS SETTING (NATURAL GAS, PROPANE GAS 30 11. DRUM & MOTOR ASSEMBLY: ELECTRIC MODEL 41 12-3-2. TEST 1 120V AC ELECTRICAL SUPPLY 21 9-2. TEST 7 GAS VALVE TEST - CONTROL LAYOUT ...18 8. TEST 3 MOTOR TEST 25 9-4. TEST 4 MOISTURE SENSOR 26 9-5. INSTALLATION INSTRUCTIONS 6 4. TEST 6 HEATER SWITCH TEST - GAS MODEL 29 10. CONTROL PANEL & PLATE ASSEMBLY 39 12-2. DRUM & MOTOR ASSEMBLY: GAS MODEL 42 13. ELECTRIC MODEL 28 9-7. ...
DRYER CYCLE PROCESS ...13 5. DIAGNOSTIC TEST ...20 9-1. TEST 2 THERMISTOR TEST 24 9-3. TEST 5 DOOR SWITCH TEST 27 9-6. CHANGE GAS SETTING (NATURAL GAS, PROPANE GAS 30 11. DRUM & MOTOR ASSEMBLY: ELECTRIC MODEL 41 12-3-2. TEST 1 120V AC ELECTRICAL SUPPLY 21 9-2. TEST 7 GAS VALVE TEST - CONTROL LAYOUT ...18 8. TEST 3 MOTOR TEST 25 9-4. TEST 4 MOISTURE SENSOR 26 9-5. INSTALLATION INSTRUCTIONS 6 4. TEST 6 HEATER SWITCH TEST - GAS MODEL 29 10. CONTROL PANEL & PLATE ASSEMBLY 39 12-2. DRUM & MOTOR ASSEMBLY: GAS MODEL 42 13. ELECTRIC MODEL 28 9-7. ...
Service Manual
Page 6
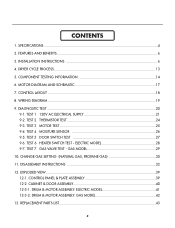
... No. ITEM Material & Finish Color Top Plate Door Trim POWER SUPPLY ELECTRICITY CONSUMPTION MOTOR HEATER LAMP GAS VALVE CONTROL TYPE DRUM CAPACITY Weight (lbs) - of Dry Levels Sound levels Sensor Moisture Temperature Reversible Door Drum Dryer Rack Child Lock Interior Light Product (WxHxD) Packing (WxHxD) DLE2516W / DLG2526W Blue White Porcelain Silver Spray 120V/240V 60Hz (26A) 250W (4.5A) 5400W (22.5A) 15 W (125mA) 13 W (110mA) x 2 Electronic 7.0 cu.ft. 126/144 9 3 5 5 High/...
... No. ITEM Material & Finish Color Top Plate Door Trim POWER SUPPLY ELECTRICITY CONSUMPTION MOTOR HEATER LAMP GAS VALVE CONTROL TYPE DRUM CAPACITY Weight (lbs) - of Dry Levels Sound levels Sensor Moisture Temperature Reversible Door Drum Dryer Rack Child Lock Interior Light Product (WxHxD) Packing (WxHxD) DLE2516W / DLG2526W Blue White Porcelain Silver Spray 120V/240V 60Hz (26A) 250W (4.5A) 5400W (22.5A) 15 W (125mA) 13 W (110mA) x 2 Electronic 7.0 cu.ft. 126/144 9 3 5 5 High/...
Service Manual
Page 12
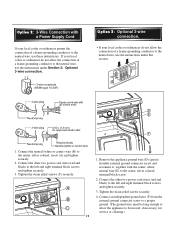
.... 3. Connect the other two power cord wires (red and black) to the neutral wire, use the instructions under this section. Remove the appliance ground wire (D) (green) fromthe external ground connector screw and reconnect it, together with a Power Supply Cord lf your local codes or ordinances permit the connection of a frame-grounding conductor to the left and right terminal block screws and tighten securely. 3. Connect the other two power cord wires (red...
.... 3. Connect the other two power cord wires (red and black) to the neutral wire, use the instructions under this section. Remove the appliance ground wire (D) (green) fromthe external ground connector screw and reconnect it, together with a Power Supply Cord lf your local codes or ordinances permit the connection of a frame-grounding conductor to the left and right terminal block screws and tighten securely. 3. Connect the other two power cord wires (red...

Service Manual
Page 21
... TIME, and LESS TIME simultaneously. 9 DIAGNOSTIC TEST 1. Activating the Heater manually with step 4 by pressing start 4 times) in the end. Pressing the START/PAUSE button CHECKING ACTION DISPLAY CHECKING POINT REMARK None Electric control & Temperature sensor LQC TEST tE1 tE2 Won't power up Detective LED or LCD Thermistor open the door. Motor & Heater Off + Lamp On + "dE" or "Error" (THE DOOR IS Buzzer beeps seven times OPEN.PLEASE CLOSE THE DOOR COMPLETELY) Door switch Lamp During check, Motor on & Heater If the door is open...
... TIME, and LESS TIME simultaneously. 9 DIAGNOSTIC TEST 1. Activating the Heater manually with step 4 by pressing start 4 times) in the end. Pressing the START/PAUSE button CHECKING ACTION DISPLAY CHECKING POINT REMARK None Electric control & Temperature sensor LQC TEST tE1 tE2 Won't power up Detective LED or LCD Thermistor open the door. Motor & Heater Off + Lamp On + "dE" or "Error" (THE DOOR IS Buzzer beeps seven times OPEN.PLEASE CLOSE THE DOOR COMPLETELY) Door switch Lamp During check, Motor on & Heater If the door is open...
Service Manual
Page 26
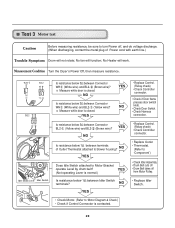
... wire)? Is resistance below 1Ω between terminals of Power cord with earth line.) Trouble Symptom Drum will not rotate; NO YES • Replace Control. (Relay check) • Check Controller connector. • Replace Outlet • Thermostat. (Refer to 'Component') • Check Idler Assembly. • Drum Belt cuts off • Drum Belt takes off , and do voltage discharge. (When discharging, contact the metal plug of Outlet Thermostat attached to Motor Bracket operate Level by drum belt? Measurement Condition Turn the Dryer's Power...
... wire)? Is resistance below 1Ω between terminals of Power cord with earth line.) Trouble Symptom Drum will not rotate; NO YES • Replace Control. (Relay check) • Check Controller connector. • Replace Outlet • Thermostat. (Refer to 'Component') • Check Idler Assembly. • Drum Belt cuts off • Drum Belt takes off , and do voltage discharge. (When discharging, contact the metal plug of Outlet Thermostat attached to Motor Bracket operate Level by drum belt? Measurement Condition Turn the Dryer's Power...
Service Manual
Page 27
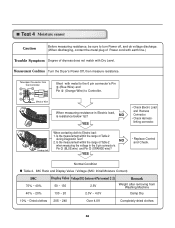
... after removing from the Controller. NO YES Damping cloth When contacting cloth to Controller. Normal Condition Table 2. Metal or Wire When measuring resistance in the 6 pin connector's Pin (BLUE wire) and Pin (ORANGE wire)? Short with Dry Level. Test 4 Moisture sensor Caution Before measuring resistance, be sure to turn Power off, and do voltage discharge. (When discharging, contact the metal plug of Power cord with earth line.) Trouble Symptom...
... after removing from the Controller. NO YES Damping cloth When contacting cloth to Controller. Normal Condition Table 2. Metal or Wire When measuring resistance in the 6 pin connector's Pin (BLUE wire) and Pin (ORANGE wire)? Short with Dry Level. Test 4 Moisture sensor Caution Before measuring resistance, be sure to turn Power off, and do voltage discharge. (When discharging, contact the metal plug of Power cord with earth line.) Trouble Symptom...
Service Manual
Page 44
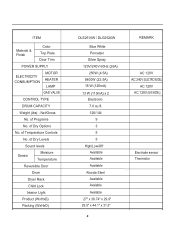
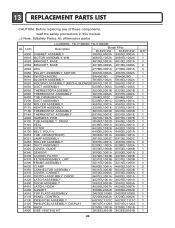
... 4986EL2004D 4986EL2004D 3457ER1006E 3457ER1006E A110 PANEL, CONTROL A130 PWB (PCB) ASSEMBLY 3720EL0002A 3720EL0002A 6871EC1121C 6871EC1121C A120 PWB (PCB) ASSEMBLY, DISPLAY A700 RACK A800 SIDE VENTING KIT 6871EC1120A 6871EC1120A 3750EL1001B 3750EL1001B 383EEL9001B 383EEL9001B 43 QTY 1 1 2 2 4 1 1 1 1 1 1 1 1 1 2 1 1 1 1 1 2 3 1 1 1 2 1 1 2 1 1 1 2 1 1 1 1 1 1 1 1 1 1 1 1 1 13 REPLACEMENT PARTS LIST CAUTION: Before replacing any of these components, read the safety precautions in this manual. ¡Æ Note: S(Safety Parts), AL (Alternative parts) LG MODEL: TD-V10062E, TD-V10060E...
... 4986EL2004D 4986EL2004D 3457ER1006E 3457ER1006E A110 PANEL, CONTROL A130 PWB (PCB) ASSEMBLY 3720EL0002A 3720EL0002A 6871EC1121C 6871EC1121C A120 PWB (PCB) ASSEMBLY, DISPLAY A700 RACK A800 SIDE VENTING KIT 6871EC1120A 6871EC1120A 3750EL1001B 3750EL1001B 383EEL9001B 383EEL9001B 43 QTY 1 1 2 2 4 1 1 1 1 1 1 1 1 1 2 1 1 1 1 1 2 3 1 1 1 2 1 1 2 1 1 1 2 1 1 1 1 1 1 1 1 1 1 1 1 1 13 REPLACEMENT PARTS LIST CAUTION: Before replacing any of these components, read the safety precautions in this manual. ¡Æ Note: S(Safety Parts), AL (Alternative parts) LG MODEL: TD-V10062E, TD-V10060E...
Owners Manual
Page 4
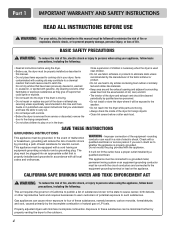
... into the dryer if the drum is moving. • Do not repair or replace any part of the dryer or attempt any servicing unless specifically recommended in this Use and Care Guide or in published user-repair instructions that you are moving. • Always check the inside of electric shock. WARNING - Items contaminated with a cord having an equipment-grounding conductor and a grounding plug. CALIFORNIA SAFE DRINKING WATER AND TOXIC...
... into the dryer if the drum is moving. • Do not repair or replace any part of the dryer or attempt any servicing unless specifically recommended in this Use and Care Guide or in published user-repair instructions that you are moving. • Always check the inside of electric shock. WARNING - Items contaminated with a cord having an equipment-grounding conductor and a grounding plug. CALIFORNIA SAFE DRINKING WATER AND TOXIC...
Owners Manual
Page 5
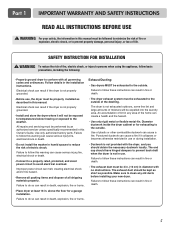
... when the dryer is not provided with all shipping materials properly. The exhaust duct should have hinged dampers to follow these instructions can cause serious injury,fire, electrical shock or death. • Connect to a properly rated, protected, and sized power circuit to the outside. Make sure to prevent property damage, personal injury, or loss of lint in any old ducts before installing your...
... when the dryer is not provided with all shipping materials properly. The exhaust duct should have hinged dampers to follow these instructions can cause serious injury,fire, electrical shock or death. • Connect to a properly rated, protected, and sized power circuit to the outside. Make sure to prevent property damage, personal injury, or loss of lint in any old ducts before installing your...
Owners Manual
Page 6
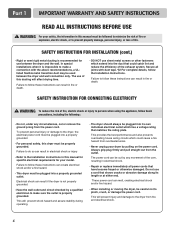
... remove the ground prong from overheated wires. • Never unplug your dryer by a qualified electrician to make sure the outlet is not properly grounded. • Have the wall outlet and circuit checked by pulling on the power cord. Secure all power cords that could cause a fire hazard from the power cord. The power cord can result if the dryer is properly grounded. This will affect drying time. SAFETY INSTRUCTION FOR CONNECTING ELECTRICITY...
... remove the ground prong from overheated wires. • Never unplug your dryer by a qualified electrician to make sure the outlet is not properly grounded. • Have the wall outlet and circuit checked by pulling on the power cord. Secure all power cords that could cause a fire hazard from the power cord. The power cord can result if the dryer is properly grounded. This will affect drying time. SAFETY INSTRUCTION FOR CONNECTING ELECTRICITY...
Owners Manual
Page 11
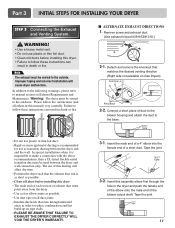
... and incorrect installation will affect dry time. • Position the dryer such that runs through the hole in order to the outdoors. Remove screw and exhaust duct. (Use exhaust kit part #3911EZ9131X.) 2-1. WARNING! • Use a heavy metal vent. • Do not use as possible. • Use duct tape on pipe walls. • PLEASE BE AWARE THAT FAILURE TO EXHAUST THE DRYER CORRECTLY WILL VOID THE DRYER'S WARRANTY. 3-1. The use of this assembly elbow...
... and incorrect installation will affect dry time. • Position the dryer such that runs through the hole in order to the outdoors. Remove screw and exhaust duct. (Use exhaust kit part #3911EZ9131X.) 2-1. WARNING! • Use a heavy metal vent. • Do not use as possible. • Use duct tape on pipe walls. • PLEASE BE AWARE THAT FAILURE TO EXHAUST THE DRYER CORRECTLY WILL VOID THE DRYER'S WARRANTY. 3-1. The use of this assembly elbow...
Owners Manual
Page 12
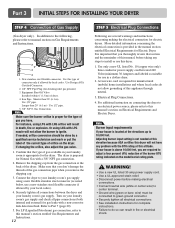
... connector. • Securely tighten all connections between the dryer and your house is provided in fire or electrical shock. It is required for the dryer. Electrical Plug Connections. 4. Use this dryer. 1. Turn on the model/serial rating plate. For LP (Liquefied Petroleum) gas connection, refer to this manual's section entitled Gas Requirements and Instructions. 12 STEP 5 Electrical Plug Connections Following are required to center terminal. • Ground wire (green or bare wire) must be done by local codes. A four-wire cord...
... connector. • Securely tighten all connections between the dryer and your house is provided in fire or electrical shock. It is required for the dryer. Electrical Plug Connections. 4. Use this dryer. 1. Turn on the model/serial rating plate. For LP (Liquefied Petroleum) gas connection, refer to this manual's section entitled Gas Requirements and Instructions. 12 STEP 5 Electrical Plug Connections Following are required to center terminal. • Ground wire (green or bare wire) must be done by local codes. A four-wire cord...
Owners Manual
Page 14
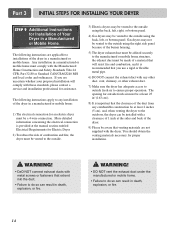
... manual section entitled Electrical Requirements for Electric Dryer 2) To reduce the risk of combustion and fire, the dryer must be vented to the outside. 3) Electric dryers may be vented to the outside using the back, left, right, or bottom panel. 4) Gas dryers may not be vented to the outside using the back, left, or bottom panel. The following instructions apply to any other duct, vent, chimney, or other exhaust duct. 7) Make sure the dryer...
... manual section entitled Electrical Requirements for Electric Dryer 2) To reduce the risk of combustion and fire, the dryer must be vented to the outside. 3) Electric dryers may be vented to the outside using the back, left, right, or bottom panel. 4) Gas dryers may not be vented to the outside using the back, left, or bottom panel. The following instructions apply to any other duct, vent, chimney, or other exhaust duct. 7) Make sure the dryer...

Owners Manual
Page 17
..., 3-Wire Installation Instructions for electric dryers. d) The power cord (pigtail) connection between wall receptacle and dryer terminal block IS NOT supplied with the circuit conductors and connected to examples on both sides of the National Electrical Code, ANSI/NFPA 70 and all applicable local regulations. Refer to the equipment-grounding terminal or lead on the following are included in length, use U.L. (Underwriters Laboratories) listed No. 8 A.W.G. Part 5 ELECTRICAL REQUIREMENTS FOR ELECTRIC DRYERS The following pages. Type...
..., 3-Wire Installation Instructions for electric dryers. d) The power cord (pigtail) connection between wall receptacle and dryer terminal block IS NOT supplied with the circuit conductors and connected to examples on both sides of the National Electrical Code, ANSI/NFPA 70 and all applicable local regulations. Refer to the equipment-grounding terminal or lead on the following are included in length, use U.L. (Underwriters Laboratories) listed No. 8 A.W.G. Part 5 ELECTRICAL REQUIREMENTS FOR ELECTRIC DRYERS The following pages. Type...
Owners Manual
Page 18
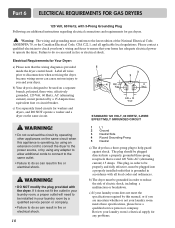
... fuse or circuit breaker. b) Your dryer is provided inside the dryer control hood. Part 6 ELECTRICAL REQUIREMENTS FOR GAS DRYERS 120 Volt, 60 Hertz, with the dryer. Failure to do so can result in accordance with all local codes and ordinances. The plug should be plugged directed into a properly installed outlet that the wiring diagram is designed to be properly and fully effective, must be installed in your laundry room, a proper outlet will need...
... fuse or circuit breaker. b) Your dryer is provided inside the dryer control hood. Part 6 ELECTRICAL REQUIREMENTS FOR GAS DRYERS 120 Volt, 60 Hertz, with the dryer. Failure to do so can result in accordance with all local codes and ordinances. The plug should be plugged directed into a properly installed outlet that the wiring diagram is designed to be properly and fully effective, must be installed in your laundry room, a proper outlet will need...
Owners Manual
Page 19
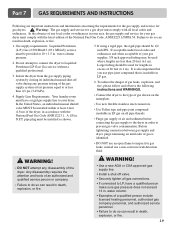
... should be installed as shown. 5. Any disassembly requires the attention and tools of the dryer. WARNING! • Use a new AGA or CSA approved gas supply line. • Install a shut-off valve during any disassembly of an authorized and qualified service person or company. • Failure to your gas dryer must be used where lengths are important instructions and information concerning the requirements for the gas supply and service for your...
... should be installed as shown. 5. Any disassembly requires the attention and tools of the dryer. WARNING! • Use a new AGA or CSA approved gas supply line. • Install a shut-off valve during any disassembly of an authorized and qualified service person or company. • Failure to your gas dryer must be used where lengths are important instructions and information concerning the requirements for the gas supply and service for your...
Owners Manual
Page 28
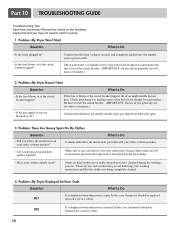
... not need to use two fuses or breakers.) 2. tE2 It is displayed when thermistor is securely and completely pushed into the laundry room's power outlet. In this case, thermistor should be replaced by a service center. 28 Problem: There Are Greasy Spots On My Clothes. Part 10 TROUBLESHOOTING GUIDE Troubleshooting Tips Save time and money! Problem: My Dryer Won't Start Question What to Do It is displayed when thermistor is the circuit breaker tripped...
... not need to use two fuses or breakers.) 2. tE2 It is displayed when thermistor is securely and completely pushed into the laundry room's power outlet. In this case, thermistor should be replaced by a service center. 28 Problem: There Are Greasy Spots On My Clothes. Part 10 TROUBLESHOOTING GUIDE Troubleshooting Tips Save time and money! Problem: My Dryer Won't Start Question What to Do It is displayed when thermistor is the circuit breaker tripped...
Owners Manual
Page 29
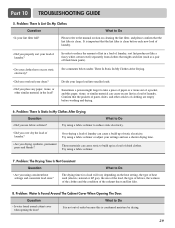
... load sizes? Problem: The Drying Time Is Not Consistent Question What to reduce static electricity. • Did you over dry the load of laundry? Question What to reduce the amount of lint in a load of laundry can cause excess lint in the load? Over-drying a load of dried clothes. In order to Do • Is water found around cabinet cover when opening the door? See comments below under. Divide your lint filter...
... load sizes? Problem: The Drying Time Is Not Consistent Question What to reduce static electricity. • Did you over dry the load of laundry? Question What to reduce the amount of lint in a load of laundry can cause excess lint in the load? Over-drying a load of dried clothes. In order to Do • Is water found around cabinet cover when opening the door? See comments below under. Divide your lint filter...
Owners Manual
Page 30
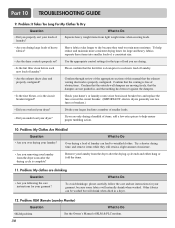
... manual that the lint filter is free of smaller loads. • Did you following the care instructions for large and heavy fabrics, separate these items into a number of obstructions. Divide your larger load into smaller loads of laundry? Problem: My clothes are drying. • Is the lint filter clean before each new load of heavy fabrics? Check your home's or laundry room's fuse box/circuit breaker box and replace the fuse or reset the circuit breaker...
... manual that the lint filter is free of smaller loads. • Did you following the care instructions for large and heavy fabrics, separate these items into a number of obstructions. Divide your larger load into smaller loads of laundry? Problem: My clothes are drying. • Is the lint filter clean before each new load of heavy fabrics? Check your home's or laundry room's fuse box/circuit breaker box and replace the fuse or reset the circuit breaker...


