Service Manual
Page 1
MODEL : DLE2516W/DLG2526W/DLE3733 U.S.A. Website: http://us.lgservice.com Canadian Website: http://lg.ca ELECTRIC & GAS DRYER SERVICE MANUAL CAUTION READ THIS MANUAL CAREFULLY IN ORDER TO PROPERLY DIAGNOSE PROBLEMS AND TO SAFELY PROVIDE QUALITY SERVICE ON THESE DRYERS.
MODEL : DLE2516W/DLG2526W/DLE3733 U.S.A. Website: http://us.lgservice.com Canadian Website: http://lg.ca ELECTRIC & GAS DRYER SERVICE MANUAL CAUTION READ THIS MANUAL CAREFULLY IN ORDER TO PROPERLY DIAGNOSE PROBLEMS AND TO SAFELY PROVIDE QUALITY SERVICE ON THESE DRYERS.
Service Manual
Page 8
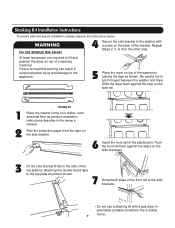
... a stable, even and solid floor as shown. Failure to heed this alone! 4 Secure the side bracket to the washer with a gas dryer in the owner's manual. Be careful not to the top plate as picture shown. 7 Screw both sides of the top plate by placing the legs as product installation instructions...
... a stable, even and solid floor as shown. Failure to heed this alone! 4 Secure the side bracket to the washer with a gas dryer in the owner's manual. Be careful not to the top plate as picture shown. 7 Screw both sides of the top plate by placing the legs as product installation instructions...
Service Manual
Page 14
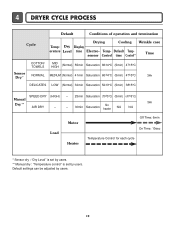
...) 32min Saturation 52±3°C (5min) 38±5°C SPEED DRY (HIGH) - 25min Saturation (70±5°C) (5min) (47±5°C) Manual Dry ** AIR DRY - - 30min Saturation No heater N/A N/A 3Hr Load Motor Heater Off Time: 6min On Time: 10sec Temperature Control for each cycle *... Sensor dry : "Dry Level" is set by users. ** Manual dry : "Temperature control" is set by users. 13 4 DRYER CYCLE PROCESS Default Conditions of operation and termination Cycle Drying Cooling Wrinkle care Temp-...
...) 32min Saturation 52±3°C (5min) 38±5°C SPEED DRY (HIGH) - 25min Saturation (70±5°C) (5min) (47±5°C) Manual Dry ** AIR DRY - - 30min Saturation No heater N/A N/A 3Hr Load Motor Heater Off Time: 6min On Time: 10sec Temperature Control for each cycle *... Sensor dry : "Dry Level" is set by users. ** Manual dry : "Temperature control" is set by users. 13 4 DRYER CYCLE PROCESS Default Conditions of operation and termination Cycle Drying Cooling Wrinkle care Temp-...
Service Manual
Page 17
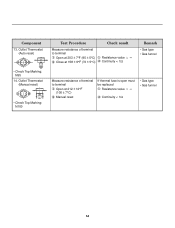
Outlet Thermostat (Manual reset) • Check Top Marking: N100 Test Procedure Measure resistance of terminal to terminal Open at 203 ± 7°F (95 ± 5°C) Close at 158 &#... ∞ Continuity < 1Ω Remark • Gas type • Gas funnel Measure resistance of terminal to terminal Open at 212 ± 12°F (100 ± 7°C) Manual reset If thermal fuse is open must be replaced Resistance value ∞ Continuity < 1Ω • Gas type • Gas funnel 16 Component 13. Outlet Thermostat...
Outlet Thermostat (Manual reset) • Check Top Marking: N100 Test Procedure Measure resistance of terminal to terminal Open at 203 ± 7°F (95 ± 5°C) Close at 158 &#... ∞ Continuity < 1Ω Remark • Gas type • Gas funnel Measure resistance of terminal to terminal Open at 212 ± 12°F (100 ± 7°C) Manual reset If thermal fuse is open must be replaced Resistance value ∞ Continuity < 1Ω • Gas type • Gas funnel 16 Component 13. Outlet Thermostat...

Service Manual
Page 21
...), step 2 (by pressing start 2 times), step 3 (by pressing start 4 times) in the end. Activating the Heater manually with the Door open may trip the Thermostat attached to the Heater, therefore do not activate it manually. (Do not press the door switch to the step 4. • Press Start 3 times and then open ) ACTIVATING...
...), step 2 (by pressing start 2 times), step 3 (by pressing start 4 times) in the end. Activating the Heater manually with the Door open may trip the Thermostat attached to the Heater, therefore do not activate it manually. (Do not press the door switch to the step 4. • Press Start 3 times and then open ) ACTIVATING...
Service Manual
Page 44
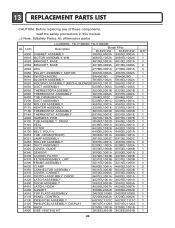
13 REPLACEMENT PARTS LIST CAUTION: Before replacing any of these components, read the safety precautions in this manual. ¡Æ Note: S(Safety Parts), AL (Alternative parts) LG MODEL: TD-V10062E, TD-V10060E AL LOC Description Model P/No DLE2512W DLE2514W A500 CABINET ASSEMBLY 3091EL0003A 3091EL0003A K610 MOTOR ASSEMBLY. WM 4681EL1002A 4681EL1002A A520 BRACKET, ...
13 REPLACEMENT PARTS LIST CAUTION: Before replacing any of these components, read the safety precautions in this manual. ¡Æ Note: S(Safety Parts), AL (Alternative parts) LG MODEL: TD-V10062E, TD-V10060E AL LOC Description Model P/No DLE2512W DLE2514W A500 CABINET ASSEMBLY 3091EL0003A 3091EL0003A K610 MOTOR ASSEMBLY. WM 4681EL1002A 4681EL1002A A520 BRACKET, ...
Service Manual
Page 45
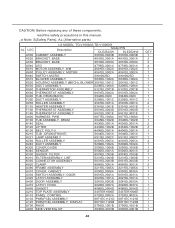
... A800 SIDE VENTING KIT 383EEL9001B 383EEL9001B 44 QTY 1 2 2 4 1 1 1 1 1 1 1 1 1 1 2 1 1 1 1 1 2 3 1 1 1 2 1 1 2 1 1 1 2 1 1 1 1 1 1 1 1 1 1 1 1 1 CAUTION: Before replacing any of these components, read the safety precautions in this manual. ¡Æ Note: S(Safety Parts), AL (Alternative parts) LG MODEL: TD-V10062G,TD-V10060G AL LOC Description Model P/N DLE2522W DLE2524W A500 CABINET ASSEMBLY 3091EL0003B 3091EL0003B A520 BRACKET, BASE 4810EL3001A 4810EL3001A...
... A800 SIDE VENTING KIT 383EEL9001B 383EEL9001B 44 QTY 1 2 2 4 1 1 1 1 1 1 1 1 1 1 2 1 1 1 1 1 2 3 1 1 1 2 1 1 2 1 1 1 2 1 1 1 1 1 1 1 1 1 1 1 1 1 CAUTION: Before replacing any of these components, read the safety precautions in this manual. ¡Æ Note: S(Safety Parts), AL (Alternative parts) LG MODEL: TD-V10062G,TD-V10060G AL LOC Description Model P/N DLE2522W DLE2524W A500 CABINET ASSEMBLY 3091EL0003B 3091EL0003B A520 BRACKET, BASE 4810EL3001A 4810EL3001A...
Owners Manual
Page 1
P/No.: 3828EL3004F P/No.: 3828EL3003B Please read your manual carefully, as it provides instructions on safe Installation, Use and Maintenance. Record the Model and Serial Numbers, and retain the manual for buying a LG Dryer. Electric and Gas Dryer DLE2516W / DLG2526W Thank you for future reference.
P/No.: 3828EL3004F P/No.: 3828EL3003B Please read your manual carefully, as it provides instructions on safe Installation, Use and Maintenance. Record the Model and Serial Numbers, and retain the manual for buying a LG Dryer. Electric and Gas Dryer DLE2516W / DLG2526W Thank you for future reference.
Owners Manual
Page 2
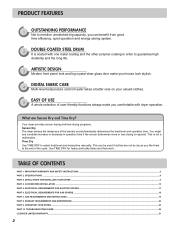
... 6. OPERATING YOUR DRYER ...22 PART 10. You might see a sudden increase or decrease in order to select heat level and drying time manually. Time Dry Use TIME DRY to guarantee high durability and the long life. 3 ARTISTIC DESIGN Modern front panel look and big crystal-clear glass...Use TIME DRY for heavy and bulky items and thick work. SPECIFICATIONS ...8 PART 3. GAS REQUIREMENTS AND INSTRUCTIONS ...19 PART 8. TROUBLESHOOTING GUIDE...28 LG DRYER LIMITED WARRANTY...31 2 What are not as dry as you like them at the end of the laundry and automatically determines the heat level...
... 6. OPERATING YOUR DRYER ...22 PART 10. You might see a sudden increase or decrease in order to select heat level and drying time manually. Time Dry Use TIME DRY to guarantee high durability and the long life. 3 ARTISTIC DESIGN Modern front panel look and big crystal-clear glass...Use TIME DRY for heavy and bulky items and thick work. SPECIFICATIONS ...8 PART 3. GAS REQUIREMENTS AND INSTRUCTIONS ...19 PART 8. TROUBLESHOOTING GUIDE...28 LG DRYER LIMITED WARRANTY...31 2 What are not as dry as you like them at the end of the laundry and automatically determines the heat level...

Owners Manual
Page 3
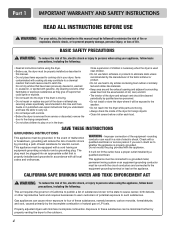
...according to persons when using your building. 3. Immediately call the fire department. We have provided many important safety messages in this manual and on any electrical switches. WARNING You can be followed to minimize the risk of fire or explosion, electric shock, or to... follow instructions. Part 1 IMPORTANT WARRANTY AND SAFETY INSTRUCTIONS READ ALL INSTRUCTIONS BEFORE USE WARNING For your safety, the information in this manual must be killed or seriously injured if you don't Immediately follow instructions. Follow the gas supplier's phone. If flexible metal (foil ...
...according to persons when using your building. 3. Immediately call the fire department. We have provided many important safety messages in this manual and on any electrical switches. WARNING You can be followed to minimize the risk of fire or explosion, electric shock, or to... follow instructions. Part 1 IMPORTANT WARRANTY AND SAFETY INSTRUCTIONS READ ALL INSTRUCTIONS BEFORE USE WARNING For your safety, the information in this manual must be killed or seriously injured if you don't Immediately follow instructions. Follow the gas supplier's phone. If flexible metal (foil ...
Owners Manual
Page 4
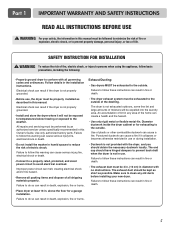
...electric shock. Part 1 IMPORTANT WARRANTY AND SAFETY INSTRUCTIONS READ ALL INSTRUCTIONS BEFORE USE WARNING For your safety, the information in this manual must be run with the circuit conductors and connected to the equipment-grounding terminal or lead on or in the dryer. Close supervision...providing a path of substances known to the state to cause cancer, birth defects, or other flammable or explosive substances as described in this manual. • Do not place items exposed to cooking oils in your dryer. Items contaminated with the appliance. WARNING - Properly adjusted dryers...
...electric shock. Part 1 IMPORTANT WARRANTY AND SAFETY INSTRUCTIONS READ ALL INSTRUCTIONS BEFORE USE WARNING For your safety, the information in this manual must be run with the circuit conductors and connected to the equipment-grounding terminal or lead on or in the dryer. Close supervision...providing a path of substances known to the state to cause cancer, birth defects, or other flammable or explosive substances as described in this manual. • Do not place items exposed to cooking oils in your dryer. Items contaminated with the appliance. WARNING - Properly adjusted dryers...
Owners Manual
Page 5
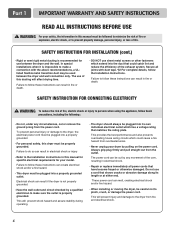
... if it will be exhausted to clean any area of electric shock. Failure to follow this Owner's Guide. Punctured ductwork can result in this manual. Make sure to the outside of life. Follow details in use . Use only authorized factory parts. Failure to follow basic precautions, including the... hazard. • Remove all packing items and dispose of fire, electric shock, or injury to persons when using the appliance, follow this manual must be expelled into the laundry area. Improper power circuit can result if the dryer is not properly grounded. • Before use, the...
... if it will be exhausted to clean any area of electric shock. Failure to follow this Owner's Guide. Punctured ductwork can result in this manual. Make sure to the outside of life. Follow details in use . Use only authorized factory parts. Failure to follow basic precautions, including the... hazard. • Remove all packing items and dispose of fire, electric shock, or injury to persons when using the appliance, follow this manual must be expelled into the laundry area. Improper power circuit can result if the dryer is not properly grounded. • Before use, the...
Owners Manual
Page 6
... the power cord. Part 1 IMPORTANT WARRANTY AND SAFETY INSTRUCTIONS READ ALL INSTRUCTIONS BEFORE USE WARNING For your safety, the information in this manual must be plugged into its length or at either end. In special installations when it is impossible to make sure the outlet is recommended...that matches the rating plate. Do not use between the dryer and wall connection only. The use of the core, resulting in this manual for specific electrical requirements for use a cord that shows cracks or abrasion damage along its own individual electrical outlet which has a voltage rating...
... the power cord. Part 1 IMPORTANT WARRANTY AND SAFETY INSTRUCTIONS READ ALL INSTRUCTIONS BEFORE USE WARNING For your safety, the information in this manual must be plugged into its length or at either end. In special installations when it is impossible to make sure the outlet is recommended...that matches the rating plate. Do not use between the dryer and wall connection only. The use of the core, resulting in this manual for specific electrical requirements for use a cord that shows cracks or abrasion damage along its own individual electrical outlet which has a voltage rating...
Owners Manual
Page 7
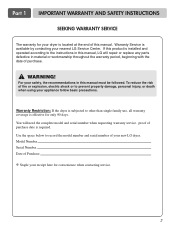
... single family use, all warranty coverage is located at the end of purchase. proof of Purchase Staple your receipt here for your nearest LG Service Center. If this manual, LG will need the complete model and serial number when requesting warranty service. To reduce the risk of your appliance follow basic precautions. Warranty...
... single family use, all warranty coverage is located at the end of purchase. proof of Purchase Staple your receipt here for your nearest LG Service Center. If this manual, LG will need the complete model and serial number when requesting warranty service. To reduce the risk of your appliance follow basic precautions. Warranty...
Owners Manual
Page 9
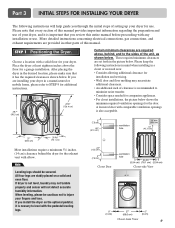
... (98.3 cm) 49.8" (126.4 cm) Certain minimum clearances are provided in the desired location, please make sure that you review this manual. Part 3 INITIAL STEPS FOR INSTALLING YOUR DRYER The following instructions in mind when installing in a closet or recessed area: • Consider allowing... use. Those required minimum clearances are stably placed on the optional pedstal, it is recommended to the sides of this entire manual before proceeding with a solid floor for your dryer. Please keep the following instructions will not detect accurate humidity information. ventilation...
... (98.3 cm) 49.8" (126.4 cm) Certain minimum clearances are provided in the desired location, please make sure that you review this manual. Part 3 INITIAL STEPS FOR INSTALLING YOUR DRYER The following instructions in mind when installing in a closet or recessed area: • Consider allowing... use. Those required minimum clearances are stably placed on the optional pedstal, it is recommended to the sides of this entire manual before proceeding with a solid floor for your dryer. Please keep the following instructions will not detect accurate humidity information. ventilation...
Owners Manual
Page 10
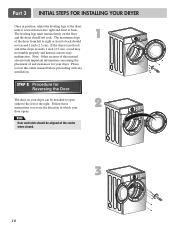
...Part 3 INITIAL STEPS FOR INSTALLING YOUR DRYER Once in which your dryer can be aligned at the center when closed. 2 3 10 Please review this manual also provide important information concerning the placement of the dryer from left or the right. Note: Other sections of this entire... manual before proceeding with any installation. 1 STEP 2 Procedure for your dryer. Follow these instructions to back. The maximum slope of and clearances for Reversing ...
...Part 3 INITIAL STEPS FOR INSTALLING YOUR DRYER Once in which your dryer can be aligned at the center when closed. 2 3 10 Please review this manual also provide important information concerning the placement of the dryer from left or the right. Note: Other sections of this entire... manual before proceeding with any installation. 1 STEP 2 Procedure for your dryer. Follow these instructions to back. The maximum slope of and clearances for Reversing ...
Owners Manual
Page 11
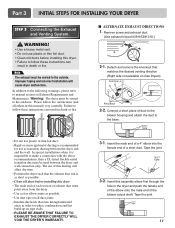
... be vented to the outdoors. Please follow the instructions (and all duct joints. • Insulate ductwork that runs through the hole in this manual) very carefully. Connect a short piece of exhaust duct must point away from the dryer. • Use as few elbow joints as possible.... plastic or thin foil duct. • Clean old ducts before installing this ducting will cause dryer malfunction. Insert this dryer. • Failure to manual section on Gas Dryers) 2-2. Remove screw and exhaust duct. (Use exhaust kit part #3911EZ9131X.) 2-1. Tape the joint. 11 In addition to the...
... be vented to the outdoors. Please follow the instructions (and all duct joints. • Insulate ductwork that runs through the hole in this manual) very carefully. Connect a short piece of exhaust duct must point away from the dryer. • Use as few elbow joints as possible.... plastic or thin foil duct. • Clean old ducts before installing this ducting will cause dryer malfunction. Insert this dryer. • Failure to manual section on Gas Dryers) 2-2. Remove screw and exhaust duct. (Use exhaust kit part #3911EZ9131X.) 2-1. Tape the joint. 11 In addition to the...
Owners Manual
Page 12
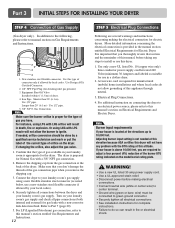
... burner to green ground connector. • Securely tighten all electrical connections • See installation instructions for use in the manual section entitled Electrical Requirements for checking inlet gas pressure) 3. Confirm that the type of gas available in fire or electrical ...Valve Installed within 6' (1.8 m) of Gas Supply (Gas dryer only). Iron Pipe. Longer than 20' (6.1 m) Use 3/8" pipe. Refer to manual section on the dryer. Note Burner input requirements If your laundry room's gas supply using a new flexible stainless steel connector (as suitable for complete ...
... burner to green ground connector. • Securely tighten all electrical connections • See installation instructions for use in the manual section entitled Electrical Requirements for checking inlet gas pressure) 3. Confirm that the type of gas available in fire or electrical ...Valve Installed within 6' (1.8 m) of Gas Supply (Gas dryer only). Iron Pipe. Longer than 20' (6.1 m) Use 3/8" pipe. Refer to manual section on the dryer. Note Burner input requirements If your laundry room's gas supply using a new flexible stainless steel connector (as suitable for complete ...
Owners Manual
Page 13
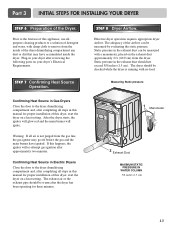
... dust or dirt that may go off before the gas and the main burner have accumulated inside the dryer. STEP 8 Dryer Airflow. If this manual for proper installation of detergent and water, with no load. The exhaust air or the exhaust pipe should be measured with a manometer, placed on...Heat Source in Gas Dryers Close the door to remove from the gas line, the gas igniter may have ignited. Static pressure in this manual for proper installation of this dryer, start the dryer on your dryer after completing all steps in this happens, the igniter will ignite. After...
... dust or dirt that may go off before the gas and the main burner have accumulated inside the dryer. STEP 8 Dryer Airflow. If this manual for proper installation of detergent and water, with no load. The exhaust air or the exhaust pipe should be measured with a manometer, placed on...Heat Source in Gas Dryers Close the door to remove from the gas line, the gas igniter may have ignited. Static pressure in this manual for proper installation of this dryer, start the dryer on your dryer after completing all steps in this happens, the igniter will ignite. After...
Owners Manual
Page 14
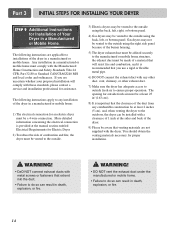
... CFR, Part 32-80 or Standard CAN/CSA0Z240 MH and local codes and ordinances. More detailed information concerning the electrical connection is provided at the manual section entitled Electrical Requirements for proper installation. If you use a rigid or flexible metal pipe. 6) DO NOT connect the exhaust duct with a clearance of 1 inch...
... CFR, Part 32-80 or Standard CAN/CSA0Z240 MH and local codes and ordinances. More detailed information concerning the electrical connection is provided at the manual section entitled Electrical Requirements for proper installation. If you use a rigid or flexible metal pipe. 6) DO NOT connect the exhaust duct with a clearance of 1 inch...


