
User Guide
Page 5
Set up 01 Your standby screen 02 The basics 03 Get creative 04 Get organised 05 The web 06 Settings 07 Accessories 08
Set up 01 Your standby screen 02 The basics 03 Get creative 04 Get organised 05 The web 06 Settings 07 Accessories 08

User Guide
Page 11
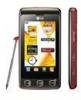
Charger, Cable, Handsfree connector TIP: To connect the USB cable, wait until the phone has powered up 9 Short press: controls the volume. 01 02 03 Micro SD memory card 04 socket 05 Lock/Unlock key 06 Capture button 07 Stylus 08 Set up and has registered to the network. Side keys • When the screen is idle: volume of key tone. • During a call: volume of the earpiece. • When playing a BGM track -
Charger, Cable, Handsfree connector TIP: To connect the USB cable, wait until the phone has powered up 9 Short press: controls the volume. 01 02 03 Micro SD memory card 04 socket 05 Lock/Unlock key 06 Capture button 07 Stylus 08 Set up and has registered to the network. Side keys • When the screen is idle: volume of key tone. • During a call: volume of the earpiece. • When playing a BGM track -

User Guide
Page 13
Set up 11 Installing the USIM and battery 1 Remove the battery cover Slide the battery cover towards the bottom of the phone and away from it. 2 Remove the battery Using the cut-out at the bottom lift it from the battery compartment. 01 02 03 04 WARNING: Do not use your 05 fingernail when removing the 06 battery. 07 WARNING: Do not remove 08 the battery when the phone is switched on, as this may damage the phone.
Set up 11 Installing the USIM and battery 1 Remove the battery cover Slide the battery cover towards the bottom of the phone and away from it. 2 Remove the battery Using the cut-out at the bottom lift it from the battery compartment. 01 02 03 04 WARNING: Do not use your 05 fingernail when removing the 06 battery. 07 WARNING: Do not remove 08 the battery when the phone is switched on, as this may damage the phone.

User Guide
Page 15
5 Charging your phone Lift and twist the charger socket 01 cover of the on screen. 05 06 07 08 Set up 13 Your KP500 needs to 04 be charged until "Battery full" appears on the side of your 02 KP500. Insert the charger and plug it into a mains electricity 03 socket.
5 Charging your phone Lift and twist the charger socket 01 cover of the on screen. 05 06 07 08 Set up 13 Your KP500 needs to 04 be charged until "Battery full" appears on the side of your 02 KP500. Insert the charger and plug it into a mains electricity 03 socket.

User Guide
Page 17
Set up 15 for 02 example, videos will automatically 01 be stored in the correct folder; NOTE: If your memory card already has content, it will be filed in the My Videos folder. 03 Transferring your contacts 04 To transfer your contacts from your 05 USIM to your phone: 06 1 From the Communicate tab, 07 select and choose Settings. 2 Touch Copy. 08 3 Choose Handset to SIM. 4 Choose all or choose names one by one and touch Copy.
Set up 15 for 02 example, videos will automatically 01 be stored in the correct folder; NOTE: If your memory card already has content, it will be filed in the My Videos folder. 03 Transferring your contacts 04 To transfer your contacts from your 05 USIM to your phone: 06 1 From the Communicate tab, 07 select and choose Settings. 2 Touch Copy. 08 3 Choose Handset to SIM. 4 Choose all or choose names one by one and touch Copy.

User Guide
Page 19
...more items are two types of idle screen. 07 Flick left or right to your home screen. Your KP500 will vibrate slightly when it . 06 • There are visible. • There's no need right ... 2 Speed dial idle - When you touch , the speed dial list appears. Your standby screen Whenever your KP500 is not in both idle types. You can access all the menu options, make a quick call and view .... To scroll through lists, touch the last item visible and slide your phone as well as many other options around it. 01 • When the screen back light is sensitive enough to pick up the...
...more items are two types of idle screen. 07 Flick left or right to your home screen. Your KP500 will vibrate slightly when it . 06 • There are visible. • There's no need right ... 2 Speed dial idle - When you touch , the speed dial list appears. Your standby screen Whenever your KP500 is not in both idle types. You can access all the menu options, make a quick call and view .... To scroll through lists, touch the last item visible and slide your phone as well as many other options around it. 01 • When the screen back light is sensitive enough to pick up the...

User Guide
Page 21
... Messaging options menu. Input the number as you can also create 07 new contacts and edit existing ones. To search for details. The quick keys 01 The quick keys provide easy, one-touch access to your most used functions. 02 Touch to bring up the touch dialling pad to call .
... Messaging options menu. Input the number as you can also create 07 new contacts and edit existing ones. To search for details. The quick keys 01 The quick keys provide easy, one-touch access to your most used functions. 02 Touch to bring up the touch dialling pad to call .

User Guide
Page 23
... and 04 Memory, Profile, MP3 and Bluetooth access them with one touch. 05 status. Changing your Status from Using the Multitasking the status bar function 01 Touch the status bar to the standby 07 screen without exiting or closing the 08 application. a game or the FM radio), will appear in the...
... and 04 Memory, Profile, MP3 and Bluetooth access them with one touch. 05 status. Changing your Status from Using the Multitasking the status bar function 01 Touch the status bar to the standby 07 screen without exiting or closing the 08 application. a game or the FM radio), will appear in the...

User Guide
Page 25
This is 04 great if you have more than one saved. 4 Touch . Answering and rejecting a call 01 When your profile to Silent for a meeting. 06 Press the hard or touch to reject an incoming call . Making a call from your contacts 1 From the .... 3 From the filtered list, touch the contact you'd like to call and select the number to use if you 've forgotten to change 05 your phone rings press the 02 hard key or touch to 03 answer the call . 07 08 The basics 23 Tap to mute the ringing.
This is 04 great if you have more than one saved. 4 Touch . Answering and rejecting a call 01 When your profile to Silent for a meeting. 06 Press the hard or touch to reject an incoming call . Making a call from your contacts 1 From the .... 3 From the filtered list, touch the contact you'd like to call and select the number to use if you 've forgotten to change 05 your phone rings press the 02 hard key or touch to 03 answer the call . 07 08 The basics 23 Tap to mute the ringing.

User Guide
Page 27
... dial contact. 3 Your address book will be displayed on the call screen. Select the contact you want 02 left edge of the held call , touch 01 use the up and down button on hold. 08 5 To change this. To find a contact tap the to call. 03 2 Dial the number or search... your initial call . 6 To end one or both calls press and select End followed by touching their phone number once. You cannot change between the calls, touch and choose Swap call will open. Your initial call or press the number of the...
... dial contact. 3 Your address book will be displayed on the call screen. Select the contact you want 02 left edge of the held call , touch 01 use the up and down button on hold. 08 5 To change this. To find a contact tap the to call. 03 2 Dial the number or search... your initial call . 6 To end one or both calls press and select End followed by touching their phone number once. You cannot change between the calls, touch and choose Swap call will open. Your initial call or press the number of the...

User Guide
Page 29
... of the call. . 05 Using call diverts, choose Deactivate all the recorded items. TIP! Touch any call log touch and Delete all to delete all 01 from the Call divert menu. 02 TIP! Incoming when abroad 4 Input the number you are incurred for details. From any single call log entry to...
... of the call. . 05 Using call diverts, choose Deactivate all the recorded items. TIP! Touch any call log touch and Delete all to delete all 01 from the Call divert menu. 02 TIP! Incoming when abroad 4 Input the number you are incurred for details. From any single call log entry to...

User Guide
Page 31
Select Yes to answer a call. 03 Save new number - The list will move up 07 the screen. To scroll through a list 06 of options, touch the last item visible and slide your finger up 08 so more items are visible. BT answer mode - free to be able to answer a call 01 using a Bluetooth headset, or 02 select Handset to press a key on the handset to 04 save a new number. 05 TIP! Select Hands- The basics 29
Select Yes to answer a call. 03 Save new number - The list will move up 07 the screen. To scroll through a list 06 of options, touch the last item visible and slide your finger up 08 so more items are visible. BT answer mode - free to be able to answer a call 01 using a Bluetooth headset, or 02 select Handset to press a key on the handset to 04 save a new number. 05 TIP! Select Hands- The basics 29

User Guide
Page 33
... or Move to the TIP! Delete - Here's how 02 Office, Pager, Fax, and General. You can enter up to one or more 2 You can do 01 has a preset type Mobile, Home, when viewing a contact. on page 32. Touch Yes if you are many things you originally saved the contacts, see Creating...
... or Move to the TIP! Delete - Here's how 02 Office, Pager, Fax, and General. You can enter up to one or more 2 You can do 01 has a preset type Mobile, Home, when viewing a contact. on page 32. Touch Yes if you are many things you originally saved the contacts, see Creating...

User Guide
Page 35
... scroll through a list of a contact first. Changing your contact settings You can adapt your contact settings so that your address book suits your handset or 01 from the USIM 08 to the handset it to do this one .
... scroll through a list of a contact first. Changing your contact settings You can adapt your contact settings so that your address book suits your handset or 01 from the USIM 08 to the handset it to do this one .

User Guide
Page 37
...: If an image, video or sound is 1 Touch to an MMS and you will be automatically convert to open your address book. Messaging Messaging Your KP500 combines SMS, MMS and email into one intuitive and easy to . 07 . There are two ways to enter the messaging centre: 5 Touch T(1) at the top... of the screen to enter the recipient's 01 number, or touch the search icon 02 to open a blank message. 2 From here you send the message to use menu.
...: If an image, video or sound is 1 Touch to an MMS and you will be automatically convert to open your address book. Messaging Messaging Your KP500 combines SMS, MMS and email into one intuitive and easy to . 07 . There are two ways to enter the messaging centre: 5 Touch T(1) at the top... of the screen to enter the recipient's 01 number, or touch the search icon 02 to open a blank message. 2 From here you send the message to use menu.

User Guide
Page 39
Abc manual In Abc mode you will type in new words. TIP! words, keep typing in 01 In Abc mode you will see . Keyboard mode predicts and shows what you must touch the next. These words are predicted 02 key repeatedly to ...
Abc manual In Abc mode you will type in new words. TIP! words, keep typing in 01 In Abc mode you will see . Keyboard mode predicts and shows what you must touch the next. These words are predicted 02 key repeatedly to ...

User Guide
Page 41
At @ Strokes Note: Start each stroke at the dot. Numbers Numbers are written above the arrow. 01 Number Strokes 02 0 03 1 04 2 3 05 4 06 5 07 6 7 08 8 9 The basics 39 Letter Q R S T U V W X Y Z ß Strokes Punctuation marks Mark Full stop .
At @ Strokes Note: Start each stroke at the dot. Numbers Numbers are written above the arrow. 01 Number Strokes 02 0 03 1 04 2 3 05 4 06 5 07 6 7 08 8 9 The basics 39 Letter Q R S T U V W X Y Z ß Strokes Punctuation marks Mark Full stop .

User Guide
Page 43
... email address - Enter the 'reply to send Username - Enter your outgoing(SMTP) mail server name or IP address. Mailbox type - on SMTP authentication if the 01 Password -
... email address - Enter the 'reply to send Username - Enter your outgoing(SMTP) mail server name or IP address. Mailbox type - on SMTP authentication if the 01 Password -

User Guide
Page 45
... Excel, PowerPoint and PDF documents to your KP500 so you want to use then . Communicate menu and a new 03 email will connect to check automatically. The basics 43 Retrieving your email Sending an email using your You can automatically or manually new account 01 check your account for new emails. 1 ...Touch New Email in the 02 See 'Changing your email settings' on the move. address and write your message. 05 You can review them on page 44 to your email account and retrieve your KP500 will open. TIP! ...
... Excel, PowerPoint and PDF documents to your KP500 so you want to use then . Communicate menu and a new 03 email will connect to check automatically. The basics 43 Retrieving your email Sending an email using your You can automatically or manually new account 01 check your account for new emails. 1 ...Touch New Email in the 02 See 'Changing your email settings' on the move. address and write your message. 05 You can review them on page 44 to your email account and retrieve your KP500 will open. TIP! ...

User Guide
Page 47
...of your messages below for details. 06 Mailbox - Create folders to new You'll recognise the folder structure 01 emails. New email notification - Sent items - used on your KP500 will be alerted to store your 08 mailbox. Create an email self-explanatory. and more, see Managing ...Outbox - The basics 45 My Folders - All the emails you 03 on. This is fairly 02 Signature - receive are placed into your KP500, which is a temporary storage folder while messages are placed in your messages. Drafts - All the messsages you receive 07 on your inbox 04...
...of your messages below for details. 06 Mailbox - Create folders to new You'll recognise the folder structure 01 emails. New email notification - Sent items - used on your KP500 will be alerted to store your 08 mailbox. Create an email self-explanatory. and more, see Managing ...Outbox - The basics 45 My Folders - All the emails you 03 on. This is fairly 02 Signature - receive are placed into your KP500, which is a temporary storage folder while messages are placed in your messages. Drafts - All the messsages you receive 07 on your inbox 04...