User Guide
Page 3
... power cord before cleaning. Replacing the Lamp Replacing the lamp can be in the Regulatory Compliance section on page 37. See Cleaning the Projector on page 52. - Regulatory Warnings Before installing and using the projector, read the regulatory notices in the way of foot traffic. PPrreeffaaccee Power Safety Only use for a prolonged period. Remove the batteries from the remote control when storing or not in use the supplied power cord. Before replacing the lamp...
... power cord before cleaning. Replacing the Lamp Replacing the lamp can be in the Regulatory Compliance section on page 37. See Cleaning the Projector on page 52. - Regulatory Warnings Before installing and using the projector, read the regulatory notices in the way of foot traffic. PPrreeffaaccee Power Safety Only use for a prolonged period. Remove the batteries from the remote control when storing or not in use the supplied power cord. Before replacing the lamp...

User Guide
Page 4
... crisp, clear images. • Flexible setup allows for front, rear projections. • Line-of-vision projections remain square, with all major video standards including NTSC, PAL, and SECAM. • A high brightness rating allows for presentations in daylight or in lit rooms. • Supports resolutions up to SXGA at 16.7 million colors to your convenience and to install and operate the DLP projector. DDLLPP...
... crisp, clear images. • Flexible setup allows for front, rear projections. • Line-of-vision projections remain square, with all major video standards including NTSC, PAL, and SECAM. • A high brightness rating allows for presentations in daylight or in lit rooms. • Supports resolutions up to SXGA at 16.7 million colors to your convenience and to install and operate the DLP projector. DDLLPP...
User Guide
Page 5
...VIDEO/AUDIO MENU ...25 Audio...26 INSTALLATION I MENU...27 Advanced...28 INSTALLATION II MENU ...29 Advanced Feature ...30 OSD Menu Setting...31 Peripheral Test...31 Lamp Hour Reset ...32 Factory Reset ...32 Status...33 MAINTENANCE AND SECURITY...34 REPLACING THE PROJECTION LAMP...34 Resetting the Lamp...36 CLEANING THE PROJECTOR...37 Cleaning the Lens ...37 Cleaning the Case ...37 USING THE KENSINGTON® LOCK ...38 TROUBLESHOOTING ...39 COMMON PROBLEMS AND SOLUTIONS ...39 TIPS FOR TROUBLESHOOTING ...39 LED ERROR MESSAGES ...40 IMAGE PROBLEMS...40 LAMP PROBLEMS ...41 REMOTE CONTROL PROBLEMS...
...VIDEO/AUDIO MENU ...25 Audio...26 INSTALLATION I MENU...27 Advanced...28 INSTALLATION II MENU ...29 Advanced Feature ...30 OSD Menu Setting...31 Peripheral Test...31 Lamp Hour Reset ...32 Factory Reset ...32 Status...33 MAINTENANCE AND SECURITY...34 REPLACING THE PROJECTION LAMP...34 Resetting the Lamp...36 CLEANING THE PROJECTOR...37 Cleaning the Lens ...37 Cleaning the Case ...37 USING THE KENSINGTON® LOCK ...38 TROUBLESHOOTING ...39 COMMON PROBLEMS AND SOLUTIONS ...39 TIPS FOR TROUBLESHOOTING ...39 LED ERROR MESSAGES ...40 IMAGE PROBLEMS...40 LAMP PROBLEMS ...41 REMOTE CONTROL PROBLEMS...
User Guide
Page 7
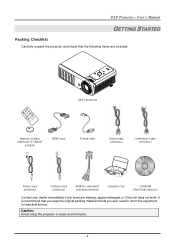
... unpack the projector and check that you keep the original packing material should you ever need to return the equipment for warranty service. It is recommend that the following items are included: DLP PROJECTOR REMOTE CONTROL (WITH ONE 3V CR2025 BATTERY) RGB CABLE POWER CORD AUDIO CABLE (OPTIONAL) COMPONENT CABLE (OPTIONAL) VIDEO CABLE (OPTIONAL) S-VIDEO CABLE (OPTIONAL) RGB TO COMPONENT ADAPTER (OPTIONAL) CARRYING CASE CD-ROM (THIS USER'S MANUAL) Contact your...
... unpack the projector and check that you keep the original packing material should you ever need to return the equipment for warranty service. It is recommend that the following items are included: DLP PROJECTOR REMOTE CONTROL (WITH ONE 3V CR2025 BATTERY) RGB CABLE POWER CORD AUDIO CABLE (OPTIONAL) COMPONENT CABLE (OPTIONAL) VIDEO CABLE (OPTIONAL) S-VIDEO CABLE (OPTIONAL) RGB TO COMPONENT ADAPTER (OPTIONAL) CARRYING CASE CD-ROM (THIS USER'S MANUAL) Contact your...
User Guide
Page 8
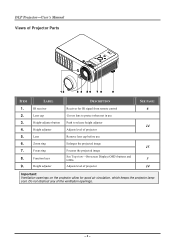
... Display (OSD) buttons and LEDs. 3 9. Do not obstruct any of projector 5. IR receiver Receiver for good air circulation, which keeps the projector lamp cool. Zoom ring Enlarges the projected image 15 7. Lens Remove lens cap before use 3. Focus ring Focuses the projected image 8. Height adjuster Adjusts level of Projector Parts ITEM LABEL DESCRIPTION SEE PAGE: 1. DDLLPP PPrroojjeeccttoorr--UUsseerr''ss MMaannuuaall Views of projector 14 Important: Ventilation openings on the projector allow for IR signal from remote control 6 2. Lens cap Covers...
... Display (OSD) buttons and LEDs. 3 9. Do not obstruct any of projector 5. IR receiver Receiver for good air circulation, which keeps the projector lamp cool. Zoom ring Enlarges the projected image 15 7. Lens Remove lens cap before use 3. Focus ring Focuses the projected image 8. Height adjuster Adjusts level of Projector Parts ITEM LABEL DESCRIPTION SEE PAGE: 1. DDLLPP PPrroojjeeccttoorr--UUsseerr''ss MMaannuuaall Views of projector 14 Important: Ventilation openings on the projector allow for IR signal from remote control 6 2. Lens cap Covers...
User Guide
Page 9
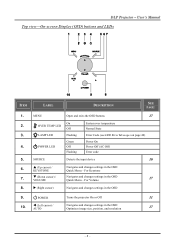
LAMP LED Flashing Error Code (see LED Error Messages on page 40) Green Power On 4. SOURCE Detects the input device 10 6. For Volume 17 8. X (Right cursor) Navigates and changes settings in the OSD Quick Menu - For Keystone 7. S (Up cursor) / KEYSTONE Navigates and changes settings in the OSD 9. MENU Open and exits the OSD buttons 17 On 2. OVER TEMP LED Off System over temperature Normal State 3. T (Down cursor) / VOLUME Navigates and changes settings in the OSD Optimizes image size, position, and...
LAMP LED Flashing Error Code (see LED Error Messages on page 40) Green Power On 4. SOURCE Detects the input device 10 6. For Volume 17 8. X (Right cursor) Navigates and changes settings in the OSD Quick Menu - For Keystone 7. S (Up cursor) / KEYSTONE Navigates and changes settings in the OSD 9. MENU Open and exits the OSD buttons 17 On 2. OVER TEMP LED Off System over temperature Normal State 3. T (Down cursor) / VOLUME Navigates and changes settings in the OSD Optimizes image size, position, and...

User Guide
Page 11
... view DDLLPP PPrroojjeeccttoorr -- LABEL Lamp cover Height adjustor Height adjustor button Lens cap hook Tilt adjustor Ceiling support holes DESCRIPTION SEE PAGE: Remove when changing the lamp 34 Adjuster drops down when adjuster button is pushed 14 Push to release adjustor To fasten the lens cap cover Rotate adjuster lever to adjust angle position 14 Contact your dealer for information on mounting the projector on a ceiling Note: When installing, ensure that you use...
... view DDLLPP PPrroojjeeccttoorr -- LABEL Lamp cover Height adjustor Height adjustor button Lens cap hook Tilt adjustor Ceiling support holes DESCRIPTION SEE PAGE: Remove when changing the lamp 34 Adjuster drops down when adjuster button is pushed 14 Push to release adjustor To fasten the lens cap cover Rotate adjuster lever to adjust angle position 14 Contact your dealer for information on mounting the projector on a ceiling Note: When installing, ensure that you use...

User Guide
Page 12
If the path between the remote control and the projector. Avoid using the projector with bright fluorescent lighting turned on the remote control. - 6 - DDLLPP PPrroojjeeccttoorr--UUsseerr''ss MMaannuuaall Remote Control Parts Important: 1. Certain high-frequency fluorescent lights can bounce the signal off certain reflective surfaces such as the corresponding buttons on the projector have the same functions as projector screens. 3. This user's manual describes the functions based on . Be sure nothing obstructs...
If the path between the remote control and the projector. Avoid using the projector with bright fluorescent lighting turned on the remote control. - 6 - DDLLPP PPrroojjeeccttoorr--UUsseerr''ss MMaannuuaall Remote Control Parts Important: 1. Certain high-frequency fluorescent lights can bounce the signal off certain reflective surfaces such as the corresponding buttons on the projector have the same functions as projector screens. 3. This user's manual describes the functions based on . Be sure nothing obstructs...

User Guide
Page 17
... POWER button. Do not unplug the power cord until the POWER LED stops flashing-indicating the projector has cooled down the Projector 1. If more than one input device is connected, press the SOURCE button and use ▲▼ to turn on the connected devices. 3. See Setting an Access Password (Security Lock) on the projector lights. 2. The POWER LED on page 12 if security lock is supported through the RGB to remove the lens cap before starting projector. 2. The projector splash screen displays and connected...
... POWER button. Do not unplug the power cord until the POWER LED stops flashing-indicating the projector has cooled down the Projector 1. If more than one input device is connected, press the SOURCE button and use ▲▼ to turn on the connected devices. 3. See Setting an Access Password (Security Lock) on the projector lights. 2. The POWER LED on page 12 if security lock is supported through the RGB to remove the lens cap before starting projector. 2. The projector splash screen displays and connected...

User Guide
Page 19
... service center. In case you set the password. The password confirm menu appears when user presses the power-on keypad or IR remote control for password entry. You can use the cursor buttons either on key in any combination including the same arrow five times, but not less than five. Service center will validate the owner and help reset the password. 5. Press the cursor buttons in case the Security Lock...
... service center. In case you set the password. The password confirm menu appears when user presses the power-on keypad or IR remote control for password entry. You can use the cursor buttons either on key in any combination including the same arrow five times, but not less than five. Service center will validate the owner and help reset the password. 5. Press the cursor buttons in case the Security Lock...

User Guide
Page 27
...) / ► to reset all settings to enter the Advanced menu. UUsseerr''ss MMaannuuaall Image Menu Press the MENU button to adjust the Brilliant Color value. Press the cursor ◄► button to open the OSD menu. Press the cursor ◄► button to the Image Menu. Press ◄► to adjust the gamma correction of the display. Note: Regarding Display Mode, the parameter adjustments are disabled except for settings. Press the...
...) / ► to reset all settings to enter the Advanced menu. UUsseerr''ss MMaannuuaall Image Menu Press the MENU button to adjust the Brilliant Color value. Press the cursor ◄► button to open the OSD menu. Press the cursor ◄► button to the Image Menu. Press ◄► to adjust the gamma correction of the display. Note: Regarding Display Mode, the parameter adjustments are disabled except for settings. Press the...

User Guide
Page 31
... Control for settings. See Audio on page 26. ITEM Video AGC Video Saturation Video Tint Film Mode Video Overscan Audio Reset DESCRIPTION Press the ◄► buttons to use this issue, open the OSD menu. Press the ◄► buttons to adjust the video tint/hue. Press (Enter) / ► to default values. Press the cursor ▲▼ button to move to move up the projector for the best picture appearance for display...
... Control for settings. See Audio on page 26. ITEM Video AGC Video Saturation Video Tint Film Mode Video Overscan Audio Reset DESCRIPTION Press the ◄► buttons to use this issue, open the OSD menu. Press the ◄► buttons to adjust the video tint/hue. Press (Enter) / ► to default values. Press the cursor ▲▼ button to move to move up the projector for the best picture appearance for display...

User Guide
Page 33
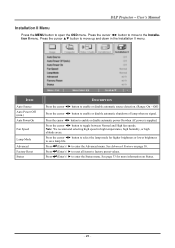
... enter the Advanced menu. Press the cursor ◄► button to select different color to open the OSD menu. DDLLPP PPrroojjeeccttoorr -- UUsseerr''ss MMaannuuaall Installation I Menu Press the MENU button to blank the screen. Press the cursor ◄► button to select a different localization Menu. ITEM Language Blank Screen Projection Aspect Ratio Keystone Digital Zoom Advanced Reset DESCRIPTION Press the cursor ◄► button to adjust the video aspect ratio. Press...
... enter the Advanced menu. Press the cursor ◄► button to select different color to open the OSD menu. DDLLPP PPrroojjeeccttoorr -- UUsseerr''ss MMaannuuaall Installation I Menu Press the MENU button to blank the screen. Press the cursor ◄► button to select a different localization Menu. ITEM Language Blank Screen Projection Aspect Ratio Keystone Digital Zoom Advanced Reset DESCRIPTION Press the cursor ◄► button to adjust the video aspect ratio. Press...
User Guide
Page 35
... lamp when no signal. See Advanced Feature on Status. - 29 - ITEM Auto Source Auto Power Off (min.) Auto Power On Fan Speed Lamp Mode Advanced Factory Reset Status DESCRIPTION Press the cursor ◄► button to enable or disable automatic source detection. (Range: On ~ Off) Press the cursor ◄► button to enable or disable automatic power On when AC power is supplied. Press the cursor ◄► button to select the lamp mode...
... lamp when no signal. See Advanced Feature on Status. - 29 - ITEM Auto Source Auto Power Off (min.) Auto Power On Fan Speed Lamp Mode Advanced Factory Reset Status DESCRIPTION Press the cursor ◄► button to enable or disable automatic source detection. (Range: On ~ Off) Press the cursor ◄► button to enable or disable automatic power On when AC power is supplied. Press the cursor ◄► button to select the lamp mode...
User Guide
Page 36
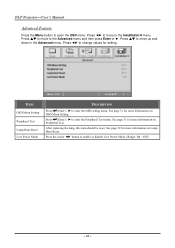
Press (Enter) / ► to enter the OSD setting menu. ITEM OSD Menu Setting Peripheral Test Lamp Hour Reset Low Power Mode DESCRIPTION Press (Enter) / ► to enter the Peripheral Test menu. Press the cursor ◄► button to open the OSD menu. Press ◄► to change values for more information on Peripheral Test. Press ◄► to move up and down in the Advanced...
Press (Enter) / ► to enter the OSD setting menu. ITEM OSD Menu Setting Peripheral Test Lamp Hour Reset Low Power Mode DESCRIPTION Press (Enter) / ► to enter the Peripheral Test menu. Press the cursor ◄► button to open the OSD menu. Press ◄► to change values for more information on Peripheral Test. Press ◄► to move up and down in the Advanced...
User Guide
Page 45
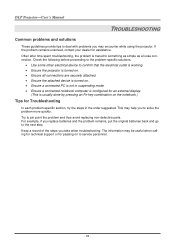
... thus avoid replacing non-defective parts. If the problem remains unsolved, contact your dealer for an external display. (This is traced to the next step. Check the following before proceeding to the problem-specific solutions. • Use some other electrical device to confirm that the electrical outlet is working. • Ensure the projector is turned on. • Ensure all connections are securely...
... thus avoid replacing non-defective parts. If the problem remains unsolved, contact your dealer for an external display. (This is traced to the next step. Check the following before proceeding to the problem-specific solutions. • Use some other electrical device to confirm that the electrical outlet is working. • Ensure the projector is turned on. • Ensure all connections are securely...
User Guide
Page 46
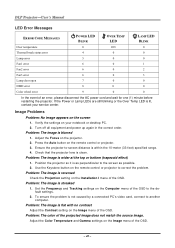
... Auto button on the screen 1. Check that the projector lens is lit, contact your notebook or desktop PC. 2. Problem: The color of the OSD. If the Power or Lamp LEDs are still blinking or the Over Temp LED is clean. Turn off all equipment and power up again in the correct order. Adjust the Focus on the Image menu of the projected image does not match the source image. Problem: The image is flat with no contrast Adjust...
... Auto button on the screen 1. Check that the projector lens is lit, contact your notebook or desktop PC. 2. Problem: The color of the OSD. If the Power or Lamp LEDs are still blinking or the Over Temp LED is clean. Turn off all equipment and power up again in the correct order. Adjust the Focus on the Image menu of the projected image does not match the source image. Problem: The image is flat with no contrast Adjust...
User Guide
Page 47
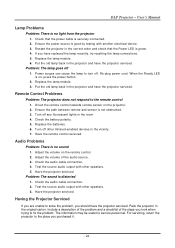
... the remote control serviced. Problem: The sound is on, press the power button. 2. Having the Projector Serviced If you are unable to solve the problem, you purchased it. - 41 - Replace the lamp module. 6. Direct the remote control towards remote sensor on the remote control. 2. Check the audio cable connection. 2. Turn off . Power surges can cause the lamp to the place you should have replaced the lamp recently, try resetting the lamp connections. 5. For servicing, return the projector to turn off any fluorescent lights...
... the remote control serviced. Problem: The sound is on, press the power button. 2. Having the Projector Serviced If you are unable to solve the problem, you purchased it. - 41 - Replace the lamp module. 6. Direct the remote control towards remote sensor on the remote control. 2. Check the audio cable connection. 2. Turn off . Power surges can cause the lamp to the place you should have replaced the lamp recently, try resetting the lamp connections. 5. For servicing, return the projector to turn off any fluorescent lights...
User Guide
Page 48
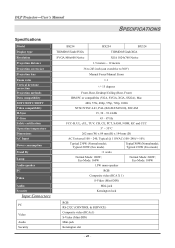
...205W (Eco mode) Typical 300W (Normal mode); DDLLPP PPrroojjeeccttoorr--UUsseerr''ss MMaannuuaall SPECIFICATIONS Specifications Model Display type Resolution Projection distance Projection screen size Projection lens Zoom ratio Vertical keystone correction Projection methods Data compatibility SDTV/EDTV/ HDTV Video compatibility H-Sync V-Sync Safety certification Operation temperature Dimensions AC Input Power consumption Stand By Lamp Audio speaker PC Video Audio Security Input Connectors PC Video Audio Security BS254 BX254 BX324 TI DMD 0.55-inch SVGA TI DMD 0.55-inch XGA SVGA 800x600...
...205W (Eco mode) Typical 300W (Normal mode); DDLLPP PPrroojjeeccttoorr--UUsseerr''ss MMaannuuaall SPECIFICATIONS Specifications Model Display type Resolution Projection distance Projection screen size Projection lens Zoom ratio Vertical keystone correction Projection methods Data compatibility SDTV/EDTV/ HDTV Video compatibility H-Sync V-Sync Safety certification Operation temperature Dimensions AC Input Power consumption Stand By Lamp Audio speaker PC Video Audio Security Input Connectors PC Video Audio Security BS254 BX254 BX324 TI DMD 0.55-inch SVGA TI DMD 0.55-inch XGA SVGA 800x600...
User Guide
Page 54
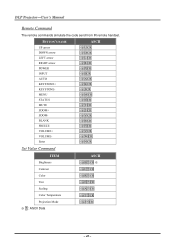
... remote handset. CR Tint ~ s N ? CR - 48 - BUTTON'S NAME ASCII UP arrow DOWN arrow LEFT arrow RIGHT arrow POWER INPUT AUTO KEYSTONE+ KEYSTONEMENU STATUS MUTE ZOOM+ ZOOMBLANK FREEZE VOLUME+ VOLUMEEnter ~ r U CR ~ r D CR ~ r L CR ~ r R CR ~ r P CR ~ r I CR ~ r A CR ~ r K CR ~ r J CR ~ r M CR ~ r S CR ~ r T CR ~ r Z CR ~ r Y CR ~ r B CR ~ r F CR ~ r V CR ~ r W CR ~ r N CR Set Value Command ITEM Brightness ASCII ~ s B ? CR Scaling ~ s A ? CR Projection Mode ※ ? : ASCII Data ~ s J ? CR Color...
... remote handset. CR Tint ~ s N ? CR - 48 - BUTTON'S NAME ASCII UP arrow DOWN arrow LEFT arrow RIGHT arrow POWER INPUT AUTO KEYSTONE+ KEYSTONEMENU STATUS MUTE ZOOM+ ZOOMBLANK FREEZE VOLUME+ VOLUMEEnter ~ r U CR ~ r D CR ~ r L CR ~ r R CR ~ r P CR ~ r I CR ~ r A CR ~ r K CR ~ r J CR ~ r M CR ~ r S CR ~ r T CR ~ r Z CR ~ r Y CR ~ r B CR ~ r F CR ~ r V CR ~ r W CR ~ r N CR Set Value Command ITEM Brightness ASCII ~ s B ? CR Scaling ~ s A ? CR Projection Mode ※ ? : ASCII Data ~ s J ? CR Color...


