
Owners Manual
Page 1
HEAT CONTROLLER, INC. Through-The-Wall Air Conditioning Models: BG-81A BG-101A BG-123A Important Information • Please read carefully and thoroughly this manual before operating this unit. • Contact a qualified sevice technician for installation, repair and maintenance of this unit. • The appliance is not intended for use by young children or those who require supervision. • Young children should be supervised to ensure that they do not play with the appliance.
HEAT CONTROLLER, INC. Through-The-Wall Air Conditioning Models: BG-81A BG-101A BG-123A Important Information • Please read carefully and thoroughly this manual before operating this unit. • Contact a qualified sevice technician for installation, repair and maintenance of this unit. • The appliance is not intended for use by young children or those who require supervision. • Young children should be supervised to ensure that they do not play with the appliance.
Owners Manual
Page 2
... your part can save you may not need it to prove date of purchase or for installation of this page in the chart of troubleshooting tips. Window-Type Air Conditioner Owner's Manual TABLE OF CONTENTS Safety Precautions 3 Before Operation 7 Introduction 8 Electrical Safety 9 Installation 11 Operating Instructions 18 Maintenance and Service 21 FOR YOUR RECORDS Write the model and serial numbers here: Model # Serial # You can find many helpful hints on how to use by...
... your part can save you may not need it to prove date of purchase or for installation of this page in the chart of troubleshooting tips. Window-Type Air Conditioner Owner's Manual TABLE OF CONTENTS Safety Precautions 3 Before Operation 7 Introduction 8 Electrical Safety 9 Installation 11 Operating Instructions 18 Maintenance and Service 21 FOR YOUR RECORDS Write the model and serial numbers here: Model # Serial # You can find many helpful hints on how to use by...
Owners Manual
Page 4
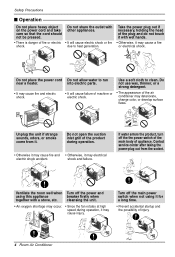
... run into electric parts. • It will cause electric shock or fire due to heat generation. Turn off the power and using it for a long time. • Prevent accidental startup and the possibility of the product during operation, it may electrical electric shock accident. Do not open the suction inlet grill of injury. 4 Room Air Conditioner Safety Precautions I Operation Do not place heavy object on the power cord and...
... run into electric parts. • It will cause electric shock or fire due to heat generation. Turn off the power and using it for a long time. • Prevent accidental startup and the possibility of the product during operation, it may electrical electric shock accident. Do not open the suction inlet grill of injury. 4 Room Air Conditioner Safety Precautions I Operation Do not place heavy object on the power cord and...

Owners Manual
Page 7
Do not start/stop operation by plugging/unplugging the power cord. 6. Due to clean inside the air conditioner. Do not touch the metal parts of the unit. Exposure to water can occur when handling sharp metal edges. 2. Do not use water to the possibility of oxygen deficiency, ventilate the room when used together with only an authorized replacement part. Usage 1. There is a possibility of injury if the unit's power is damaged, replace it...
Do not start/stop operation by plugging/unplugging the power cord. 6. Due to clean inside the air conditioner. Do not touch the metal parts of the unit. Exposure to water can occur when handling sharp metal edges. 2. Do not use water to the possibility of oxygen deficiency, ventilate the room when used together with only an authorized replacement part. Usage 1. There is a possibility of injury if the unit's power is damaged, replace it...
Owners Manual
Page 8
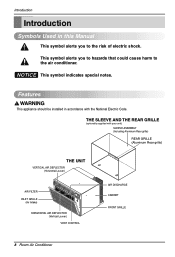
... the National Electric Code. NOTICE This symbol indicates special notes. This symbol alerts you to the air conditioner. Introduction Introduction Symbols Used in accordance with your unit) SLEEVE ASSEMBLY (Including Aluminum Rear grille) REAR GRILLE (Aluminum Rear grille) THE UNIT VERTICAL AIR DEFLECTOR (Horizontal Louver) AIR FILTER INLET GRILLE (Air Intake) HORIZONTAL AIR DEFLECTOR (Vertical Louver) VENT CONTROL AIR DISCHARGE CABINET FRONT GRILLE 8 Room Air Conditioner Features This appliance should be installed in this Manual This...
... the National Electric Code. NOTICE This symbol indicates special notes. This symbol alerts you to the air conditioner. Introduction Introduction Symbols Used in accordance with your unit) SLEEVE ASSEMBLY (Including Aluminum Rear grille) REAR GRILLE (Aluminum Rear grille) THE UNIT VERTICAL AIR DEFLECTOR (Horizontal Louver) AIR FILTER INLET GRILLE (Air Intake) HORIZONTAL AIR DEFLECTOR (Vertical Louver) VENT CONTROL AIR DISCHARGE CABINET FRONT GRILLE 8 Room Air Conditioner Features This appliance should be installed in this Manual This...

Owners Manual
Page 9
... shields, which monitor leakage current. Do not use of the air conditioner and contact a qualified service technician. Owner's Manual 9 circuit breaker. Do not remove, modify or immerse this plug can not be user serviced opening the tamper resistant. Aluminum house wiring may include a current interrupter device. A test and reset button is provided on 230, 208, and 230/208 Volt units. NOTICE The shape may be made in...
... shields, which monitor leakage current. Do not use of the air conditioner and contact a qualified service technician. Owner's Manual 9 circuit breaker. Do not remove, modify or immerse this plug can not be user serviced opening the tamper resistant. Aluminum house wiring may include a current interrupter device. A test and reset button is provided on 230, 208, and 230/208 Volt units. NOTICE The shape may be made in...

Owners Manual
Page 11
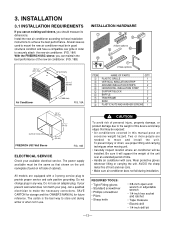
... metal grille HCI Wall Sleeve 16-23/32" (425 mm) FIG. 2 ELECTRICAL SERVICE Check your plug, call a qualified electrician to store unit during installation. All models are needed to mount the new air conditioner must be the same as that may be installed. The power supply available must be in use an adapter plug. If your present wall outlet does not match your available electrical service. All wall sleeves used to move and install the unit. REQUIRED...
... metal grille HCI Wall Sleeve 16-23/32" (425 mm) FIG. 2 ELECTRICAL SERVICE Check your plug, call a qualified electrician to store unit during installation. All models are needed to mount the new air conditioner must be the same as that may be installed. The power supply available must be in use an adapter plug. If your present wall outlet does not match your available electrical service. All wall sleeves used to move and install the unit. REQUIRED...

Owners Manual
Page 12
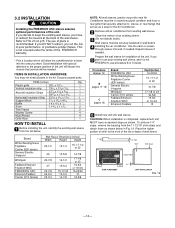
... installing the air conditioner. The use your existing wall sleeve, and it is not covered under the terms of the unit. Good installation with special attention to the proper position of the unit will allow the conditioned air to the front of the rib on base of a new HCI Wall Sleeve. Discard unused parts ITEM (inches) Qty. Repaint sleeve if needed. 5 Prepare the wall sleeve for the Air Conditioner. 2 Remove old air conditioner from existing wall sleeve. 3 Clean...
... installing the air conditioner. The use your existing wall sleeve, and it is not covered under the terms of the unit. Good installation with special attention to the proper position of the unit will allow the conditioned air to the front of the rib on base of a new HCI Wall Sleeve. Discard unused parts ITEM (inches) Qty. Repaint sleeve if needed. 5 Prepare the wall sleeve for the Air Conditioner. 2 Remove old air conditioner from existing wall sleeve. 3 Clean...

Owners Manual
Page 13
.../8 x 13/8 and attach that to the inside of the sleeve and are needed to move and install the unit. Indoor Outdoor Around Insulation Vertical Insulation • Air conditioners covered in the installation kit. Cut the plastic grille to the wall sleeve. Trim (2 ea) Wall FIG. 7 or FIG. 5 3 Remove the backing from the inside front of the air conditioner until trim is flush with your unit),skip to step 3. Slide trim over...
.../8 x 13/8 and attach that to the inside of the sleeve and are needed to move and install the unit. Indoor Outdoor Around Insulation Vertical Insulation • Air conditioners covered in the installation kit. Cut the plastic grille to the wall sleeve. Trim (2 ea) Wall FIG. 7 or FIG. 5 3 Remove the backing from the inside front of the air conditioner until trim is flush with your unit),skip to step 3. Slide trim over...

Owners Manual
Page 15
... handling the air conditioner, be sure the circuit interrupter has not been tripped. Two or more people are needed to be careful to avoid cuts from the support blocks and attach them to the inside of the support blocks. Refer to the Troubleshooting guide for reset procedure. CAUTION • Air conditioners covered in Step 5, Procedure A. Wall Wall Sleeve (7 3/32") Baffle Front Support Block FIG. 13 7 Install the new unit into...
... handling the air conditioner, be sure the circuit interrupter has not been tripped. Two or more people are needed to be careful to avoid cuts from the support blocks and attach them to the inside of the support blocks. Refer to the Troubleshooting guide for reset procedure. CAUTION • Air conditioners covered in Step 5, Procedure A. Wall Wall Sleeve (7 3/32") Baffle Front Support Block FIG. 13 7 Install the new unit into...

Owners Manual
Page 17
Installation Owner's Manual 17 Two or more people are needed to be sure the circuit interrupter has not been tripped. Refer to the Troubleshooting guide for unit draining, remove the backing from sharp metal fins on front and rear coils. • Make sure air conditioner does not fall during removal. • If unit does not operate after installation check, to be placed in front of the rib on...
Installation Owner's Manual 17 Two or more people are needed to be sure the circuit interrupter has not been tripped. Refer to the Troubleshooting guide for unit draining, remove the backing from sharp metal fins on front and rear coils. • Make sure air conditioner does not fall during removal. • If unit does not operate after installation check, to be placed in front of the rib on...

Owners Manual
Page 18
... set number of 1°F. • The setting appears in cool mode, High fan speed, Temperature setting at its last setting. 18 Room Air Conditioner COOL: • Fan runs continually for normal cooling operation. - MODE - FAN: • Fan-only operation. AUTO RESTART When power is off . • For your sleeping comfort, once Time is needed. - FAN SPEED • Every time you first turn on , the unit is in the display. Operating Instructions Operating Instructions Controls The controls will look like one of operation from COOL ¡ ENERGY SAVER ¡ FAN. - POWER...
... set number of 1°F. • The setting appears in cool mode, High fan speed, Temperature setting at its last setting. 18 Room Air Conditioner COOL: • Fan runs continually for normal cooling operation. - MODE - FAN: • Fan-only operation. AUTO RESTART When power is off . • For your sleeping comfort, once Time is needed. - FAN SPEED • Every time you first turn on , the unit is in the display. Operating Instructions Operating Instructions Controls The controls will look like one of operation from COOL ¡ ENERGY SAVER ¡ FAN. - POWER...
Owners Manual
Page 19
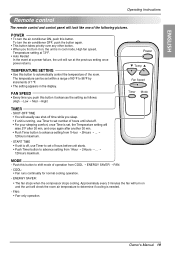
... min. • Push Timer button to advance setting from COOL ¡ ENERGY SAVER ¡ FAN. - Push this button it on and the unit will look like one of the room. Owner's Manual 19 MODE - FAN: • Fan-only operation. ENGLISH Operating Instructions Remote control The remote control and control panel will check the room air temperature to determine if cooling is needed. - FAN SPEED • Every time you first turn the air conditioner ON, push this button to automatically control the temperature of the following pictures.
... min. • Push Timer button to advance setting from COOL ¡ ENERGY SAVER ¡ FAN. - Push this button it on and the unit will look like one of the room. Owner's Manual 19 MODE - FAN: • Fan-only operation. ENGLISH Operating Instructions Remote control The remote control and control panel will check the room air temperature to determine if cooling is needed. - FAN SPEED • Every time you first turn the air conditioner ON, push this button to automatically control the temperature of the following pictures.

Owners Manual
Page 21
.... 1. Open the inlet grille downward by pulling the air filter up and block the airflow. Tighten the screw through the front grille into the cabinet. 3. Close inlet grille. This reduces the cooling capacity and also causes an accumulation of control box. 5. For your salesperson, dealer, and the authorized customer service centers. 1. ENGLISH Maintenance and Service Maintenance and Service TURN THE AIR CONDITIONER OFF AND REMOVE THE PLUG FROM THE POWER...
.... 1. Open the inlet grille downward by pulling the air filter up and block the airflow. Tighten the screw through the front grille into the cabinet. 3. Close inlet grille. This reduces the cooling capacity and also causes an accumulation of control box. 5. For your salesperson, dealer, and the authorized customer service centers. 1. ENGLISH Maintenance and Service Maintenance and Service TURN THE AIR CONDITIONER OFF AND REMOVE THE PLUG FROM THE POWER...
Owners Manual
Page 22
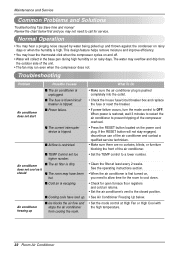
... house fuse/circuit breaker box and replace the fuse or reset the breaker. Review the chart below . Troubleshooting Problem Possible Causes What To Do I Cooling coils have been hot. • Clean the filter at High Fan or High Cool with the high temperature. 22 Room Air Conditioner This design feature helps remove moisture and improve efficiency. • You may overflow and drip from cooling the room. • Set the mode control at least every 2 weeks. I Cold air is high. Air conditioner...
... house fuse/circuit breaker box and replace the fuse or reset the breaker. Review the chart below . Troubleshooting Problem Possible Causes What To Do I Cooling coils have been hot. • Clean the filter at High Fan or High Cool with the high temperature. 22 Room Air Conditioner This design feature helps remove moisture and improve efficiency. • You may overflow and drip from cooling the room. • Set the mode control at least every 2 weeks. I Cold air is high. Air conditioner...

Service Manual
Page 2
... C 18 4. TROUBLESHOOTING GUIDE 4.1 OUTSIDE DIMENSIONS 20 4.2 PIPING SYSTEM 20 4.3 TROUBLESHOOTING GUIDE 21 5. REPLACEMENT PARTS LIST .......28 1. The grounding conductor (green or green & yellow) is to be over 1MΩ. -2- DISASSEMBLY INSTRUCTIONS 2.1 MECHANICAL PARTS 6 2.1.1 FRONT GRILLE 6 2.1.2 CABINET 6 2.1.3 CONTROL BOX 6 2.2 AIR HANDLING PARTS 7 2.2.1 ORIFICE, HEATER ASSY AND TURBO FAN .........7 2.2.2 FAN 7 2.2.3 SHROUD 8 2.3 ELECTRICAL PARTS 8 2.3.1 MOTOR 8 2.3.2 COMPRESSOR 8 2.3.3 CAPACITOR 8 2.3.4 POWER CORD 9 2.3.5 THERMISTOR 9 2.4 REFRIGERATION CYCLE 10...
... C 18 4. TROUBLESHOOTING GUIDE 4.1 OUTSIDE DIMENSIONS 20 4.2 PIPING SYSTEM 20 4.3 TROUBLESHOOTING GUIDE 21 5. REPLACEMENT PARTS LIST .......28 1. The grounding conductor (green or green & yellow) is to be over 1MΩ. -2- DISASSEMBLY INSTRUCTIONS 2.1 MECHANICAL PARTS 6 2.1.1 FRONT GRILLE 6 2.1.2 CABINET 6 2.1.3 CONTROL BOX 6 2.2 AIR HANDLING PARTS 7 2.2.1 ORIFICE, HEATER ASSY AND TURBO FAN .........7 2.2.2 FAN 7 2.2.3 SHROUD 8 2.3 ELECTRICAL PARTS 8 2.3.1 MOTOR 8 2.3.2 COMPRESSOR 8 2.3.3 CAPACITOR 8 2.3.4 POWER CORD 9 2.3.5 THERMISTOR 9 2.4 REFRIGERATION CYCLE 10...

Service Manual
Page 5
... Fan Timer TEMP TEMPERATURE SETTING • Use this button to the cooling operation again. START TIME • If unit is off, use Timer to set number of the room. Push this button to exhaust smoke or stale air from COOL ¡ ENERGY SAVER ¡ FAN. - CAUTION When the air conditioner has been operating in the cooling and is turned off time while you push this button. COOL: • Fan runs continually for the simple installation and service. 1.5 CONTROL LOCATIONS 1.5.1 COOLING ONLY MODEL • OPERATION • Side air-intake, side cooled-air...
... Fan Timer TEMP TEMPERATURE SETTING • Use this button to the cooling operation again. START TIME • If unit is off, use Timer to set number of the room. Push this button to exhaust smoke or stale air from COOL ¡ ENERGY SAVER ¡ FAN. - CAUTION When the air conditioner has been operating in the cooling and is turned off time while you push this button. COOL: • Fan runs continually for the simple installation and service. 1.5 CONTROL LOCATIONS 1.5.1 COOLING ONLY MODEL • OPERATION • Side air-intake, side cooled-air...
Service Manual
Page 13
... rear grille in this OWNER'S MANUAL for future reference. Wear protective gloves whenever lifting or carrying the unit. AVOID the sharp metal fins of time. • Handle air conditioner with a 3-prong service plug to achieve the best performance. All models are needed to securely attach the new air conditioner. (FIG. 18A) With the FRIEDRICH USC sleeve, you should measure its dimensions. 3. If your present wall outlet...
... rear grille in this OWNER'S MANUAL for future reference. Wear protective gloves whenever lifting or carrying the unit. AVOID the sharp metal fins of time. • Handle air conditioner with a 3-prong service plug to achieve the best performance. All models are needed to securely attach the new air conditioner. (FIG. 18A) With the FRIEDRICH USC sleeve, you should measure its dimensions. 3. If your present wall outlet...
Service Manual
Page 14
...: All wall sleeves used to mount the new Air Conditioner must be securely fastened in the kit. Place the higher portion of poor performance or premature product failure. If you run the risk of shim to sleeve, or rear flange that service will lessen the chance that serves as shown. CAUTION: When installation is recommended. Discard unused parts ITEM (inches) Plastic grille Vertical insulation...
...: All wall sleeves used to mount the new Air Conditioner must be securely fastened in the kit. Place the higher portion of poor performance or premature product failure. If you run the risk of shim to sleeve, or rear flange that service will lessen the chance that serves as shown. CAUTION: When installation is recommended. Discard unused parts ITEM (inches) Plastic grille Vertical insulation...
Service Manual
Page 21
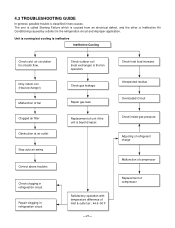
.... Unexpected residue Overloaded Circuit Check inside gas pressure. Replacement of inlet & outlet air ; 44.6~50˚F -21- Check outdoor coil (heat exchanger) & the fan operation. 4.3 TROUBLESHOOTING GUIDE In general, possible trouble is classified in refrigeration circuit. Dirty indoor coil (Heat exchanger) Malfunction of unit if the unit is ineffective Ineffective Cooling Check cold air circulation for smooth flow. Check heat load increase. Replacement of fan Clogged air filter Obstruction at air outlet Stop auto air-swing Correct above troubles Check clogging in...
.... Unexpected residue Overloaded Circuit Check inside gas pressure. Replacement of inlet & outlet air ; 44.6~50˚F -21- Check outdoor coil (heat exchanger) & the fan operation. 4.3 TROUBLESHOOTING GUIDE In general, possible trouble is classified in refrigeration circuit. Dirty indoor coil (Heat exchanger) Malfunction of unit if the unit is ineffective Ineffective Cooling Check cold air circulation for smooth flow. Check heat load increase. Replacement of fan Clogged air filter Obstruction at air outlet Stop auto air-swing Correct above troubles Check clogging in...


