User Guide
Page 1
Android 8.0 www.lg.com USER GUIDE LG Digital Signage (MONITOR SIGNAGE) Please read this manual carefully before operating your set and retain it for future reference.
Android 8.0 www.lg.com USER GUIDE LG Digital Signage (MONITOR SIGNAGE) Please read this manual carefully before operating your set and retain it for future reference.
User Guide
Page 2
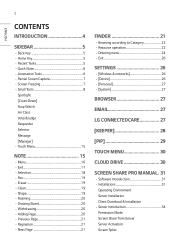
... 5 --Home Key 5 --Recent Tasks 5 --Quick Note 6 --Annotation Tools 6 --Partial Screen Capture 7 --Screen Freezing 7 --Small Tools 8 Spotlight [CountDown] Stop Watch Air Class Voter&Judge Responder Selector Message...SETTINGS 26 --[Wireless & networks 26 --[Device 26 --[Personal 27 --[System 27 BROWSER 27 EMAIL 27 LG CONNECTEDCARE 27 [KEEPER 28 [PIP 29 TOUCH MENU 30 CLOUD DRIVE 30 SCREEN SHARE PRO MANUAL.. 31 --Software Introduction 31 --Installations 31 Operating Environment Server Installation Client Download & Installation --Server Introduction 34 Permission Mode Screen...
... 5 --Home Key 5 --Recent Tasks 5 --Quick Note 6 --Annotation Tools 6 --Partial Screen Capture 7 --Screen Freezing 7 --Small Tools 8 Spotlight [CountDown] Stop Watch Air Class Voter&Judge Responder Selector Message...SETTINGS 26 --[Wireless & networks 26 --[Device 26 --[Personal 27 --[System 27 BROWSER 27 EMAIL 27 LG CONNECTEDCARE 27 [KEEPER 28 [PIP 29 TOUCH MENU 30 CLOUD DRIVE 30 SCREEN SHARE PRO MANUAL.. 31 --Software Introduction 31 --Installations 31 Operating Environment Server Installation Client Download & Installation --Server Introduction 34 Permission Mode Screen...
User Guide
Page 3
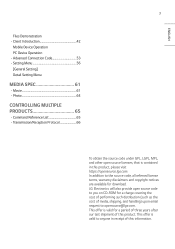
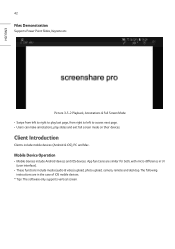
... referred license terms, warranty disclaimers and copyright notices are available for download. ENGLISH 3 Files Demonstration --Client Introduction 42 Mobile Device Operation PC Device Operation --Advanced Connection Code 53 --Setting Menu 56 [General Setting] Detail Setting Menu MEDIA SPEC 61 --Movie 61 --Photo 64 CONTROLLING MULTIPLE PRODUCTS 65 --Command Reference List 65 --Transmission/Reception Protocol 66 To obtain the...
... referred license terms, warranty disclaimers and copyright notices are available for download. ENGLISH 3 Files Demonstration --Client Introduction 42 Mobile Device Operation PC Device Operation --Advanced Connection Code 53 --Setting Menu 56 [General Setting] Detail Setting Menu MEDIA SPEC 61 --Movie 61 --Photo 64 CONTROLLING MULTIPLE PRODUCTS 65 --Command Reference List 65 --Transmission/Reception Protocol 66 To obtain the...
User Guide
Page 5
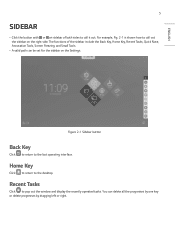
...desktop. Figure 2-1 Sidebar button Back Key Click to return to pop out the window and display the recently operated tasks. Recent Tasks Click to the last operating interface. For example, ... shown how to call it out. Home Key Click to return to call out the sidebar on the Settings. ENGLISH 5 SIDEBAR •• Click the button with or on sidebar of the sidebar include the Back... Key, Home Key, Recent Tasks, Quick Note, Annotation Tools, Screen Freezing, and Small Tools. •• A valid path can delete all the progresses by one key ...
...desktop. Figure 2-1 Sidebar button Back Key Click to return to pop out the window and display the recently operated tasks. Recent Tasks Click to the last operating interface. For example, ... shown how to call it out. Home Key Click to return to call out the sidebar on the Settings. ENGLISH 5 SIDEBAR •• Click the button with or on sidebar of the sidebar include the Back... Key, Home Key, Recent Tasks, Quick Note, Annotation Tools, Screen Freezing, and Small Tools. •• A valid path can delete all the progresses by one key ...
User Guide
Page 22
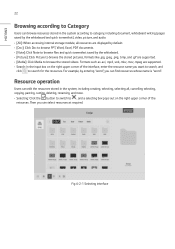
...word", you can select resources as .avi, .mp4, .vob, .mkv, .mov, .mpeg are supported. •• [Media]: Click Media to browse the stored videos. Resource operation Users can edit the resources stored in the system according to category, including document, whiteboard writing (pages saved... as required. ENGLISH 22 Browsing according to Category Users can browse resources stored in the system, including creating, selecting, selecting all resources are displayed by default. •• [Doc]: Click Doc to browse PPT, Word, Excel, PDF documents. •• [Note]: Click Note ...
...word", you can select resources as .avi, .mp4, .vob, .mkv, .mov, .mpeg are supported. •• [Media]: Click Media to browse the stored videos. Resource operation Users can edit the resources stored in the system according to category, including document, whiteboard writing (pages saved... as required. ENGLISH 22 Browsing according to Category Users can browse resources stored in the system, including creating, selecting, selecting all resources are displayed by default. •• [Doc]: Click Doc to browse PPT, Word, Excel, PDF documents. •• [Note]: Click Note ...
User Guide
Page 26
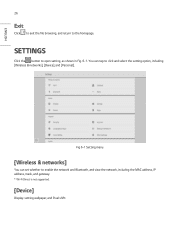
SETTINGS Click the button to the homepage. ENGLISH 26 Exit Click to exit the file browsing, and return to open setting, as shown in Fig. 6-1. You can set whether to click and select the setting option, including [Wireless & networks], [Device], and [Personal]. Fig 6-1 Setting menu [Wireless & networks] You can tap to enable the network and Bluetooth, and view the network, including the MAC address, IP address, mask, and gateway. * Wi-Fi Direct is not supported. [Device] Display: setting wallpaper, and Pixel shift.
SETTINGS Click the button to the homepage. ENGLISH 26 Exit Click to exit the file browsing, and return to open setting, as shown in Fig. 6-1. You can set whether to click and select the setting option, including [Wireless & networks], [Device], and [Personal]. Fig 6-1 Setting menu [Wireless & networks] You can tap to enable the network and Bluetooth, and view the network, including the MAC address, IP address, mask, and gateway. * Wi-Fi Direct is not supported. [Device] Display: setting wallpaper, and Pixel shift.
User Guide
Page 27
...; Security: All the CA certificates you have trusted, setting USB Lock, setting the security mode, Changing the Security Password -- Once a security password is set up an e-mail. EMAIL Once properly connected to the network, click to set , it must be entered to access secured items. (Default: 000000) •• Language & Input: Setting language and input method •• Startup and shutdown...
...; Security: All the CA certificates you have trusted, setting USB Lock, setting the security mode, Changing the Security Password -- Once a security password is set up an e-mail. EMAIL Once properly connected to the network, click to set , it must be entered to access secured items. (Default: 000000) •• Language & Input: Setting language and input method •• Startup and shutdown...

User Guide
Page 30
ENGLISH 30 TOUCH MENU Click the button, or Finger sliding upwards from the bottom of the signal input will take a few seconds. CLOUD DRIVE Click the button to connect to access the Touch Menu. Fig 9-1 [General Setting] •• PC: Select the PC input. •• Android: Select the Android input. •• HDMI: Select the HDMI input. •• VGA: Select the VGA input. •• AV: Select the AV input. •• DVI: Select the DVI input. * The switching of the screen to the Cloud Drive.
ENGLISH 30 TOUCH MENU Click the button, or Finger sliding upwards from the bottom of the signal input will take a few seconds. CLOUD DRIVE Click the button to connect to access the Touch Menu. Fig 9-1 [General Setting] •• PC: Select the PC input. •• Android: Select the Android input. •• HDMI: Select the HDMI input. •• VGA: Select the VGA input. •• AV: Select the AV input. •• DVI: Select the DVI input. * The switching of the screen to the Cloud Drive.

User Guide
Page 34
ENGLISH 34 Server Introduction After installing server application, follow the user guide to connect devices to connect with IFP. Picture 3-1-1 Server Interface 1 Download client application either by scanning QR code or 2 Entering address in web browser. 3 Make sure client devices are connected to the same network as IFP. 4 Enter the same code on devices to IFP.
ENGLISH 34 Server Introduction After installing server application, follow the user guide to connect devices to connect with IFP. Picture 3-1-1 Server Interface 1 Download client application either by scanning QR code or 2 Entering address in web browser. 3 Make sure client devices are connected to the same network as IFP. 4 Enter the same code on devices to IFP.
User Guide
Page 42
...Supports Power Point Slides, Keynote etc. App functions are in UI (user interface). •• These functions include media (audio & video) upload, photo upload, camera, remote and desktop. The following instructions are similar for both, with micro difference in the case of iOS mobile devices. * Tips: The software only supports vertical screen... Playback, Annotations & Full Screen Mode •• Swipe from left to right to play last page, from right to left to access next page. •• Users can make annotations, play slides and exit full screen mode on their devices.
...Supports Power Point Slides, Keynote etc. App functions are in UI (user interface). •• These functions include media (audio & video) upload, photo upload, camera, remote and desktop. The following instructions are similar for both, with micro difference in the case of iOS mobile devices. * Tips: The software only supports vertical screen... Playback, Annotations & Full Screen Mode •• Swipe from left to right to play last page, from right to left to access next page. •• Users can make annotations, play slides and exit full screen mode on their devices.

User Guide
Page 49
... arrow on the touchpad. Click to choose. •• Back to desktop: Click to exit remote mode and go back to simulate the mouse right-click button. Picture 4-1-7-4 Motion Mode •• Motion mode: As shown in picture 4-1-7-1, users can remotely control IFP by clicking on IFP will move the mouse. Two buttons are available. Click [Left...
... arrow on the touchpad. Click to choose. •• Back to desktop: Click to exit remote mode and go back to simulate the mouse right-click button. Picture 4-1-7-4 Motion Mode •• Motion mode: As shown in picture 4-1-7-1, users can remotely control IFP by clicking on IFP will move the mouse. Two buttons are available. Click [Left...
User Guide
Page 50
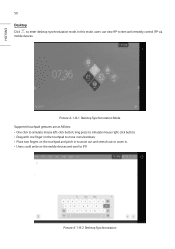
In this mode, users can view IFP screen and remotely control IFP via mobile devices. Picture 4-1-8-2 Desktop Synchronization Picture 4-1-8-1 Desktop Synchronization Mode Supported touchpad gestures are as follows: •• One click to IFP. long press to simulate mouse right-click button; •• Drag with .../windows; •• Place two fingers on the touchpad and pinch in to zoom out and stretch out to zoom in. •• Users could write on the mobile devices and send to simulate mouse left-click button; ENGLISH 50 Desktop Click to enter desktop synchronization...
In this mode, users can view IFP screen and remotely control IFP via mobile devices. Picture 4-1-8-2 Desktop Synchronization Picture 4-1-8-1 Desktop Synchronization Mode Supported touchpad gestures are as follows: •• One click to IFP. long press to simulate mouse right-click button; •• Drag with .../windows; •• Place two fingers on the touchpad and pinch in to zoom out and stretch out to zoom in. •• Users could write on the mobile devices and send to simulate mouse left-click button; ENGLISH 50 Desktop Click to enter desktop synchronization...

User Guide
Page 52
...in full-screen. Click to enable server devices to switch between different mirroring resolution. •• Receiver operation. Picture 4-2-3 PC Client Device Mirroring Successfully •• Stop mirroring. Click to remotely control client. &#...8226;• Keep aspect ratio. Make adjustment if needed. As is ready for Mirroring to enter mirroring mode. Once enabled, only one client device could mirror with IFP. •• Disconnect. Click to disconnect client devices from server and go back to connect with IFP. 52 2 Enter code...
...in full-screen. Click to enable server devices to switch between different mirroring resolution. •• Receiver operation. Picture 4-2-3 PC Client Device Mirroring Successfully •• Stop mirroring. Click to remotely control client. &#...8226;• Keep aspect ratio. Make adjustment if needed. As is ready for Mirroring to enter mirroring mode. Once enabled, only one client device could mirror with IFP. •• Disconnect. Click to disconnect client devices from server and go back to connect with IFP. 52 2 Enter code...
User Guide
Page 53
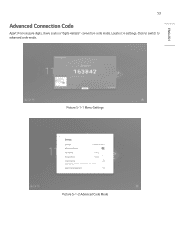
ENGLISH 53 Advanced Connection Code Apart from six pure digits, there is also a "digits+letters" connection code mode. Picture 5-1-1 Menu-Settings Picture 5-1-2 Advanced Code Mode Click to switch to advanced code mode. Locate it in settings.
ENGLISH 53 Advanced Connection Code Apart from six pure digits, there is also a "digits+letters" connection code mode. Picture 5-1-1 Menu-Settings Picture 5-1-2 Advanced Code Mode Click to switch to advanced code mode. Locate it in settings.
User Guide
Page 55
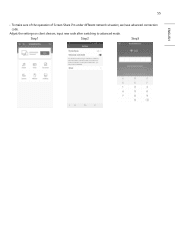
Step1 Step2 Step3 55 ENGLISH •• To make sure of the operation of Screen Share Pro under different network situation, we have advanced connection code. Adjust the settings on client devices, input new code after switching to advanced mode.
Step1 Step2 Step3 55 ENGLISH •• To make sure of the operation of Screen Share Pro under different network situation, we have advanced connection code. Adjust the settings on client devices, input new code after switching to advanced mode.
User Guide
Page 56
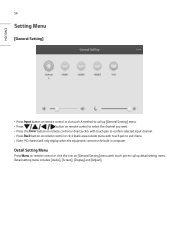
.... •• Note: PC channel will only display when the equipment connects the built-in computer. Detail setting menu includes [Audio], [Screen], [Display] and [Adjust]. 56 Setting Menu [General Setting] ENGLISH •• Press button on remote control or via touch A method to call up [General Setting] menu. •• Press button on remote control to select the channel you need. •...
.... •• Note: PC channel will only display when the equipment connects the built-in computer. Detail setting menu includes [Audio], [Screen], [Display] and [Adjust]. 56 Setting Menu [General Setting] ENGLISH •• Press button on remote control or via touch A method to call up [General Setting] menu. •• Press button on remote control to select the channel you need. •...
User Guide
Page 57
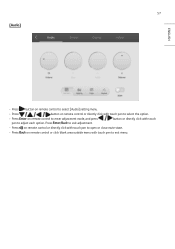
57 [Audio] ENGLISH •• Press button on remote control to select [Audio] setting menu. •• Press button on remote control or directly click with touch pen to select the option. •• Press on remote control or click blank area outside menu with touch pen to open or close mute state. •• Press on remote control to enter adjustment mode, and press pen to exit adjustment. Press / to adjust each option. button or directly click with touch •• Press on remote control or directly click with touch pen to exit menu.
57 [Audio] ENGLISH •• Press button on remote control to select [Audio] setting menu. •• Press button on remote control or directly click with touch pen to select the option. •• Press on remote control or click blank area outside menu with touch pen to open or close mute state. •• Press on remote control to enter adjustment mode, and press pen to exit adjustment. Press / to adjust each option. button or directly click with touch •• Press on remote control or directly click with touch pen to exit menu.

User Guide
Page 58
on remote control or directly click with touch pen to select the option. on remote control or directly click with touch pen to enter the selected mode. on remote control to select [Screen] setting menu. 58 [Screen] ENGLISH •• Press •• Press •• Press •• Press button on remote control or click blank area outside menu with touch pen to exit menu.
on remote control or directly click with touch pen to select the option. on remote control or directly click with touch pen to enter the selected mode. on remote control to select [Screen] setting menu. 58 [Screen] ENGLISH •• Press •• Press •• Press •• Press button on remote control or click blank area outside menu with touch pen to exit menu.

User Guide
Page 59
button or directly click with touch pen to exit menu. •• The display item is deactivated for the Android input. Press / to exit adjustment. 59 [Display] ENGLISH •• Press button on remote control to select [Display] setting menu. •• Press button on remote control or directly click with touch pen to select the option. •• Press on remote control or click blank area outside menu with touch •• Press on remote control to enter adjustment mode, and press pen to adjust each option.
button or directly click with touch pen to exit menu. •• The display item is deactivated for the Android input. Press / to exit adjustment. 59 [Display] ENGLISH •• Press button on remote control to select [Display] setting menu. •• Press button on remote control or directly click with touch pen to select the option. •• Press on remote control or click blank area outside menu with touch •• Press on remote control to enter adjustment mode, and press pen to adjust each option.

User Guide
Page 67
Power (Command: 30) Controls the power on/off status of the monitor. Brightness (Command: 35) Adjust the screen brightness. Volume (Command: 38) Adjust the volume. Transmission (3A)(30 31)(Type)(38)(Data)(0D) Data 000(30 30 30) ~ 100(31 30 30) 10. ...)(Type)(34)(Data)(0D) Data 000(30 30 30) ~ 100(31 30 30) 67 06. Bass (Command: 32) Adjust the sound bass. Sound mode (Command: 37) Select sound mode. Transmission (3A)(30 31)(Type)(31)(Data)(0D) Data 000(30 30 30) ~ 100(31 30 30) 03. Transmission (3A)(30 31)(Type...
Power (Command: 30) Controls the power on/off status of the monitor. Brightness (Command: 35) Adjust the screen brightness. Volume (Command: 38) Adjust the volume. Transmission (3A)(30 31)(Type)(38)(Data)(0D) Data 000(30 30 30) ~ 100(31 30 30) 10. ...)(Type)(34)(Data)(0D) Data 000(30 30 30) ~ 100(31 30 30) 67 06. Bass (Command: 32) Adjust the sound bass. Sound mode (Command: 37) Select sound mode. Transmission (3A)(30 31)(Type)(31)(Data)(0D) Data 000(30 30 30) ~ 100(31 30 30) 03. Transmission (3A)(30 31)(Type...

