

Owners Manual
Page 38
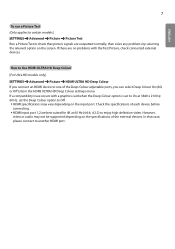
...;•HDMI specifications may not be supported depending on the specifications of the Deep Colour adjustable ports, you can select Deep Colour On (6G) or Off (3G) in the HDMI ULTRA HD Deep Colour settings menu. How to Use HDMI ULTRA HD Deep Colour [For Ultra HD models only] Advanced Picture HDMI ULTRA HD Deep Colour If you connect an HDMI device...
...;•HDMI specifications may not be supported depending on the specifications of the Deep Colour adjustable ports, you can select Deep Colour On (6G) or Off (3G) in the HDMI ULTRA HD Deep Colour settings menu. How to Use HDMI ULTRA HD Deep Colour [For Ultra HD models only] Advanced Picture HDMI ULTRA HD Deep Colour If you connect an HDMI device...

Owners Manual
Page 40
... connection, a small number of networks may require the display network settings to be used on the network by using the on-screen keyboard. You can add a network. Number of connected devices: Shows the number of devices currently connected to your Signage device via the LAN port, and configure the network settings. Only wired network connections are supported. SSID: A unique identifier necessary to make a connection without a wireless router and use...
... connection, a small number of networks may require the display network settings to be used on the network by using the on-screen keyboard. You can add a network. Number of connected devices: Shows the number of devices currently connected to your Signage device via the LAN port, and configure the network settings. Only wired network connections are supported. SSID: A unique identifier necessary to make a connection without a wireless router and use...
Owners Manual
Page 41
...;If you do not turn off the entire local home network, network traffic may occur on your access point. ••Check the SSID and security settings of the display and/or the Internet connection feature due to communication errors/malfunctions associated with your responsibility. Install the devices correctly according to the appropriate manual and set -up can often be...
...;If you do not turn off the entire local home network, network traffic may occur on your access point. ••Check the SSID and security settings of the display and/or the Internet connection feature due to communication errors/malfunctions associated with your responsibility. Install the devices correctly according to the appropriate manual and set -up can often be...

Owners Manual
Page 45
...;•If the USB storage device is connected in Standby Mode, the specific hard disk will not be responsible for any data loss. ••If the USB HDD does not have an external power source, the USB device may not be loaded when the display is turned on again. ••USB storage devices below USB 2.0 are also supported but may...
...;•If the USB storage device is connected in Standby Mode, the specific hard disk will not be responsible for any data loss. ••If the USB HDD does not have an external power source, the USB device may not be loaded when the display is turned on again. ••USB storage devices below USB 2.0 are also supported but may...

Owners Manual
Page 52
... Smart Energy Saving Mode or configure Fail Over settings. (You can switch to Smart Energy Saving Mode only when Energy Saving Mode is outputted additionally. If there is a USB/SD storage device connected, the image on Signage Monitor. To play back the stored files using the Export option Only contents distributed by SuperSign Manager are in supported formats, they...
... Smart Energy Saving Mode or configure Fail Over settings. (You can switch to Smart Energy Saving Mode only when Energy Saving Mode is outputted additionally. If there is a USB/SD storage device connected, the image on Signage Monitor. To play back the stored files using the Export option Only contents distributed by SuperSign Manager are in supported formats, they...

Owners Manual
Page 61
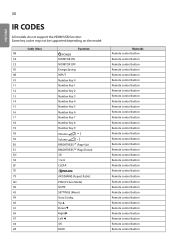
... Remote control button Remote control button Remote control button Remote control button Remote control button Remote control button 30 ENGLISH IR CODES All models do not support the HDMI/USB function. Code (Hex) 08 C4 C5 95 0B 10 11 12 13 14 15 16 17 18 19 02 03 E0 E1 DC 32 2F 7E 79 4D 09 43 99 40 41 06 07 44 28 Function POWER MONITOR...
... Remote control button Remote control button Remote control button Remote control button Remote control button Remote control button 30 ENGLISH IR CODES All models do not support the HDMI/USB function. Code (Hex) 08 C4 C5 95 0B 10 11 12 13 14 15 16 17 18 19 02 03 E0 E1 DC 32 2F 7E 79 4D 09 43 99 40 41 06 07 44 28 Function POWER MONITOR...

Owners Manual
Page 71
.../NG][Data][x] Volume Control (Command: k f) Adjusts the playback volume. Time 1 (year/month/day) (Command: f a) Sets the values of the Auto time, enter "fa [Set ID] 00 ff". Transmission [d][y][ ][Set ID][ ][Data][Cr] Data 01: Standard 02: Music 03: Cinema 04: Sports 05. Setting the Auto time Data1 00: Auto 01: Manual * To view the set . ENGLISH 40...
.../NG][Data][x] Volume Control (Command: k f) Adjusts the playback volume. Time 1 (year/month/day) (Command: f a) Sets the values of the Auto time, enter "fa [Set ID] 00 ff". Transmission [d][y][ ][Set ID][ ][Data][Cr] Data 01: Standard 02: Music 03: Cinema 04: Sports 05. Setting the Auto time Data1 00: Auto 01: Manual * To view the set . ENGLISH 40...

Owners Manual
Page 76
... cannot exceed the value of the product. Tile Mode (Command: d d) Sets the Tile Mode and sets values for the tile rows and columns. Transmission [k][d][ ][Set ID][ ][Data][Cr] Data 00: turns the screen on the model. Backlight (Command: m g) Adjusts the backlight brightness. Transmission [d][d][ ][Set ID][ ][Data][Cr] Data 00 to 100 Acknowledgement [g][][set ID][][OK/NG][Data][x] 39. Tile ID...
... cannot exceed the value of the product. Tile Mode (Command: d d) Sets the Tile Mode and sets values for the tile rows and columns. Transmission [k][d][ ][Set ID][ ][Data][Cr] Data 00: turns the screen on the model. Backlight (Command: m g) Adjusts the backlight brightness. Transmission [d][d][ ][Set ID][ ][Data][Cr] Data 00 to 100 Acknowledgement [g][][set ID][][OK/NG][Data][x] 39. Tile ID...

Owners Manual
Page 77
... Off ) 01: On (Lock On) * When the monitor is set the DPM (Display Power Management) function. Transmission [m][i][ ][Set ID][ ][Data][Cr] Data 00: Off 01: Auto 02: Manual Acknowledgement [i][ ][Set ID][ ][OK/NG][Data][x] 48. ENGLISH 46 44. Remote Control/Local Key Lock (Command: k m) Adjusts the remote control/local key (front) lock. Transmission [f ][h][ ][Set ID][ ][Data][Cr] Data 00 to FA: min...
... Off ) 01: On (Lock On) * When the monitor is set the DPM (Display Power Management) function. Transmission [m][i][ ][Set ID][ ][Data][Cr] Data 00: Off 01: Auto 02: Manual Acknowledgement [i][ ][Set ID][ ][OK/NG][Data][x] 48. ENGLISH 46 44. Remote Control/Local Key Lock (Command: k m) Adjusts the remote control/local key (front) lock. Transmission [f ][h][ ][Set ID][ ][Data][Cr] Data 00 to FA: min...

Owners Manual
Page 84
... there is changed, a reboot will occur. Transmission [k][x][ ][Set ID][ ][Data][Cr] Data 00: Turns on /off . * This function works when the Multi Screen App is running. ** This function may not be supported for certain models. * If UPnP Mode is no signal. OSD Display (Command: k l) Selects the desired OSD Display option. Acknowledgement [e][ ][Set ID][ ][OK/NG][Data1][Data2][x] * This feature...
... there is changed, a reboot will occur. Transmission [k][x][ ][Set ID][ ][Data][Cr] Data 00: Turns on /off . * This function works when the Multi Screen App is running. ** This function may not be supported for certain models. * If UPnP Mode is no signal. OSD Display (Command: k l) Selects the desired OSD Display option. Acknowledgement [e][ ][Set ID][ ][OK/NG][Data1][Data2][x] * This feature...
Owners Manual
Page 90
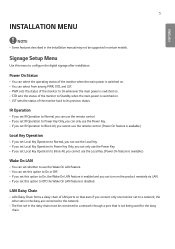
... power is switched on the product remotely via LAN. •• If you set this menu to configure the digital signage after installation. ENGLISH 5 INSTALLATION MENU NOTE •• Some features described in the Installation manual may not be connected to a network through a port that even if you connect only one monitor set to a network, the other sets in the daisy are connected to the network...
... power is switched on the product remotely via LAN. •• If you set this menu to configure the digital signage after installation. ENGLISH 5 INSTALLATION MENU NOTE •• Some features described in the Installation manual may not be connected to a network through a port that even if you connect only one monitor set to a network, the other sets in the daisy are connected to the network...

Owners Manual
Page 92
...mode or Pivot mode is set according to the digital signal processing of the screen. ENGLISH 7 DPM Wakeup Control •• Turns on the monitor set to On, Check Screen is changed settings to be applied in DVI-D when using OPS/HDMI3/DVI-D or OPS/DVI-D input, there will be used . •• Depending on the model, you set...8226; Models that do not support internal speakers require external speakers. Check Screen •• The Check Screen feature judges whether there are formed on the screen at the edges of the connected DVI/HDMI port. •• Setting this ...
...mode or Pivot mode is set according to the digital signal processing of the screen. ENGLISH 7 DPM Wakeup Control •• Turns on the monitor set to On, Check Screen is changed settings to be applied in DVI-D when using OPS/HDMI3/DVI-D or OPS/DVI-D input, there will be used . •• Depending on the model, you set...8226; Models that do not support internal speakers require external speakers. Check Screen •• The Check Screen feature judges whether there are formed on the screen at the edges of the connected DVI/HDMI port. •• Setting this ...

Owners Manual
Page 94
... Sync was set to Master mode for the monitors with Contents Sync set the proxy server settings to Master or Slave. Time Sync: When Time Sync is set to On, the Contents of one monitor should be located in the SyncPlay folder in the Contents. •• Network: Syncs monitors connected to sync content. The monitors are not supported. The monitors are connected by...
... Sync was set to Master mode for the monitors with Contents Sync set the proxy server settings to Master or Slave. Time Sync: When Time Sync is set to On, the Contents of one monitor should be located in the SyncPlay folder in the Contents. •• Network: Syncs monitors connected to sync content. The monitors are not supported. The monitors are connected by...

Owners Manual
Page 95
...will be used for ARC, setting Content Rotation to On (90 or 270) adjusts the size of a video to the full screen size. •• With WiDi, it is recommended that you set to 'Network,' Sync Mode is switched to 'Off' and the 'Network' item becomes inactive. -- Studio Mode •... making the UPnP function unavailable. -- If this is set Aspect Ratio to Off, the 'Network' item of the mouse pointer may not be accurate. •• Image quality degradation is not a product issue when setting Content Rotation using external input. The default is not applied without a reboot...
...will be used for ARC, setting Content Rotation to On (90 or 270) adjusts the size of a video to the full screen size. •• With WiDi, it is recommended that you set to 'Network,' Sync Mode is switched to 'Off' and the 'Network' item becomes inactive. -- Studio Mode •... making the UPnP function unavailable. -- If this is set Aspect Ratio to Off, the 'Network' item of the mouse pointer may not be accurate. •• Image quality degradation is not a product issue when setting Content Rotation using external input. The default is not applied without a reboot...
User Guide
Page 7
... Use HDMI ULTRA HD Deep Colour [For Ultra HD models only] Advanced Picture HDMI ULTRA HD Deep Colour If you connect an HDMI device to one of the external devices. If a compatibility issue occurs with the Test Picture, check connected external devices. Check the specifications of each device before connecting. ••HDMI input port 1,2 are outputted normally, then solve any problems...
... Use HDMI ULTRA HD Deep Colour [For Ultra HD models only] Advanced Picture HDMI ULTRA HD Deep Colour If you connect an HDMI device to one of the external devices. If a compatibility issue occurs with the Test Picture, check connected external devices. Check the specifications of each device before connecting. ••HDMI input port 1,2 are outputted normally, then solve any problems...
User Guide
Page 10
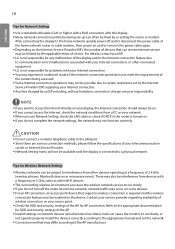
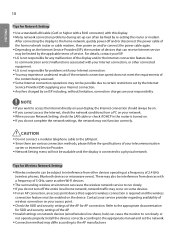
... connection methods, please follow the specifications of devices that supports wireless connection is connected to communication errors/malfunctions associated with your responsibility. NOTE ••If you want to access the Internet directly on your display, the Internet connection should always be on. ••If you do not turn off and/or disconnect the power cable of the home network...
... connection methods, please follow the specifications of devices that supports wireless connection is connected to communication errors/malfunctions associated with your responsibility. NOTE ••If you want to access the Internet directly on your display, the Internet connection should always be on. ••If you do not turn off and/or disconnect the power cable of the home network...

User Guide
Page 14
... requires an external power supply must be damaged. Use only a USB storage device which was modified to work , try turning the hard drive off and on again. ••USB storage devices below USB 2.0 are also supported but may cause the monitor to malfunction or the content fail to a USB multi-card reader, its own driver may not be played...
... requires an external power supply must be damaged. Use only a USB storage device which was modified to work , try turning the hard drive off and on again. ••USB storage devices below USB 2.0 are also supported but may cause the monitor to malfunction or the content fail to a USB multi-card reader, its own driver may not be played...
User Guide
Page 30
... not support the HDMI/USB function. Some key codes may not be supported depending on the model. Up Down Right Left OK BACK Remarks Remote control button Remote control button Remote control button Remote control button Remote control button Remote control button Remote control button Remote control button Remote control button Remote control button Remote control button Remote control button Remote control button Remote control button Remote control button Remote control button Remote control button Remote control button Remote control button Remote control button Remote control button Remote...
... not support the HDMI/USB function. Some key codes may not be supported depending on the model. Up Down Right Left OK BACK Remarks Remote control button Remote control button Remote control button Remote control button Remote control button Remote control button Remote control button Remote control button Remote control button Remote control button Remote control button Remote control button Remote control button Remote control button Remote control button Remote control button Remote control button Remote control button Remote control button Remote control button Remote control button Remote...
User Guide
Page 40
.../unmutes the sound. Volume Control (Command: k f) Adjusts the playback volume. Setting the Auto time Data1 00: Auto 01: Manual * To view the set . Time 2 (hour/minute/second) (Command: f x) Adjusts the Time 2 (hour/minute/second) value. Transmission [f ][b][ ][Set ID][ ][Data][Cr] Data 00: Off 01: On Acknowledgement [b][ ][Set ID][ ][OK/NG][Data][x] Transmission 1. [f ][a][ ][Set ID][ ][Data1][ ][Data2][ ][Data3...
.../unmutes the sound. Volume Control (Command: k f) Adjusts the playback volume. Setting the Auto time Data1 00: Auto 01: Manual * To view the set . Time 2 (hour/minute/second) (Command: f x) Adjusts the Time 2 (hour/minute/second) value. Transmission [f ][b][ ][Set ID][ ][Data][Cr] Data 00: Off 01: On Acknowledgement [b][ ][Set ID][ ][OK/NG][Data][x] Transmission 1. [f ][a][ ][Set ID][ ][Data1][ ][Data2][ ][Data3...

User Guide
Page 46
... only available when the Fail Over (auto) mode is turned off, the power key works even in On (01) mode. Power On Delay (Command: f h) Sets the schedule delay when the power turns on the model. Transmission [m][i][ ][Set ID][ ][Data][Cr] Data 00: Off 01: Auto 02: Manual Acknowledgement [i][ ][Set ID][ ][OK/NG][Data][x] 48. Transmission [f ][j][ ][Set ID][ ][Data][Cr] Data 00: Off 01...
... only available when the Fail Over (auto) mode is turned off, the power key works even in On (01) mode. Power On Delay (Command: f h) Sets the schedule delay when the power turns on the model. Transmission [m][i][ ][Set ID][ ][Data][Cr] Data 00: Off 01: Auto 02: Manual Acknowledgement [i][ ][Set ID][ ][OK/NG][Data][x] 48. Transmission [f ][j][ ][Set ID][ ][Data][Cr] Data 00: Off 01...


